Difference between pages "Challenger 2 (2F)" and "M4A3E2 (76) W"
(Changed the weight value in the table. Tank mass from 63.6 to 69 and AoA from 1.1 to 5, so it is the same as in game.) |
|||
| Line 1: | Line 1: | ||
{{About | {{About | ||
| − | | about = | + | | about = American heavy tank '''{{PAGENAME}}''' |
| − | | usage = other | + | | other |
| − | | link = | + | | usage-1 = other M4 Shermans |
| + | | link-1 = M4 Sherman (Family) | ||
| + | | usage-2 = other uses | ||
| + | | link-2 = M4 (Disambiguation) | ||
}} | }} | ||
{{Specs-Card | {{Specs-Card | ||
| − | |code= | + | |code=us_m4a3e2_76w_sherman_jumbo |
| − | |images={{Specs-Card-Image|GarageImage_{{PAGENAME}}.jpg|ArtImage_ | + | |images={{Specs-Card-Image|GarageImage_{{PAGENAME}}.jpg|ArtImage_{{PAGENAME}}.png}} |
}} | }} | ||
== Description == | == Description == | ||
<!-- ''In the description, the first part should be about the history of the creation and combat usage of the vehicle, as well as its key features. In the second part, tell the reader about the ground vehicle in the game. Insert a screenshot of the vehicle, so that if the novice player does not remember the vehicle by name, he will immediately understand what kind of vehicle the article is talking about.'' --> | <!-- ''In the description, the first part should be about the history of the creation and combat usage of the vehicle, as well as its key features. In the second part, tell the reader about the ground vehicle in the game. Insert a screenshot of the vehicle, so that if the novice player does not remember the vehicle by name, he will immediately understand what kind of vehicle the article is talking about.'' --> | ||
| − | The ''' | + | The '''M4A3E2 (76) W Sherman - Assault Tank''', also known as the "Jumbo", is a special up-gunned and armoured modification of the M4A3, which is the fourth variant of the early-generation [[M4 Sherman (Family)|Medium Tank M4 (Sherman) family]]. Approximately 100 M4A3E2s were up-gunned to 76 mm M1 tank guns in February 1945, using supplies salvaged from knocked-out late-generation M4 Shermans and standard supply stocks. Since the [[M4A3E2]] gun mount was originally designed for the 76 mm M1 tank gun, this upgrade was a relatively simple field upgrade. The reorganization of the main tank gun ammunition stowage was the most difficult part of the upgrade. This necessitated the removal of the turret as well as the installation of 76 mm ammunition racks in place of the shorter 75 mm ammunition racks. These replacement racks were then held in place by a series of custom-made welded bracing. According to records, such a modification required around 75 hours per tank. It should be emphasized that the term 'Jumbo' does not exist in any military material and is probably certainly a post-war nickname, possibly developed by a model organization. |
| + | |||
| + | Introduced in [[Update 1.45 "Steel Generals"]], the M4A3E2 (76) W improves on the previous M4A3E2, which was based on the original M4A3 Sherman variant. The M4A3E2 (76) W finally gives players the much-needed improvement in armour penetration, allowing it to deal with adversaries from the front considerably more easily. However, due to the increased battle rating of the M4A3E2 (76) W and the abundance of even stronger opponents, the tank's frontal armour protection is no longer as effective as it was with the preceding M4A3E2. Due to considerable advancements in firepower, enemies at this rank may frequently penetrate the M4A2E2 (76) W from the front with ease. Nonetheless, this is a significant and welcome firepower improvement that is critical for the M4A3E2 (76) W. Players must be more cautious throughout battle as adversaries' weaponry becomes increasingly powerful. | ||
== General info == | == General info == | ||
| Line 17: | Line 22: | ||
{{Specs-Tank-Armour}} | {{Specs-Tank-Armour}} | ||
<!-- ''Describe armour protection. Note the most well protected and key weak areas. Appreciate the layout of modules as well as the number and location of crew members. Is the level of armour protection sufficient, is the placement of modules helpful for survival in combat? If necessary use a visual template to indicate the most secure and weak zones of the armour.'' --> | <!-- ''Describe armour protection. Note the most well protected and key weak areas. Appreciate the layout of modules as well as the number and location of crew members. Is the level of armour protection sufficient, is the placement of modules helpful for survival in combat? If necessary use a visual template to indicate the most secure and weak zones of the armour.'' --> | ||
| − | + | '''Armour type:''' | |
| − | |||
| − | |||
| − | |||
| − | |||
| − | + | * Rolled homogeneous armour (Front, Side, Rear, Roof) | |
| + | * Cast homogeneous armour (Turret, Transmission area) | ||
{| class="wikitable" | {| class="wikitable" | ||
|- | |- | ||
| − | ! Armour !! Front !! Sides !! Rear !! Roof | + | ! Armour !! Front (Slope angle) !! Sides !! Rear !! Roof |
| − | |||
| − | |||
| − | |||
| − | |||
| − | |||
| − | |||
| − | |||
| − | |||
| − | |||
| − | |||
| − | |||
| − | |||
| − | |||
| − | |||
| − | |||
| − | |||
| − | |||
| − | |||
| − | |||
| − | |||
| − | |||
|- | |- | ||
| − | | | + | | Hull || 63.5 + 38.1 mm (47°) || 76.2 mm || 38.1 mm || 19.5 mm |
|- | |- | ||
| + | | Turret || 177.8 mm || 152.4 mm || 152.4 mm || 25.4 mm | ||
|} | |} | ||
| Line 58: | Line 40: | ||
<!-- ''Write about the mobility of the ground vehicle. Estimate the specific power and manoeuvrability, as well as the maximum speed forwards and backwards.'' --> | <!-- ''Write about the mobility of the ground vehicle. Estimate the specific power and manoeuvrability, as well as the maximum speed forwards and backwards.'' --> | ||
| − | {{tankMobility|abMinHp= | + | {{tankMobility|abMinHp=646|rbMinHp=442}} |
=== Modifications and economy === | === Modifications and economy === | ||
{{Specs-Economy}} | {{Specs-Economy}} | ||
| + | |||
| + | To start out, you will want to get Tracks, Parts, then M62 Shell, and work your way from there, as those are the core components of the M4A3E2 (76) W Sherman Jumbo. With the better ammunition, you will be able to penetrate more and be far more dangerous on the field. And with Tracks & Parts, you won't need to worry about the lights/mediums that keep popping out your tracks to get to your side or backside. After getting these three things, it's best to work on manoeuvrability and M93 Shot as a first priority. | ||
== Armaments == | == Armaments == | ||
| Line 68: | Line 52: | ||
{{Specs-Tank-Weapon|1}} | {{Specs-Tank-Weapon|1}} | ||
<!-- ''Give the reader information about the characteristics of the main gun. Assess its effectiveness in a battle based on the reloading speed, ballistics and the power of shells. Do not forget about the flexibility of the fire, that is how quickly the cannon can be aimed at the target, open fire on it and aim at another enemy. Add a link to the main article on the gun: <code><nowiki>{{main|Name of the weapon}}</nowiki></code>. Describe in general terms the ammunition available for the main gun. Give advice on how to use them and how to fill the ammunition storage.'' --> | <!-- ''Give the reader information about the characteristics of the main gun. Assess its effectiveness in a battle based on the reloading speed, ballistics and the power of shells. Do not forget about the flexibility of the fire, that is how quickly the cannon can be aimed at the target, open fire on it and aim at another enemy. Add a link to the main article on the gun: <code><nowiki>{{main|Name of the weapon}}</nowiki></code>. Describe in general terms the ammunition available for the main gun. Give advice on how to use them and how to fill the ammunition storage.'' --> | ||
| − | {{main| | + | {{main|M1 (76 mm)}} |
{| class="wikitable" style="text-align:center" width="100%" | {| class="wikitable" style="text-align:center" width="100%" | ||
|- | |- | ||
| − | ! colspan="5" | [[ | + | ! colspan="5" | [[M1 (76 mm)|76 mm M1]] || colspan="5" | Turret rotation speed (°/s) || colspan="4" | Reloading rate (seconds) |
|- | |- | ||
! Mode !! Capacity !! Vertical !! Horizontal !! Stabilizer | ! Mode !! Capacity !! Vertical !! Horizontal !! Stabilizer | ||
| Line 79: | Line 63: | ||
|- | |- | ||
! ''Arcade'' | ! ''Arcade'' | ||
| − | | rowspan="2" | | + | | rowspan="2" | 71 || rowspan="2" | -10°/+25° || rowspan="2" | ±180° || rowspan="2" | {{Annotation|Vertical|up to 24 km/h}} || 19.4 || 26.9 || 32.6 || 36.1 || 38.4 || rowspan="2" | 7.67 || rowspan="2" | 6.79 || rowspan="2" | 6.25 || rowspan="2" | 5.90 |
|- | |- | ||
! ''Realistic'' | ! ''Realistic'' | ||
| − | | | + | | 14.3 || 16.8 || 20.4 || 22.6 || 24.0 |
|- | |- | ||
|} | |} | ||
==== Ammunition ==== | ==== Ammunition ==== | ||
| − | + | ||
| − | + | * '''M79 shot''' - The M79 AP shot is the stock shell, it has 15 mm penetration less than the M62 at point blank while also lacking any explosive filler. Inferior in almost every way to the M62, it should be replaced by it as soon as possible. | |
| − | + | ||
| − | + | * '''M42A1 shell''' - This is the HE shell of the {{PAGENAME}}. It's best to use this when fighting AA trucks or other lightly-armoured tanks. Carry only 1 to 5 of these shells as you won't really need them, but they're useful for when a pesky AA truck comes around the corner and you're firing APCR at it. | |
| − | + | ||
| − | + | * '''M62 shell''' - It is recommended to research this shell as soon as possible. With a 149 mm top penetration, the M62 APCBC shot usually won't be able to destroy heavy opponents or tank destroyers it will see at its BR from the front, however, the armour makes up for it to have more time looking for a good shot. Although only a minor upgrade from the stock M79, it is quite handy, and can deal with many of the opponents at its BR if you know where to aim. For one thing, this shell can destroy most cannon barrels with a direct hit. | |
| − | + | ||
| − | + | * '''M93 shot''' - This APCR round is the last ammunition upgrade of the {{PAGENAME}}. With a penetration upgrade of 40 mm over the M62 shell, this will be the best shell for the {{PAGENAME}} Sherman Jumbo. With this shell, you'll be able to penetrate even the most armoured of opponents, except perhaps the occasional Tiger II or IS-2. | |
| − | + | ||
| − | + | {{:M1 (76 mm)/Ammunition|M79 shot, M42A1 shell, M62 shell, M93 shot, M88}} | |
| − | |||
| − | |||
| − | |||
| − | |||
| − | |||
| − | |||
| − | |||
| − | |||
| − | |||
| − | |||
| − | |||
| − | |||
| − | |||
| − | |||
| − | |||
| − | |||
| − | |||
| − | |||
| − | |||
| − | |||
| − | |||
| − | |||
| − | |||
| − | |||
| − | |||
| − | |||
| − | |||
| − | |||
| − | |||
| − | |||
| − | |||
| − | { | ||
| − | |||
| − | |||
| − | |||
| − | |||
| − | |||
| − | |||
| − | |||
| − | |||
| − | |||
| − | |||
| − | |||
| − | |||
| − | |} | ||
==== [[Ammo racks]] ==== | ==== [[Ammo racks]] ==== | ||
| − | <!-- '''Last updated: 2. | + | [[File:Ammoracks M4A1 (75) W (China).png|right|thumb|x250px|[[Ammo racks]] of the M4A1 (75) W (China) (identical)]] |
| + | <!-- '''Last updated: 2.11.0.27''' --> | ||
{| class="wikitable" style="text-align:center" | {| class="wikitable" style="text-align:center" | ||
|- | |- | ||
! Full<br>ammo | ! Full<br>ammo | ||
| − | |||
! 1st<br>rack empty | ! 1st<br>rack empty | ||
! 2nd<br>rack empty | ! 2nd<br>rack empty | ||
! 3rd<br>rack empty | ! 3rd<br>rack empty | ||
| − | |||
| − | |||
| − | |||
| − | |||
| − | |||
| − | |||
! Visual<br>discrepancy | ! Visual<br>discrepancy | ||
|- | |- | ||
| − | | ''' | + | | '''71''' || 66 ''(+5)'' || 31 ''(+40)'' || 1 ''(+70)'' || No |
| − | | | ||
| − | | | ||
| − | | | ||
| − | | | ||
| − | | | ||
| − | | | ||
| − | |||
| − | |||
| − | | | ||
| − | |||
| − | | No | ||
|- | |- | ||
|} | |} | ||
| − | + | '''Note''': | |
| − | * | + | * Shells are modeled individually and disappear from the rack after having been shot or loaded. |
| − | |||
=== Machine guns === | === Machine guns === | ||
| + | {{Specs-Tank-Weapon|2}} | ||
{{Specs-Tank-Weapon|3}} | {{Specs-Tank-Weapon|3}} | ||
| − | |||
<!-- ''Offensive and anti-aircraft machine guns not only allow you to fight some aircraft but also are effective against lightly armoured vehicles. Evaluate machine guns and give recommendations on its use.'' --> | <!-- ''Offensive and anti-aircraft machine guns not only allow you to fight some aircraft but also are effective against lightly armoured vehicles. Evaluate machine guns and give recommendations on its use.'' --> | ||
| − | {{main| | + | {{main|M2HB (12.7 mm)|M1919A4 (7.62 mm)}} |
{| class="wikitable" style="text-align:center" width="50%" | {| class="wikitable" style="text-align:center" width="50%" | ||
|- | |- | ||
| − | ! colspan="5" | [[ | + | ! colspan="5" | [[M2HB (12.7 mm)|12.7 mm M2HB]] |
|- | |- | ||
! Mount !! Capacity (Belt) !! Fire rate !! Vertical !! Horizontal | ! Mount !! Capacity (Belt) !! Fire rate !! Vertical !! Horizontal | ||
|- | |- | ||
| − | | Pintle || | + | | Pintle || 600 (200) || 577 || -10°/+30° || ±60° |
|- | |- | ||
|} | |} | ||
{| class="wikitable" style="text-align:center" width="50%" | {| class="wikitable" style="text-align:center" width="50%" | ||
|- | |- | ||
| − | ! colspan="5" | [[ | + | ! colspan="5" | [[M1919A4 (7.62 mm)|7.62 mm M1919A4]] |
|- | |- | ||
! Mount !! Capacity (Belt) !! Fire rate !! Vertical !! Horizontal | ! Mount !! Capacity (Belt) !! Fire rate !! Vertical !! Horizontal | ||
|- | |- | ||
| − | | Coaxial || | + | | Coaxial || 3,000 (250) || 500 || N/A || N/A |
|- | |- | ||
|} | |} | ||
| Line 206: | Line 127: | ||
== Usage in battles == | == Usage in battles == | ||
<!-- ''Describe the tactics of playing in the vehicle, the features of using vehicles in the team and advice on tactics. Refrain from creating a "guide" - do not impose a single point of view but instead give the reader food for thought. Describe the most dangerous enemies and give recommendations on fighting them. If necessary, note the specifics of the game in different modes (AB, RB, SB).'' --> | <!-- ''Describe the tactics of playing in the vehicle, the features of using vehicles in the team and advice on tactics. Refrain from creating a "guide" - do not impose a single point of view but instead give the reader food for thought. Describe the most dangerous enemies and give recommendations on fighting them. If necessary, note the specifics of the game in different modes (AB, RB, SB).'' --> | ||
| − | |||
| − | + | Although based on a medium tank, the {{PAGENAME}} the weight of its additional armor means that it is slower than most medium tanks at its rank. | |
| − | |||
| − | + | The {{PAGENAME}} regularly faces the [[Tiger II (P)|Tiger IIs]] and [[Jagdpanther]]s. The best way to deal with these are to flank and disable them quickly. If this is not possible, the best tactic is often to disable their modules while retreating to wait for your allies to assist. Focus on taking out their guns and tracks while moving to cover. Avoid engaging them frontally if at all possible, especially at long ranges. | |
| − | |||
| − | |||
| − | + | Most Soviet tanks at this rank share an easy to identify weak spot: the turret ring. A single well-placed shot to this area, where the turret meets the hull, will usually kill their gunner and prevent them from returning fire. In addition, destorying the turret ring will prevent them from moving their gun horizontally until repaired. | |
| − | |||
| − | |||
| − | + | Like all M4 variants, the sides of the {{PAGENAME}} are large, vertical, and poorly armored. The frontal armor is your best defense, and should be used to maximum advantage. Maintaining awareness of the number and position of the enemies that you face is key, as they ''will'' attempt to flank you to position themselves for a side shot. | |
| − | + | To ensure that you can get a good shot, find out what enemy tanks you'll see in the Jumbo then check where their ammo is and how much armour is protecting that area. If you know you can penetrate that, go for the ammo/gunner/gun, as the M93 shot does not fragment or have a HE filler, it simply pierces the tank and goes straight through. | |
| − | + | ;Environments | |
| − | |||
| − | + | In urban environments, you're going to want to move up with the rest of the group, however, don't move up as the lead tank because you will surely find a nasty surprise at the end of the road. When facing Tiger II's, they will be able to penetrate anywhere they want in your frontal armour, even your thickest point (turret) if their ammo is upgraded enough. It's best to shoot the flat part of the turret, or get to their sides and penetrate them. However, if you can't do either of those, track them and hope that something bigger on your team will be able to take it out. The M93 can penetrate the front of the [[Tiger II (P)]], but not the H model. | |
| − | + | In open terrain, you can usually brawl from long-range with certain tanks, such as the Tiger I, and mediums of Russia. However, if you see a Tiger II or other formidable opponent, it's best to stay far and show your front, angling the best. You can also use the hills to your advantage as most tanks do, and hide behind them before quickly moving out of cover, taking pot-shots at the enemy tank then heading back into cover. | |
| + | |||
| + | ===Arcade battles=== | ||
| + | In Arcade Battles you will usually see some pretty nasty tanks, however, because of your turret and hull armour, you will be able to usually survive. Use the player-name system to your advantage and shoot enemy tanks when they're not looking. However, because it's arcade and you're much more likely to be hit, it's best to angle your armour at a slightly less 35-degree angle. In AB, you will most likely have an advantage if you make the first shot, you're fast, and you never show your side. | ||
| + | |||
| + | ===Realistic/Simulator battles=== | ||
| + | [[File:Where to Aim at a Tiger E With A 76mm Jumbo.png|thumb|This is where you should aim with the M62 shell to penetrate a Tiger from the front.]] | ||
| + | In realistic battles and simulator battles, your opponents will be much more battle hardened and know where to shoot the Jumbo. When facing enemy tanks, don't always suspect that you can just show your frontal armour and turret and expect to not get penetrated. As said before, be safe and be quick, and angle your armour when you can because that saves lives. You never want to go solo and move up on your own, as you will most definitely meet a tank destroyer or quite possibly a heavy tank. When meeting an [[IS-2]], a turret hit or shot between the hull and turret will usually cripple it, but when facing a Tiger II you'll have to be a bit more careful, as the tank is bigger and stronger than you. Although your M93 shot usually has the penetration power, it cannot penetrate the Tiger II's hull and your best luck will be shooting the flat armour of the turret front. | ||
| + | |||
| + | '''Tiger I E:''' This is a tough opponent to face, but, it can be killed quite easily if you know what to do. With the M62 round, you should aim at the area shown in the picture. It will penetrate the Tiger unless it is very sharply angled, but that could often mean that you can get a side shot. Do not aim for the drivers viewport or the machine gun, just aim for the flat armour on this section of the tank. | ||
| + | [[File:Panther Cupola - Where to Shoot.png|left|thumb|This is the most most surefire way to disable a Panther quickly.]] | ||
| + | '''Panther:''' This is another very common and tough opponent to face. Do not shoot for the hull front, it will not be able to penetrate. You can try to shoot the turret front, but there is a chance you will bounce. The most surefire way to disable a Panther is to shoot the commander's cupola, highlighted on the left. This will often kill the commander and gunner, and about half the time it will also kill the loader. | ||
| + | |||
| + | '''IS-2:''' This is one common opponent from the Soviet/Chinese tree. Its 122 mm gun can easily penetrate the Jumbo, regardless of angle and distance. To destroy it, shoot at it when it's reloading or is unaware of your presence. For the 1943 model, aim at the cupola or the curved part of its hull armour that blends into the side. It has only 4 crew so killing all the turret crew (3, which is easy) will destroy it. For the 1944 model, only aim at the turret or the cupola as its hull is very strong. | ||
| + | |||
| + | === Against the M4A3E2 === | ||
| + | '''Light tank/SPAA:''' the Jumbo will be a very tough opponent for these light vehicles simply due to its thick armour. Use your good mobility and flank it whenever you can. Do not shoot at the turret at all times since it is 152 mm thick all-round, which is immune to almost all rounds from light vehicles. As you are at its side, target the lower part of the hull side where it is only 38 mm thick and can be penetrated by even low BR tanks like [[M5A1]]. Penetrating shells through there will knock out all of its crew. Breaking its barrel or tracks can also be an option, but beware of its turning turret and roof mounted heavy MG. It might take several hits thus longer time to disable these modules, so retreat if there is danger. | ||
| + | |||
| + | '''Medium tank''': medium tank commanders will have a better time dealing with an M4A3E2 as they are now better armed while also having adequate mobility to flank around. When the Jumbo is angling it is generally still impossible to penetrate. However if its angle is a bit too much and exposes more of its side, shells with good performance against sloped armour (e.g. BR-365A) will easily go through the lower part of the hull side, right above the front sprocket wheel. If the engagement distance is very close and the Jumbo does not have bushes, you can probably see its famous weak spot: the MG port. Aim carefully at it, as it has a chance to bounce or absorb a shell. A penetration through there will usually destroy the target. At this close range, certain tanks like [[T-34-85]] and [[Panther A]] may not need to aim at the MG port, as they can punch straight through the upper front plate with ballistic capped shells or superior penetration. | ||
| + | |||
| + | '''Heavy tank/tank destroyer:''' since these heavier vehicles (e.g. [[IS-2 (Family)|IS-2]]) generally come with extreme penetrations, there is not much to say. Target the M4A3E2's upper frontal plate if it is not angling. If it is, aim at the gun mantlet or lower side armour. Do not hit the weld line that joins the curved transmission housing with the flat upper front plate, it is very likely to absorb the shell. | ||
=== Pros and cons === | === Pros and cons === | ||
| Line 235: | Line 169: | ||
'''Pros:''' | '''Pros:''' | ||
| − | * | + | * Better 76 mm armour-piercing power compared to [[M4A3E2|previous version]], especially with APCR when available |
| − | * | + | * One of the fastest reloading armament for a heavy tank of the rank |
| − | * | + | * Good gun depression of -10 degrees, can help fighting at hull-down positions |
| − | * | + | * Equipped with a stabiliser to allow fire-on-the-move at low speed |
| − | * | + | * Jumbo armour layout gives enhanced frontal protection for the hull and turret, especially so when angled |
| − | * | + | * Weak spots on front hull are small and are hard to hit at longer ranges |
| + | * Centralised "wet" ammunition stowage in the centre, reducing chance of a penetrating shot igniting the ammunition | ||
| + | * Good forward acceleration to get on the move quickly | ||
'''Cons:''' | '''Cons:''' | ||
| − | * | + | * Constantly faces enemy tanks with guns able to easily penetrate the front armour |
| − | * | + | * Angling benefit to frontal hull armour is mitigated by extremely thin lower side armour, which can be easily penetrated by enemy guns |
| − | * | + | * Due to the layered armour at the front and the armour over-matching mechanic, the upper glacis armour can be dubious in that it does not reliably ricochet shells, even from smaller calibre guns like the 75 mm SA50 |
| − | * | + | * Aiming at dangerous enemy tanks can allow them to attack the relatively flat gun mantlet or the weaker area above mantlet, penetrating and knocking out the gun, the turret crew, or both |
| − | * | + | * 76 mm gun may find itself lacking against enemy frontal armour, requiring some good shot placement and/or tactical manoeuvres |
| − | * | + | * Roof armour is thin enough that some aerial attack at a perpendicular angle can penetrate |
| + | * Tall profile makes it a bigger target | ||
| + | * Bad off-road manoeuvrability | ||
| + | * Quite low top speed of 35 km/h, with a likewise bad reverse speed of -4 km/h | ||
== History == | == History == | ||
<!-- ''Describe the history of the creation and combat usage of the vehicle in more detail than in the introduction. If the historical reference turns out to be too long, take it to a separate article, taking a link to the article about the vehicle and adding a block "/History" (example: <nowiki>https://wiki.warthunder.com/(Vehicle-name)/History</nowiki>) and add a link to it here using the <code>main</code> template. Be sure to reference text and sources by using <code><nowiki><ref></ref></nowiki></code>, as well as adding them at the end of the article with <code><nowiki><references /></nowiki></code>. This section may also include the vehicle's dev blog entry (if applicable) and the in-game encyclopedia description (under <code><nowiki>=== In-game description ===</nowiki></code>, also if applicable).'' --> | <!-- ''Describe the history of the creation and combat usage of the vehicle in more detail than in the introduction. If the historical reference turns out to be too long, take it to a separate article, taking a link to the article about the vehicle and adding a block "/History" (example: <nowiki>https://wiki.warthunder.com/(Vehicle-name)/History</nowiki>) and add a link to it here using the <code>main</code> template. Be sure to reference text and sources by using <code><nowiki><ref></ref></nowiki></code>, as well as adding them at the end of the article with <code><nowiki><references /></nowiki></code>. This section may also include the vehicle's dev blog entry (if applicable) and the in-game encyclopedia description (under <code><nowiki>=== In-game description ===</nowiki></code>, also if applicable).'' --> | ||
| − | + | ===Development=== | |
| − | + | Long before D-Day, American war planners knew that it would a long and decisive battle against the German defensive and that the need for an assault tank to push the lines and capture the beach was needed. The Americans knew they would need a tank that was up-armoured and up-gunned, something beyond the standard M4 Sherman. The hope was the have the M26 Pershing finished by 1944, however, because of difficulties, it was delayed to 1945. | |
| − | |||
| − | + | US Ordnance then took their abundant [[M4|M4 Shermans]] in stock and fixed them up for the new role they've been assigned in. Although keeping the same engine, the armour was upped from around 76.2 mm initial thickness to 102 mm and angled at 47 degrees from vertical. This angle would influence later Sherman design such as the M4A3 by changing the original 56 degrees angled glacis with protruding crew hatches to 47 degrees angled glacis without any protrusion from the crew hatches. This modified M4 Sherman's armour when angled would then be 150 mm line-of-sight (LOS) thick and 180 mm effective. The side armour is also increased to 76.2 mm thick and the turret is redesigned to provide more protection. These modified Shermans were designated the '''[[M4A3E2|M4A3E2]]''' by the Ordnance Department, whereas the nickname "Jumbo" was likely a post-war invention. At the end of the modifications, the Sherman "Jumbo" now weighed about 42 tons and moves a lower speed of 22 mph. A drawback to the increased weight of the Sherman is that the Vertical Volute Suspension System (VVSS) from the Sherman was unable to take the weight easily, so extra care was taken by the crew members to not break the suspension. | |
| − | ''' | + | In March of 1944, the US Army ordered for 254 of these vehicles to be delivered for use for European Operations. Intended for the assault on the Normandy Beachhead, it was deployed in Normandy after D-Day to assist the infantry push through German defences. The M4A3E2 originally came with the 75 mm guns to support infantry with its better HE shells compared to the planned 76 mm instalment, but the 76 mm was installed later in the campaign and called the '''M4A3E2 (76) W Jumbo'''. |
| − | The | + | ===Combat usage=== |
| + | The M4A3E2 was well-liked by the crew and commanders due to its protection value. Despite the weight difference and strain on the suspension, it performed reliably and could absorb damage that would otherwise destroy regular Shermans. Later in the war, when the quantity of the M4 Sherman "Jumbos" were unable to meet the demand, George S. Patton ordered for existing M4 Shermans to weld on armour plates scavenged from knocked out tanks to a makeshift "Expedient Jumbos". This caused the newer Shermans such as the [[M4A3 (76) W|M4A3 (76) W HVSS]] could have the same protection by welding metal onto the hull. One of the Jumbo's notable participation in the war was in Patton's Third Army where it spearheaded the assault to Bastogne to relieve the pinned down 101st Paratroopers. | ||
| − | + | When the war in the European Theater ended, the M4A3E2s were then placed stateside for the preparation for the invasion of the Japanese Home Islands. However, this was never to be fulfilled as Japan then surrendered to the United States in September 1945. The M4A3E2 Shermans proved to be a very effective stop-gap solution until heavier armoured tanks such as the Pershing could come into play. In 1948, about 96 Sherman Jumbos still remained in US inventory. | |
| − | + | {{break}} | |
| + | {{Navigation-Start|{{Annotation|Archive of the in-game description|An archive of the historical description of the vehicle that was presented in-game prior to Update 1.55 'Royal Armour'}}}} | ||
| + | {{Navigation-First-Simple-Line}} | ||
| + | Preparations for the invasion of Europe saw a heavily armoured assault tank designated M4A3E2 (76)W designed using the M4A3 base. In March 1944 the Armed Forces Committee approved a program refitting 254 tanks, some of which were equipped with 76 mm cannons. Their armour was strengthened by stacking 38 mm armour plates welded together on the front and sides of the hull. As a result, the frontal armour reached a thickness of 102 mm to go along with the 76 mm on the sides. The transmission was protected with a 140 mm cast cover, while the rest of the hull was not modified. The new T23 cast turret had walls 152 mm thick and was special in that it did not have a hatch from which to fire a personal weapon. The 178 mm mantlet was mounted with a 76 mm M1A1C cannon, while ammunition was stored in wet stowage. The thicker armour pushed the tank's weight to 38 tons, simultaneously lowering its top speed to 35 km/h. | ||
| − | + | The exact number of M4A3E2 tanks refitted with 76 mm M1A1C cannons was never ascertained. | |
| − | + | The tanks were very popular as column leads, given the fact that German antitank guns could not penetrate their frontal armour. | |
| − | + | {{Navigation-End}} | |
| − | |||
== Media == | == Media == | ||
| Line 278: | Line 219: | ||
;Skins | ;Skins | ||
| − | * [https://live.warthunder.com/feed/camouflages/?vehicle= | + | * [https://live.warthunder.com/feed/camouflages/?vehicle=us_m4a3e2_76w_sherman_jumbo Skins and camouflages for the {{PAGENAME}} from live.warthunder.com.] |
;Videos | ;Videos | ||
| − | {{Youtube-gallery| | + | {{Youtube-gallery|0O2vyfpO_do|'''The Tiger 1's Worst Nightmare - M4A3E2 Jumbo (76) W''' - ''Virus''}} |
== See also == | == See also == | ||
| Line 288: | Line 229: | ||
* ''links to approximate analogues of other nations and research trees.'' --> | * ''links to approximate analogues of other nations and research trees.'' --> | ||
| − | ; | + | ;Other M4A3E2 vehicles in the game |
| − | * [[ | + | * [[M4A3E2]] |
| − | * [[ | + | * [[Cobra King]] |
| − | * [[ | + | * [[M4A3E2 (France)]] |
| − | |||
| − | |||
== External links == | == External links == | ||
| Line 300: | Line 239: | ||
* ''topic on the official game forum;'' | * ''topic on the official game forum;'' | ||
* ''other literature.'' --> | * ''other literature.'' --> | ||
| − | |||
| − | * | + | * [https://tanks-encyclopedia.com/ww2/US/m4a3e2-jumbo-assault-tank <nowiki>[Tanks Encyclopedia]</nowiki> Assault Tank M4A3E2 Jumbo] |
| − | |||
| − | {{ | + | {{TankManufacturer Ordnance Department}} |
| + | {{USA heavy tanks}} | ||
Latest revision as of 16:28, 2 February 2024
| This page is about the American heavy tank M4A3E2 (76) W. For other M4 Shermans, see M4 Sherman (Family). For other uses, see M4 (Disambiguation). |
_W.jpg)
_W.png)
Contents
Description
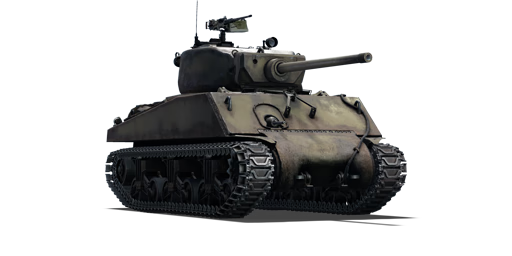
The M4A3E2 (76) W Sherman - Assault Tank, also known as the "Jumbo", is a special up-gunned and armoured modification of the M4A3, which is the fourth variant of the early-generation Medium Tank M4 (Sherman) family. Approximately 100 M4A3E2s were up-gunned to 76 mm M1 tank guns in February 1945, using supplies salvaged from knocked-out late-generation M4 Shermans and standard supply stocks. Since the M4A3E2 gun mount was originally designed for the 76 mm M1 tank gun, this upgrade was a relatively simple field upgrade. The reorganization of the main tank gun ammunition stowage was the most difficult part of the upgrade. This necessitated the removal of the turret as well as the installation of 76 mm ammunition racks in place of the shorter 75 mm ammunition racks. These replacement racks were then held in place by a series of custom-made welded bracing. According to records, such a modification required around 75 hours per tank. It should be emphasized that the term 'Jumbo' does not exist in any military material and is probably certainly a post-war nickname, possibly developed by a model organization.
Introduced in Update 1.45 "Steel Generals", the M4A3E2 (76) W improves on the previous M4A3E2, which was based on the original M4A3 Sherman variant. The M4A3E2 (76) W finally gives players the much-needed improvement in armour penetration, allowing it to deal with adversaries from the front considerably more easily. However, due to the increased battle rating of the M4A3E2 (76) W and the abundance of even stronger opponents, the tank's frontal armour protection is no longer as effective as it was with the preceding M4A3E2. Due to considerable advancements in firepower, enemies at this rank may frequently penetrate the M4A2E2 (76) W from the front with ease. Nonetheless, this is a significant and welcome firepower improvement that is critical for the M4A3E2 (76) W. Players must be more cautious throughout battle as adversaries' weaponry becomes increasingly powerful.
General info
Survivability and armour
Armour type:
- Rolled homogeneous armour (Front, Side, Rear, Roof)
- Cast homogeneous armour (Turret, Transmission area)
| Armour | Front (Slope angle) | Sides | Rear | Roof |
|---|---|---|---|---|
| Hull | 63.5 + 38.1 mm (47°) | 76.2 mm | 38.1 mm | 19.5 mm |
| Turret | 177.8 mm | 152.4 mm | 152.4 mm | 25.4 mm |
Mobility
| Game Mode | Max Speed (km/h) | Weight (tons) | Engine power (horsepower) | Power-to-weight ratio (hp/ton) | |||
|---|---|---|---|---|---|---|---|
| Forward | Reverse | Stock | Upgraded | Stock | Upgraded | ||
| Arcade | Expression error: Unexpected * operator. | 646 | Expression error: Unexpected round operator. | __.__ | |||
| Realistic | 442 | Expression error: Unexpected round operator. | __.__ | ||||
Modifications and economy
To start out, you will want to get Tracks, Parts, then M62 Shell, and work your way from there, as those are the core components of the M4A3E2 (76) W Sherman Jumbo. With the better ammunition, you will be able to penetrate more and be far more dangerous on the field. And with Tracks & Parts, you won't need to worry about the lights/mediums that keep popping out your tracks to get to your side or backside. After getting these three things, it's best to work on manoeuvrability and M93 Shot as a first priority.
Armaments
Main armament
| 76 mm M1 | Turret rotation speed (°/s) | Reloading rate (seconds) | |||||||||||
|---|---|---|---|---|---|---|---|---|---|---|---|---|---|
| Mode | Capacity | Vertical | Horizontal | Stabilizer | Stock | Upgraded | Full | Expert | Aced | Stock | Full | Expert | Aced |
| Arcade | 71 | -10°/+25° | ±180° | Vertical | 19.4 | 26.9 | 32.6 | 36.1 | 38.4 | 7.67 | 6.79 | 6.25 | 5.90 |
| Realistic | 14.3 | 16.8 | 20.4 | 22.6 | 24.0 | ||||||||
Ammunition
- M79 shot - The M79 AP shot is the stock shell, it has 15 mm penetration less than the M62 at point blank while also lacking any explosive filler. Inferior in almost every way to the M62, it should be replaced by it as soon as possible.
- M42A1 shell - This is the HE shell of the M4A3E2 (76) W. It's best to use this when fighting AA trucks or other lightly-armoured tanks. Carry only 1 to 5 of these shells as you won't really need them, but they're useful for when a pesky AA truck comes around the corner and you're firing APCR at it.
- M62 shell - It is recommended to research this shell as soon as possible. With a 149 mm top penetration, the M62 APCBC shot usually won't be able to destroy heavy opponents or tank destroyers it will see at its BR from the front, however, the armour makes up for it to have more time looking for a good shot. Although only a minor upgrade from the stock M79, it is quite handy, and can deal with many of the opponents at its BR if you know where to aim. For one thing, this shell can destroy most cannon barrels with a direct hit.
- M93 shot - This APCR round is the last ammunition upgrade of the M4A3E2 (76) W. With a penetration upgrade of 40 mm over the M62 shell, this will be the best shell for the M4A3E2 (76) W Sherman Jumbo. With this shell, you'll be able to penetrate even the most armoured of opponents, except perhaps the occasional Tiger II or IS-2.
| Penetration statistics | |||||||
|---|---|---|---|---|---|---|---|
| Ammunition | Type of warhead |
Penetration @ 0° Angle of Attack (mm) | |||||
| 10 m | 100 m | 500 m | 1,000 m | 1,500 m | 2,000 m | ||
| M79 shot | AP | 134 | 132 | 121 | 109 | 99 | 89 |
| M42A1 shell | HE | 16 | 16 | 14 | 13 | 11 | 10 |
| M62 shell | APCBC | 149 | 146 | 133 | 119 | 106 | 94 |
| M93 shot | APCR | 190 | 186 | 167 | 146 | 128 | 112 |
| Shell details | ||||||||||||
|---|---|---|---|---|---|---|---|---|---|---|---|---|
| Ammunition | Type of warhead |
Velocity (m/s) |
Projectile mass (kg) |
Fuse delay (m) |
Fuse sensitivity (mm) |
Explosive mass (TNT equivalent) (g) |
Ricochet | |||||
| 0% | 50% | 100% | ||||||||||
| M79 shot | AP | 792 | 6.8 | - | - | - | 47° | 60° | 65° | |||
| M42A1 shell | HE | 823 | 5.84 | 0.2 | 0.1 | 390 | 79° | 80° | 81° | |||
| M62 shell | APCBC | 792 | 7 | 1.2 | 14 | 63.7 | 48° | 63° | 71° | |||
| M93 shot | APCR | 1,036 | 4.22 | - | - | - | 66° | 70° | 72° | |||
| Smoke shell characteristics | ||||||
|---|---|---|---|---|---|---|
| Ammunition | Velocity (m/s) |
Projectile mass (kg) |
Screen radius (m) |
Screen deploy time (s) |
Screen hold time (s) |
Explosive mass (TNT equivalent) (g) |
| M88 | 274 | 3.44 | 13 | 5 | 20 | 50 |
Ammo racks
_W_(China).png)
| Full ammo |
1st rack empty |
2nd rack empty |
3rd rack empty |
Visual discrepancy |
|---|---|---|---|---|
| 71 | 66 (+5) | 31 (+40) | 1 (+70) | No |
Note:
- Shells are modeled individually and disappear from the rack after having been shot or loaded.
Machine guns
| 12.7 mm M2HB | ||||
|---|---|---|---|---|
| Mount | Capacity (Belt) | Fire rate | Vertical | Horizontal |
| Pintle | 600 (200) | 577 | -10°/+30° | ±60° |
| 7.62 mm M1919A4 | ||||
|---|---|---|---|---|
| Mount | Capacity (Belt) | Fire rate | Vertical | Horizontal |
| Coaxial | 3,000 (250) | 500 | N/A | N/A |
Usage in battles
Although based on a medium tank, the M4A3E2 (76) W the weight of its additional armor means that it is slower than most medium tanks at its rank.
The M4A3E2 (76) W regularly faces the Tiger IIs and Jagdpanthers. The best way to deal with these are to flank and disable them quickly. If this is not possible, the best tactic is often to disable their modules while retreating to wait for your allies to assist. Focus on taking out their guns and tracks while moving to cover. Avoid engaging them frontally if at all possible, especially at long ranges.
Most Soviet tanks at this rank share an easy to identify weak spot: the turret ring. A single well-placed shot to this area, where the turret meets the hull, will usually kill their gunner and prevent them from returning fire. In addition, destorying the turret ring will prevent them from moving their gun horizontally until repaired.
Like all M4 variants, the sides of the M4A3E2 (76) W are large, vertical, and poorly armored. The frontal armor is your best defense, and should be used to maximum advantage. Maintaining awareness of the number and position of the enemies that you face is key, as they will attempt to flank you to position themselves for a side shot.
To ensure that you can get a good shot, find out what enemy tanks you'll see in the Jumbo then check where their ammo is and how much armour is protecting that area. If you know you can penetrate that, go for the ammo/gunner/gun, as the M93 shot does not fragment or have a HE filler, it simply pierces the tank and goes straight through.
- Environments
In urban environments, you're going to want to move up with the rest of the group, however, don't move up as the lead tank because you will surely find a nasty surprise at the end of the road. When facing Tiger II's, they will be able to penetrate anywhere they want in your frontal armour, even your thickest point (turret) if their ammo is upgraded enough. It's best to shoot the flat part of the turret, or get to their sides and penetrate them. However, if you can't do either of those, track them and hope that something bigger on your team will be able to take it out. The M93 can penetrate the front of the Tiger II (P), but not the H model.
In open terrain, you can usually brawl from long-range with certain tanks, such as the Tiger I, and mediums of Russia. However, if you see a Tiger II or other formidable opponent, it's best to stay far and show your front, angling the best. You can also use the hills to your advantage as most tanks do, and hide behind them before quickly moving out of cover, taking pot-shots at the enemy tank then heading back into cover.
Arcade battles
In Arcade Battles you will usually see some pretty nasty tanks, however, because of your turret and hull armour, you will be able to usually survive. Use the player-name system to your advantage and shoot enemy tanks when they're not looking. However, because it's arcade and you're much more likely to be hit, it's best to angle your armour at a slightly less 35-degree angle. In AB, you will most likely have an advantage if you make the first shot, you're fast, and you never show your side.
Realistic/Simulator battles

In realistic battles and simulator battles, your opponents will be much more battle hardened and know where to shoot the Jumbo. When facing enemy tanks, don't always suspect that you can just show your frontal armour and turret and expect to not get penetrated. As said before, be safe and be quick, and angle your armour when you can because that saves lives. You never want to go solo and move up on your own, as you will most definitely meet a tank destroyer or quite possibly a heavy tank. When meeting an IS-2, a turret hit or shot between the hull and turret will usually cripple it, but when facing a Tiger II you'll have to be a bit more careful, as the tank is bigger and stronger than you. Although your M93 shot usually has the penetration power, it cannot penetrate the Tiger II's hull and your best luck will be shooting the flat armour of the turret front.
Tiger I E: This is a tough opponent to face, but, it can be killed quite easily if you know what to do. With the M62 round, you should aim at the area shown in the picture. It will penetrate the Tiger unless it is very sharply angled, but that could often mean that you can get a side shot. Do not aim for the drivers viewport or the machine gun, just aim for the flat armour on this section of the tank.

Panther: This is another very common and tough opponent to face. Do not shoot for the hull front, it will not be able to penetrate. You can try to shoot the turret front, but there is a chance you will bounce. The most surefire way to disable a Panther is to shoot the commander's cupola, highlighted on the left. This will often kill the commander and gunner, and about half the time it will also kill the loader.
IS-2: This is one common opponent from the Soviet/Chinese tree. Its 122 mm gun can easily penetrate the Jumbo, regardless of angle and distance. To destroy it, shoot at it when it's reloading or is unaware of your presence. For the 1943 model, aim at the cupola or the curved part of its hull armour that blends into the side. It has only 4 crew so killing all the turret crew (3, which is easy) will destroy it. For the 1944 model, only aim at the turret or the cupola as its hull is very strong.
Against the M4A3E2
Light tank/SPAA: the Jumbo will be a very tough opponent for these light vehicles simply due to its thick armour. Use your good mobility and flank it whenever you can. Do not shoot at the turret at all times since it is 152 mm thick all-round, which is immune to almost all rounds from light vehicles. As you are at its side, target the lower part of the hull side where it is only 38 mm thick and can be penetrated by even low BR tanks like M5A1. Penetrating shells through there will knock out all of its crew. Breaking its barrel or tracks can also be an option, but beware of its turning turret and roof mounted heavy MG. It might take several hits thus longer time to disable these modules, so retreat if there is danger.
Medium tank: medium tank commanders will have a better time dealing with an M4A3E2 as they are now better armed while also having adequate mobility to flank around. When the Jumbo is angling it is generally still impossible to penetrate. However if its angle is a bit too much and exposes more of its side, shells with good performance against sloped armour (e.g. BR-365A) will easily go through the lower part of the hull side, right above the front sprocket wheel. If the engagement distance is very close and the Jumbo does not have bushes, you can probably see its famous weak spot: the MG port. Aim carefully at it, as it has a chance to bounce or absorb a shell. A penetration through there will usually destroy the target. At this close range, certain tanks like T-34-85 and Panther A may not need to aim at the MG port, as they can punch straight through the upper front plate with ballistic capped shells or superior penetration.
Heavy tank/tank destroyer: since these heavier vehicles (e.g. IS-2) generally come with extreme penetrations, there is not much to say. Target the M4A3E2's upper frontal plate if it is not angling. If it is, aim at the gun mantlet or lower side armour. Do not hit the weld line that joins the curved transmission housing with the flat upper front plate, it is very likely to absorb the shell.
Pros and cons
Pros:
- Better 76 mm armour-piercing power compared to previous version, especially with APCR when available
- One of the fastest reloading armament for a heavy tank of the rank
- Good gun depression of -10 degrees, can help fighting at hull-down positions
- Equipped with a stabiliser to allow fire-on-the-move at low speed
- Jumbo armour layout gives enhanced frontal protection for the hull and turret, especially so when angled
- Weak spots on front hull are small and are hard to hit at longer ranges
- Centralised "wet" ammunition stowage in the centre, reducing chance of a penetrating shot igniting the ammunition
- Good forward acceleration to get on the move quickly
Cons:
- Constantly faces enemy tanks with guns able to easily penetrate the front armour
- Angling benefit to frontal hull armour is mitigated by extremely thin lower side armour, which can be easily penetrated by enemy guns
- Due to the layered armour at the front and the armour over-matching mechanic, the upper glacis armour can be dubious in that it does not reliably ricochet shells, even from smaller calibre guns like the 75 mm SA50
- Aiming at dangerous enemy tanks can allow them to attack the relatively flat gun mantlet or the weaker area above mantlet, penetrating and knocking out the gun, the turret crew, or both
- 76 mm gun may find itself lacking against enemy frontal armour, requiring some good shot placement and/or tactical manoeuvres
- Roof armour is thin enough that some aerial attack at a perpendicular angle can penetrate
- Tall profile makes it a bigger target
- Bad off-road manoeuvrability
- Quite low top speed of 35 km/h, with a likewise bad reverse speed of -4 km/h
History
Development
Long before D-Day, American war planners knew that it would a long and decisive battle against the German defensive and that the need for an assault tank to push the lines and capture the beach was needed. The Americans knew they would need a tank that was up-armoured and up-gunned, something beyond the standard M4 Sherman. The hope was the have the M26 Pershing finished by 1944, however, because of difficulties, it was delayed to 1945.
US Ordnance then took their abundant M4 Shermans in stock and fixed them up for the new role they've been assigned in. Although keeping the same engine, the armour was upped from around 76.2 mm initial thickness to 102 mm and angled at 47 degrees from vertical. This angle would influence later Sherman design such as the M4A3 by changing the original 56 degrees angled glacis with protruding crew hatches to 47 degrees angled glacis without any protrusion from the crew hatches. This modified M4 Sherman's armour when angled would then be 150 mm line-of-sight (LOS) thick and 180 mm effective. The side armour is also increased to 76.2 mm thick and the turret is redesigned to provide more protection. These modified Shermans were designated the M4A3E2 by the Ordnance Department, whereas the nickname "Jumbo" was likely a post-war invention. At the end of the modifications, the Sherman "Jumbo" now weighed about 42 tons and moves a lower speed of 22 mph. A drawback to the increased weight of the Sherman is that the Vertical Volute Suspension System (VVSS) from the Sherman was unable to take the weight easily, so extra care was taken by the crew members to not break the suspension.
In March of 1944, the US Army ordered for 254 of these vehicles to be delivered for use for European Operations. Intended for the assault on the Normandy Beachhead, it was deployed in Normandy after D-Day to assist the infantry push through German defences. The M4A3E2 originally came with the 75 mm guns to support infantry with its better HE shells compared to the planned 76 mm instalment, but the 76 mm was installed later in the campaign and called the M4A3E2 (76) W Jumbo.
Combat usage
The M4A3E2 was well-liked by the crew and commanders due to its protection value. Despite the weight difference and strain on the suspension, it performed reliably and could absorb damage that would otherwise destroy regular Shermans. Later in the war, when the quantity of the M4 Sherman "Jumbos" were unable to meet the demand, George S. Patton ordered for existing M4 Shermans to weld on armour plates scavenged from knocked out tanks to a makeshift "Expedient Jumbos". This caused the newer Shermans such as the M4A3 (76) W HVSS could have the same protection by welding metal onto the hull. One of the Jumbo's notable participation in the war was in Patton's Third Army where it spearheaded the assault to Bastogne to relieve the pinned down 101st Paratroopers.
When the war in the European Theater ended, the M4A3E2s were then placed stateside for the preparation for the invasion of the Japanese Home Islands. However, this was never to be fulfilled as Japan then surrendered to the United States in September 1945. The M4A3E2 Shermans proved to be a very effective stop-gap solution until heavier armoured tanks such as the Pershing could come into play. In 1948, about 96 Sherman Jumbos still remained in US inventory.
| Archive of the in-game description | |
|---|---|
|
Preparations for the invasion of Europe saw a heavily armoured assault tank designated M4A3E2 (76)W designed using the M4A3 base. In March 1944 the Armed Forces Committee approved a program refitting 254 tanks, some of which were equipped with 76 mm cannons. Their armour was strengthened by stacking 38 mm armour plates welded together on the front and sides of the hull. As a result, the frontal armour reached a thickness of 102 mm to go along with the 76 mm on the sides. The transmission was protected with a 140 mm cast cover, while the rest of the hull was not modified. The new T23 cast turret had walls 152 mm thick and was special in that it did not have a hatch from which to fire a personal weapon. The 178 mm mantlet was mounted with a 76 mm M1A1C cannon, while ammunition was stored in wet stowage. The thicker armour pushed the tank's weight to 38 tons, simultaneously lowering its top speed to 35 km/h. The exact number of M4A3E2 tanks refitted with 76 mm M1A1C cannons was never ascertained. The tanks were very popular as column leads, given the fact that German antitank guns could not penetrate their frontal armour. | |
Media
- Skins
- Videos
See also
- Other M4A3E2 vehicles in the game
External links
| USA heavy tanks | |
|---|---|
| M4 Jumbo | M4A3E2 · Cobra King · M4A3E2 (76) W |
| M6 | M6A1 · T1E1 · T1E1 (90) · M6A2E1 |
| T26 | T26E1-1 · T26E5 |
| T29/30/34 | T29 · T30 · T34 |
| T32 | T32 · T32E1 |
| M103 | M103 |
| Others | T14 |
