M56
Contents
Description
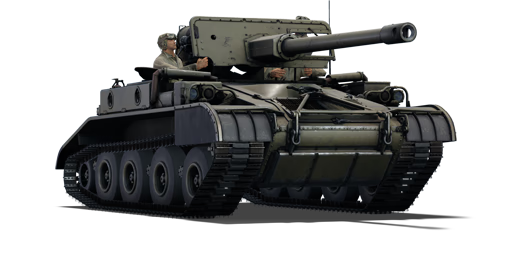
After World War II, the US Airborne units sought ways to improve their anti-tank firepower to defend against enemy armour attack after an airdrop. As the design must be lightweight for airborne purposes, it must contain the most firepower possible on a mobile platform. This translated into the installment of a 90 mm M54 gun onto a small tracked chassis. This small vehicle was accepted for service in 1958 as the M56, or by its nickname "Scorpion". 150 units would be produced by Cadillac Motor Division and saw combat service in the Vietnam War.
Introduced in Update 1.63 "Desert Hunters", the M56 is one of the lightest tank destroyer in the game. Despite that, it contains a very powerful punch with a 90 mm M54 gun with the standard complement of 90 mm ammunition that can be seen on the 90 mm equipped medium tanks. This includes the lethal HEAT-FS round, which can penetrate up to 320 mm of armour, more than enough against most of the M56's enemies. Being lightweight also provides mobility benefits, as the engine is more than enough to propel the M56 quickly, allowing it to weave through rough terrain to get into optimum position and hide with its low profile to wait for the right moment to strike. However, the exposed crew and the bare armour means even a light spray of machine guns can be enough to knock out or outright destroy the vehicle.
General info
Survivability and armour
Fitting the definition of a glass cannon, the M56 has virtually no armour to speak of, as the majority of the tank comprises structural steel not meant to protect the crew and has a weak armour modifier (x0.45 KE), which renders it near useless in protecting internal components from incoming fire of any calibre, with the exception of high-angle impacts from rifle-calibre rounds. This description also applies to the only armour plate found on the entire tank, the gun shield, as the 5 mm thick plate with 12 mm of bullet-proof glass will only be able to stop rifle-calibre bullets from mid to long ranges.
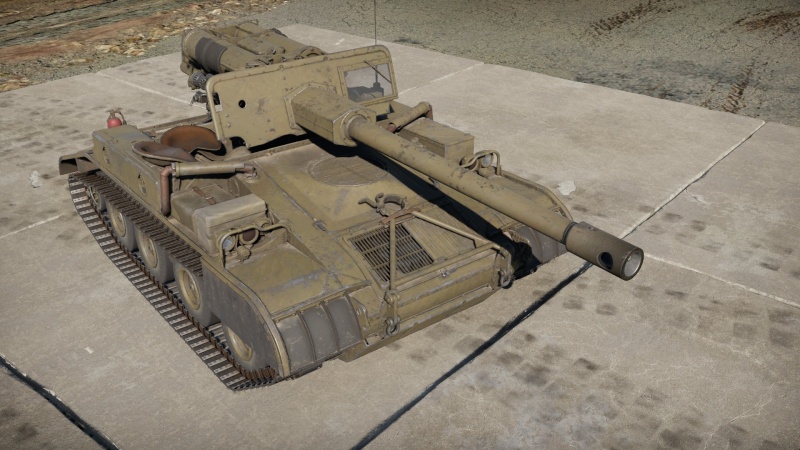
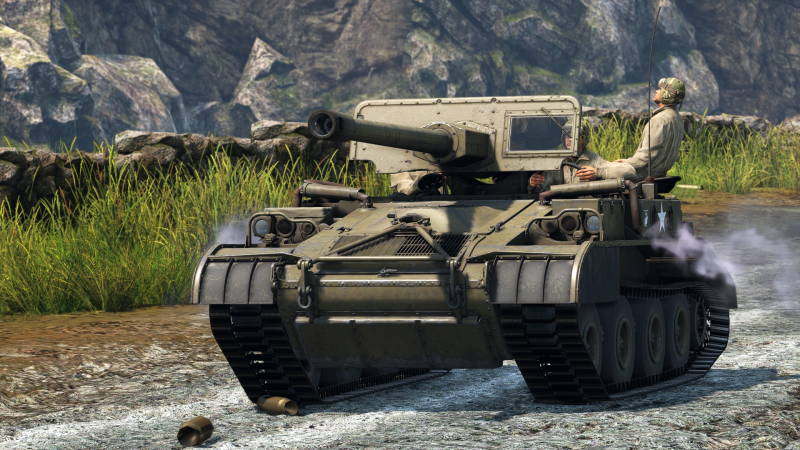
The crew consists of only 3 members: a driver on the left side of the gun breech, the gunner on the right side of the gun breech, and the commander sitting rather casually behind the driver. If the tank is spotted and takes fire, expect the commander to be the first crew member down, since he is the most exposed among the three, sitting far away and above the gun shield. This will also impact your reload rate.
Overall, survivability is very low and it is advised to take precautions not to take any fire from the opposition, making use of terrain and mobility when the battle gets heated. Any HE shell will destroy your vehicle, with the overpressure mechanics. This makes chemical energy and artillery shells as well as rockets deadly for your vehicle.
Armour type:
- Structural steel
- Rolled homogeneous armour (Gun shield)
- Bulletproof glass
| Armour | Front | Sides | Rear | Roof |
|---|---|---|---|---|
| Hull | 15 mm (59-79°) Front glacis 15 + 10 mm (29-65°) Lower glacis 10 mm Engine cover |
15 mm | 15 mm (1-70°) | 10 mm |
| Gun Shield | 5 mm (17°) Shield 12 mm (17°) Bulletproof Glass |
N/A | N/A | N/A |
Notes:
- Wheel thickness is 10 mm, sprocket and idler wheel are 20 mm thick, and tracks are 15 mm thick.
Mobility
| Game Mode | Max Speed (km/h) | Weight (tons) | Engine power (horsepower) | Power-to-weight ratio (hp/ton) | |||
|---|---|---|---|---|---|---|---|
| Forward | Reverse | Stock | Upgraded | Stock | Upgraded | ||
| Arcade | Expression error: Unexpected * operator. | 284 | Expression error: Unexpected round operator. | __.__ | |||
| Realistic | 177 | Expression error: Unexpected round operator. | __.__ | ||||
Where the M56 lacks in armour, it easily makes up for in mobility. Its light weight and decently powered engine gives it a great power-to-weight ratio that lets it propel to top speed easily, even when stock. You'll want to use this to gain access to favourable positions at the beginning of each match. When your position is compromised, seek a retreat using its excellent reverse speed of -20 km/h and plan ahead your next route.
Modifications and economy
Armaments
Main armament
| 90 mm M54 | Turret rotation speed (°/s) | Reloading rate (seconds) | |||||||||||
|---|---|---|---|---|---|---|---|---|---|---|---|---|---|
| Mode | Capacity | Vertical | Horizontal | Stabilizer | Stock | Upgraded | Full | Expert | Aced | Stock | Full | Expert | Aced |
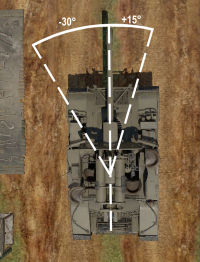
| Arcade | 29 | -10°/+15° | -30°/+15° | - | 5.3 | 7.3 | 8.9 | 9.8 | 10.5 | 7.80 | 6.90 | 6.36 | 6.00 |
| Realistic | 3.6 | 4.2 | 5.1 | 5.6 | 6.0 | ||||||||
The 90 mm M54 is the M41 gun available on the M48A1 but equipped with a recoil system, which is why they have the same available ammunition choice. The cannon's accuracy drop is noticeable as soon as 800 m distance and a handicap over 1,000 m unless you fire at huge targets (Ferdinand, Jadgtiger, Tiger II, etc.). Some stabilized ammunition, such as HEATFS, do not suffer as much from the accuracy drop over distance.
The rotation speed of the gun is very slow compared to other tanks at the same rank or battle rating who can aim their gun in average 2 to 3 times faster than you do. Which means your targeting process will be long if you aim to be accurate. Also, any movement of your hull will make you restart your targeting process from scratch, which limits greatly your possibility to overextend, even after a successful first disabling shot.
Additionally to having a limited gun rotation on the horizontal axis, that displacement is asymmetrical due to the driver position limiting movement to the right side. This can make the tracking of a target difficult as the gun quickly reaches a stop. Take that constraint into account when positioning your hull at a firing spot.
Your hull being very light, it can not absorb all of the recoil power (even with the huge damping cylinders on the gun). Every shot taken throws your gun off target after firing, forcing to restart your targeting process or even reposition your hull. Using the "sight distance control" feature can help mitigate that aspect but any movement of the mouse during the recoil phase will nullify the sight setting.
Ammunition
The M54 cannon offers 5 types of ammunition to choose from: APCR shots, APCBC rounds, HEATFS rounds, HESH shells, and HE shells.
The M332 APCR shells are the basic rounds that you'll utilize when you first play your tank. Like any other APCR shell, with knowledge of the opposition's internal components such as gunner/driver locations and ammo racks, it is very useful against heavy foes with low-angle slopes in their armour profile. But, it is very lacking in post-penetration damage. Though they are free to use, players may find the lack of post-penetration damage unfavourable, especially for a glass cannon who can't risk staying exposed for very long trying to pick apart an armoured foe.
The M82 APCBC shells are probably the first shells you'll unlock and will provide some relief if you've grown tired of the APCR's low post-penetration damage. Like any other APHE, they possess good penetration at close to mid range with exceptional post-penetration damage for dealing with moderately armoured targets like many of the medium tanks you'll encounter at your battle rating. As soon as you unlock these, start carrying these as your standard round against most tanks while carrying a few of the above APCR for heavier foes, at least until you unlock the HEATFS round.
The M431 HEATFS should be the round you want to rely on to take care of most armoured foes you come across. Combining the best muzzle velocity, the greatest penetration, especially at long range, and decent post-penetration damage makes this the superior round to use in any mid-to-long range engagement. At close range or in ambush situations, with this shell being your loaded round, you will most likely cripple any target you may encounter. It may then be best to switch to APCBC or HESH (depending on the vehicle type) as a follow up to finish off the surviving target, unless the target still presents itself to be very armoured from your angle of fire (like the Maus or most heavies from the front). Especially so if you're conscious about your ammo bill after the battle as HEATFS are not the cheapest option.
The T142E3 HESH are an advanced high-explosive round that's capable of penetrating thick armour, even when it is highly-sloped. If you know your target possesses not a single plate of armour greater than 100 mm, then these are the rounds to use to wreck them at any range, as these are equally effective against a valid target, including many medium tanks, any light tank and SPAA, and even some heavy tanks that rely on angles rather then raw thickness like an IS-3 or AMX-50 Surbaisse. Just be sure to aim away from the tracks and suspension, as these modules can easily absorb any damage caused by HESH.
The M71 HE are just like your typical medium-calibre HE round, good against unarmoured targets like exposed crew members, hull-breakable vehicles, and air targets (should you be able to hit them), but not very useful outside of that. Though this is a free round with slightly better velocity (making it easier to use at long range), favour HESH instead when you can as it carries nearly as much of a payload and has increased versatility against more targets.
One last ammo type to mention are the M313 Smoke shells. While not particularly useful for the role the M56 typically fills, they can still have good effect in long-range conflicts where a smoke to the face of an experienced enemy sniper can buy you or your allies time to bypass them in favour of a retreat or advancement towards the objective.
Overall, with all shells unlocked where you'll be employing mid to close range tactics, the typical recommended ammo composition can look something like this: 12 HEATFS, 4 APCBC, 5 HESH. For long-range engagements where you'll be playing more of a sniper role, it's best to forego the APCBC in favour of bringing as much HEATFS as you can while throwing in a couple of smokes, though the smokes are optional. With this the recommended ammo composition for long-range engagements will look more like this: 20 HEATFS, 7 HESH, 2 Smokes.
| Penetration statistics | |||||||
|---|---|---|---|---|---|---|---|
| Ammunition | Type of warhead |
Penetration @ 0° Angle of Attack (mm) | |||||
| 10 m | 100 m | 500 m | 1,000 m | 1,500 m | 2,000 m | ||
| M332 shot | APCR | 291 | 286 | 264 | 240 | 217 | 197 |
| T142E3 | HESH | 102 | 102 | 102 | 102 | 102 | 102 |
| M82 shot | APCBC | 185 | 182 | 169 | 155 | 142 | 130 |
| M431 shell | HEATFS | 320 | 320 | 320 | 320 | 320 | 320 |
| M71 shell | HE | 20 | 20 | 18 | 17 | 16 | 16 |
| Shell details | ||||||||||||
|---|---|---|---|---|---|---|---|---|---|---|---|---|
| Ammunition | Type of warhead |
Velocity (m/s) |
Projectile mass (kg) |
Fuse delay (m) |
Fuse sensitivity (mm) |
Explosive mass (TNT equivalent) (g) |
Ricochet | |||||
| 0% | 50% | 100% | ||||||||||
| M332 shot | APCR | 1,165 | 5.7 | - | - | - | 66° | 70° | 72° | |||
| T142E3 | HESH | 792 | 10.6 | 0.1 | 4 | 3,050 | 73° | 77° | 80° | |||
| M82 shot | APCBC | 853 | 10.91 | 1.2 | 14 | 137.2 | 48° | 63° | 71° | |||
| M431 shell | HEATFS | 1,216 | 5.8 | 0.05 | 0.1 | 712.64 | 65° | 72° | 77° | |||
| M71 shell | HE | 823 | 10.55 | 0.2 | 0.1 | 1,210 | 79° | 80° | 81° | |||
| Smoke shell characteristics | ||||||
|---|---|---|---|---|---|---|
| Ammunition | Velocity (m/s) |
Projectile mass (kg) |
Screen radius (m) |
Screen deploy time (s) |
Screen hold time (s) |
Explosive mass (TNT equivalent) (g) |
| M313 | 821 | 10.7 | 9 | 5 | 20 | 50 |
Ammo racks
| Full ammo |
1st rack empty |
2nd rack empty |
3rd rack empty |
Visual discrepancy |
|---|---|---|---|---|
| 29 | 20 (+9) | 11 (+18) | 1 (+28) | No |
Notes:
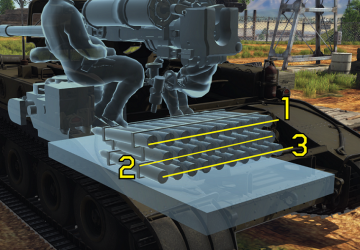
- The ammo racks on the M56 are 3 staggered rows of 10 (top), 9 (middle) and 10 (bottom) totaling 29 shells.
- The first rack to be depleted is the top row, then the middle row and finally the bottom row.
- To go into battle at full capacity, pack 29 shells (bottom row: 10 + middle row: 9 + top row: 10, with 1 shell in the breech taken from the top row).
- To go into battle with the first rack depleted, pack 20 shells (bottom row: 10 + middle row: 9 + 1 shell in the breech).
- To go into battle with the first and second racks depleted, pack 11 shells (bottom row: 10 + 1 shell in the breech).
- To go into battle with the 3 racks depleted, pack 1 shell (1 shell in the breech).
- Recommended ammo load is 20. Carry a full load of 29 rounds only for large open maps like Kursk, Fulda Gap and Maginot Line.
Usage in battles
The M56 Scorpion is a fast, light tank destroyer with very little armour to speak of.
A rapid volley from an enemy machine gun will knock out the three crew members with ease, if not carefully concealed. Its 90 mm M54 cannon is very able to disable enemy tanks at Rank IV. It is able to perform various destruction missions utilising various tactics. An M56 Scorpion is a dedicated airborne tank destroyer with airborne vehicle-based performance. The scorpion has a very stable and fast rate of acceleration on any terrain with a top speed of up to 28 MPH (45 km/h). With its high speed, it is very tempting to charge towards the capture point. When in a situation where a single enemy tank is present, unprotected, uncovered and separated from the opposing team. A rampaging Scorpion will be able to close in, then blow it up to kingdom come. However, caution must be undertaken throughout.
Be wary that any tank, even if only armed with a machine gun, is capable of knocking out the M56 due to the exposed crew. One particular enemy to keep an eye out for is the ASU-85. It's a complete Soviet equivalent of the Scorpion. Its stock BR-372 APCBC shell is hopeless against a Scorpion since it will always overpenetrate it & be unable to explode inside its engine or gun breech. Meanwhile the M82 APCBC shell has the opposite effect against it, as the ASU-85 has 45 mm armour just like the T-34-85, which was a big mistake. Even with inferior penetration, an M82 still has 1.5x more explosive warhead. Given enough penetration, it will always be able to cause it to explode frontally without much effort. Take a grain of salt when firing at the ASU-85 from its flank, since the M82 will also overpenetrate away. Loading the M71 HE is much better, since the explosion will spam the ASU-85's interior all over the place. Or if already loaded with M82 & an ASU-85 is approaching while showing its flank, aim for the engine to prevent it from recovering & escaping. Then blast it away.
Game modes
While the Arcade Battle environment is not favourable due to the marker system easily spotting the M56, it can still perform in flank and surprise attacks if employed properly. It still can snipe from far away & make score against some targets when the M431 HEATFS is unlocked. Be aware that many light tanks can hunt it down if caught in firing range, particularly the M41A1 Bulldog and T92.
Flanking/Sniper
The battle environment is more favourable in Realistic and Simulator Battles. It can completely perform full flanking manoeuvres even when stock, it can also snipe from far-distance without getting spotted easily. Using both tactics will guarantee a complete concealment from the enemy, while being able to fire M82 APCBC shells at them. Closing in to the enemy is only viable if the enemy number has been completely depleted and/or are unable to insert reinforcements to cover their team.
Closing in, the Scorpion can out manoeuvre and outflank most, if not all enemy vehicles at its BR. When it is unable to flank due to tight enemy formation across the map, sniping is the best option.
It is recommended to load M431 HEATFS or M82 APCBC rounds if the enemy armour is insufficient to withstand such rounds (e.g. T-34-100). The reload time can help it to outgun any opposition, to withstand its sustained rate of fire. Especially if it is equipped with an Ace crew, which can reload around of 7 seconds. Also, try to use an ambush tactic. It can annihilate a whole team if used by a skilled player.
Ambush
In Realistic, the great speed, manoeuvrability, and minuscule size of the M56 is nearly perfect for the role of an ambush predator. The M56 is capable of driving stealthily behind enemy lines completely undetected. However, in city environments, the M56 must practice stealth much more, as to not alert any enemy.
Once in position, hopefully within a circle of bushes or rubble, the small tank destroyer can capitalize on its scouting ability, revealing most of its enemies' positions. The use of the main cannon will also thin out the enemy defense for the M56's team's main force.
However, firing the main cannon more than thrice before moving locations will most likely alert the enemy. Therefore, when the M56's position eventually does get compromised, its cannon and excellent acceleration can both take out any unwanted investigators, and carry itself nimbly into another hiding spot. It is recommended to load mainly on M82 APCBC shells for attacking the unsuspecting sides of the enemy and a few M431 HEATFS rounds for any sticky situation that the M56 might get into whilst getting to or from a hiding spot.
Pros and cons
Pros:
- Very small profile (68% visibility)
- Excellent mobility & manoeuvrability on all terrain (45 km/h top speed & great acceleration, 20 km/h reverse speed)
- A practically airworthy vehicle- very, very light (7 tons)
- The same 90 mm gun and ammunition selection as the M48A1 Patton
- Quick reload time
- 3 varieties of very capable shells
- Stock APCR shell has a big penetration power
- Destructive APCBC with explosive filler can take out enemies with a single shot
- HEATFS can punch through 320 mm of armour
Cons:
- No armour
- A shot through the bulletproof glass will knock-out 2 crew members and instantly disable the vehicle
- High chance to catch fire when shot in the frontal hull
- Affected by the overpressure mechanic (large HE shells will outright destroy the M56)
- Hopeless if it is immobilised
- Open-topped vehicle with all crew members exposed
- vulnerable to strafing attacks from planes
- Easily tipped over because of its light weight
- Top speed is limited at 45 km/h. While boasting excellent acceleration, it will be outrun by other light vehicles on open field
- Does not climb hills well unless approached with good speed
- APCR as stock shell; unable to cripple a tank even from flank with only a shot
- Gun has very slow traverse and elevation, meaning that it takes a while to readjust after taking a shot
History
Development
During World War II, the constant problem for the US Airborne divisions is that their anti-tank power was very minimal in the front lines. Though there were attempts to improve their firepower with towed anti-tank guns or airborne tanks like the M22 Locust, the former proved too cumbersome and heavy while the latter proved too under-powered and weak. Thus, development began in April 1949 for a very lightly armoured vehicle to mount a hard-hitting gun with heavy emphasis on firepower, speed, and with as little weight as possible. This evolved into the development of a self-propelled 90 mm gun and the project was taken up by the Cadillac Motor Division of General Motors. The pilot vehicle developed were designated T101.[1]
The first models were completed in 1953 and were tested in 1955. It was approved for service in 1958 and designated as the M56 90 mm self-propelled gun, or by its nickname "Scorpion" and its acronym SPAT (Self-Propelled Anti-Tank). Its main selling point was being light enough at only 7 tons to be lifted by helicopter or carried onto aircraft, allowing for parachute drops. As a rather specialized vehicle, it wasn't produced in large numbers, with only 150 units built from the Cadillac production line from 1953 to 1959.[1]
Usage
The M56 Scorpion was issued out to airborne and anti-tank units from 1958 to the early 1960s. As a defensive weapon, the M56 Scorpion was never meant to venture out to seek and destroy enemy tanks, but its lack of armour was still criticized by its crew, what with only a simple gun shield blocking the crew from getting shot by even small arms. The lightness of the vehicle was also bad for the extreme recoil of the 90 mm M54 gun, which would lift the entire vehicle off its front wheels.[1] An informal manual even recommends that when firing, the commander and loader should step off the vehicle to avoid being harmed by the lurching vehicle. The M56 Scorpion served America in combat during the Vietnam War in the 173rd Airborne Brigade, with 17 vehicles organized into three platoons. It served as a defensive role in most of American foreign bases until the advent of the anti-tank missile launchers such as the TOW, which proved more potent than the Scorpion, and was replaced in the late 1960s and early 70s.[1]
The M56 Scorpions were also given out in limited numbers, with Morocco given 87 vehicles and Spain obtaining 5 in the Military Aid Program. Morocco used the Scorpions in the Western Sahara War, being the only foreign user of the M56 Scorpions.
Survivors
At least 18 intact M56 Scorpions survive in the United States today, mainly in museums and in private collections.
Media
- Skins
- Videos
See also
Links to the articles on the War Thunder Wiki that you think will be useful for the reader, for example:
- reference to the series of the vehicles;
- links to approximate analogues of other nations and research trees.
External links
References
| USA tank destroyers | |
|---|---|
| M10 | M10 GMC |
| M36 | M36 GMC · M36B2 |
| T95 | T28 · T95 |
| M109 | M109A1 |
| ATGM | LOSAT · M901 |
| Wheeled | M3 GMC · T55E1 |
| Other | M8 HMC · M50 · M56 |
| China | ▃LVT(A)(4) (ZIS-2) |


