Cobra King
| This page is about the premium American heavy tank Cobra King. For other versions, see M4 Sherman (Family). For other uses, see M4 (Disambiguation). |
Contents
Description
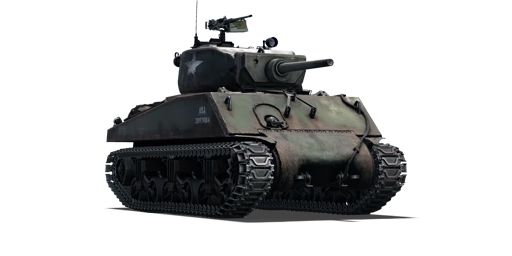
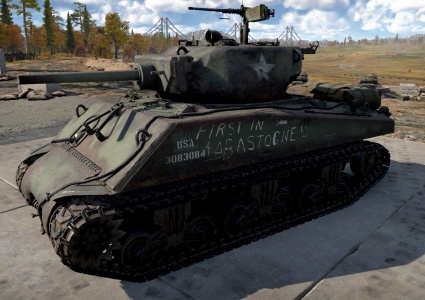
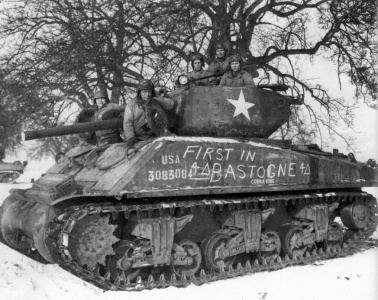
The Cobra King is a unique version of the M4A3E2 Sherman, which was an up-armoured modification of the M4A3, the fourth variant of the early-generation Medium Tank M4 (Sherman) family. During the Battle of the Bulge in December 1944, the Germans assaulted and cornered U.S. soldiers in the town of Bastogne. The Cobra King was the first tank to enter the perimeter of Bastogne, bringing relief to the besieged American 101st Airborne Division. Cobra King saw combat for the first time in 1944. It was destroyed during a battle in France in November 1944, but it was later restored and reassigned. In late 1944, the tank was deployed to Company C of the American 4th Armored Division's 37th Tank Battalion, which was the spearhead of General Patton's Third Army moving into Bastogne. The 37th Tank Battalion was then commanded by Creighton Abrams, subsequently commander of U.S. forces in the Vietnam War, Chief of Staff of the United States Army, and namesake of the M1 Abrams tank. Lieutenant Charles Boggess led a crew that included Hubert S. Smith (driver), Harold Hafner (co-driver), Milton Jafet (gunner), and James G. Murphy (loader). Boggess had taken over for the tank's former commander, Charles Trover, who was killed by a sniper on December 23rd while standing in the turret.
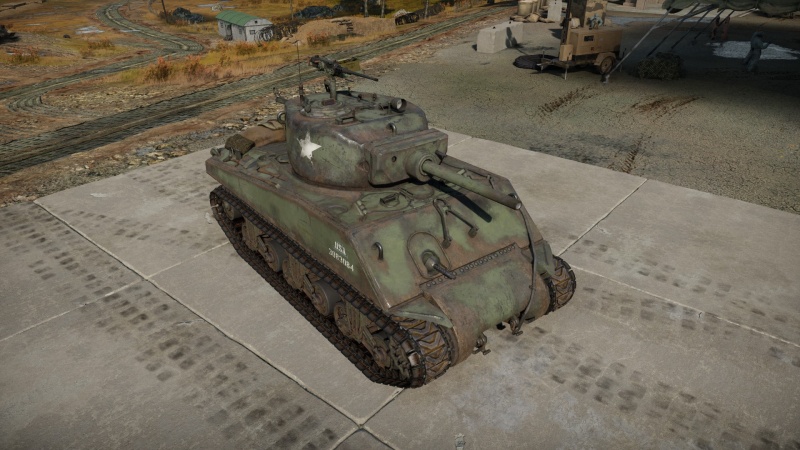
Introduced in Update 1.45 "Steel Generals", the Cobra King is a unique premium version of the M4A3E2, which is a makeshift heavy tank based on the original M4A3 Sherman variant. Playstyles are very much similar to the standard M4A3E2. Though it may look similar to an ordinary M4A3 Sherman medium tank, it can sustain substantially more damage than any M4 Sherman variants and can attack enemy positions effectively. The majority of Cobra King adversaries will struggle to penetrate this vehicle from the front. When you utilize the M4A3E2 to lead an aggressive charge, your opponents will usually direct their fire at you, allowing others in your team to attack enemy targets with less pressure. Despite its superb armour, the Cobra King's 75 mm M3 tank gun is underwhelming. It lacks the armour penetration to engage most opponents within its ranks from the front. Players will usually have to destroy critical components such as the barrel and tracks, and flank enemies for the weaker side armour in order to properly destroy hostile vehicles.
General info
Survivability and armour
The "Cobra King" still features the double layered front armour, giving the vehicle its distinctive 101.6 mm total front armour. The transmission housing is also considerably beefier too from the addition of armour in the area as well. The front of the T23-style turret is also distinctive, with the very blocky gun mantlet and circular barrel shroud around the rather underwhelming 75 mm gun barrel.
The sides and suspension look like the usual game with the M4 Sherman series, but with minor differences. The flat side armour of the hull, instead of 38.1 mm thick, is now 76.2 mm thick for much stronger side protection. However, the lower side hull around the bogie suspension area is still only 38.1 mm thick, vulnerable to most regular anti-tank weapons. Another minor difference is the tracks, the T48 rubber chevron tracks are equipped with extended end connectors in an effort to improve ground pressure performance for the additional weight of the armour.
Armour type:
- Rolled homogeneous armour (Front, Side, Rear, Roof)
- Cast homogeneous armour (Turret, Transmission area)
| Armour | Front (Slope angle) | Sides | Rear | Roof |
|---|---|---|---|---|
| Hull | 63.5 + 38.1 mm (47°) Front glacis 114.3-139.7 mm (7-66°) Transmission housing |
76.2 mm Top 38.1 mm Bottom |
38.1 mm (10°) Top 38.1 mm (7-24°) Bottom |
19.5 mm |
| Turret | 152.4 mm (0-52°) Turret front 177.8 mm (4-60°) Gun mantlet |
152.4 mm (4-42°) | 152.4 mm (0-79°) | 63.5 mm Front 25.4 mm |
| Cupola | 51 mm | 51 mm | 51 mm | 25.4 mm |
Notes:
- Suspension wheels are 15 mm, bogies 10 mm, and tracks are 17 mm thick.
- Belly armour is 25.4 mm thick.
- Hull underside right above the tracks is 9.5 mm thick.
- Gun breech is 300 mm thick in structural steel.
The M4A3E2 Jumbo presents very little frontal weak spots in an engagement. It is best to try to force the Jumbo towards the player or allies. An angle more than 30 degrees can expose the much weaker lower side hull armour in the suspension that is only 38.1 mm thick. With a powerful enough gun, a round can penetrate this area and damage the crew, or even set off the ammunition all cluttered up on the bottom of the tank.
If a frontal engagement is unavoidable and is unfortunately armed with guns unable to penetrate the front glacis, there are only two areas that are viable. First is the machine gun port, which is one of the areas that is not layered with the extra 38.1 mm added on top of the base armour. Guns like the Panzer IV 75 mm KwK40 guns that are unable to cleave through the front glacis can push their luck in this area, with small "sweet spots" the round can pass through. Another way to attack the M4A3E2 in this scenario is exploiting a shot-trap in the gun mantlet. The small corner flaps on the bottom corners of the gun mantlet have a tendency to deflect rounds downwards onto the 19.5 mm hull roof armour. While this will be left to the ricochet chances, it is still possible and can be used if no other scenarios are favourable.
Mobility
| Game Mode | Max Speed (km/h) | Weight (tons) | Engine power (horsepower) | Power-to-weight ratio (hp/ton) | |||
|---|---|---|---|---|---|---|---|
| Forward | Reverse | Stock | Upgraded | Stock | Upgraded | ||
| Arcade | Expression error: Unexpected * operator. | 646 | Expression error: Unexpected round operator. | __.__ | |||
| Realistic | 442 | Expression error: Unexpected round operator. | __.__ | ||||
Modifications and economy
Armaments
Main armament
| 75 mm M3 | Turret rotation speed (°/s) | Reloading rate (seconds) | |||||||||||
|---|---|---|---|---|---|---|---|---|---|---|---|---|---|
| Mode | Capacity | Vertical | Horizontal | Stabilizer | Stock | Upgraded | Full | Expert | Aced | Stock | Full | Expert | Aced |
| Arcade | 104 | -10°/+25° | ±180° | Vertical | 19.42 | 26.88 | 32.64 | 36.10 | 38.40 | 6.50 | 5.75 | 5.30 | 5.00 |
| Realistic | 14.28 | 16.80 | 20.40 | 22.56 | 24.00 | ||||||||
Ammunition
| Penetration statistics | |||||||
|---|---|---|---|---|---|---|---|
| Ammunition | Type of warhead |
Penetration @ 0° Angle of Attack (mm) | |||||
| 10 m | 100 m | 500 m | 1,000 m | 1,500 m | 2,000 m | ||
| M72 shot | AP | 91 | 88 | 78 | 67 | 57 | 49 |
| M48 shell | HE | 10 | 10 | 10 | 10 | 10 | 10 |
| M61 shot | APCBC | 104 | 102 | 93 | 84 | 75 | 68 |
| T45 shot | APCR | 139 | 135 | 121 | 105 | 91 | 79 |
| Shell details | ||||||||||||
|---|---|---|---|---|---|---|---|---|---|---|---|---|
| Ammunition | Type of warhead |
Velocity (m/s) |
Projectile mass (kg) |
Fuse delay (m) |
Fuse sensitivity (mm) |
Explosive mass (TNT equivalent) (g) |
Ricochet | |||||
| 0% | 50% | 100% | ||||||||||
| M72 shot | AP | 619 | 6.3 | - | - | - | 47° | 60° | 65° | |||
| M48 shell | HE | 463 | 6.3 | 0.2 | 0.1 | 666 | 79° | 80° | 81° | |||
| M61 shot | APCBC | 618 | 6.79 | 1.2 | 14 | 63.7 | 48° | 63° | 71° | |||
| T45 shot | APCR | 868 | 3.81 | - | - | - | 66° | 70° | 72° | |||
| Smoke shell characteristics | ||||||
|---|---|---|---|---|---|---|
| Ammunition | Velocity (m/s) |
Projectile mass (kg) |
Screen radius (m) |
Screen deploy time (s) |
Screen hold time (s) |
Explosive mass (TNT equivalent) (g) |
| M89 | 259 | 3 | 9 | 5 | 20 | 50 |
Ammo racks
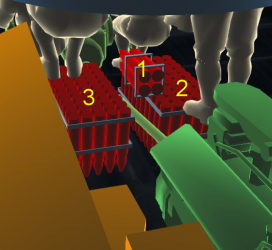
| Full ammo |
1st rack empty |
2nd rack empty |
3rd rack empty |
Visual discrepancy |
|---|---|---|---|---|
| 104 | 100 (+4) | 50 (+54) | 0 (+104) | No |
Notes:
- As they are modelled by sets of 2, shells disappear from the rack only after you've fired both shells in the set.
- Floor left rack only: 50 (+54) shells.
Machine guns
| 12.7 mm M2HB | ||||
|---|---|---|---|---|
| Mount | Capacity (Belt) | Fire rate | Vertical | Horizontal |
| Pintle | 600 (200) | 577 | -10°/+30° | ±60° |
| 7.62 mm M1919A4 | ||||
|---|---|---|---|---|
| Mount | Capacity (Belt) | Fire rate | Vertical | Horizontal |
| Coaxial | 3,000 (250) | 500 | N/A | N/A |
Usage in battles
The Cobra King is best in assaulting enemy positions with allies. Its great mobility for a heavy tank, especially with its armour, makes it a vehicle able to charge into battle with confidence. It can act as a bullet magnet against enemy tanks more worried about the Cobra King, diverting fire that would have been directed more vulnerable teammates. Though the 75 mm gun's AP performance is not suited to the types of enemies expected at the BR, it can still harass enemies and the gun is lethal enough that enemies will be forced to show their front armour towards the Jumbo else a 75 mm penetrates their side armour. Their focus on the Jumbo can allow allies to move around and eliminate them. During all this, take care not to over-angle and show the lower side armour too much as this allows vehicles to penetrate down there and damage modules, even the ammunition storage if they are lucky.
Another role the Cobra King is good at is as a flanker. Due to its great mobility as a heavy tank, the Cobra King can manoeuvre like a medium tank around the battlefield. This is also beneficial to the 75 mm gun as it would permit the Cobra King a chance to attack the weaker side armours of enemy vehicles. Once flanking around and finding a prime position in a firing angle right into an enemy choke point, minimize exposure to anything but the front armour and the Cobra King can remain a formidable obstacle to all opponents. Take care not to be outflanked by enemy players aware of the Cobra King's position.
As the Cobra King has a slightly higher battle rating than the other M4 Shermans, it can be up-tiered against tanks such as the Tiger H1 and the Panther D, meaning its M61 round will be almost harmless. For this reason, it is advisable to take the T45 APCR ammo into battle, at least enough to take on the armoured targets the Cobra King will face.
The Soviet 85 mm gun can be a threat, so caution is advised when going up against tanks armed with the 85 mm, such as the T-34-85, SU-85, and IS-1. The Jagdpanzer 38(t) and Jagdpanzer IV can be tricky when facing off against them. Their frontal armour is too thick and sloped for the 75 mm M3 gun to have any effect on it. For these two targets, it is advised to target their tracks and transmission and then flank for a side shot, where the armour is much weaker. Finally, the Sturer Emil wields a 128 mm that can penetrate the front plate of the Cobra King, so caution is advised against those as well.
Pros and cons
Pros:
- Excellent frontal armour
- Very strong turret armour from all sides, excellent at hull down position
- Nimble for a heavy tank, able to accelerate quickly
- APCR shot has high penetration power
- High rate of fire for the 75 mm M3 gun
- Excellent gun depression
- Equipped with gun stabilizer, making it more accurate at moving and when preparing a shot after moving
Cons:
- 75 mm M3 gun lacks penetration against most tanks frontally
- APCR shot has poor post-penetration damage
- The frontal armour still presents several weak spots enemies can easily exploit
- Side and rear armour are pretty weak and limit angling tactics
- Low top speed
- Reverse speed is poor
History
Development
Even before the invasion of Normandy, the Allied commanders had to figure out a method in order to breach heavily-defended fortification lines such as the Siegfried Line blocking the path from France to Germany. One of the solutions was the implementation of "assault tanks" that would enter enemy territory and root out the enemy fortifications. The initial plan was for the production of the M26 Pershing tanks to fulfil this role, but setbacks in its development caused the M26 deployment to be delayed until 1945. A quick solution had to be made to fill this "assault tank" role for the invasion of Europe in 1944.
The US Ordnance Department then took their abundant M4 Shermans in stock and fixed them up for the new role they've been assigned. Although keeping the same engine, the armour was upped from around 76.2 mm initial thickness to 102 mm and angled at 47 degrees from vertical. This angle would influence later Sherman designs such as the M4A3 by changing the original 56 degrees angled glacis with protruding crew hatches to 47 degrees angled glacis without any protrusion from the crew hatches. This modified M4 Sherman's armour when angled would then be 150 mm line-of-sight (LOS) thick and 180 mm effective. The side armour was also increased to 76.2 mm thick and the turret was redesigned to provide more protection. These modified Shermans were designated as the M4A3E2 by the Ordnance Department, whereas the nickname "Jumbo" was likely a post-war invention. At the end of the modifications, the Sherman "Jumbo" now weighed about 42 tons and moved at a lower speed of 22 miles per hour. A drawback to the increased weight of the Sherman is that the Vertical Volute Suspension System (VVSS) from the Sherman was unable to take the weight easily, so extra care was taken by the crew members to not break the suspension.
In March of 1944, the US Army ordered 254 of these vehicles to be delivered for use in European Operations. Intended to assault the Normandy Beachhead, it was deployed in Normandy after D-Day to assist the infantry push through German defences. The M4A3E2 originally came with the 75 mm cannon to support infantry with its better HE shells compared to the planned 76 mm instalment, but the 76 mm was installed later in the campaign and called the M4A3E2 (76) W Jumbo.
Combat usage
The M4A3E2s was well-liked by the crew and commanders due to its protection value. Despite the weight difference and strain on the suspension, it performed reliably and could absorb damage that would otherwise destroy regular Shermans. Later in the war, when the quantity of the M4 Sherman "Jumbos" were unable to meet the demand, George S. Patton ordered the existing M4 Shermans to weld on armour plates scavenged from knocked out tanks to makeshift "on-the-field" Jumbos. This caused the newer Shermans such as the M4A3 (76) W HVSS to have the same protection by welding metal onto the hull. One of the Jumbo's notable participation in the war was in Patton's Third Army where it spearheaded the assault of Bastogne to relieve the pinned down 101st Paratroopers. The M4A3E2 "Cobra King" was the tank Lt Charles P. Boggess commanded to lead elements of Patton's Third Army into Bastogne on December 25, 1944. The 101st was finally relieved and reconnected with the Third Army on December 27. "Cobra King", however, was knocked out sometime during the fighting (maybe during the Hammelburg Raid) and had its interior destroyed by an internal fire. When the tank's remnants were identified in 2008, it was shipped back to the United States to Fort Knox at the Patton museum to be restored by Len Dyer, director of the Patton Museum and the soon-to-be National Armor and Cavalry Museum. After two years of restoration work, the tank was put into the display at Fort Benning as a dedication to the Charlie Company of the 4th Armored Division's 37th Tank Battalion. It was moved in August 2017 to the future National Museum of the United States Army at Fort Belvoir, Virginia.[1]
When the war in the European Theater ended, the M4A3E2s were then placed stateside for the preparation for the invasion of the Japanese Home Islands. However, this was never to be fulfilled as Japan surrendered to the United States in September 1945. The M4A3E2 Shermans proved to be a very effective stop-gap solution until heavier armoured tanks such as the Pershing could come into play. In 1948, about 96 Sherman Jumbos still remained in US inventory.
| Archive of the in-game description | |
|---|---|
|
Preparations for the invasion of Europe saw a heavily armoured assault tank designated M4A3E2 (76)W designed using the M4A3 base. In March 1944 the Armed Forces Committee approved a program refitting 254 tanks, some of which were equipped with 76 mm cannons. Their armour was strengthened by stacking 38 mm armour plates welded together on the front and sides of the hull. As a result, the frontal armour reached a thickness of 102 mm to go along with the 76 mm on the sides. The transmission was protected with a 140 mm cast cover, while the rest of the hull was not modified. The new T23 cast turret had walls 152 mm thick and was special in that it did not have a hatch from which to fire a personal weapon. The 178 mm mantlet was mounted with a 76 mm M1A1C cannon, while ammunition was stored in wet stowage. The thicker armour pushed the tank's weight to 38 tons, simultaneously lowering its top speed to 35 km/h. The exact number of M4A3E2 tanks refitted with 76 mm M1A1C cannons was never ascertained. The tanks were very popular as column leads, given the fact that German antitank guns could not penetrate their frontal armour. | |
Media
- Skins
- Images
- Videos
See also
- Other M4A3E2 vehicles in the game
External links
News article about the tank
- [Stars and Stripes] Vilseck Tank confirmed as 'Cobra King'
- [American WWII] Cobra King: where is she today?
- [US Army] 'Cobra King' led 4th Armored Division column that relieved Bastogne during Battle of the Bulge
- [Washington Post] A battered World War II hero of Bastogne gets a new home, and a museum built around it
References
| USA heavy tanks | |
|---|---|
| M4 Jumbo | M4A3E2 · Cobra King · M4A3E2 (76) W |
| M6 | M6A1 · T1E1 · T1E1 (90) · M6A2E1 |
| T26 | T26E1-1 · T26E5 |
| T29/30/34 | T29 · T30 · T34 |
| T32 | T32 · T32E1 |
| M103 | M103 |
| Others | T14 |
| USA premium ground vehicles | |
|---|---|
| Light tanks | LVT(A)(4) · M2A4 (1st Arm.Div.) · M3A1 (USMC) · ▃Stuart VI (5th CAD) · M8 LAC · M8A1 GMC |
| M18 "Black Cat" · Super Hellcat · T18E2 · M551(76) · T114 · M1128 Wolfpack | |
| Medium tanks | ▃Grant I · M4A5 · Calliope · T20 · M26 T99 · M26E1 · M46 "Tiger" · T54E1 · T54E2 · ▃Magach 3 (ERA) · M728 CEV |
| XM1 (GM) · XM1 (Chrysler) · M1 KVT · M1A1 Click-Bait | |
| Heavy tanks | T14 · Cobra King · M6A2E1 · T29 · T30 |
| Tank destroyers | T28 · T55E1 |


