Difference between revisions of "A6M2"
(Updated as of 1.89.1.35) |
(Edits.) |
||
| Line 256: | Line 256: | ||
A total of 740 A6M2 model 21s were built in Mitsubishi plants; 326 were built in Nakajima plants. | A total of 740 A6M2 model 21s were built in Mitsubishi plants; 326 were built in Nakajima plants. | ||
| + | === Notable pilots === | ||
| + | |||
| + | <div><ul> | ||
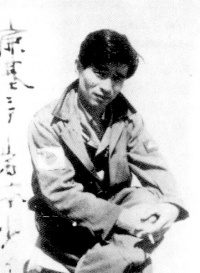
| + | <li style="display: inline-block;"> [[File:Tetsuzo_Iwamoto_Profile.jpg|thumb|none|200px|link=User:U64962917#Iwamoto_Tetsuzō|[[User:U64962917#Iwamoto_Tetsuzō|Iwamoto]] flew sorties throughout the Pacific Theater in a ''{{PAGENAME}}''.]] </li><!-- | ||
| + | <li style="display: inline-block;"> [[File:X.jpg|thumb|none|200px|"Image Description"]] </li> | ||
| + | <li style="display: inline-block;"> [[File:X.jpg|thumb|none|200px|"Image Description"]] </li> | ||
| + | <li style="display: inline-block;"> [[File:X.jpg|thumb|none|250px|"Image Description"]] </li>--> | ||
| + | </ul></div> | ||
== Media == | == Media == | ||
<!-- ''Excellent additions to the article would be video guides, screenshots from the game, and photos.'' --> | <!-- ''Excellent additions to the article would be video guides, screenshots from the game, and photos.'' --> | ||
Revision as of 18:14, 19 June 2019
Contents
| This page is about the Japanese fighter A6M2. For the American version, see A6M2 (USA). For other versions, see A6M (Family). |
Description
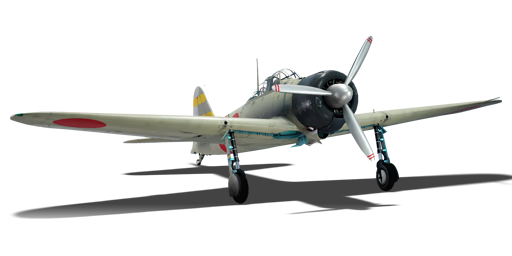
The A6M2 Reisen is a rank Japanese fighter
with a battle rating of (AB), (RB), and (SB). It has been in the game since the start of the Open Beta Test prior to Update 1.27.
One thing many players note when fighting the Zero is its immense manoeuvrability and turn rate. It is incredibly nimble and has an amazing climb rate, which allows you to run literal rings around many opponents. Even fighters renowned for manoeuvrability, like the mighty Spitfire, will think twice before engaging in a turn fight with the Zero. A deadly addition of two 20 mm cannons and two 7.7 mm machine guns mean that you can compete with other fighters.
The Zero's lightly loaded, high lift wing and low weight make it a dream to fly at speeds below 400 km/h, with an ability to execute wild gyrations and zoom climbs at the whim of the pilot. However, the Zero is hard to handle as it approaches speeds of 480 km/h.
Force an enemy pilot into a dogfight at 370 - 400 km/h and below 6,000 meters. At this speed and altitude, no enemy fighter can out-manoeuvre or out-climb you. Jump on cruising enemy aircraft from above, fasten onto the tail of the bandit, use your superior manoeuvrability to match his evasive moves, and put enough rounds into him to bring him down. Use your machine guns first to "bore-sight" the enemy - once you get hits on him, finish him off with your cannons. Below 480 km/h, you can fling the Zero all over the sky to get on an enemy's tail or to shake off all but the most determined attacker. Climb away from most enemy aircraft, hanging on your prop in a near-vertical climb. Manoeuvres like the Immelmann are easy, and heavier fighters can't stay with you. The Zero rolls faster to the left than to the right. Roll left to tighten your turn and get onto the enemy's six. Don't dive away from attackers - your plane doesn't have the power or weight to out-run most fighters. To exploit your plane's best performance, force the enemy lower and slow down the pace of the engagement.
General info
Flight performance
Describe how the aircraft behaves in the air. Speed, manoeuvrability, acceleration and allowable loads - these are the most important characteristics of the vehicle.
| Characteristics | |||||||
|---|---|---|---|---|---|---|---|
| Stock | |||||||
| Max Speed (km/h at 4,400 m) |
Max altitude (meters) |
Turn time (seconds) |
Rate of climb (meters/second) |
Take-off run (meters) | |||
| AB | RB | AB | RB | AB | RB | ||
| 491 | 477 | 17.7 | 18.1 | 10.2 | 10.2 | 175 | |
| Upgraded | |||||||
| Max Speed (km/h at 4,400 m) |
Max altitude (meters) |
Turn time (seconds) |
Rate of climb (meters/second) |
Take-off run (meters) | |||
| AB | RB | AB | RB | AB | RB | ||
| 531 | 510 | 16.8 | 17.0 | 17.4 | 13.3 | 175 | |
Details
| Features | ||||
|---|---|---|---|---|
| Combat flaps | Take-off flaps | Landing flaps | Air brakes | Arrestor gear |
| ✓ | ✓ | ✓ | X | ✓ |
| Limits | ||||
|---|---|---|---|---|
| Wing-break speed (km/h) |
Gear limit (km/h) |
Combat flaps (km/h) |
Max Static G | |
| + | - | |||
| 510 | ~12 | ~7 | ||
| Optimal velocities | |||
|---|---|---|---|
| Ailerons (km/h) |
Rudder (km/h) |
Elevators (km/h) |
Radiator (km/h) |
| < 270 | < 420 | < 410 | > 324 |
| Compressor (RB/SB) | ||
|---|---|---|
| Setting 1 | ||
| Optimal altitude | 100% Engine power | WEP Engine power |
| 3,400 m | 950 hp | 1,075 hp |
Survivability and armour
Examine the survivability of the aircraft. Note how vulnerable the structure is and how secure the pilot is, whether the fuel tanks are armoured, etc. Describe the armour, if there is any, and also mention the vulnerability of other critical aircraft systems.
Armaments
Offensive armament
The A6M2 is armed with:
- 2 x 20 mm Type 99 Model 1 navy cannons, wing-mounted (60 rpg = 120 total)
- 2 x 7.7 mm Type 97 navy machine guns, nose-mounted (680 rpg = 1,360 total)
Suspended armament
The A6M2 can be outfitted with the following ordnance:
- Without load
- 2 x 60 kg Navy Type 97 Number 6 bombs (120 kg total)
Usage in battles
The A6M2 Reisen is a very manoeuvrable plane, so note that when battling it, do not engage in low manoeuvres. Try to force it into high-speed manoeuvres, as it's prone to ripping/compressing at high speeds. Apply boom and zoom tactics on this plane as it will be easily cornered.
Manual Engine Control
| MEC elements | ||||||
|---|---|---|---|---|---|---|
| Mixer | Pitch | Radiator | Supercharger | Turbocharger | ||
| Oil | Water | Type | ||||
| Controllable | Controllable Not auto controlled |
Controllable Not auto controlled |
Controllable Not auto controlled |
Separate | Not controllable 1 gear |
Not controllable |
Modules
| Tier | Flight performance | Survivability | Weaponry | ||
|---|---|---|---|---|---|
| I | Fuselage repair | Radiator | Offensive 7 mm | ||
| II | Compressor | Airframe | New 7 mm MGs | 9 in (mod30) | |
| III | Wings repair | Engine | Offensive 20 mm | ||
| IV | Engine injection | Cover | New 20 mm cannons | ||
- The low top speed is a severe issue when stock. Compressor and New Engine greatly help. Having access to new 20 mm belts is helpful as well.
Pros and cons
Pros:
- Excellent turn rate
- Excellent roll rate
- Superior climb rate up to 4,500 m
- Decent cannon armament
- Nimble, your opponents will have a hard time hitting you
- Extremely manoeuvrable
- Very good at catching enemies off guard
- Can out turn most enemies at its BR range
- Tailhook enables it to land on carriers
- Very short takeoff distance
Cons:
- No armour and no pilot protection
- Limited 20 mm cannon ammo
- 7.7 mm machine guns don't really do any significant damage
- Guns have different trajectories, you need to get really close to targets to be effective
- Attacking bombers is one of the worst jobs for the Zero, as it is easily damaged by their gunners
- Although it can carry bombs, it's just absurd to equip them to the Zero
- Slow
- Strictly limited to the air-to-air role, although it performs exceptionally in it
- No self-sealing fuel tanks and the plane is littered with fuel tanks, will ignite and burn to death quite often
- Can easily be countered by just doing simple Boom & Zoom as the Zero lacks adequate energy retention
- Low dive speed, and easily compressed in a dive
- Has lots of bars inside the cockpit, limiting visibility
- Prone to ripping at high-speed manoeuvres
History
In 1937, the Imperial Japanese Navy's Koku Hombu (Aviation Bureau) issued the "Planning Requirements for the Prototype 12-shi Carrier Fighter" to the Mitsubishi Kokuki K.K. (Mitsubishi Aircraft Company Ltd.) and the Nakajima Hikooki K.K. (Nakajima Aeroplane Company Ltd.), requiring designs for a new fighter to replace the Mitsubishi Type 96 Carrier Fighter (A5M). The requirements were extremely challenging: manoeuvrability equal to or better than the Type 96 fighter, heavier armament including 20 mm cannons, exceptional rate-of-climb to intercept bombers, a range of at least 1,010 miles with a normal fuel load to escort bombers, a take-off distance of less than 230 ft into a 30 mph wind, landing speed of less than 67 mph, and a top speed better than 310 mph.
Nakajima soon bowed out in the face of such seemingly impossible requirements, but Jiro Horikoshi, who had previously designed the A5M, and his design team at Mitsubishi were undeterred. In addition to the already demanding requirements of the IJN, Horikoshi was also limited by the relatively weak engines that the Japanese aviation industry had to offer at the time. Selecting the lighter but less powerful Mitsubishi Zuisei-13 ("Holy Star"), which had a rating of less than 900 hp, the Mitsubishi team strove to design the lightest possible airframe around the engine, but that was still strong enough to withstand carrier operations and carry enough fuel and weapons to be an effective fighter. To this end, they were fortunate that the Sumitomo Metal Company had just finished developing a new strong zinc-aluminium alloy known as Extra Super Duralumin (ESD), allowing thinner sheets to be used for the skin of the fighter without loss of strength. However, they also had to dispense with self-sealing fuel tanks and any sort of armour for the pilot. The relatively light but less powerful Oerlikon FF 20 mm cannon was chosen as the fighter's main armament, produced in Japan as the 20 mm Type 99. A large wing ensured a low wing loading to ensure maneuverability but limited the diving and level speeds.
The first flight of the Prototype 12-shi carrier fighter (later designated A6M1) took place on 1 April 1939. The next month, the IJNAF expressed its intentions to switch from the Zuisei-13 to the more powerful Nakajima Sakae-12 ("Prosperity") 14-cylinder radial engine, and it was first installed on the third prototype. This prototype would be designated as the A6M2, and it was with the Sakae radial engine that almost every model of the A6M fighter family would go to war. Testing of the first three A6M prototypes took place later that year. The A6M1 was able to meet all but the maximum speed requirements, but the Sakae-equipped A6M2 exceeded them at 331 mph. On 31 July 1940, the Mitsubishi A6M2 was formally accepted by the IJNAF as the Type 0 Carrier Fighter Model 11.
The A6M2 proved itself during combat in China. The aircraft also performed well during its carrier trials. One problem that did quickly arise was its ability to fit on carrier's elevators. The solution was to have the A6M2 fold its wing tips to avoid damage. This reduced the total wingspan by 20 inches. This change required it to have a new designation. The aircraft was put into production in November of 1941 and a total of 740 were constructed. This particular variant was code-named "Zeke 21" by Allies.
In-game description
At its launch, the A6M2 model 11 knew no equal.
This single-seater carrier-based fighter was designed to replace the aging A5M. To reduce its weight, duralumin was widely used, and its propeller was made of a lightweight aluminum alloy. The A6M2 did not have high survivability due to its lack of armor and self-sealing fuel tanks, but in the first half of World War II, it had a considerable advantage in maneuverability and speed when compared to the Allies (which had nothing to oppose the Zero until the arrival of aircraft such as the F4U and F6F).
The first prototype of this series, the A6M1, first flew on April 1, 1939. During the test, a more powerful engine was proposed, and the Mitsubishi Zuisei 13 (780 hp) was replaced with the Nakajima Sakae 12 (940 hp). After a successful test flight, the new engine was adopted for serial production and the plane was designated the A6M2 Model 11. Its main drawback was that it could not be used on aircraft carriers due to its large wingspan, which was not designed for carrier-based operations. To circumvent this limitation, the A6M2 model 21 was designed with folding 500 mm wing panels.
The Zero had no equal in the sky until the end of 1942, and even when it was finally made obsolete, its production continued until the end of the war, making it the most popular fighter in Japan. Like many other Japanese aircraft, the Zero was used in the last months of the war to attack bombers.
A total of 740 A6M2 model 21s were built in Mitsubishi plants; 326 were built in Nakajima plants.
Notable pilots
-
 Iwamoto flew sorties throughout the Pacific Theater in a A6M2.
Media
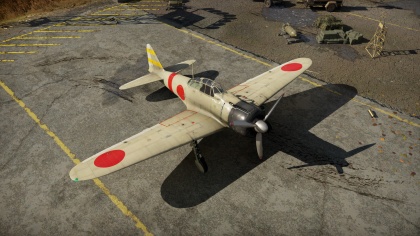
Skin and Camouflages for the A6M2 in Warthunder Live.
See also
Links to the articles on the War Thunder Wiki that you think will be useful for the reader, for example:
- reference to the series of the aircraft;
- links to approximate analogues of other nations and research trees.
External links
| Japan fighters | |
|---|---|
| Navy | |
| Carrier-based fighter | |
| A5M | A5M4 · Hagiri's A5M4 |
| A6M | A6M2 mod. 11 · A6M2 · A6M3 · A6M3 mod. 22 · A6M3 mod. 22Ko · A6M5 · A6M5 Ko · A6M5 otsu · A6M5 Hei · A6M6c |
| A7He | A7He1* |
| A7M | A7M1 (NK9H) · A7M2 |
| Land-based Fighter | |
| J2M | J2M2 · J2M3 · J2M4 Kai · J2M5 · J2M5 (30 mm) |
| J6K | J6K1 |
| J7W | J7W1 |
| N1K-J | N1K1-Ja · N1K2-J · N1K2-Ja |
| Fighter seaplane | |
| N1K | N1K1 |
| A6M-N | A6M2-N |
| Army | |
| Ki-10 | Ki-10-I · Ki-10-I C · Ki-10-II · Ki-10-II C |
| Ki-27 | Ki-27 otsu · Ki-27 otsu Tachiarai |
| Ki-43 | Ki-43-I · Ki-43-II · Ki-43-III otsu |
| Ki-44 | Ki-44-I · Ki-44-I 34 · Ki-44-II otsu · Ki-44-II hei |
| Ki-61 | Ki-61-I ko · Ki-61-I otsu · Ki-61-I hei · Tada's Ki-61-I hei · Ki-61-I tei · Ki-61-II Otsu Kai |
| Ki-84 | Ki-84 ko · Ki-84 otsu · Ki-84 hei |
| Ki-87 | Ki-87 |
| Ki-94 | Ki-94-II |
| Ki-100 | Ki-100 · Ki-100-II |
| Other countries | ▅F4U-1A · ▅P-51C-11-NT · ▅Bf 109 E-7 · ▅Fw 190 A-5 |
| *Imported designation of the He 112 (A6M was in development - A7M would take A7 designation after the cancelation of the A7He) | |


