Difference between pages "Bf 109 E-1" and "Me 264"
(Updated as of 1.89.1.100) |
(New Specs-Card Artimage. Old picture moved to Media: Images) |
||
| Line 1: | Line 1: | ||
| − | {{ | + | {{Specs-Card |
| − | {{Specs-Card| | + | |code=me_264 |
| − | + | |images={{Specs-Card-Image|GarageImage_{{PAGENAME}}.jpg|ArtImage2_{{PAGENAME}}.png}} | |
| − | | | ||
| − | |||
| − | |||
}} | }} | ||
== Description == | == Description == | ||
<!-- ''In the description, the first part should be about the history of and the creation and combat usage of the aircraft, as well as its key features. In the second part, tell the reader about the aircraft in the game. Insert a screenshot of the vehicle, so that if the novice player does not remember the vehicle by name, he will immediately understand what kind of vehicle the article is talking about.'' --> | <!-- ''In the description, the first part should be about the history of and the creation and combat usage of the aircraft, as well as its key features. In the second part, tell the reader about the aircraft in the game. Insert a screenshot of the vehicle, so that if the novice player does not remember the vehicle by name, he will immediately understand what kind of vehicle the article is talking about.'' --> | ||
| − | + | The '''Me 264''' was Messerschmitt's submission to the German Air Ministry's specification for a long-range heavy bomber. Hitler reportedly boasted to Mussolini that Germany would have bombers that could fly all the way to the east coast of the United States by 1941. Messerschmitt had thought of creating a long-range aircraft before and finally saw the Amerika Bomber project as a way to design and produce them. Messerschmitt had tough competition like Junkers and Dornier who had an immense amount of experience building bombers. The final design included four engines and had a range of around 7,000 miles (11,265 km). Eventually, the Me 264 failed to compete with the performance of competition like the Junkers 390, Junkers' proposal with six engines. The Kriegsmarine expressed interest in the project and planned to repurpose the Me 264 as a reconnaissance aircraft for the U-boats. However, Doenitz saw the failures of the program and managed to talk Hitler out of it. Finally, after the prototypes were damaged by the Allied bombing campaigns and constant setbacks, Hermann Göring ordered work be stopped on the Me 264. | |
| − | |||
| − | The ''' | ||
| − | + | Introduced in [[Update 1.89 "Imperial Navy"]], the Me 264 is a powerful and strong heavy bomber. It features an excellent bomb load of up to two 1,800 kg bombs and three 250 kg bombs totalling 4,350 kg. It also has strong defensive capabilities, with two 13 mm turrets and three 20 mm turrets. Combined with the very high altitude bomber air spawn, the Me 264 is a very difficult aircraft for opponents to attack. It's also quite fast for a bomber with an impressive top speed of 519 km/h (324 mph). Players will be satisfied with its performance and capability against both ground targets and enemy aircraft. | |
| − | |||
| − | |||
== General info == | == General info == | ||
=== Flight performance === | === Flight performance === | ||
| − | ''Describe how the aircraft behaves in the air. Speed, manoeuvrability, acceleration and allowable loads - these are the most important characteristics of the vehicle.'' | + | {{Specs-Avia-Flight}} |
| + | <!-- ''Describe how the aircraft behaves in the air. Speed, manoeuvrability, acceleration and allowable loads - these are the most important characteristics of the vehicle.'' --> | ||
| + | The first thing the player will notice is the plane's similarity to the famed B-29, as it shares a similarly designed fuselage and glazed nose, but a different twin tail instead of the large single tail on the B-29. Despite being a heavy bomber, the Me 264 is quite responsive and manoeuvrable. However, you are still a heavy bomber and you shouldn't try to turn with anyone. It is also quite speedy for its rank and classification, able to out-speed some of the planes at its BR when at altitude. | ||
| + | In addition to its powerful engines, the Me 264 can be equipped with rocket boosters that provide additional thrust for a short time. The keybind to activate the feature can be set in Controls > Aircraft > Mechanization > Ignite boosters. These boosters will only appear if the bomber spawns on an airfield. | ||
| − | {| class="wikitable" style="text-align:center" | + | {| class="wikitable" style="text-align:center" width="70%" |
| − | + | ! rowspan="2" | Characteristics | |
| − | + | ! colspan="2" | Max Speed<br>(km/h at 6,000 m) | |
| − | + | ! rowspan="2" | Max altitude<br>(metres) | |
| − | ! | ||
| − | |||
| − | ! colspan="2" | Max Speed<br>(km/h at | ||
| − | ! rowspan="2" | Max altitude<br>( | ||
! colspan="2" | Turn time<br>(seconds) | ! colspan="2" | Turn time<br>(seconds) | ||
| − | ! colspan="2" | Rate of climb<br>( | + | ! colspan="2" | Rate of climb<br>(metres/second) |
| − | ! rowspan="2" | Take-off run<br>( | + | ! rowspan="2" | Take-off run<br>(metres) |
|- | |- | ||
! AB !! RB !! AB !! RB !! AB !! RB | ! AB !! RB !! AB !! RB !! AB !! RB | ||
|- | |- | ||
| − | | | + | ! Stock |
| − | + | | 494 || 477 || rowspan="2" | {{Specs|ceiling}} || 38.4 || 39.4 || 1.2 || 1.2 || rowspan="2" | 900 | |
| − | |||
| − | |||
| − | |||
| − | |||
| − | |||
| − | |||
| − | |||
| − | |||
| − | |||
|- | |- | ||
| − | | | + | ! Upgraded |
| + | | 546 || 519 || 35.8 || 37.0 || 6.6 || 3.5 | ||
|- | |- | ||
|} | |} | ||
==== Details ==== | ==== Details ==== | ||
| − | {| class="wikitable" style="text-align:center" | + | {| class="wikitable" style="text-align:center" width="50%" |
|- | |- | ||
! colspan="5" | Features | ! colspan="5" | Features | ||
|- | |- | ||
| − | ! Combat flaps | + | ! Combat flaps !! Take-off flaps !! Landing flaps !! Air brakes !! Arrestor gear |
| − | ! Take-off flaps | ||
| − | ! Landing flaps | ||
| − | ! Air brakes | ||
| − | ! Arrestor gear | ||
|- | |- | ||
| ✓ || ✓ || ✓ || X || X <!-- ✓ --> | | ✓ || ✓ || ✓ || X || X <!-- ✓ --> | ||
| Line 66: | Line 46: | ||
|} | |} | ||
| − | {| class="wikitable" style="text-align:center" | + | {| class="wikitable" style="text-align:center" width="50%" |
|- | |- | ||
| − | ! colspan=" | + | ! colspan="7" | Limits |
|- | |- | ||
| − | ! rowspan="2" | | + | ! rowspan="2" | Wings (km/h) |
| − | ! rowspan="2" | Gear | + | ! rowspan="2" | Gear (km/h) |
| − | ! | + | ! colspan="3" | Flaps (km/h) |
! colspan="2" | Max Static G | ! colspan="2" | Max Static G | ||
|- | |- | ||
| − | ! + | + | ! Combat !! Take-off !! Landing !! + !! - |
| − | ! - | ||
|- | |- | ||
| − | | {{Specs|destruction| | + | | 609 <!-- {{Specs|destruction|body}} --> || {{Specs|destruction|gear}} || 370 || 357 || 290 || ~6 || ~3 |
|- | |- | ||
|} | |} | ||
| Line 84: | Line 63: | ||
{| class="wikitable" style="text-align:center" | {| class="wikitable" style="text-align:center" | ||
|- | |- | ||
| − | ! colspan="4" | Optimal velocities | + | ! colspan="4" | Optimal velocities (km/h) |
|- | |- | ||
| − | ! Ailerons | + | ! Ailerons !! Rudder !! Elevators !! Radiator |
| − | ! Rudder | ||
| − | ! Elevators | ||
| − | ! Radiator | ||
|- | |- | ||
| − | | < | + | | < 340 || < 350 || < 290 || > 290 |
|- | |- | ||
|} | |} | ||
| − | + | === Survivability and armour === | |
| − | + | {{Specs-Avia-Armour}} | |
| − | ! | + | <!-- ''Examine the survivability of the aircraft. Note how vulnerable the structure is and how secure the pilot is, whether the fuel tanks are armoured, etc. Describe the armour, if there is any, and also mention the vulnerability of other critical aircraft systems.'' --> |
| − | + | ||
| − | + | * 7 mm steel behind and to the left of pilot | |
| − | + | * 9 mm steel to the right of pilot | |
| − | + | * Self-sealing fuel tanks located throughout the wings | |
| − | + | * Unarmoured pilots (can be knocked out in head-ons) | |
| − | |||
| − | |||
| − | |||
| − | |||
| − | |||
| − | + | Despite not being well armoured, the Me 264 Amerikabomber can take quite a beating and has a knack for surviving fires. Due to its four engines, it can lose one or two and still make it back to base for repairs. However, it is one of the largest planes in the game and thus is impossible to miss, so while you can take a lot of damage, you will be receiving a lot as well. | |
| − | |||
| − | + | Although it doesn't have a lot of armour, it has the guns to make up for it. With 3 x MG 151/20's that have access to the dreaded Minengeschoß high-explosive incendiary round complemented by another 3 x MG 131 heavy machine guns, as a few well-placed shots will make short work of any attacker that recklessly tails you. | |
| − | |||
| − | |||
| − | |||
| − | + | === Modifications and economy === | |
| − | + | {{Specs-Economy}} | |
| − | |||
| − | + | The stock payload is quite poor, so pick up the ETC 500/II modification first, followed by the 20 mm belts to add more Minengeschoß rounds, then the ETC 1000/I and ETC 1800. The rest of the modules are up to you, but survivability modules are recommended to withstand the beating you will be getting. | |
| + | == Armaments == | ||
| + | {{Specs-Avia-Armaments}} | ||
=== Suspended armament === | === Suspended armament === | ||
| + | {{Specs-Avia-Suspended}} | ||
<!-- ''Describe the aircraft's suspended armament: additional cannons under the wings, bombs, rockets and torpedoes. This section is especially important for bombers and attackers. If there is no suspended weaponry remove this subsection.'' --> | <!-- ''Describe the aircraft's suspended armament: additional cannons under the wings, bombs, rockets and torpedoes. This section is especially important for bombers and attackers. If there is no suspended weaponry remove this subsection.'' --> | ||
| − | {{main| | + | {{main|SC250JA (250 kg)|SC500K (500 kg)|SC1000L2 (1,000 kg)|SC1800B (1,800 kg)}} |
| + | {{main|PC1000 (1,000 kg)|PC1600 (1,600 kg)}} | ||
The '''''{{PAGENAME}}''''' can be outfitted with the following ordnance: | The '''''{{PAGENAME}}''''' can be outfitted with the following ordnance: | ||
| − | * | + | |
| − | * 4 x | + | * 9 x 250 kg SC250JA bombs (2,250 kg total) |
| − | * 1 x 250 kg SC250JA | + | * 6 x 500 kg SC500K bombs + 3 x 250 kg SC250JA bombs (3,750 kg total) |
| + | * 4 x 1,000 kg SC1000L2 bombs (4,000 kg total) | ||
| + | * 2 x 1,800 kg SC1800B bombs + 3 x 250 kg SC250JA bombs (4,350 kg total) | ||
| + | * 4 x 1,000 kg PC1000 bombs (4,000 kg total) | ||
| + | * 2 x 1,600 kg PC1600 bombs + 3 x 250 kg SC250JA bombs (3,950 kg total) | ||
| + | |||
| + | With a massive 4,000 kg payload, the Me 264 has the second-best payload of any non-premium German bomber and one of the best payloads at its battle rating. The best payload for base-bombing in Air RB is the 2 x SC1800B + 3 x SC250JA bombs, as each of the SC1800s can destroy an RB base at its BR, leaving the SC250s for more base-bombing or artillery positions. The 4 x SC1000 loadout has more TNT, however after bombing 2 bases you will have no more available bombs. In Arcade Battles, no matter the payload you choose, you cannot destroy a base in one go. Even if you drop all of your bombs a little percentage of the base's health will remain and you have to drop another bomb to finish the base. | ||
| + | |||
| + | For the mixed bomb loads, the rule of thumb is that the heaviest bombs drop first and the lighter 250 kg bombs drop last. | ||
| + | |||
| + | === Defensive armament === | ||
| + | {{Specs-Avia-Defensive}} | ||
| + | <!-- ''Defensive armament with turret machine guns or cannons, crewed by gunners. Examine the number of gunners and what belts or drums are better to use. If defensive weaponry is not available, remove this subsection.'' --> | ||
| + | {{main|MG 151 (20 mm)|MG 131 (13 mm)}} | ||
| + | |||
| + | The '''''{{PAGENAME}}''''' is defended by: | ||
| + | |||
| + | * 1 x 13 mm MG 131 machine gun, nose turret (750 rpg) | ||
| + | * 1 x 20 mm MG 151 cannon, front dorsal turret (450 rpg) | ||
| + | * 1 x 20 mm MG 151 cannon, rear dorsal turret (450 rpg) | ||
| + | * 1 x 20 mm MG 151 cannon, ventral turret (750 rpg) | ||
| + | * 1 x 13 mm MG 131 machine gun, 2 x beam turrets (500 rpg) | ||
== Usage in battles == | == Usage in battles == | ||
| − | <!-- ''Describe the tactics of playing in | + | <!-- ''Describe the tactics of playing in the aircraft, the features of using aircraft in a team and advice on tactics. Refrain from creating a "guide" - do not impose a single point of view, but instead, give the reader food for thought. Examine the most dangerous enemies and give recommendations on fighting them. If necessary, note the specifics of the game in different modes (AB, RB, SB).'' --> |
| − | + | ||
| + | The Me 264 plays like your typical heavy bomber: a slow and lumbering beast that has amazing defensive armament and a good payload. While you may have one of the best defensive armaments in the German bomber line (or out of bombers in general), it is best to avoid engagements all together to minimize potential damage due to your massive size. However, if an enemy gets on your tail, they're as good as dead thanks to your superb defensive armament that can shred through planes like paper. Never allow a plane to head-on you. Be sure to face your tail towards the attacker, as more than half of your guns face towards the back and your glazed nose makes it easy to snipe your pilot out. | ||
| + | |||
| + | Due to the Me 264's painfully slow turning circle, fly for a bit before turning around in case you miss a base. Turning around prematurely can result in the base being missed once again. Once you have expended all your bombs, reduce throttle to 0-20% and gradually descend towards your airfield. Unlike other German bombers of this rank, its wings are surprisingly tolerant of higher speeds but it is still important to monitor speeds to avoid overload. | ||
| + | |||
| + | Notable enemies include any heavily armed interceptor that has at least semi-decent performance, but notably the [[P-61C-1|P-61]], [[P-38J-15|P-38J]], [[Mosquito FB Mk VI|Mosquito]] and the [[P-47D-28|P-47D]]s, as all of these planes can climb to your altitude and destroy you with their heavy armament. | ||
| + | |||
| + | The P-61 and P-38J are some of the most deadly, as their powerful armament can tear you in half, especially the P-61 with its quad AN/M2 20 mm cannons. Focus fire on the cockpit in order to snipe the pilot. | ||
| + | |||
| + | The Mosquito is a sort of push-pull. While you can down it easily due to its wooden construction, it can do the same to you with its quad Hispano Mk.II's. Aim for a centre mass near the cockpit, as this is the most vulnerable area or aim for the wings where the fuel tanks are stored and can cause fires. | ||
| + | |||
| + | You can deal with the P-47D's in a similar fashion as the P-61 and P-38J, but you should focus fire on the engine and wings as this can result in fires, broken engines and snapped wings. Watch out for its 8 x .50 cals, as most of the pilots run the Tracer belt which is entirely API-T and is known for starting fires. | ||
| − | + | '''Playstyles''' | |
| − | + | There are three playstyles the 264 can cater to, although the second one is very risky and is not recommended. | |
| − | |||
| − | ''' | + | '''High-Altitude Strategic Bomber''' - The role the 264 was designed for, and the role it excels the most at. Firstly climb to altitude, anywhere from 6-7 km and then maintain that altitude through a level flight and gain some speed, as would-be attackers will struggle to catch you by keeping a constant speed of 400-435 km/h or 250-270 mph. Make your way towards the bases and drop your bombs. |
| − | + | '''Gunship''' - While being significantly more dangerous to the player, the "Gunship" playstyle is infinitely more fun. It is only recommended to use this playstyle when the plane is spaded. Stay relatively low to the ground and attack ground troops, and if any player comes to attack you, focus your guns on them and let them tail you. The main bonus for flying in this way is that your extremely vulnerable belly is covered, preventing anybody from attacking you from there. The only reason this playstyle is viable is that the lower rank players you will encounter are more likely to make mistakes such as tailing you, allowing you to shoot them down for points. | |
| − | |||
| − | ''' | ||
| − | + | '''Bomber Hunter''' - Climb to meet enemy bombers at high-altitude. While the enemy bombers will acknowledge the Me 264, they will rarely react against the Me 264 aside from keeping some air space. Deny their evasive manoeuvres and close-in to the enemy bombers. Once in range, use the 20 mm HEI-T belts and attack the enemy. Attempt to approach the target to make use of as many turrets as possible at a time for a quick end to the engagement. If the bomber's defensive is formidable, try to enter and exit the engagement as fast as possible to avoid significant damage to the Me 264. | |
| − | |||
| − | + | '''When attacking''': | |
| − | + | Never tail a Me 264. Tailing a 264 is basically suicide unless all of their gunners are knocked out. You can treat the 264 almost like a B-29 or B-17 as the planes are very similar in both design and defensive capabilities. It is best to head-on the bomber if you can as you can easily knock out the pilots due to its glazed nose while also taking minimal damage. However, the bomber lacks a ventral turret on its belly, making it easy to deal damage from below, but be wary of the downwards facing rear 20 mm cannon near the tail. When at a higher altitude, it is best to make a dive from an oblique angle and focus fire on the wings and nose. | |
=== Manual Engine Control === | === Manual Engine Control === | ||
| Line 165: | Line 163: | ||
! rowspan="2" | Turbocharger | ! rowspan="2" | Turbocharger | ||
|- | |- | ||
| − | ! Oil | + | ! Oil !! Water !! Type |
| − | ! Water | ||
| − | ! Type | ||
|- | |- | ||
| − | | Not controllable || Controllable<br> | + | | Not controllable || Controllable<br>Auto control available || Not controllable<br>Not auto controlled || Controllable<br>Not auto controlled || Combined || Not controllable<br>3 gears || Not controllable |
|- | |- | ||
|} | |} | ||
| − | |||
| − | |||
| − | |||
| − | |||
| − | |||
| − | |||
| − | |||
| − | |||
| − | |||
| − | |||
| − | |||
| − | |||
| − | |||
| − | |||
| − | |||
| − | |||
| − | |||
| − | |||
| − | |||
| − | |||
| − | |||
| − | |||
| − | |||
| − | |||
| − | |||
| − | |||
| − | |||
| − | |||
| − | |||
| − | |||
| − | |||
| − | |||
| − | |||
| − | |||
| − | |||
| − | |||
| − | |||
| − | |||
| − | |||
=== Pros and cons === | === Pros and cons === | ||
<!-- ''Summarise and briefly evaluate the vehicle in terms of its characteristics and combat effectiveness. Mark its pros and cons in the bulleted list. Try not to use more than 6 points for each of the characteristics. Avoid using categorical definitions such as "bad", "good" and the like - use substitutions with softer forms such as "inadequate" and "effective".'' --> | <!-- ''Summarise and briefly evaluate the vehicle in terms of its characteristics and combat effectiveness. Mark its pros and cons in the bulleted list. Try not to use more than 6 points for each of the characteristics. Avoid using categorical definitions such as "bad", "good" and the like - use substitutions with softer forms such as "inadequate" and "effective".'' --> | ||
| − | |||
'''Pros:''' | '''Pros:''' | ||
| − | * | + | |
| − | * Great | + | * Deadly and accurate defensive armament |
| − | * | + | * Great payload, unmatched by any non-premium until the [[He 177 A-5]] |
| − | * | + | * Decent speed and acceleration for a bomber |
| − | * | + | * Good manoeuvrability |
| − | * | + | * Surprisingly responsive |
| − | * | + | * Fast and very hard to catch once it's at altitude |
| − | * | + | * Durable, can take a beating |
| + | * Engines do not overheat at all when using WEP | ||
'''Cons:''' | '''Cons:''' | ||
| − | * | + | |
| − | * | + | * Gunners have a lot of dead zones |
| − | * | + | * Massive size, one of the biggest planes in the game |
| − | * | + | * Has trouble diving at high speeds |
| + | * No significant armour protection | ||
| + | * Incredibly hard to land, even harder with a damaged airframe | ||
| + | * No air brake | ||
| + | * Very hard to pull the nose down due to high lift | ||
| + | * Limited WEP duration | ||
== History == | == History == | ||
| − | <!-- ''Describe the history of the creation and combat usage of the aircraft in more detail than in the introduction. If the historical reference turns out to be too long, take it to a separate article, taking a link to the article about the vehicle and adding a block "/ History" (example: <nowiki>https://wiki.warthunder.com/(Vehicle-name)/History</nowiki>) and add a link to it here using the <code>main</code> template. Be sure to reference text and sources by using <code><nowiki><ref></ref></nowiki></code>, as well as adding them at the end of the article with <code><nowiki><references /></nowiki></code>. This section may also include the vehicle's dev blog entry (if applicable) and the in-game encyclopedia description (under <code><nowiki>=== In-game description ===</nowiki></code>, also if applicable).'' --> | + | <!-- ''Describe the history of the creation and combat usage of the aircraft in more detail than in the introduction. If the historical reference turns out to be too long, take it to a separate article, taking a link to the article about the vehicle and adding a block "/History" (example: <nowiki>https://wiki.warthunder.com/(Vehicle-name)/History</nowiki>) and add a link to it here using the <code>main</code> template. Be sure to reference text and sources by using <code><nowiki><ref></ref></nowiki></code>, as well as adding them at the end of the article with <code><nowiki><references /></nowiki></code>. This section may also include the vehicle's dev blog entry (if applicable) and the in-game encyclopedia description (under <code><nowiki>=== In-game description ===</nowiki></code>, also if applicable).'' --> |
| − | + | Development of the Me 264 began in the late 1930s when Messerschmitt conducted work on developing a long-range reconnaissance aircraft, designated P.1061. In early 1941, six prototypes of the P.1061 were ordered and the aircraft received the formal designation of Me 264. However, the initial order for six prototypes would shortly afterwards be dropped to three. | |
| − | + | Progress on constructing the ordered prototypes was slow at start, but development quickly picked up the pace with the start of the Amerikabomber project in spring 1942. The project called for new very long range strategic bomber designs, resulting in several designs being proposed, among them also the Me 264. | |
| + | |||
| + | It soon became clear that despite all the advantages of the Me 264 the aircraft would not be able to demonstrate acceptable flight characteristics due to the lack of more powerful engines at that time. Apart from the Amerikabomber project, the Me 264 was also briefly considered by the Kriegsmarine as a possible replacement for the dated Fw 200 in the maritime reconnaissance role. | ||
| + | |||
| + | The first and only prototype of the Me 264 which saw completion, flew on 23 December 1942. While undergoing modifications, the Me 264 project had its further development halted, with the sole completed prototype being used as a transport machine. In 1943, the second prototype was destroyed during an allied bombing raid. The same fate also struck the first and unfinished third prototype in July 1944. After all prototypes were lost, the Me 264 project was officially cancelled in September 1944. | ||
| + | |||
| + | ''- From [[wt:en/news/6190-development-me-264-the-teutonic-superfortress-en|Devblog]]'' | ||
== Media == | == Media == | ||
<!-- ''Excellent additions to the article would be video guides, screenshots from the game, and photos.'' --> | <!-- ''Excellent additions to the article would be video guides, screenshots from the game, and photos.'' --> | ||
| − | * [ | + | |
| − | {{Youtube-gallery| | + | ;Skins |
| + | * [https://live.warthunder.com/feed/camouflages/?vehicle=me_264 Skins and camouflages for the {{PAGENAME}} from live.warthunder.com.] | ||
| + | |||
| + | ;Images | ||
| + | <gallery mode="packed" heights="150px"> | ||
| + | File:Me 264 WTWallpaper 001.jpg | ||
| + | File:Me 264 WTWallpaper 002.jpg | ||
| + | File:Me 264 WTWallpaper 003.jpg | ||
| + | File:Me 264 WTWallpaper 004.jpg | ||
| + | File:Me 264 WTWallpaper 005.jpg | ||
| + | File:Me 264 WTWallpaper 006.jpg | ||
| + | File:Me 264 WTWallpaper 007.jpg | ||
| + | File:ArtImage Me 264.jpg | ||
| + | </gallery> | ||
| + | |||
| + | ;Videos | ||
| + | {{Youtube-gallery|lBTQGGr-Kxs|'''The Shooting Range #149''' - ''Pages of History'' section at 05:10 discusses the Me 264.}} | ||
== See also == | == See also == | ||
| Line 247: | Line 231: | ||
* ''reference to the series of the aircraft;'' | * ''reference to the series of the aircraft;'' | ||
* ''links to approximate analogues of other nations and research trees.'' --> | * ''links to approximate analogues of other nations and research trees.'' --> | ||
| − | * | + | |
| − | * [ | + | ;Aircraft of comparable role, configuration and era |
| + | |||
| + | * Boeing [[B-29A-BN|B-29]] Superfortress | ||
| + | * Tupolev [[Tu-4]] | ||
| + | * Avro [[Lincoln B Mk II|Lincoln]] | ||
| + | * Nakajima [[G8N1]] | ||
| + | * Piaggio [[P.108B serie 1|P.108]] | ||
== External links == | == External links == | ||
| − | ''Paste links to sources and external resources, such as:'' | + | <!-- ''Paste links to sources and external resources, such as:'' |
* ''topic on the official game forum;'' | * ''topic on the official game forum;'' | ||
| − | * '' | + | * ''other literature.'' --> |
| − | * | + | |
| + | * [[wt:en/news/6190-development-me-264-the-teutonic-superfortress-en|[Devblog] Me 264: The Teutonic Superfortress]] | ||
| + | * [https://forum.warthunder.com/index.php?/topic/453535-me-264 Official data sheet - more details about the performance] | ||
| + | * [https://rarehistoricalphotos.com/amerikan-bomber-1942/ <nowiki>[Rare Historical Photos]</nowiki> Messerschmitt Me 264 Amerika bomber] | ||
| − | {{Germany | + | {{AirManufacturer BFW}} |
| + | {{Germany bombers}} | ||
Latest revision as of 01:28, 11 August 2024


Contents
Description
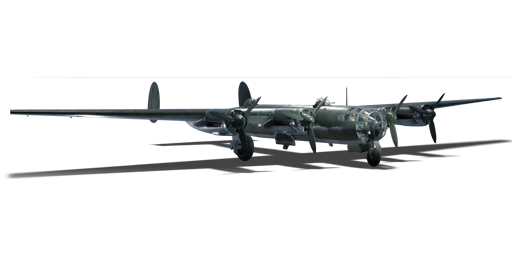
The Me 264 was Messerschmitt's submission to the German Air Ministry's specification for a long-range heavy bomber. Hitler reportedly boasted to Mussolini that Germany would have bombers that could fly all the way to the east coast of the United States by 1941. Messerschmitt had thought of creating a long-range aircraft before and finally saw the Amerika Bomber project as a way to design and produce them. Messerschmitt had tough competition like Junkers and Dornier who had an immense amount of experience building bombers. The final design included four engines and had a range of around 7,000 miles (11,265 km). Eventually, the Me 264 failed to compete with the performance of competition like the Junkers 390, Junkers' proposal with six engines. The Kriegsmarine expressed interest in the project and planned to repurpose the Me 264 as a reconnaissance aircraft for the U-boats. However, Doenitz saw the failures of the program and managed to talk Hitler out of it. Finally, after the prototypes were damaged by the Allied bombing campaigns and constant setbacks, Hermann Göring ordered work be stopped on the Me 264.
Introduced in Update 1.89 "Imperial Navy", the Me 264 is a powerful and strong heavy bomber. It features an excellent bomb load of up to two 1,800 kg bombs and three 250 kg bombs totalling 4,350 kg. It also has strong defensive capabilities, with two 13 mm turrets and three 20 mm turrets. Combined with the very high altitude bomber air spawn, the Me 264 is a very difficult aircraft for opponents to attack. It's also quite fast for a bomber with an impressive top speed of 519 km/h (324 mph). Players will be satisfied with its performance and capability against both ground targets and enemy aircraft.
General info
Flight performance
The first thing the player will notice is the plane's similarity to the famed B-29, as it shares a similarly designed fuselage and glazed nose, but a different twin tail instead of the large single tail on the B-29. Despite being a heavy bomber, the Me 264 is quite responsive and manoeuvrable. However, you are still a heavy bomber and you shouldn't try to turn with anyone. It is also quite speedy for its rank and classification, able to out-speed some of the planes at its BR when at altitude. In addition to its powerful engines, the Me 264 can be equipped with rocket boosters that provide additional thrust for a short time. The keybind to activate the feature can be set in Controls > Aircraft > Mechanization > Ignite boosters. These boosters will only appear if the bomber spawns on an airfield.
| Characteristics | Max Speed (km/h at 6,000 m) |
Max altitude (metres) |
Turn time (seconds) |
Rate of climb (metres/second) |
Take-off run (metres) | |||
|---|---|---|---|---|---|---|---|---|
| AB | RB | AB | RB | AB | RB | |||
| Stock | 494 | 477 | 38.4 | 39.4 | 1.2 | 1.2 | 900 | |
| Upgraded | 546 | 519 | 35.8 | 37.0 | 6.6 | 3.5 | ||
Details
| Features | ||||
|---|---|---|---|---|
| Combat flaps | Take-off flaps | Landing flaps | Air brakes | Arrestor gear |
| ✓ | ✓ | ✓ | X | X |
| Limits | ||||||
|---|---|---|---|---|---|---|
| Wings (km/h) | Gear (km/h) | Flaps (km/h) | Max Static G | |||
| Combat | Take-off | Landing | + | - | ||
| 609 | 370 | 357 | 290 | ~6 | ~3 | |
| Optimal velocities (km/h) | |||
|---|---|---|---|
| Ailerons | Rudder | Elevators | Radiator |
| < 340 | < 350 | < 290 | > 290 |
Survivability and armour
- 7 mm steel behind and to the left of pilot
- 9 mm steel to the right of pilot
- Self-sealing fuel tanks located throughout the wings
- Unarmoured pilots (can be knocked out in head-ons)
Despite not being well armoured, the Me 264 Amerikabomber can take quite a beating and has a knack for surviving fires. Due to its four engines, it can lose one or two and still make it back to base for repairs. However, it is one of the largest planes in the game and thus is impossible to miss, so while you can take a lot of damage, you will be receiving a lot as well.
Although it doesn't have a lot of armour, it has the guns to make up for it. With 3 x MG 151/20's that have access to the dreaded Minengeschoß high-explosive incendiary round complemented by another 3 x MG 131 heavy machine guns, as a few well-placed shots will make short work of any attacker that recklessly tails you.
Modifications and economy
The stock payload is quite poor, so pick up the ETC 500/II modification first, followed by the 20 mm belts to add more Minengeschoß rounds, then the ETC 1000/I and ETC 1800. The rest of the modules are up to you, but survivability modules are recommended to withstand the beating you will be getting.
Armaments
Suspended armament
The Me 264 can be outfitted with the following ordnance:
- 9 x 250 kg SC250JA bombs (2,250 kg total)
- 6 x 500 kg SC500K bombs + 3 x 250 kg SC250JA bombs (3,750 kg total)
- 4 x 1,000 kg SC1000L2 bombs (4,000 kg total)
- 2 x 1,800 kg SC1800B bombs + 3 x 250 kg SC250JA bombs (4,350 kg total)
- 4 x 1,000 kg PC1000 bombs (4,000 kg total)
- 2 x 1,600 kg PC1600 bombs + 3 x 250 kg SC250JA bombs (3,950 kg total)
With a massive 4,000 kg payload, the Me 264 has the second-best payload of any non-premium German bomber and one of the best payloads at its battle rating. The best payload for base-bombing in Air RB is the 2 x SC1800B + 3 x SC250JA bombs, as each of the SC1800s can destroy an RB base at its BR, leaving the SC250s for more base-bombing or artillery positions. The 4 x SC1000 loadout has more TNT, however after bombing 2 bases you will have no more available bombs. In Arcade Battles, no matter the payload you choose, you cannot destroy a base in one go. Even if you drop all of your bombs a little percentage of the base's health will remain and you have to drop another bomb to finish the base.
For the mixed bomb loads, the rule of thumb is that the heaviest bombs drop first and the lighter 250 kg bombs drop last.
Defensive armament
The Me 264 is defended by:
- 1 x 13 mm MG 131 machine gun, nose turret (750 rpg)
- 1 x 20 mm MG 151 cannon, front dorsal turret (450 rpg)
- 1 x 20 mm MG 151 cannon, rear dorsal turret (450 rpg)
- 1 x 20 mm MG 151 cannon, ventral turret (750 rpg)
- 1 x 13 mm MG 131 machine gun, 2 x beam turrets (500 rpg)
Usage in battles
The Me 264 plays like your typical heavy bomber: a slow and lumbering beast that has amazing defensive armament and a good payload. While you may have one of the best defensive armaments in the German bomber line (or out of bombers in general), it is best to avoid engagements all together to minimize potential damage due to your massive size. However, if an enemy gets on your tail, they're as good as dead thanks to your superb defensive armament that can shred through planes like paper. Never allow a plane to head-on you. Be sure to face your tail towards the attacker, as more than half of your guns face towards the back and your glazed nose makes it easy to snipe your pilot out.
Due to the Me 264's painfully slow turning circle, fly for a bit before turning around in case you miss a base. Turning around prematurely can result in the base being missed once again. Once you have expended all your bombs, reduce throttle to 0-20% and gradually descend towards your airfield. Unlike other German bombers of this rank, its wings are surprisingly tolerant of higher speeds but it is still important to monitor speeds to avoid overload.
Notable enemies include any heavily armed interceptor that has at least semi-decent performance, but notably the P-61, P-38J, Mosquito and the P-47Ds, as all of these planes can climb to your altitude and destroy you with their heavy armament.
The P-61 and P-38J are some of the most deadly, as their powerful armament can tear you in half, especially the P-61 with its quad AN/M2 20 mm cannons. Focus fire on the cockpit in order to snipe the pilot.
The Mosquito is a sort of push-pull. While you can down it easily due to its wooden construction, it can do the same to you with its quad Hispano Mk.II's. Aim for a centre mass near the cockpit, as this is the most vulnerable area or aim for the wings where the fuel tanks are stored and can cause fires.
You can deal with the P-47D's in a similar fashion as the P-61 and P-38J, but you should focus fire on the engine and wings as this can result in fires, broken engines and snapped wings. Watch out for its 8 x .50 cals, as most of the pilots run the Tracer belt which is entirely API-T and is known for starting fires.
Playstyles
There are three playstyles the 264 can cater to, although the second one is very risky and is not recommended.
High-Altitude Strategic Bomber - The role the 264 was designed for, and the role it excels the most at. Firstly climb to altitude, anywhere from 6-7 km and then maintain that altitude through a level flight and gain some speed, as would-be attackers will struggle to catch you by keeping a constant speed of 400-435 km/h or 250-270 mph. Make your way towards the bases and drop your bombs.
Gunship - While being significantly more dangerous to the player, the "Gunship" playstyle is infinitely more fun. It is only recommended to use this playstyle when the plane is spaded. Stay relatively low to the ground and attack ground troops, and if any player comes to attack you, focus your guns on them and let them tail you. The main bonus for flying in this way is that your extremely vulnerable belly is covered, preventing anybody from attacking you from there. The only reason this playstyle is viable is that the lower rank players you will encounter are more likely to make mistakes such as tailing you, allowing you to shoot them down for points.
Bomber Hunter - Climb to meet enemy bombers at high-altitude. While the enemy bombers will acknowledge the Me 264, they will rarely react against the Me 264 aside from keeping some air space. Deny their evasive manoeuvres and close-in to the enemy bombers. Once in range, use the 20 mm HEI-T belts and attack the enemy. Attempt to approach the target to make use of as many turrets as possible at a time for a quick end to the engagement. If the bomber's defensive is formidable, try to enter and exit the engagement as fast as possible to avoid significant damage to the Me 264.
When attacking:
Never tail a Me 264. Tailing a 264 is basically suicide unless all of their gunners are knocked out. You can treat the 264 almost like a B-29 or B-17 as the planes are very similar in both design and defensive capabilities. It is best to head-on the bomber if you can as you can easily knock out the pilots due to its glazed nose while also taking minimal damage. However, the bomber lacks a ventral turret on its belly, making it easy to deal damage from below, but be wary of the downwards facing rear 20 mm cannon near the tail. When at a higher altitude, it is best to make a dive from an oblique angle and focus fire on the wings and nose.
Manual Engine Control
| MEC elements | ||||||
|---|---|---|---|---|---|---|
| Mixer | Pitch | Radiator | Supercharger | Turbocharger | ||
| Oil | Water | Type | ||||
| Not controllable | Controllable Auto control available |
Not controllable Not auto controlled |
Controllable Not auto controlled |
Combined | Not controllable 3 gears |
Not controllable |
Pros and cons
Pros:
- Deadly and accurate defensive armament
- Great payload, unmatched by any non-premium until the He 177 A-5
- Decent speed and acceleration for a bomber
- Good manoeuvrability
- Surprisingly responsive
- Fast and very hard to catch once it's at altitude
- Durable, can take a beating
- Engines do not overheat at all when using WEP
Cons:
- Gunners have a lot of dead zones
- Massive size, one of the biggest planes in the game
- Has trouble diving at high speeds
- No significant armour protection
- Incredibly hard to land, even harder with a damaged airframe
- No air brake
- Very hard to pull the nose down due to high lift
- Limited WEP duration
History
Development of the Me 264 began in the late 1930s when Messerschmitt conducted work on developing a long-range reconnaissance aircraft, designated P.1061. In early 1941, six prototypes of the P.1061 were ordered and the aircraft received the formal designation of Me 264. However, the initial order for six prototypes would shortly afterwards be dropped to three.
Progress on constructing the ordered prototypes was slow at start, but development quickly picked up the pace with the start of the Amerikabomber project in spring 1942. The project called for new very long range strategic bomber designs, resulting in several designs being proposed, among them also the Me 264.
It soon became clear that despite all the advantages of the Me 264 the aircraft would not be able to demonstrate acceptable flight characteristics due to the lack of more powerful engines at that time. Apart from the Amerikabomber project, the Me 264 was also briefly considered by the Kriegsmarine as a possible replacement for the dated Fw 200 in the maritime reconnaissance role.
The first and only prototype of the Me 264 which saw completion, flew on 23 December 1942. While undergoing modifications, the Me 264 project had its further development halted, with the sole completed prototype being used as a transport machine. In 1943, the second prototype was destroyed during an allied bombing raid. The same fate also struck the first and unfinished third prototype in July 1944. After all prototypes were lost, the Me 264 project was officially cancelled in September 1944.
- From Devblog
Media
- Skins
- Images


- Videos
See also
- Aircraft of comparable role, configuration and era
External links
- [Devblog] Me 264: The Teutonic Superfortress
- Official data sheet - more details about the performance
- [Rare Historical Photos] Messerschmitt Me 264 Amerika bomber
| Germany bombers | |
|---|---|
| Arado | Ar 196 A-3 |
| Blohm & Voss | BV 138 C-1 · BV 238 |
| Dornier | Do 17 E-1 · Do 17 Z-2 · Do 217 E-2 · Do 217 E-4 · Do 217 K-1 · Do 217 M-1 |
| Focke-Wulf | Fw 189 A-1 · Fw 200 C-1 |
| Henschel | Hs 123 A-1 |
| Heinkel | He 111 H-3 · He 111 H-6 · He 111 H-16 · He 115 C-1 · He 177 A-3 · He 177 A-5 |
| Junkers | Ju 87 B-2 · Ju 87 R-2 · Ju 87 R-2 Libya · Ju 87 D-3 · Ju 87 D-5 · Ju 88 A-1 · Ju 88 A-4 · Ju 188 A-2 · Ju 288 C |
| Messerschmitt | Me 264 |
| Savoia-Marchetti | ▀S.M.79 serie 1 · ▀S.M.79 B · ▀S.M.79 serie 4 · ▀S.M.79 serie 8 |
| ▀S.M.79 AS · ▀S.M.79 bis/N · ▀S.M.79 bis/T.M | |
| Trophies | ▀Wellington Mk Ic |
