Difference between pages "T-34-85" and "T-34 (1st Gv.T.Br.)"
(→Armaments: corrected stats and changed tables to up-to-date format) |
(→Description: Updated description to reflect the unit it is representing) |
||
| Line 1: | Line 1: | ||
| − | |||
{{About | {{About | ||
| about = Soviet medium tank '''{{PAGENAME}}''' | | about = Soviet medium tank '''{{PAGENAME}}''' | ||
| − | | usage = other | + | | usage = other versions |
| link = T-34 (Family) | | link = T-34 (Family) | ||
| + | }} | ||
| + | {{Specs-Card | ||
| + | |code=ussr_t_34_1941_cast_turret | ||
| + | |images={{Specs-Card-Image|GarageImage_{{PAGENAME}}.jpg}} | ||
}} | }} | ||
== Description == | == Description == | ||
| − | <!--''In the description, the first part | + | <!-- ''In the description, the first part should be about the history of the creation and combat usage of the vehicle, as well as its key features. In the second part, tell the reader about the ground vehicle in the game. Insert a screenshot of the vehicle, so that if the novice player does not remember the vehicle by name, he will immediately understand what kind of vehicle the article is talking about.'' --> |
| − | + | The '''T-34 (1941) 1st Guards Tank Brigade''' is a special T-34 (1941), which is the second variant of the [[T-34 (Family)|T-34 medium tank family]] that served in the 1st Guards Tank Brigade (1-ю гвардейскую танковую бригаду). The 1st Guards Tank Brigade originally started as the 4th Tank Brigade, which was formed at Prudboy in the Stalingrad region. Equipped with T-34 and KV-1 tanks, the brigade saw extensive combat during the Battle of Moscow and in recognition of its combat prestige was renamed by Order No. 337 with the title of "Guards" as the 1st Guards Tank Brigade, the very first in the Red Army. The 1st Guards Tank Brigade would continue to see combat for the remainder of World War II. | |
| − | |||
| − | The ''' | ||
| − | + | Introduced in [[Update 1.41]], the T-34 (1st Gv.T.Br.) is a premium version of the [[T-34 (1941)]] painted in the colours of the 1st Guards Tank Army. The playstyle is largely identical to the standard variant. | |
| − | The | + | The T-34 (1st Gv.T.Br.) was sold as a premium pack until it was withdrawn from the store following the [[wt:en/news/55232-shop-winter-sales-special-bundle-and-gift-certificates-en|2018 Winter sales]]. It was later made available in-game for Golden Eagles for a limited time during the "Defender of the Fatherland" mini-events in [[wt:en/news/5345-special-defender-of-the-fatherland-en|2018]], [[wt:en/news/6048-event-defender-of-the-fatherland-en|2019]] and [[wt:en/news/6588-event-defender-of-the-fatherland-en|2020]], the [[wt:en/news/7447-special-80th-anniversary-of-the-battle-of-moscow-en|"80th Anniversary of the Battle of Moscow" mini-event in 2021]], and the [[wt:en/news/8111-esport-defender-tournament-series-en|"Defender Special" mini-event in 2023]]. |
== General info == | == General info == | ||
=== Survivability and armour === | === Survivability and armour === | ||
| − | <!--''Describe armour protection. Note the most well protected and key weak areas. Appreciate the layout of modules as well as the number and location of crew members. Is the level of armour protection sufficient, is the placement of modules helpful for survival in combat?'' | + | {{Specs-Tank-Armour}} |
| + | <!-- ''Describe armour protection. Note the most well protected and key weak areas. Appreciate the layout of modules as well as the number and location of crew members. Is the level of armour protection sufficient, is the placement of modules helpful for survival in combat? If necessary use a visual template to indicate the most secure and weak zones of the armour.'' --> | ||
| + | The armour on the T-34 (1st Gv.T.Br.) is good, it is sloped all around, but don't expect miracles when fighting enemies with high-velocity guns such as StuG III F or PzIV F2. It can bounce most low-velocity AP shells but remember those guns also use HEAT ammo which can penetrate it easily. Hull plates are 40-45 mm thick with driver's hatch being 60 mm. Turret armour is 45 mm all around with gun mantlet being the same. For more detailed armour layout see the table and pictures below. The frontal hull plate's effective thickness is around 75 mm straight on, with it increasing as you angle the tank. With a standard 30° diamond formation you can get it up to 85-100 mm effective thickness. Be careful not to angle too much as your sides become prone to penetration. | ||
| − | + | '''Armour type:''' | |
| − | '''Armour type:''' | ||
| − | *Rolled homogeneous armour | + | * Rolled homogeneous armour |
| − | *Cast homogeneous armour (Turret | + | * Cast homogeneous armour (Turret, Driver's hatch, Machine gun port) |
{| class="wikitable" | {| class="wikitable" | ||
|- | |- | ||
| − | ! Armour !! Front (Slope angle) !! Sides !! Rear !! Roof | + | ! Armour !! Front (Slope angle) !! Sides (Slope angle) !! Rear !! Roof |
| − | |||
| − | |||
|- | |- | ||
| − | | | + | | Hull || 45 mm (60°) ''Front Glacis'' <br /> 45 mm (53°) ''Lower Glacis'' <br> 60 mm (60°) ''Driver's Port'' <br> 45 mm (28-77°) ''Machine Gun Port'' || 40 mm (40°) ''Top Hull'' <br /> 45 mm (0°) ''Lower hull'' || 40 mm (47°) ''Top'' <br> 40 mm (46°) ''Bottom'' || 16 mm |
|- | |- | ||
| − | + | | Turret || 45 mm (3-81°) ''Turret front'' <br> 45 mm (5-74°) ''Gun mantlet'' || 45 mm (29-31°) || 45 mm (30°) || 15 mm | |
|- | |- | ||
| − | |||
|} | |} | ||
'''Notes:''' | '''Notes:''' | ||
| − | + | * Suspensions wheels and tracks are 20 mm thick. | |
| − | * Suspensions wheels | ||
| − | |||
| − | |||
=== Mobility === | === Mobility === | ||
| + | {{Specs-Tank-Mobility}} | ||
<!-- ''Write about the mobility of the ground vehicle. Estimate the specific power and manoeuvrability, as well as the maximum speed forwards and backwards.'' --> | <!-- ''Write about the mobility of the ground vehicle. Estimate the specific power and manoeuvrability, as well as the maximum speed forwards and backwards.'' --> | ||
| − | {{tankMobility|abMinHp= 775|rbMinHp= 442 | + | {{tankMobility|abMinHp=775|rbMinHp=442}} |
| + | |||
| + | With its 17 hp/ton power ratio and a top speed of 49 km/h, it is faster and more mobile than other nations' counterparts (Shermans and Pz.IVs). The tank's transmission is in the back which is also an advantage as you won't get stuck or turned to the side on sharp terrain changes. Use your speed to get to a good advantage point at the start of every battle. The tank can reach 30 km/h easily on flat ground in about 4-5 sec and reaching 45-49 km/h in the next 4-5 sec while not turning. Bear in mind that every slight change of direction will cost you a few km/h - something to think about when relocating under enemy fire. For fast turning in place, it is best to go forward for a second or two, releasing the throttle and steering the tank left or right. This can save you precious seconds when responding to threats on your sides. It is also worth mentioning that turret rotation speed is 17,6°/s. This combined with hull mobility gives you very fast response time when being flanked or when performing a "carousel" manoeuvre. | ||
| + | |||
| + | === Modifications and economy === | ||
| + | {{Specs-Economy}} | ||
== Armaments == | == Armaments == | ||
| + | {{Specs-Tank-Armaments}} | ||
=== Main armament === | === Main armament === | ||
| − | <!--''Give the reader information about the characteristics of the main gun. Assess its effectiveness in a battle based on the reloading speed, ballistics and the power of shells. Do not forget about the flexibility of the fire, that is how quickly the cannon can be aimed at the target, open fire on it and aim at another enemy. Add a link to the main article on the gun: <code><nowiki>{{main|Name of the weapon}}</nowiki></code>. Describe in general terms the ammunition available for the main gun. Give advice on how to use them and how to fill the ammunition storage.''--> | + | {{Specs-Tank-Weapon|1}} |
| − | + | <!-- ''Give the reader information about the characteristics of the main gun. Assess its effectiveness in a battle based on the reloading speed, ballistics and the power of shells. Do not forget about the flexibility of the fire, that is how quickly the cannon can be aimed at the target, open fire on it and aim at another enemy. Add a link to the main article on the gun: <code><nowiki>{{main|Name of the weapon}}</nowiki></code>. Describe in general terms the ammunition available for the main gun. Give advice on how to use them and how to fill the ammunition storage.'' --> | |
| − | + | {{main|F-34 (76 mm)}} | |
| + | |||
| + | The F-34 76 mm main gun is capable of handling most of the tanks you encounter in 1-3 shots, depending on your knowledge of opponents crew/modules layout. Reload time starts with 7.2 sec and can be brought down to 6.0 seconds with level 50 loader's reloading skill and buying expert upgrade for the entire crew. It comes with a variety of ammunition so you're prepared for everything. More details about specific ammo below. The tank also has the coaxial 7.62 DT MG which can be used to shoot at aircraft (don't expect to do much to them) or to injure/knock out exposed crew members in open vehicles (Marder III series, ZiS-30 and various SPAA vehicles). The gun's vertical guidance makes for good elevation but poor depression. For example, most of the German and USA tanks of the rank have -10° depression angle. On the other hand, you can try your luck as SPAA and take down some low-flying attackers/bombers with the main gun. Also, it's worth mentioning that positioning the gun over the engine deck will make your depression even worse, only about -1°. This is due to engine deck cover plates being in the way of your gun mantlet. The area is 90° wide and it may cause some trouble if the enemy gets right on your rear, rendering you unable to hit the desired spot. | ||
| − | |||
{| class="wikitable" style="text-align:center" width="100%" | {| class="wikitable" style="text-align:center" width="100%" | ||
|- | |- | ||
| − | ! colspan="5" | [[ | + | ! colspan="5" | [[F-34 (76 mm)|76 mm F-34]] || colspan="5" | Turret rotation speed (°/s) || colspan="4" | Reloading rate (seconds) |
|- | |- | ||
! Mode !! Capacity !! Vertical !! Horizontal !! Stabilizer | ! Mode !! Capacity !! Vertical !! Horizontal !! Stabilizer | ||
| Line 66: | Line 70: | ||
|- | |- | ||
! ''Arcade'' | ! ''Arcade'' | ||
| − | | rowspan="2" | | + | | rowspan="2" | 77 || rowspan="2" | -5°/+30° || rowspan="2" | ±180° || rowspan="2" | N/A || 23.8 || 32.9 || 40.0 || 44.2 || 47.1 || rowspan="2" | 8.97 || rowspan="2" | 7.94 || rowspan="2" | 7.31 || rowspan="2" | 6.90 |
|- | |- | ||
! ''Realistic'' | ! ''Realistic'' | ||
| − | | 14. | + | | 14.9 || 17.5 || 21.2 || 23.5 || 25.0 |
|- | |- | ||
|} | |} | ||
| − | + | ==== Ammunition ==== | |
| − | + | {{:F-34 (76 mm)/Ammunition|BR-350A (MD-5 fuze), BR-350SP, BR-350B (MD-8 fuze), OF-350M, Sh-354T, D-350A}} | |
| − | + | ==== [[Ammo racks]] ==== | |
| − | + | [[File:Ammoracks_T-34_(1940).png|right|thumb|x250px|[[Ammo racks]] of the T-34 (1940) (identical to T-34 (1941))]] | |
| − | + | <!-- '''Last updated:''' --> | |
| − | |||
| − | |||
| − | |||
| − | |||
| − | |||
| − | |||
| − | |||
| − | |||
| − | |||
| − | |||
| − | |||
| − | |||
| − | |||
| − | |||
| − | |||
| − | |||
| − | |||
| − | |||
| − | |||
| − | |||
| − | |||
| − | |||
| − | |||
| − | |||
| − | |||
| − | |||
| − | |||
| − | |||
| − | |||
| − | |||
| − | |||
| − | |||
| − | |||
| − | |||
| − | |||
| − | |||
| − | |||
| − | |||
| − | |||
| − | |||
| − | |||
| − | |||
| − | |||
| − | |||
| − | |||
| − | |||
| − | |||
| − | |||
| − | |||
| − | |||
| − | |||
| − | [[File: | ||
{| class="wikitable" style="text-align:center" | {| class="wikitable" style="text-align:center" | ||
|- | |- | ||
| Line 138: | Line 90: | ||
! 3rd<br>rack empty | ! 3rd<br>rack empty | ||
! 4th<br>rack empty | ! 4th<br>rack empty | ||
| − | |||
| − | |||
! Visual<br>discrepancy | ! Visual<br>discrepancy | ||
|- | |- | ||
| − | | | + | | '''77''' || 75 ''(+2)'' || 72 ''(+5)'' || 69 ''(+8)'' || 1 ''(+76)'' || No |
|- | |- | ||
|} | |} | ||
| + | '''Note''': | ||
| − | + | * Turret empty: 69 ''(+8)'' shells. | |
=== Machine guns === | === Machine guns === | ||
| − | <!--''Offensive and anti-aircraft machine guns not only allow you to fight some aircraft but also are effective against lightly armoured vehicles. Evaluate machine guns and give recommendations on its use.''--> | + | {{Specs-Tank-Weapon|2}} |
| + | <!-- ''Offensive and anti-aircraft machine guns not only allow you to fight some aircraft but also are effective against lightly armoured vehicles. Evaluate machine guns and give recommendations on its use.'' --> | ||
{{main|DT (7.62 mm)}} | {{main|DT (7.62 mm)}} | ||
| Line 164: | Line 116: | ||
== Usage in battles == | == Usage in battles == | ||
<!-- ''Describe the tactics of playing in the vehicle, the features of using vehicles in the team and advice on tactics. Refrain from creating a "guide" - do not impose a single point of view but instead give the reader food for thought. Describe the most dangerous enemies and give recommendations on fighting them. If necessary, note the specifics of the game in different modes (AB, RB, SB).'' --> | <!-- ''Describe the tactics of playing in the vehicle, the features of using vehicles in the team and advice on tactics. Refrain from creating a "guide" - do not impose a single point of view but instead give the reader food for thought. Describe the most dangerous enemies and give recommendations on fighting them. If necessary, note the specifics of the game in different modes (AB, RB, SB).'' --> | ||
| − | + | This tank will feel the same as the [[T-34 (1940)|T-34 1940]] in many ways. However, the play styles of these tanks could not be more different. The armour of this tank, while the same as the T-34 1940, is no longer as hard to penetrate by rival tanks; however its great mobility and speed more than makeup for this versus its rivals. The proper use of the mobility of this tank is the greatest factor to its successful use. The gun on this tank feels more suited to a tank of this mobility than its predecessor, with much more potential for destroying enemies with one shot, its reload speed allowing for a fast follow up shot before you run to cover. This tank is a great all around tank with the ability to quickly exploit weaknesses in the enemy lines as well as the ability to make a hole in the enemy lines through sheer firepower. | |
| − | + | This tank features great speed and agility combined with a good turret traverse and reload speed. Its armour is also capable of bouncing shots. This tank is best employed in flanking manoeuvres, which focus on using the speed of this vehicle to catch players off-guard. The abundant sloped armour often helps this tank make it safely through the flanks at high speed even if noticed, as poorly aimed enemy shells are often deflected. Armour protection from the front, in general, is quite good especially if angled properly; however, it features many weak spots that can be easily exploited such as the machine gun port. | |
| − | If | + | Pay attention to your team when playing alone. It is easy to rush forward to your favourite place just to find out you're alone and knocked out before slower tanks arrive to help you. If you happen to end up in that situation you can try to run or make a heroic stand. In good hands, the T-34 (1st Gv.T.Br.) is capable of holding off and defeating superior numbers on its own. Keep your tank on the flattest ground as possible so you have gun depression to fire at all times. If the hill is between you and the enemy don't go over it, go around it, since bad gun depression will make you exposed for too long before you can fire. Keep an eye at the minimap at all times for flanking enemies since any T-34 has fuel tanks on each side of the hull (2 on the right and 3 on the left side). One shot to your side and you'll find yourself on fire most of the times. Tanks such as KV-1 can be a tricky thing to handle sometimes, especially at long ranges. With proper aiming and ammo selection, even the sturdy KV-1 can be defeated. When it comes to survival, keep in mind that the T-34 (1st Gv.T.Br.) has several weak spots at the front. This tank's best bet when it is bound to get shot is to start moving. Change your angle and rotate the turret while reloading. That way your weak spots won't be a static target. Hull-down tactics won't work in most cases because of bad gun depression and the fact that turret is no better armoured than the hull. More details about weak spots are in the pictures below, also showing how to defeat a T-34 (1st Gv.T.Br.). In case you lose two crew members, your rate of fire will be decreased drastically. If that happens you're no longer viable as a front line tank and your best bet is to fight from cover, employing so-called "peek-a-boo" tactics. That way you can keep yourself in a fight and always have a safe place to handle long reload. |
| − | '' | + | Against any T-34 including the T-34 (1st Gv.T.Br.) you should try to limit its movement. If fighting from a static position, aim for the gunner just right of the main gun when he's facing you. As mentioned above, when shooting T-34 from the side you have a very high chance of setting him on fire. The only choice you have is will you shot more towards the engine to immobilize him for sure or aim for the crew compartment. Under the turret, on the tank's floor, is a big pile of ammunition; thus, when shooting from the side try to hit the place where ammo and fuel tank overlap. You can also aim just above the ammo rack for a better chance of incapacitating crew members in case ammo does not detonate. |
| − | + | ===Arcade battles=== | |
| + | Use your speed to either cap the specific point and withdraw and/or to place yourself somewhere so you can overwatch the enemy route. Use artillery support to defend capture zones and to keep enemies pinned. Flush enemies out of cover or even destroy them if they do not bother to move. After a few points, you will have an option to participate in air events. You can defend or attack bombers/attackers or call one of your own. Before joining an air event, make sure you are in a safe secluded place, so your tank does not get destroyed while you are away in the sky. Also, pay attention to the mini-map to determine the direction the enemy air strike is coming from. | ||
| − | The | + | ===Realistic/Simulator battles=== |
| − | + | The first thing any tanker should do before playing in these modes is to unlock the "summer camouflage" because you won't fool anyone with that stock white camouflage unless playing on a snowy map. Use your speed to position yourself into ambush position and await your targets. If you are up for more mobile tactics, use terrain and the summer camouflage to your advantages. Pick off one enemy at a time and escape the area. On city maps, use small side streets to keep your enemies guessing of where you will pop up. | |
| − | |||
| − | |||
| − | |||
| − | |||
| − | |||
| − | |||
| − | |||
| − | |||
| − | |||
| − | |||
| − | |||
| − | |||
| − | |||
| − | |||
| − | |||
| − | |||
| − | |||
| − | |||
| − | |||
| − | |||
| − | |||
| − | |||
| − | |||
| − | |||
| − | |||
| − | |||
| − | |||
| − | |||
| − | |||
| − | |||
| − | |||
| − | |||
| − | |||
| − | |||
| − | |||
| − | |||
| − | |||
| − | |||
| − | |||
| − | |||
| − | |||
| − | |||
| − | |||
| − | |||
| − | |||
| − | |||
| − | |||
| − | |||
| − | |||
| − | |||
| − | |||
| − | |||
| − | |||
| − | |||
=== Pros and cons === | === Pros and cons === | ||
| Line 236: | Line 135: | ||
'''Pros:''' | '''Pros:''' | ||
| − | * | + | * Gun has good penetration, and the APHEs have great post-penetration damage |
| − | * | + | * Good rate of fire |
| − | * | + | * Good all-around armour |
| − | * | + | * Good top speed and hull traverse, allowing it to relocate easily |
| − | * | + | * Perfect balance of mobility, protection and firepower |
| − | * | + | * Sloped armour increasing the chance of ricochet |
| − | * | + | * Transmission is in the rear |
| + | * Large choice of ammunition | ||
'''Cons:''' | '''Cons:''' | ||
| − | * | + | * Many weak spots on the front of hull and turret |
| − | * | + | * Large target |
| − | * | + | * Fuel tanks beside the combat compartment, close to the ammo rack, make the tank prone fire, fuel tank detonations and ammo rack detonation chances at the same time |
| − | * | + | * Four crew members so you can only afford to lose one before the rate of fire drops drastically |
| − | * | + | * Default camouflage is winter and makes you stand out on summer maps |
| + | * Bad gun depression of only -5 degrees | ||
| + | * Sun behind the tank with the white paint can cause glare to the player through the monitor | ||
* Awkward to place bushes on upper front hull due to the obstruction of MG port and driver's optics | * Awkward to place bushes on upper front hull due to the obstruction of MG port and driver's optics | ||
== History == | == History == | ||
| − | <!--''Describe the history of the creation and combat usage of the | + | <!-- ''Describe the history of the creation and combat usage of the vehicle in more detail than in the introduction. If the historical reference turns out to be too long, take it to a separate article, taking a link to the article about the vehicle and adding a block "/History" (example: <nowiki>https://wiki.warthunder.com/(Vehicle-name)/History</nowiki>) and add a link to it here using the <code>main</code> template. Be sure to reference text and sources by using <code><nowiki><ref></ref></nowiki></code>, as well as adding them at the end of the article with <code><nowiki><references /></nowiki></code>. This section may also include the vehicle's dev blog entry (if applicable) and the in-game encyclopedia description (under <code><nowiki>=== In-game description ===</nowiki></code>, also if applicable).'' --> |
===Development=== | ===Development=== | ||
| − | + | By 1939, the most numerous tank models in the Red Army were the [[T-26]] and the [[BT-7|BT-series]] light tanks. Though adequate on the days they were introduced, they are now outdated by this time due to the changing technology in anti-tank warfare. Back in 1937, a new tank project was already taking place under engineer Mikhail Koshkin, who was assigned to lead a design team at the Kharkiv Locomotive Factory (KhPZ) for a replacement for the BT light tanks as a new "cavalry tank" to engage in manoeuvre warfare. The first prototype was designated the ''A-20'' with 20 mm of armour, a 45 mm gun, and a diesel engine in a V-12 configuration. The Christie suspension is taken from the BT, even the conversion to drive track-less on roads. But gradually, the new track designs available made this conversion redundant and was excluded in further models. The A-20 also showed the effective research done into sloping armour on previous prototype designs, utilizing an all-around sloping armour on the design. | |
| − | + | It was during this design process that the Russo-Japanese border wars took place and showed the deficiency of the T-26 and BT models. Koshkin then appealed for the initiation of a much better tank concept, the "universal tank" to completely replace the T-26 and BT tanks. The second prototype was the A-32 and has an increased 32 mm of frontal armour with a 76.2 mm L-10 gun. The heavier prototype was still just as mobile as the A-20, and further development into the design increased the frontal armour thickness to 45 mm thick and a newer 76.2 mm L-11 gun attached instead. This model was approved for production and designated the '''T-34''' after the year 1934 when Koshkin believed was when he formulated the idea for the T-34. Koshkin, however, never saw his tanks in action as he succumbed to pneumonia in September 1940 after trials with the T-34 in the cold winter. Thus, the drivetrain developer Alexander Morozov was appointed as the next Chief Designer. The T-34 tank would go on to become the most produced World War II tank, with 84,000 tanks produced in the production span between 1940 to 1958. | |
| + | |||
| + | ===Design=== | ||
| + | The T-34 took all of the Soviet's experiences with tanks and incorporated into the design. The tank had great sloping armour, a powerful engine, wide tracks, and a large gun. At its introduction, the armour of the T-34 was one of the best in the world, by sloping the 45 mm thick armour plate by 60 degrees, the effective thickness was now 90 mm thick. The armour was welded into place instead of riveted as rivets tend to "spall" and cause damage inside the tank even if the armour was not penetrated. The 76.2 mm gun was a major advantage compared to those on its adversaries, as it could be used as a multi-purpose weapon against infantry and tanks, unlike the Germans who had tanks split for two different roles such as the [[Panzer III]] for anti-tank and the [[Panzer IV]] for infantry support. The engine, a Model V-2-34 V12 diesel engine, was adequately powerful for the Christie suspension tank design and allowed the T-34 to reach a maximum of 53 km/h (33 mph). The powerful engine, added with the wide tracks that gave it lower ground pressure, allowed the T-34 to travel across cross-country terrain with relative freedom without risk of bogging down. | ||
| − | + | However, the T-34 is not without its fault and its quality is very questionable in some cases. Two [[T-34 (1941)]] models were sent to United States in late 1942 for evaluations. The evaluations found the armour quality to be rather insufficient, with improper welding in places that can allow leaks and improper alloys that made armour weaker in some places than others, the T-34 cast turret was even found to use softer armour than the hull that render it vulnerable to even 37 mm shells. The gun sights for the 76.2 mm cannon was also quite poor in comparison to the Axis and other Allies. The tank reliability was also troubled by various mechanical issues, especially in the earlier models. Low-quality air filters and insufficient airflow could impede the engine capabilities and the turret drive had poor reliability that could easily jam up. The vision devices were also poor, the crew are unable to see outside the tank with enough situational awareness, even the tank commander couldn't see well out of the tank. Also, the lack of radios on the first few years of T-34s forced the tank commanders to communicate via flags, with only company commanders tanks fitted with the radios. Ergonomics inside the tanks was unsatisfactory and was very cramped inside, with no turret basket the loader has to struggle when the turret rotates and accessing ammunition on the floor boxes makes it a hard and dangerous job for the loader. The commander's hatch on the turret was also one-piece, making even a "heads-up" view for the commander impossible on these large one-piece hatches. Finally, the two-person turret suffered from not only a very cramped compartment but an overworked commander who has to act as a gunner as well. | |
| − | === | + | ===T-34 Mod. 1941=== |
| − | The T-34- | + | The [[T-34 (1941)]] was the main T-34 variant used in 1941 and the second in the T-34/76 series, which is when it entered production. From the Model 1940, the Model 1941 has the newer F-34 76.2 mm gun, plus thicker armour. Otherwise, it was identical to the Model 1940, with a welded/cast two-man turret with a single large hatch on top for the loader and commander. The T-34 parts such as the engine, gun, and electricals are assembled in different factories, then sent to the KhPZ, Stalingrad Tractor Factory (STZ), or the Krasnoye Sormovo Factory for assembling onto the tank. However, it was at this time that the German invaded the Soviet Union in Operation Barbarossa, this forced the factories to be moved all the way to the Ural Mountains to escape the ranges of German conquest and their bombers. Though it is unknown just how many of this model was made, it became part of the 35,120 T-34/76 models created in its production life. |
| − | The | + | ===Combat Usage=== |
| + | Operation Barbarossa in June 22, 1941, was also the first time the T-34 saw combat action. The surprise appearance of the T-34 thoroughly shocked the German forces. Friedrich von Mellenthin has written in his book ''Panzer Battles'' that the Germans "had nothing comparable". The T-34 was impervious to the standard German anti-tank weaponry at the time and they were able to cause much chaos in German lines before being knocked out by either 105 mm howitzers or 88 mm FlaK cannons. In the first stages of Operation Barbarossa, the Soviet Union had 967 T-34s in inventory at the time, which they use in five mechanized corps out of the 29 available. One famous encounter with the T-34 was that it managed to crush a 37 mm Pak 36 under its treads, destroy two [[Panzer II]] light tanks, continue on for 14 km causing many casualties before being taken out. | ||
| − | + | Despite that, the Soviets still suffered major losses in armoured forces in the opening stages of Operation Barbarossa due to a few factors. One is the still unreliable mechanical system in the tank and so many were lost to mechanical issues, another was the lack of wide-scale cooperation between units due to the lack of radios in the tank, causing an inability to respond to changing situations or inform the tank units about targets. The only way tanks in smaller units could communicate with each other is by flags, which requires eyesight and are easily misinterpreted. Crew training was also very insufficient, which added to the lack of coordination between tank units, many tank crew members were only given up to 72 hours of training before being sent to the front. Losses against German gunfire were actually slim in relative to these other problems. | |
| − | |||
| − | + | Nevertheless, the T-34 (1941) variant saw the majority of the action in 1941 and continued to prove a major headache to the German forces wherever they show up. This continued up until the next year, where improved variants of the T-34 were introduced as the [[T-34 (1942)|Model 1942 and 1943]]. All these T-34/76 models continued the fight against Germany in major conflicts for the remainder of the first half of World War II. | |
| − | + | ==== 1st Guards Tank Brigade ==== | |
| + | The 4th Tank Brigade was a part of the Soviet 15th Tank Division and were stationed at Stalingrad at the beginning of the war. When German tanks attacked Russia, full mobilization within hundreds of miles followed. As German units were approaching the capital of Moscow, Soviets began to throw all available units into combat to stop them. On November 11th 1941, the 4th Tank Brigade has redesignated the '''1st Guards Tank Brigade''' due to their combat efforts. It was the very first unit that was designated as "Guards". | ||
| − | During | + | During the summer of 1941. It was noted that many Soviet units were lacking in leadership and were unable to execute orders. Many units were separated not knowing what to do, inflicting traffic jams or not even reaching the battle. Many units were lost to air strike because they just stood and died. It was obvious that not all Soviet forces were capable of fighting effectively or fighting at all. So the designation "Guards" came to be, not only for inspirational purposes but to separate units capable of performing given tasks. For combat efforts or even just for reaching the battle, the "Guards" title was assigned to units. It also gave senior commanders an indication of the unit's "semi-elite" status and their ability to execute difficult tasks. As an "elite" class, the unit sees this designation as a form of honour. |
| − | + | {{break}} | |
| − | + | {{Navigation-Start|{{Annotation|Archive of the in-game description|An archive of the historical description of the vehicle that was presented in-game prior to Update 1.55 'Royal Armour'}}}} | |
| + | {{Navigation-First-Simple-Line}} | ||
| + | The second T-34 model was developed in 1941. The main difference in the T-34 Mod. 1941 was the installation of the new 76 mm F-34 cannon with a 41.5 calibre barrel length. In addition, the shape of the cannon's recoil mechanism armour was changed, along with the method used to attach it. The muzzle velocity of its armour-piercing shell was somewhat higher than that of the L-11 cannon, amounting to 662 m/s. The weapon's armour penetration and gun depression were increased. Its practical rate of fire in combat conditions came to 3-5 shots per minute. Apart from that, the Mod. 1941 tanks were equipped with tracks with more pronounced track grousers. | ||
| − | + | In 1942, versions appeared with cast turrets and new, wider tracks. Shortages of rubber deliveries for manufacturing road wheel bands forced the development of fully metallic wheels. Throughout 1942, an attempt was made to strengthen the tank's armour by laying additional 20-25 mm plates in the turret and frontal hull. The final issue tanks had additional fuel tanks attached to the back of the hull, along with a large number of hand-rails on the turret and hull for ease of carrying tankborne infantry and servicing the vehicle's components. | |
| − | + | All in all, a large number of changes were aimed first and foremost at simplifying production and increasing the T-34's manufacturing speed. Some of these tanks were equipped with ATO-41 flamethrowers. In 1943, a design was presented at factory No. 112 to improve the T-34's armour after the fashion of German tanks. Vehicles with reinforced turrets, hull and side add-on armour were tested on the front in August 1943. Tests in combat conditions showed that the tank's survivability had not significantly increased, so the design was discarded. | |
| − | + | Setting up production in evacuated factories allowed the number of these vehicles in tank units to be significantly increased, and from 1942, the T-34 became the most prolific tank, with more produced than all other types of tanks combined. | |
| − | + | Shown as part of the 1st Guard Tank Brigade in winter camouflage. | |
| − | + | {{Navigation-End}} | |
== Media == | == Media == | ||
<!-- ''Excellent additions to the article would be video guides, screenshots from the game, and photos.'' --> | <!-- ''Excellent additions to the article would be video guides, screenshots from the game, and photos.'' --> | ||
| − | ; | + | ;Skins |
| − | + | ||
| + | * [https://live.warthunder.com/feed/camouflages/?vehicle=ussr_t_34_1941_cast_turret Skins and camouflages for the {{PAGENAME}} from live.warthunder.com.] | ||
== See also == | == See also == | ||
| − | |||
| − | |||
| − | |||
''Links to the articles on the War Thunder Wiki that you think will be useful for the reader, for example:'' | ''Links to the articles on the War Thunder Wiki that you think will be useful for the reader, for example:'' | ||
| Line 306: | Line 212: | ||
<!-- ''Paste links to sources and external resources, such as:'' | <!-- ''Paste links to sources and external resources, such as:'' | ||
* ''topic on the official game forum;'' | * ''topic on the official game forum;'' | ||
| − | |||
* ''other literature.'' --> | * ''other literature.'' --> | ||
| − | |||
| − | |||
| − | |||
| − | |||
| − | |||
| − | + | * [[wt:en/news/3267--en|[Warrior Profile] Dmitry Fyodorovich Lavrinenko]] | |
| − | |||
| + | {{TankManufacturer Morozov}} | ||
{{USSR medium tanks}} | {{USSR medium tanks}} | ||
| + | {{USSR premium ground vehicles}} | ||
Latest revision as of 01:16, 25 March 2024
| This page is about the Soviet medium tank T-34 (1st Gv.T.Br.). For other versions, see T-34 (Family). |
.jpg)
Contents
Description
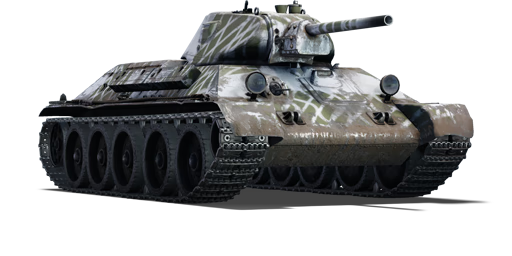
The T-34 (1941) 1st Guards Tank Brigade is a special T-34 (1941), which is the second variant of the T-34 medium tank family that served in the 1st Guards Tank Brigade (1-ю гвардейскую танковую бригаду). The 1st Guards Tank Brigade originally started as the 4th Tank Brigade, which was formed at Prudboy in the Stalingrad region. Equipped with T-34 and KV-1 tanks, the brigade saw extensive combat during the Battle of Moscow and in recognition of its combat prestige was renamed by Order No. 337 with the title of "Guards" as the 1st Guards Tank Brigade, the very first in the Red Army. The 1st Guards Tank Brigade would continue to see combat for the remainder of World War II.
Introduced in Update 1.41, the T-34 (1st Gv.T.Br.) is a premium version of the T-34 (1941) painted in the colours of the 1st Guards Tank Army. The playstyle is largely identical to the standard variant.
The T-34 (1st Gv.T.Br.) was sold as a premium pack until it was withdrawn from the store following the 2018 Winter sales. It was later made available in-game for Golden Eagles for a limited time during the "Defender of the Fatherland" mini-events in 2018, 2019 and 2020, the "80th Anniversary of the Battle of Moscow" mini-event in 2021, and the "Defender Special" mini-event in 2023.
General info
Survivability and armour
The armour on the T-34 (1st Gv.T.Br.) is good, it is sloped all around, but don't expect miracles when fighting enemies with high-velocity guns such as StuG III F or PzIV F2. It can bounce most low-velocity AP shells but remember those guns also use HEAT ammo which can penetrate it easily. Hull plates are 40-45 mm thick with driver's hatch being 60 mm. Turret armour is 45 mm all around with gun mantlet being the same. For more detailed armour layout see the table and pictures below. The frontal hull plate's effective thickness is around 75 mm straight on, with it increasing as you angle the tank. With a standard 30° diamond formation you can get it up to 85-100 mm effective thickness. Be careful not to angle too much as your sides become prone to penetration.
Armour type:
- Rolled homogeneous armour
- Cast homogeneous armour (Turret, Driver's hatch, Machine gun port)
| Armour | Front (Slope angle) | Sides (Slope angle) | Rear | Roof |
|---|---|---|---|---|
| Hull | 45 mm (60°) Front Glacis 45 mm (53°) Lower Glacis 60 mm (60°) Driver's Port 45 mm (28-77°) Machine Gun Port |
40 mm (40°) Top Hull 45 mm (0°) Lower hull |
40 mm (47°) Top 40 mm (46°) Bottom |
16 mm |
| Turret | 45 mm (3-81°) Turret front 45 mm (5-74°) Gun mantlet |
45 mm (29-31°) | 45 mm (30°) | 15 mm |
Notes:
- Suspensions wheels and tracks are 20 mm thick.
Mobility
| Game Mode | Max Speed (km/h) | Weight (tons) | Engine power (horsepower) | Power-to-weight ratio (hp/ton) | |||
|---|---|---|---|---|---|---|---|
| Forward | Reverse | Stock | Upgraded | Stock | Upgraded | ||
| Arcade | Expression error: Unexpected * operator. | 775 | Expression error: Unexpected round operator. | __.__ | |||
| Realistic | 442 | Expression error: Unexpected round operator. | __.__ | ||||
With its 17 hp/ton power ratio and a top speed of 49 km/h, it is faster and more mobile than other nations' counterparts (Shermans and Pz.IVs). The tank's transmission is in the back which is also an advantage as you won't get stuck or turned to the side on sharp terrain changes. Use your speed to get to a good advantage point at the start of every battle. The tank can reach 30 km/h easily on flat ground in about 4-5 sec and reaching 45-49 km/h in the next 4-5 sec while not turning. Bear in mind that every slight change of direction will cost you a few km/h - something to think about when relocating under enemy fire. For fast turning in place, it is best to go forward for a second or two, releasing the throttle and steering the tank left or right. This can save you precious seconds when responding to threats on your sides. It is also worth mentioning that turret rotation speed is 17,6°/s. This combined with hull mobility gives you very fast response time when being flanked or when performing a "carousel" manoeuvre.
Modifications and economy
Armaments
Main armament
The F-34 76 mm main gun is capable of handling most of the tanks you encounter in 1-3 shots, depending on your knowledge of opponents crew/modules layout. Reload time starts with 7.2 sec and can be brought down to 6.0 seconds with level 50 loader's reloading skill and buying expert upgrade for the entire crew. It comes with a variety of ammunition so you're prepared for everything. More details about specific ammo below. The tank also has the coaxial 7.62 DT MG which can be used to shoot at aircraft (don't expect to do much to them) or to injure/knock out exposed crew members in open vehicles (Marder III series, ZiS-30 and various SPAA vehicles). The gun's vertical guidance makes for good elevation but poor depression. For example, most of the German and USA tanks of the rank have -10° depression angle. On the other hand, you can try your luck as SPAA and take down some low-flying attackers/bombers with the main gun. Also, it's worth mentioning that positioning the gun over the engine deck will make your depression even worse, only about -1°. This is due to engine deck cover plates being in the way of your gun mantlet. The area is 90° wide and it may cause some trouble if the enemy gets right on your rear, rendering you unable to hit the desired spot.
| 76 mm F-34 | Turret rotation speed (°/s) | Reloading rate (seconds) | |||||||||||
|---|---|---|---|---|---|---|---|---|---|---|---|---|---|
| Mode | Capacity | Vertical | Horizontal | Stabilizer | Stock | Upgraded | Full | Expert | Aced | Stock | Full | Expert | Aced |
| Arcade | 77 | -5°/+30° | ±180° | N/A | 23.8 | 32.9 | 40.0 | 44.2 | 47.1 | 8.97 | 7.94 | 7.31 | 6.90 |
| Realistic | 14.9 | 17.5 | 21.2 | 23.5 | 25.0 | ||||||||
Ammunition
| Penetration statistics | |||||||
|---|---|---|---|---|---|---|---|
| Ammunition | Type of warhead |
Penetration @ 0° Angle of Attack (mm) | |||||
| 10 m | 100 m | 500 m | 1,000 m | 1,500 m | 2,000 m | ||
| BR-350A (MD-5 fuse) | APHEBC | 87 | 85 | 77 | 69 | 62 | 55 |
| BR-350SP | APBC | 99 | 96 | 87 | 76 | 66 | 58 |
| BR-350B (MD-8 fuse) | APHEBC | 96 | 94 | 84 | 74 | 64 | 56 |
| OF-350M | HE | 10 | 10 | 10 | 10 | 10 | 10 |
| Sh-354T | Shrapnel | 35 | 34 | 30 | 26 | 22 | 19 |
| Shell details | ||||||||||||
|---|---|---|---|---|---|---|---|---|---|---|---|---|
| Ammunition | Type of warhead |
Velocity (m/s) |
Projectile mass (kg) |
Fuse delay (m) |
Fuse sensitivity (mm) |
Explosive mass (TNT equivalent) (g) |
Ricochet | |||||
| 0% | 50% | 100% | ||||||||||
| BR-350A (MD-5 fuse) | APHEBC | 662 | 6.3 | 1.2 | 14 | 150 | 48° | 63° | 71° | |||
| BR-350SP | APBC | 655 | 6.5 | - | - | - | 48° | 63° | 71° | |||
| BR-350B (MD-8 fuse) | APHEBC | 655 | 6.5 | 0.9 | 14 | 100.1 | 48° | 63° | 71° | |||
| OF-350M | HE | 680 | 6.2 | 0.05 | 0.1 | 621 | 79° | 80° | 81° | |||
| Sh-354T | Shrapnel | 618 | 6.44 | 1.2 | 14 | 85 | 62° | 69° | 73° | |||
| Smoke shell characteristics | ||||||
|---|---|---|---|---|---|---|
| Ammunition | Velocity (m/s) |
Projectile mass (kg) |
Screen radius (m) |
Screen deploy time (s) |
Screen hold time (s) |
Explosive mass (TNT equivalent) (g) |
| D-350A | 680 | 6.45 | 13 | 5 | 20 | 50 |
Ammo racks
.png)
| Full ammo |
1st rack empty |
2nd rack empty |
3rd rack empty |
4th rack empty |
Visual discrepancy |
|---|---|---|---|---|---|
| 77 | 75 (+2) | 72 (+5) | 69 (+8) | 1 (+76) | No |
Note:
- Turret empty: 69 (+8) shells.
Machine guns
| 7.62 mm DT | ||||
|---|---|---|---|---|
| Mount | Capacity (Belt) | Fire rate | Vertical | Horizontal |
| Coaxial | 1,890 (63) | 600 | N/A | N/A |
Usage in battles
This tank will feel the same as the T-34 1940 in many ways. However, the play styles of these tanks could not be more different. The armour of this tank, while the same as the T-34 1940, is no longer as hard to penetrate by rival tanks; however its great mobility and speed more than makeup for this versus its rivals. The proper use of the mobility of this tank is the greatest factor to its successful use. The gun on this tank feels more suited to a tank of this mobility than its predecessor, with much more potential for destroying enemies with one shot, its reload speed allowing for a fast follow up shot before you run to cover. This tank is a great all around tank with the ability to quickly exploit weaknesses in the enemy lines as well as the ability to make a hole in the enemy lines through sheer firepower.
This tank features great speed and agility combined with a good turret traverse and reload speed. Its armour is also capable of bouncing shots. This tank is best employed in flanking manoeuvres, which focus on using the speed of this vehicle to catch players off-guard. The abundant sloped armour often helps this tank make it safely through the flanks at high speed even if noticed, as poorly aimed enemy shells are often deflected. Armour protection from the front, in general, is quite good especially if angled properly; however, it features many weak spots that can be easily exploited such as the machine gun port.
Pay attention to your team when playing alone. It is easy to rush forward to your favourite place just to find out you're alone and knocked out before slower tanks arrive to help you. If you happen to end up in that situation you can try to run or make a heroic stand. In good hands, the T-34 (1st Gv.T.Br.) is capable of holding off and defeating superior numbers on its own. Keep your tank on the flattest ground as possible so you have gun depression to fire at all times. If the hill is between you and the enemy don't go over it, go around it, since bad gun depression will make you exposed for too long before you can fire. Keep an eye at the minimap at all times for flanking enemies since any T-34 has fuel tanks on each side of the hull (2 on the right and 3 on the left side). One shot to your side and you'll find yourself on fire most of the times. Tanks such as KV-1 can be a tricky thing to handle sometimes, especially at long ranges. With proper aiming and ammo selection, even the sturdy KV-1 can be defeated. When it comes to survival, keep in mind that the T-34 (1st Gv.T.Br.) has several weak spots at the front. This tank's best bet when it is bound to get shot is to start moving. Change your angle and rotate the turret while reloading. That way your weak spots won't be a static target. Hull-down tactics won't work in most cases because of bad gun depression and the fact that turret is no better armoured than the hull. More details about weak spots are in the pictures below, also showing how to defeat a T-34 (1st Gv.T.Br.). In case you lose two crew members, your rate of fire will be decreased drastically. If that happens you're no longer viable as a front line tank and your best bet is to fight from cover, employing so-called "peek-a-boo" tactics. That way you can keep yourself in a fight and always have a safe place to handle long reload.
Against any T-34 including the T-34 (1st Gv.T.Br.) you should try to limit its movement. If fighting from a static position, aim for the gunner just right of the main gun when he's facing you. As mentioned above, when shooting T-34 from the side you have a very high chance of setting him on fire. The only choice you have is will you shot more towards the engine to immobilize him for sure or aim for the crew compartment. Under the turret, on the tank's floor, is a big pile of ammunition; thus, when shooting from the side try to hit the place where ammo and fuel tank overlap. You can also aim just above the ammo rack for a better chance of incapacitating crew members in case ammo does not detonate.
Arcade battles
Use your speed to either cap the specific point and withdraw and/or to place yourself somewhere so you can overwatch the enemy route. Use artillery support to defend capture zones and to keep enemies pinned. Flush enemies out of cover or even destroy them if they do not bother to move. After a few points, you will have an option to participate in air events. You can defend or attack bombers/attackers or call one of your own. Before joining an air event, make sure you are in a safe secluded place, so your tank does not get destroyed while you are away in the sky. Also, pay attention to the mini-map to determine the direction the enemy air strike is coming from.
Realistic/Simulator battles
The first thing any tanker should do before playing in these modes is to unlock the "summer camouflage" because you won't fool anyone with that stock white camouflage unless playing on a snowy map. Use your speed to position yourself into ambush position and await your targets. If you are up for more mobile tactics, use terrain and the summer camouflage to your advantages. Pick off one enemy at a time and escape the area. On city maps, use small side streets to keep your enemies guessing of where you will pop up.
Pros and cons
Pros:
- Gun has good penetration, and the APHEs have great post-penetration damage
- Good rate of fire
- Good all-around armour
- Good top speed and hull traverse, allowing it to relocate easily
- Perfect balance of mobility, protection and firepower
- Sloped armour increasing the chance of ricochet
- Transmission is in the rear
- Large choice of ammunition
Cons:
- Many weak spots on the front of hull and turret
- Large target
- Fuel tanks beside the combat compartment, close to the ammo rack, make the tank prone fire, fuel tank detonations and ammo rack detonation chances at the same time
- Four crew members so you can only afford to lose one before the rate of fire drops drastically
- Default camouflage is winter and makes you stand out on summer maps
- Bad gun depression of only -5 degrees
- Sun behind the tank with the white paint can cause glare to the player through the monitor
- Awkward to place bushes on upper front hull due to the obstruction of MG port and driver's optics
History
Development
By 1939, the most numerous tank models in the Red Army were the T-26 and the BT-series light tanks. Though adequate on the days they were introduced, they are now outdated by this time due to the changing technology in anti-tank warfare. Back in 1937, a new tank project was already taking place under engineer Mikhail Koshkin, who was assigned to lead a design team at the Kharkiv Locomotive Factory (KhPZ) for a replacement for the BT light tanks as a new "cavalry tank" to engage in manoeuvre warfare. The first prototype was designated the A-20 with 20 mm of armour, a 45 mm gun, and a diesel engine in a V-12 configuration. The Christie suspension is taken from the BT, even the conversion to drive track-less on roads. But gradually, the new track designs available made this conversion redundant and was excluded in further models. The A-20 also showed the effective research done into sloping armour on previous prototype designs, utilizing an all-around sloping armour on the design.
It was during this design process that the Russo-Japanese border wars took place and showed the deficiency of the T-26 and BT models. Koshkin then appealed for the initiation of a much better tank concept, the "universal tank" to completely replace the T-26 and BT tanks. The second prototype was the A-32 and has an increased 32 mm of frontal armour with a 76.2 mm L-10 gun. The heavier prototype was still just as mobile as the A-20, and further development into the design increased the frontal armour thickness to 45 mm thick and a newer 76.2 mm L-11 gun attached instead. This model was approved for production and designated the T-34 after the year 1934 when Koshkin believed was when he formulated the idea for the T-34. Koshkin, however, never saw his tanks in action as he succumbed to pneumonia in September 1940 after trials with the T-34 in the cold winter. Thus, the drivetrain developer Alexander Morozov was appointed as the next Chief Designer. The T-34 tank would go on to become the most produced World War II tank, with 84,000 tanks produced in the production span between 1940 to 1958.
Design
The T-34 took all of the Soviet's experiences with tanks and incorporated into the design. The tank had great sloping armour, a powerful engine, wide tracks, and a large gun. At its introduction, the armour of the T-34 was one of the best in the world, by sloping the 45 mm thick armour plate by 60 degrees, the effective thickness was now 90 mm thick. The armour was welded into place instead of riveted as rivets tend to "spall" and cause damage inside the tank even if the armour was not penetrated. The 76.2 mm gun was a major advantage compared to those on its adversaries, as it could be used as a multi-purpose weapon against infantry and tanks, unlike the Germans who had tanks split for two different roles such as the Panzer III for anti-tank and the Panzer IV for infantry support. The engine, a Model V-2-34 V12 diesel engine, was adequately powerful for the Christie suspension tank design and allowed the T-34 to reach a maximum of 53 km/h (33 mph). The powerful engine, added with the wide tracks that gave it lower ground pressure, allowed the T-34 to travel across cross-country terrain with relative freedom without risk of bogging down.
However, the T-34 is not without its fault and its quality is very questionable in some cases. Two T-34 (1941) models were sent to United States in late 1942 for evaluations. The evaluations found the armour quality to be rather insufficient, with improper welding in places that can allow leaks and improper alloys that made armour weaker in some places than others, the T-34 cast turret was even found to use softer armour than the hull that render it vulnerable to even 37 mm shells. The gun sights for the 76.2 mm cannon was also quite poor in comparison to the Axis and other Allies. The tank reliability was also troubled by various mechanical issues, especially in the earlier models. Low-quality air filters and insufficient airflow could impede the engine capabilities and the turret drive had poor reliability that could easily jam up. The vision devices were also poor, the crew are unable to see outside the tank with enough situational awareness, even the tank commander couldn't see well out of the tank. Also, the lack of radios on the first few years of T-34s forced the tank commanders to communicate via flags, with only company commanders tanks fitted with the radios. Ergonomics inside the tanks was unsatisfactory and was very cramped inside, with no turret basket the loader has to struggle when the turret rotates and accessing ammunition on the floor boxes makes it a hard and dangerous job for the loader. The commander's hatch on the turret was also one-piece, making even a "heads-up" view for the commander impossible on these large one-piece hatches. Finally, the two-person turret suffered from not only a very cramped compartment but an overworked commander who has to act as a gunner as well.
T-34 Mod. 1941
The T-34 (1941) was the main T-34 variant used in 1941 and the second in the T-34/76 series, which is when it entered production. From the Model 1940, the Model 1941 has the newer F-34 76.2 mm gun, plus thicker armour. Otherwise, it was identical to the Model 1940, with a welded/cast two-man turret with a single large hatch on top for the loader and commander. The T-34 parts such as the engine, gun, and electricals are assembled in different factories, then sent to the KhPZ, Stalingrad Tractor Factory (STZ), or the Krasnoye Sormovo Factory for assembling onto the tank. However, it was at this time that the German invaded the Soviet Union in Operation Barbarossa, this forced the factories to be moved all the way to the Ural Mountains to escape the ranges of German conquest and their bombers. Though it is unknown just how many of this model was made, it became part of the 35,120 T-34/76 models created in its production life.
Combat Usage
Operation Barbarossa in June 22, 1941, was also the first time the T-34 saw combat action. The surprise appearance of the T-34 thoroughly shocked the German forces. Friedrich von Mellenthin has written in his book Panzer Battles that the Germans "had nothing comparable". The T-34 was impervious to the standard German anti-tank weaponry at the time and they were able to cause much chaos in German lines before being knocked out by either 105 mm howitzers or 88 mm FlaK cannons. In the first stages of Operation Barbarossa, the Soviet Union had 967 T-34s in inventory at the time, which they use in five mechanized corps out of the 29 available. One famous encounter with the T-34 was that it managed to crush a 37 mm Pak 36 under its treads, destroy two Panzer II light tanks, continue on for 14 km causing many casualties before being taken out.
Despite that, the Soviets still suffered major losses in armoured forces in the opening stages of Operation Barbarossa due to a few factors. One is the still unreliable mechanical system in the tank and so many were lost to mechanical issues, another was the lack of wide-scale cooperation between units due to the lack of radios in the tank, causing an inability to respond to changing situations or inform the tank units about targets. The only way tanks in smaller units could communicate with each other is by flags, which requires eyesight and are easily misinterpreted. Crew training was also very insufficient, which added to the lack of coordination between tank units, many tank crew members were only given up to 72 hours of training before being sent to the front. Losses against German gunfire were actually slim in relative to these other problems.
Nevertheless, the T-34 (1941) variant saw the majority of the action in 1941 and continued to prove a major headache to the German forces wherever they show up. This continued up until the next year, where improved variants of the T-34 were introduced as the Model 1942 and 1943. All these T-34/76 models continued the fight against Germany in major conflicts for the remainder of the first half of World War II.
1st Guards Tank Brigade
The 4th Tank Brigade was a part of the Soviet 15th Tank Division and were stationed at Stalingrad at the beginning of the war. When German tanks attacked Russia, full mobilization within hundreds of miles followed. As German units were approaching the capital of Moscow, Soviets began to throw all available units into combat to stop them. On November 11th 1941, the 4th Tank Brigade has redesignated the 1st Guards Tank Brigade due to their combat efforts. It was the very first unit that was designated as "Guards".
During the summer of 1941. It was noted that many Soviet units were lacking in leadership and were unable to execute orders. Many units were separated not knowing what to do, inflicting traffic jams or not even reaching the battle. Many units were lost to air strike because they just stood and died. It was obvious that not all Soviet forces were capable of fighting effectively or fighting at all. So the designation "Guards" came to be, not only for inspirational purposes but to separate units capable of performing given tasks. For combat efforts or even just for reaching the battle, the "Guards" title was assigned to units. It also gave senior commanders an indication of the unit's "semi-elite" status and their ability to execute difficult tasks. As an "elite" class, the unit sees this designation as a form of honour.
| Archive of the in-game description | |
|---|---|
|
The second T-34 model was developed in 1941. The main difference in the T-34 Mod. 1941 was the installation of the new 76 mm F-34 cannon with a 41.5 calibre barrel length. In addition, the shape of the cannon's recoil mechanism armour was changed, along with the method used to attach it. The muzzle velocity of its armour-piercing shell was somewhat higher than that of the L-11 cannon, amounting to 662 m/s. The weapon's armour penetration and gun depression were increased. Its practical rate of fire in combat conditions came to 3-5 shots per minute. Apart from that, the Mod. 1941 tanks were equipped with tracks with more pronounced track grousers. In 1942, versions appeared with cast turrets and new, wider tracks. Shortages of rubber deliveries for manufacturing road wheel bands forced the development of fully metallic wheels. Throughout 1942, an attempt was made to strengthen the tank's armour by laying additional 20-25 mm plates in the turret and frontal hull. The final issue tanks had additional fuel tanks attached to the back of the hull, along with a large number of hand-rails on the turret and hull for ease of carrying tankborne infantry and servicing the vehicle's components. All in all, a large number of changes were aimed first and foremost at simplifying production and increasing the T-34's manufacturing speed. Some of these tanks were equipped with ATO-41 flamethrowers. In 1943, a design was presented at factory No. 112 to improve the T-34's armour after the fashion of German tanks. Vehicles with reinforced turrets, hull and side add-on armour were tested on the front in August 1943. Tests in combat conditions showed that the tank's survivability had not significantly increased, so the design was discarded. Setting up production in evacuated factories allowed the number of these vehicles in tank units to be significantly increased, and from 1942, the T-34 became the most prolific tank, with more produced than all other types of tanks combined. Shown as part of the 1st Guard Tank Brigade in winter camouflage. | |
Media
- Skins
See also
Links to the articles on the War Thunder Wiki that you think will be useful for the reader, for example:
- reference to the series of the vehicles;
- links to approximate analogues of other nations and research trees.
External links
| Kharkov Design Bureau for Mechanical Engineering named after A. A. Morozov | |
|---|---|
| Light Tanks | |
| BT-5 | BT-5 · RBT-5 |
| BT-7 | BT-7 · BT-7M · BT-7A (F-32) |
| Medium Tanks | |
| T-34-76 | T-34 (Prototype) · T-34 (1940) · T-34 (1941) · T-34 (1st Gv.T.Br.) · T-34 (1942) · T-34E STZ · T-34E |
| T-34-57 | T-34-57 · T-34-57 (1943) |
| T-34-85 | T-34-85 (D-5T) · T-34-85 · T-34-85E |
| T-34-100 | T-34-100 |
| T-44 | T-44 · T-44-100 · T-44-122 |
| Main Battle Tanks | |
| T-54 | T-54 (1947) · T-54 (1949) · T-54 (1951) |
| T-64 | T-64A (1971) · T-64B |
| Export/Captured | |
| T-34 | ▀T 34 747 (r) · ▄T-34 · ▄T-34-85 · ␗T-34 (1943) · ␗Т-34-85 (S-53) |
| T-54 | ▄T-54 |
| See Also | Uralmashzavod · Uralvagonzavod |
| USSR medium tanks | |
|---|---|
| T-28 | T-28 (1938) · T-28 · T-28E |
| T-34-76 | T-34 (Prototype) · T-34 (1940) · T-34 (1941) · T-34 (1st Gv.T.Br.) · T-34 (1942) · T-34E STZ · T-34E |
| T-34-57 | T-34-57 · T-34-57 (1943) |
| T-34-85 | T-34-85 (D-5T) · T-34-85 · T-34-85E |
| T-34-100 | T-34-100 |
| T-44 | T-44 · T-44-100 · T-44-122 |
| T-54 | T-54 (1947) · T-54 (1949) · T-54 (1951) |
| T-55 | TO-55 · T-55A · T-55AM-1 · T-55AMD-1 |
| T-62 | T-62 · T-62M-1 |
| T-64 | Object 435 · T-64A (1971) · T-64B |
| T-72 | T-72A · T-72AV (TURMS-T) · T-72B · T-72B (1989) · T-72B3 · T-72M2 Moderna |
| T-80 | T-80B · T-80U · T-80UD · T-80UK · T-80UM2 · Т-80U-Е1 · T-80BVM · Object 292 |
| T-90 | Т-90А · T-90M |
| Trophies/Lend-Lease | |
| Germany | ▂T-III · ▂T-V |
| Great Britain | ▂МК-IX "Valentine" |
| USA | ▂M3 Medium · ▂M4A2 |
| USSR premium ground vehicles | |
|---|---|
| Light tanks | BA-11 · RBT-5 · BT-7A (F-32) · T-26 (1st Gv.T.Br.) · T-26E · T-126 · PT-76-57 · 2S38 |
| Medium tanks | T-34 (Prototype) · T-34 (1st Gv.T.Br.) · T-34E · T-34-57 (1943) · T-34-85E · T-34-100 · T-44-122 · TO-55 · T-55AM-1 · T-72AV (TURMS-T) · T-80UD · Т-80U-Е1 |
| ▂M3 Medium · ▂M4A2 · ▂T-III · ▂T-V · ▂МК-IX "Valentine" | |
| Heavy tanks | SMK · T-35 · ▂MK-II "Matilda" · KV-1E · KV-2 (1940) · KV-2 (ZiS-6) · KV-122 · KV-220 · IS-2 "Revenge" · Object 248 · IS-6 · T-10A |
| Tank destroyers | BM-8-24 · BM-13N · BM-31-12 |
| SU-57 · SU-76D · SU-76M (5th Gv.Kav.Corps) · SU-85A · SU-100Y · SU-122P · Object 120 | |
| SPAA | ▂Phòng không T-34 · ZUT-37 |
