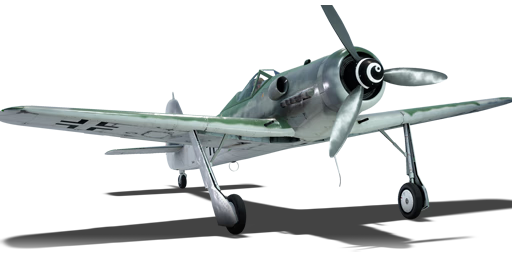
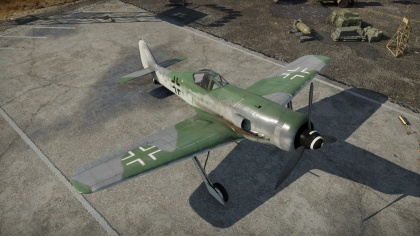
Fw 190 D-12
Contents
| This page is about the aircraft Fw 190 D-12. For other uses, see Fw 190 (Disambiguation) |
Description
The Fw 190 D-12 is a Rank IV German fighter with a battle rating of 6.0 (AB) and 5.3 (RB/SB). It was in the game since the start of the Open Beta Test prior to Update 1.29.
General info
Flight Performance
| Characteristics | |||||||
|---|---|---|---|---|---|---|---|
| Stock | |||||||
| Max Speed (km/h at 9,700 m) |
Max altitude (meters) |
Turn time (seconds) |
Rate of climb (meters/second) |
Take-off run (meters) | |||
| AB | RB | AB | RB | AB | RB | ||
| 690 | 673 | 12,000 | 23.2 | 23.6 | 10.5 | 12.8 | 317 |
| Upgraded | |||||||
| Max Speed (km/h at 9,700 m) |
Max altitude (meters) | Turn time (seconds) | Rate of climb (meters/second) |
Take-off run (meters) | |||
| AB | RB | AB | RB | AB | RB | ||
| 759 | 725 | 12,000 | 20.1 | 21.6 | 26.7 | 17.1 | 317 |
Details
| Features | ||||
|---|---|---|---|---|
| Combat flap | Take-off flap | Landing flap | Air brakes | Arrestor gear |
| X | ✓ | ✓ | X | X |
| Limits | ||||
|---|---|---|---|---|
| Wing-break speed (km/h) |
Gear limit (km/h) |
Combat flap (km/h) |
Max Static G | |
| + | - | |||
| 920 | 920 | N/A | ~21 | ~21 |
| Optimal velocities | |||
|---|---|---|---|
| Ailerons (km/h) |
Rudder (km/h) |
Elevators (km/h) |
Radiator (km/h) |
| < 420 | < 510 | < 510 | > 280 |
| Compressor (RB/SB) | ||
|---|---|---|
| Setting 1 | ||
| Optimal altitude | 100% Engine power | WEP Engine power |
| 3,900 m | 1,632 hp | 2,007 hp |
| Setting 2 | ||
| Optimal altitude | 100% Engine power | WEP Engine power |
| 7,300 m | 1,658 hp | 2,039 hp |
| Setting 3 | ||
| Optimal altitude | 100% Engine power | WEP Engine power |
| 9,700 m | 1,343 hp | 1,652 hp |
Survivability and armour
- 3 mm Steel - Engine cowl armor
- 8 mm Steel - Under cockpit/fuel tank armor
- 5 mm Steel - Rear fuel tank armor
- 8 mm Steel - Pilot's seat armor
- 6 mm Steel - Pilot's seat armor
- 12 mm Steel - Headrest armor
- 57 mm Bulletproof Glassge
Armaments
Offensive armament
The Fw 190 D-12 is armed with:
- 1 x 30 mm MK 108 cannon, nose-mounted (85 rpg)
- 2 x 20 mm MG 151/20 cannon, wing-mounted (220 rpg = 440 total)
Suspended armament
The Fw 190 D-12 can be outfitted with:
- Without load
- 4 x 50 kg SC50JA bombs (200 kg total)
- 8 x 50 kg SC50JA bombs (400 kg total)
- 4 x 50 kg SC50JA bombs + 1 x 250 kg SC250JA bomb (450 kg total)
- 1 x 250 kg SC250JA bomb (250 kg total)
- 1 x 500 kg SC500K bomb (500 kg total)
- 4 x 50 kg SC50JA bombs + 1 x 500 kg SC500K bomb (700 kg total)
Usage in the battles
The Fw 190 D-12 was developed and tested alongside the Fw 190D-13. They share the same airframe and engine performance with the only difference between the D-12 and the D-13 being the cannon mounted in the propeller. (The D-12 was tested with a Mk 108 30 mm cannon while the D-13 was tested with an MG 151 20 mm cannon in the propeller)
Due to the D-12 and D-13 being so similar, you can fly them almost identically. (Keeping in mind the differing armament velocities at longer ranges) the Fw 190 D-12 has a high top speed for its BR, heavy armament with a large ammunition pool, a fantastic engine built for high-altitude performance and it features hydraulic ailerons for an amazing high speed roll rate. It is one of the only prop driven aircraft able to reach speeds exceeding 450 MPH/725 KPH while still retaining some ability to manoeuvre. The D-12 is an energy fighter, the plane relies on speed and engine power to be successful. With it's high burst mass of and the destruction power of the Minengeschoße no bomber in game can survive a short burst. Against fighters the MK 108 is as usual difficult to aim and hit. Not to mention just overkill. As both guns have different ballistics, bind a separate key for your MG 151s. This makes aiming easier, saves ammo and is still sufficient enough against any fighter.
The Fw 190 D-12 is most effective at climbing above your foe and employing standard Boom and Zoom tactics. Keeping in mind that at 700 kph+, the flight surfaces of the Dora series notoriously compress and pulling out at those speeds can be tricky, however, it has been found that because of the fuselage mounted fuel tanks in the Dora series, taking higher fuel loads will cut the amount of time it in takes to pull out of those high speed dives by up to 50% (50% when comparing minimum fuel load to full fuel load.(As of 1.71.1))
One of the most known abilities of the Fw 190 series is their ability to out roll enemies such as the Spitfire that "lock up" at higher speeds. If attacked from above and if the enemy is at a higher speed than the D-12, it is possible to perform a series of rolls called a "scissors". The goal of this manoeuvre is to both avoid the enemy's guns by rolling out of the way as well as allowing that enemy to overshoot, resulting in the Dora pilot tailing the would-be killer. Although difficult, manoeuvres such as these can turn the tables in a one-on-one dogfight and ensure survival.
Attempt every deflection shot possible, and if the rounds are not hitting the target pull harder. It is better to have rounds fly in front of an enemy plane than miles behind them. In order to pull ahead, make good use of combat/landing flaps. However, remember not to activate them at high speeds as they will rip off causing a momentary loss of control.
The role of the Bomb Dora can be done by any 190 D. A wide arrangement of payloads is possible. But none of them is powerful enough to go for strategic bomb zones. In addition the 50 kg bombs can only be dropped in pairs in RB & SB. In combination with the lack of an aiming reticle, it is suggested to not carry the small bombs in addition to your main payload. Bridges, heavy tanks and heavy pillboxes should be the primary target for the 500 kg bomb. The other targets can be destroyed with ease by allied attackers.
Manual Engine Control
| MEC elements | ||||||
|---|---|---|---|---|---|---|
| Mixer | Pitch | Radiator | Supercharger | Turbocharger | ||
| Oil | Water | Type | ||||
| Controllable | Not controllable | Not controllable | Not controllable | Separate | Not ontrollable | Not controllable |
Modules
| Tier | Flight performance | Survivability | Weaponry |
|---|---|---|---|
| I | Fuselage Repair, Radiator | Offensive 20 mm, ETC 71 I | |
| II | Compressor | Airframe | New 13 mm Cannons, ETC 71 II |
| III | Wing Repair, Engine | Offensive 30 mm, ETC 504 I, ETC 504 + ER 4 I | |
| IV | Engine Injection | Cover | New 30 mm Cannons, ETC 504 II, ETC 504 + ER 4 II |
Pros and cons
Pros:
- Excellent energy retention
- Excellent dive acceleration
- Great speed on low altitude
- Great top-speed in a dive
- Great high-speed maneuverability (D-13 is superior)
- Great aileron control and roll speed
- Great & heavy armament
- Good ammo supply
- Good climb-rate
- Water injection ("MW50" -> WEP ingame) lasts atleast 30 minutes
Cons:
- Awful turn-rate below high-speeds
- Enormous turn cycle
- Prone to overheating
- Instructor does not like it (1.43)
History
Describe the history of the creation and combat usage of the aircraft in more detail than in the introduction. If the historical reference turns out to be too big, take it to a separate article, taking a link to an article about the vehicle and adding a block "/ historical reference" (example: https://wiki.warthunder.com/Name-vehicles/historical reference) and add a link to it here using the main template. Be sure to include links to sources at the end of the article.
Media
An excellent addition to the article will be video guides, as well as screenshots from the game and photos.
Read also
Links to the articles on the War Thunder Wiki that you think will be useful for the reader, for example,
- reference to the series of the aircraft;
- links to approximate analogues of other nations and research trees.
Sources
Paste links to sources and external resources, such as:
- topic on the official game forum;
- page on aircraft encyclopedia;
- other literature.
| Germany fighters | |
|---|---|
| Heinkel | |
| He 51 | He 51 A-1 · He 51 B-1 · He 51 B-2/H · He 51 C-1 · He 51 C-1/L |
| He 100 | He 100 D-1 |
| He 112 | He 112 A-0 · He 112 B-0 · He 112 B-1/U2 · He 112 B-2/U2 · He 112 V-5 |
| Messerschmitt | |
| Bf 109 (Jumo) | Flegel's Bf 109 A · Bf 109 B-1 · Bf 109 C-1 · Bf 109 C-1 |
| Bf 109 (DB-601) | Bf 109 E-1 · Bf 109 E-3 · Bf 109 E-4 · Bf 109 E-7/U2 · Bf 109 F-1 · Bf 109 F-2 · Bf 109 F-4 · Bf 109 F-4/trop |
| Bf 109 (DB-605) | Bf 109 G-2/trop · Bf 109 G-2 · Bf 109 G-6 · Bf 109 G-10 · Bf 109 G-14 · Bf 109 K-4 |
| Focke-Wulf | |
| Fw 190 (early) | Fw 190 A-1 · Fw 190 A-4 · Fw 190 A-5 · Fw 190 A-5 · Fw 190 A-5/U2 · Fw 190 A-5/U14 · Fw 190 A-8 · Fw 190 C |
| Fw 190 (late) | Fw 190 D-9 · Fw 190 D-12 · Fw 190 D-13 |
| Ta 152 | Ta 152 C-3 · Ta 152 H-1 |
| Blohm & Voss | |
| BV 155 | BV 155 B-1 |
| Captured: | |
| USA | ▀P-47D-16-RE · ▀P-47D |
| USSR | ▀La-5FN · ▀Yak-1B |
| Britain | ▀Tempest Mk V |
| Italy | |
| CR.42 | ▀CR.42 · ▀Marcolin's C.R.42 CN |
| G.50 | ▀G.50 serie 2 · ▀G.50 AS serie 7 |
| C.200 | ▀C. 200 serie 3 · ▀C. 200 serie 7 |
| C.202 | ▀C. 202 |
| Finland | ▀Hawk H-75A-2 |


