Difference between revisions of "Training Ground"
(Created page with "{{DISPLAYTITLE:Training Ground}} <div class="object-info clearfix" align="justify"> <div class="right-area"> File:MapIcon Ground TrainingGround.jpg|center|408px|link...") |
(No difference)
|
Revision as of 18:18, 28 October 2018
| Game Modes | ||||
|---|---|---|---|---|
Contents
Overview
Training Ground also known as Shooting Range is a special Ground Forces map, not available in normal battles. The map is used in the two tank tutorial missions, and can also be used in user made missions.
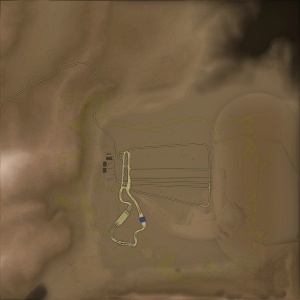
The map is set in a tank training ground. In the north of the training ground there is a shooting range, and in the south there is a mobility testing circuit. The range is 1.1km long (although there is a hill behind it were targets could be placed), and contains a number of concrete firing positions for tanks to use. To the west of shooting range there are a number of large garage like buildings, and a few barracks. There is also a walled off area, presumably for tank parking. A road leaves the training ground through a checkpoint in the northern fence, it heads north for a while before turning and eventually reaching the western edge of the map.
The mobility circuit is in the south of the map. The circuit is marked by four sets of track marks, cut into the otherwise grassy terrain. The route takes tanks through a water ditch, then up and down a steep dirt mound. After that there is a slalom section, and finally a set of concrete bridges, after which the route links back up with the starting location.
The playable area of the tank map is 4km x 4km, however the testing ground only takes up a 2km x 2km area; the rest of the tank map consists of some of the terrain surrounding the testing ground. As the map was only designed for tutorial missions (taking place within the testing ground) the terrain outside the testing ground is much less detailed than it usually is on tank maps. It is possible to fly planes on the map, but as the map is only designed for tank use, aircraft are limited to the same 4km x 4km area as the tanks.
Historical Background
This is a fictional location.
Map configuration
Basic tutorial course: "Tank Control Basics"
This tutorial takes place in tank parking area, and the south of the shooting range. The player uses a T-50, they are told the basic controls, and then drive to the south of the shooting range. They then shoot some Panzer III Ls to learn about basic shooting controls, and finally drive down the shooting range to a capture point. Once there they destroy another tank and capture the point, in order to learn how capture points end.
Basic tutorial course: "Tank Gunnery"
This tutorial uses the south of the shooting range area of the map. The player uses a Panther II (with special ammo for the sake of the tutorial), to shoot at an IS-4M, followed by a T32 (both with modified armour schemes for the sake of the tutorial). In doing so the player learns about different ammo types, and penetration. They then shoot two Panzer II Cs, placed on the hill at the end of the range, to learn about shell drop and aiming.
Strategy
Not applicable
Media
An excellent addition to the article will be video guides, as well as screenshots from the game and photos.
Read also
Links to the articles on the War Thunder Wiki that you think will be useful for the reader, for example,
- reference to the series of the vehicles;
- links to approximate analogues of other nations and research trees.
ETC.
Sources
Paste links to sources and external resources, such as:
- topic on the official game forum;
- other literature.


