Difference between revisions of "2S3M"
(→Ammunition: Updated table templates) |
(added missing info) (Tag: Visual edit) |
||
| Line 12: | Line 12: | ||
{{Specs-Tank-Armour}} | {{Specs-Tank-Armour}} | ||
<!-- ''Describe armour protection. Note the most well protected and key weak areas. Appreciate the layout of modules as well as the number and location of crew members. Is the level of armour protection sufficient, is the placement of modules helpful for survival in combat? If necessary use a visual template to indicate the most secure and weak zones of the armour.'' --> | <!-- ''Describe armour protection. Note the most well protected and key weak areas. Appreciate the layout of modules as well as the number and location of crew members. Is the level of armour protection sufficient, is the placement of modules helpful for survival in combat? If necessary use a visual template to indicate the most secure and weak zones of the armour.'' --> | ||
| − | + | The survivability of the 2S3M is a very situational one. Due to having absolutely no effective armor to stop any munition but small firearms, it is very vulnerable to all damage. However, solid shots such as APCR have a chance to go right through the armor without making any damage whatsoever. The armor of the 2S3M can also partially stop artillery strikes fragmentation depending on the distance between the explosion and the platform. The best armor of the 2S3M is not to be seen. As a howitzer with a very potent weapon, it should be never stay stationary after firing, as this can disclose the location of the platform and be killed. | |
'''Armour type:''' <!-- The types of armour present on the vehicle and their general locations --> | '''Armour type:''' <!-- The types of armour present on the vehicle and their general locations --> | ||
| Line 22: | Line 22: | ||
! Armour !! Front (Slope angle) !! Sides !! Rear !! Roof | ! Armour !! Front (Slope angle) !! Sides !! Rear !! Roof | ||
|- | |- | ||
| − | | Hull || | + | | Hull || 15 mm @ 74° || 15 mm ''Top'' <br> 15 mm ''Bottom'' || 15 mm || 10 - 15 mm |
|- | |- | ||
| − | | Turret || | + | | Turret || 10 - 30 mm ''Turret front'' <br> 20 mm ''Gun mantlet'' || 15 mm || 15 mm || 10 - 15 mm |
|- | |- | ||
| − | | Cupola || | + | | Cupola || 10 mm || 10 mm || 10 mm || 5 mm |
|- | |- | ||
|} | |} | ||
| Line 34: | Line 34: | ||
=== Mobility === | === Mobility === | ||
| − | {{Specs-Tank-Mobility}} | + | The 2S3M is not exactl agile, but it is nowhere near being tanky. It takes time to accelerate and brake due to the heavy weight of the main gun but reaches the top speed fairly easily. It holds a max speed of 60 km/h which is fast for a vehicle. As it is based on the Su-100P hull, it has a very decent turn rate and reverse speed, being able to reach up to 13 km/h while on reverse, faster than almost any Russian vehicle seen at the game. It has a very capable country-cross capability and when track module is researched, it is able to hold a much better turn radious compared to any other Russian vehicle in game.{{Specs-Tank-Mobility}} |
<!-- ''Write about the mobility of the ground vehicle. Estimate the specific power and manoeuvrability, as well as the maximum speed forwards and backwards.'' --> | <!-- ''Write about the mobility of the ground vehicle. Estimate the specific power and manoeuvrability, as well as the maximum speed forwards and backwards.'' --> | ||
| Line 47: | Line 47: | ||
{{Specs-Tank-Weapon|1}} | {{Specs-Tank-Weapon|1}} | ||
<!-- ''Give the reader information about the characteristics of the main gun. Assess its effectiveness in a battle based on the reloading speed, ballistics and the power of shells. Do not forget about the flexibility of the fire, that is how quickly the cannon can be aimed at the target, open fire on it and aim at another enemy. Add a link to the main article on the gun: <code><nowiki>{{main|Name of the weapon}}</nowiki></code>. Describe in general terms the ammunition available for the main gun. Give advice on how to use them and how to fill the ammunition storage.'' --> | <!-- ''Give the reader information about the characteristics of the main gun. Assess its effectiveness in a battle based on the reloading speed, ballistics and the power of shells. Do not forget about the flexibility of the fire, that is how quickly the cannon can be aimed at the target, open fire on it and aim at another enemy. Add a link to the main article on the gun: <code><nowiki>{{main|Name of the weapon}}</nowiki></code>. Describe in general terms the ammunition available for the main gun. Give advice on how to use them and how to fill the ammunition storage.'' --> | ||
| − | {{main|2A33 (152 mm)}} | + | {{main|2A33 (152 mm)}}The 2S3M has access to the 2A33 152 mm howitzer, a very potent gun with a significant firepower. It is the only howitzer in game capable of firing HEAT and ACBC rounds. The performance of the gun leaves nothing to expect, decent muzzle velocity for rounds as well as a slow but steady aiming speed. While it is slower in performance compared to the Type 75 SHP or the Bkan 1C, it holds one of the most devastating rounds in game: the 3OF25. Holding more than 10kg of TNT equivalent explosve mass, it is able to annihilate any ground vehicle with almost any hit. |
{| class="wikitable" style="text-align:center" width="100%" | {| class="wikitable" style="text-align:center" width="100%" | ||
| Line 164: | Line 164: | ||
== Usage in battles == | == Usage in battles == | ||
<!-- ''Describe the tactics of playing in the vehicle, the features of using vehicles in the team and advice on tactics. Refrain from creating a "guide" - do not impose a single point of view but instead give the reader food for thought. Describe the most dangerous enemies and give recommendations on fighting them. If necessary, note the specifics of the game in different modes (AB, RB, SB).'' --> | <!-- ''Describe the tactics of playing in the vehicle, the features of using vehicles in the team and advice on tactics. Refrain from creating a "guide" - do not impose a single point of view but instead give the reader food for thought. Describe the most dangerous enemies and give recommendations on fighting them. If necessary, note the specifics of the game in different modes (AB, RB, SB).'' --> | ||
| − | + | The 2S3M should be used as a support gun, able to take down even the heaviest of targets with a single shot. Teammates should be supported with the power of this weapon as well as the variety of projectiles available to it. It is not to be played as a frontline vehicle due to the immense reload time and aiming of the weapon. However it is a very good guerilla combatant and skirmmisher if used as a backup for frontline vehicles. | |
=== Pros and cons === | === Pros and cons === | ||
| Line 193: | Line 193: | ||
;Skins | ;Skins | ||
| + | |||
* [https://live.warthunder.com/feed/camouflages/?vehicle=ussr_2s3m Skins and camouflages for the {{PAGENAME}} from live.warthunder.com.] | * [https://live.warthunder.com/feed/camouflages/?vehicle=ussr_2s3m Skins and camouflages for the {{PAGENAME}} from live.warthunder.com.] | ||
Revision as of 17:56, 23 June 2022

Contents
Description
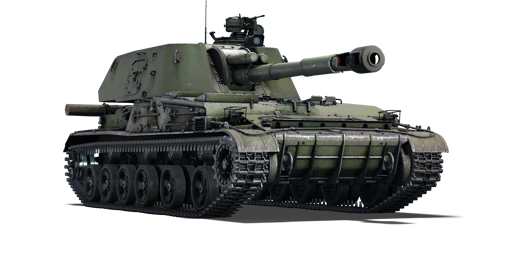
The 2S3M is a rank Soviet tank destroyer with a battle rating of (AB), (RB), and (SB). It was introduced in Update "Winged Lions".
General info
Survivability and armour
The survivability of the 2S3M is a very situational one. Due to having absolutely no effective armor to stop any munition but small firearms, it is very vulnerable to all damage. However, solid shots such as APCR have a chance to go right through the armor without making any damage whatsoever. The armor of the 2S3M can also partially stop artillery strikes fragmentation depending on the distance between the explosion and the platform. The best armor of the 2S3M is not to be seen. As a howitzer with a very potent weapon, it should be never stay stationary after firing, as this can disclose the location of the platform and be killed.
Armour type:
| Armour | Front (Slope angle) | Sides | Rear | Roof |
|---|---|---|---|---|
| Hull | 15 mm @ 74° | 15 mm Top 15 mm Bottom |
15 mm | 10 - 15 mm |
| Turret | 10 - 30 mm Turret front 20 mm Gun mantlet |
15 mm | 15 mm | 10 - 15 mm |
| Cupola | 10 mm | 10 mm | 10 mm | 5 mm |
Notes:
Mobility
The 2S3M is not exactl agile, but it is nowhere near being tanky. It takes time to accelerate and brake due to the heavy weight of the main gun but reaches the top speed fairly easily. It holds a max speed of 60 km/h which is fast for a vehicle. As it is based on the Su-100P hull, it has a very decent turn rate and reverse speed, being able to reach up to 13 km/h while on reverse, faster than almost any Russian vehicle seen at the game. It has a very capable country-cross capability and when track module is researched, it is able to hold a much better turn radious compared to any other Russian vehicle in game.
| Game Mode | Max Speed (km/h) | Weight (tons) | Engine power (horsepower) | Power-to-weight ratio (hp/ton) | |||
|---|---|---|---|---|---|---|---|
| Forward | Reverse | Stock | Upgraded | Stock | Upgraded | ||
| Arcade | Expression error: Unexpected * operator. | 739 | Expression error: Unexpected round operator. | __.__ | |||
| Realistic | 460 | Expression error: Unexpected round operator. | __.__ | ||||
Modifications and economy
Armaments
Main armament
The 2S3M has access to the 2A33 152 mm howitzer, a very potent gun with a significant firepower. It is the only howitzer in game capable of firing HEAT and ACBC rounds. The performance of the gun leaves nothing to expect, decent muzzle velocity for rounds as well as a slow but steady aiming speed. While it is slower in performance compared to the Type 75 SHP or the Bkan 1C, it holds one of the most devastating rounds in game: the 3OF25. Holding more than 10kg of TNT equivalent explosve mass, it is able to annihilate any ground vehicle with almost any hit.| 152 mm 2A33 | Turret rotation speed (°/s) | Reloading rate (seconds) | |||||||||||
|---|---|---|---|---|---|---|---|---|---|---|---|---|---|
| Mode | Capacity | Vertical | Horizontal | Stabilizer | Stock | Upgraded | Full | Expert | Aced | Stock | Full | Expert | Aced |
| Arcade | 46 | -4°/+60° | ±180° | N/A | 8.8 | 12.2 | 14.8 | 16.4 | 17.4 | 17.29 | 15.30 | 14.10 | 13.30 |
| Realistic | 6.0 | 7.0 | 8.5 | 9.4 | 10.0 | ||||||||
Ammunition
| Penetration statistics | |||||||
|---|---|---|---|---|---|---|---|
| Ammunition | Type of warhead |
Penetration @ 0° Angle of Attack (mm) | |||||
| 10 m | 100 m | 500 m | 1,000 m | 1,500 m | 2,000 m | ||
| OF-540 | HE | 49 | 49 | 49 | 49 | 49 | 49 |
| BP-540 | HEAT | 250 | 250 | 250 | 250 | 250 | 250 |
| BR-540B | APHEBC | 166 | 164 | 157 | 148 | 140 | 133 |
| 3OF25 | HE | 62 | 62 | 62 | 62 | 62 | 62 |
| 3OF25 (PF) | HE-VT | 62 | 62 | 62 | 62 | 62 | 62 |
| Shell details | |||||||||
|---|---|---|---|---|---|---|---|---|---|
| Ammunition | Type of warhead |
Velocity (m/s) |
Projectile Mass (kg) |
Fuse delay (m) |
Fuse sensitivity (mm) |
Explosive Mass (TNT equivalent) (g) |
Ricochet | ||
| 0% | 50% | 100% | |||||||
| OF-540 | HE | 655 | 43.56 | 0 | 0.1 | 5,900 | 79° | 80° | 81° |
| BP-540 | HEAT | 680 | 27.67 | 0.05 | 0.1 | 5,910 | 62° | 69° | 73° |
| BR-540B | APHEBC | 600 | 48.96 | 1.2 | 19 | 1,020 | 48° | 63° | 71° |
| 3OF25 | HE | 655 | 43.56 | 0 | 0.1 | 10,120 | 79° | 80° | 81° |
| Shell details | |||||||||||
|---|---|---|---|---|---|---|---|---|---|---|---|
| Ammunition | Type of warhead |
Velocity (m/s) |
Projectile Mass (kg) |
Fuse delay (m) |
Fuse sensitivity (mm) |
Explosive Mass (TNT equivalent) (g) |
Arming distance (m) |
Trigger radius (m) |
Ricochet | ||
| 0% | 50% | 100% | |||||||||
| 3OF25 (PF) | HE-VT | 655 | 43.56 | 0 | 0 | 10,120 | 300 | 3 | 79° | 80° | 81° |
Ammo racks
| Full ammo |
1st rack empty |
2nd rack empty |
3rd rack empty |
4th rack empty |
5th rack empty |
6th rack empty |
Visual discrepancy |
|---|---|---|---|---|---|---|---|
| 46 | __ (+__) | __ (+__) | __ (+__) | __ (+__) | __ (+__) | __ (+__) | __ |
Machine guns
| 7.62 mm PKT | ||||
|---|---|---|---|---|
| Mount | Capacity (Belt) | Fire rate | Vertical | Horizontal |
| Pintle | 1,500 (250) | 700 | -6°/+15° | -160°/+155° |
Usage in battles
The 2S3M should be used as a support gun, able to take down even the heaviest of targets with a single shot. Teammates should be supported with the power of this weapon as well as the variety of projectiles available to it. It is not to be played as a frontline vehicle due to the immense reload time and aiming of the weapon. However it is a very good guerilla combatant and skirmmisher if used as a backup for frontline vehicles.
Pros and cons
Pros:
- Its deadly HE shells can finish anything with overpressure, like Panther II, Tiger II (H), M4A3E2 (76) W, etc.
- Has a variety of shell types: HE, HEAT, HE-VT, APHEBC
- Is turreted, allowing more flexible tactics
- -14 km/h reverse speed is good enough to retreat into cover
- Has a dozer blade to build a dirt cover
- Has NVD for night battles
Cons:
- Thin armour, any weapon larger than a MG is threatening
- Poor -4° gun depression limits its ability in hilly terrains
- Long reload time
- Turret is huge, easy to get spotted and hit
History
Describe the history of the creation and combat usage of the vehicle in more detail than in the introduction. If the historical reference turns out to be too long, take it to a separate article, taking a link to the article about the vehicle and adding a block "/History" (example: https://wiki.warthunder.com/(Vehicle-name)/History) and add a link to it here using the main template. Be sure to reference text and sources by using <ref></ref>, as well as adding them at the end of the article with <references />. This section may also include the vehicle's dev blog entry (if applicable) and the in-game encyclopedia description (under === In-game description ===, also if applicable).
Media
- Skins
- Videos
See also
External links
| USSR tank destroyers | |
|---|---|
| SU-76M | SU-76M · SU-76M (5th Gv.Kav.Corps) · SU-85A |
| SU-57B | SU-57B · SU-76D |
| T-34 Derivatives | SU-122 · SU-85 · SU-85M · SU-100 · SU-122P |
| Heavy Tank Derivatives | SU-100Y · ISU-122 · ISU-122S · SU-152 · ISU-152 · Object 268 |
| SU-100P and Derivatives | SU-100P · Object 120 |
| Wheeled | YaG-10 (29-K) |
| Airborne | ASU-57 · ASU-85 |
| Rocket | BM-8-24 · BM-13N · BM-31-12 |
| ATGM | IT-1 · Shturm-S · Object 775 · Khrizantema-S |
| Artillery | 2S1 · 2S3M |
| Other | SU-5-1 · ZiS-30 · SU-122-54 |
| USA | SU-57 |
