Difference between revisions of "M10 GMC (France)"
(→Mobility) |
(Edits) |
||
| Line 2: | Line 2: | ||
| about = tank destroyer '''{{PAGENAME}}''' | | about = tank destroyer '''{{PAGENAME}}''' | ||
|other | |other | ||
| − | |usage-1 = other | + | |usage-1 = other versions |
| − | |link-1 = M10 ( | + | |link-1 = M10 (Family) |
| − | |usage-2 = other | + | |usage-2 = other uses |
| − | |link-2 = M10 ( | + | |link-2 = M10 (Disambiguation) |
}} | }} | ||
{{Specs-Card | {{Specs-Card | ||
| Line 16: | Line 16: | ||
The '''{{Specs|name}}''' ('''{{Specs|pseudonym}}''') is a rank {{Specs|rank}} French tank destroyer {{Battle-rating}}. It was introduced in [[Update 1.75 "La Résistance"]]. | The '''{{Specs|name}}''' ('''{{Specs|pseudonym}}''') is a rank {{Specs|rank}} French tank destroyer {{Battle-rating}}. It was introduced in [[Update 1.75 "La Résistance"]]. | ||
| − | The M10 GMC takes much from the [[M4A2 | + | The M10 GMC takes much from the [[M4A2]] which it was derived from. The drivetrain is identical with the drive shaft running from the engine in the rear to the front transmission and sprockets. The hull is sloped to a larger degree. The [[M7 (76 mm)|76 mm M7 cannon]] originally mounted on the experimental M6 Heavy Tank lacks the muzzle brake of the 76 mm M1A2 gun used on the later Rank III Sherman's and the [[M18 GMC]]. The turret is a pentagonal shaped M5 Mount type. |
== General info == | == General info == | ||
| Line 23: | Line 23: | ||
<!-- ''Describe armour protection. Note the most well protected and key weak areas. Appreciate the layout of modules as well as the number and location of crew members. Is the level of armour protection sufficient, is the placement of modules helpful for survival in combat? If necessary use a visual template to indicate the most secure and weak zones of the armour.'' --> | <!-- ''Describe armour protection. Note the most well protected and key weak areas. Appreciate the layout of modules as well as the number and location of crew members. Is the level of armour protection sufficient, is the placement of modules helpful for survival in combat? If necessary use a visual template to indicate the most secure and weak zones of the armour.'' --> | ||
| − | The armour of the M10 GMC is essentially decent for the rank, and with proper angling is able to ricochet a lot of shells, however, the armour is not thick enough to resist any of the stronger tank weapons of Rank II and above. The sides and back are quite thin and are not able to resist most weapons stronger than a 12.7 machine gun. The front of the turret can often eat shells as the shell will fragment on the initial armour, and the massive breech of the | + | The armour of the M10 GMC is essentially decent for the rank, and with proper angling is able to ricochet a lot of shells, however, the armour is not thick enough to resist any of the stronger tank weapons of Rank II and above. The sides and back are quite thin and are not able to resist most weapons stronger than a 12.7 mm machine gun. The front of the turret can often eat shells as the shell will fragment on the initial armour, and the massive breech of the 76 mm cannon will often absorb most if not all of the fragmentation, leaving the crew untouched, allowing for a retreat and repair without crew losses. The turret's top is open and because it that it is quite vulnerable to HE shells and planes, and artillery barrages. |
'''Armour type:''' | '''Armour type:''' | ||
| Line 60: | Line 60: | ||
{{Specs-Economy}} | {{Specs-Economy}} | ||
| − | First off get all protection modifications: | + | First off get all protection modifications: Parts and FPE. After that move on to research modifications from the Firepower tree: Horizontal Drive, Adjustment of Fire, and the Elevation Mechanism. Lastly research the Mobility tree: Tracks, Filters, Engine, Transmission, Suspension, Brake System. |
| − | Though the | + | Though the M79 shot stock is an available module in the modifications, it can be at the bottom of prioritization as it currently possess no advantage over the stock M62 shell, having the same shell velocity but with worse penetration at all distances and angles, shallower ricochet angle, higher shell cost. |
== Armaments == | == Armaments == | ||
| Line 71: | Line 71: | ||
{{main|M7 (76 mm)}} | {{main|M7 (76 mm)}} | ||
| − | The 3-inch (76 mm) cannon is a wonderful and powerful gun. APCBC ammo can penetrate any tank on the battlefield even from long range. Because APCBC has enough penetration, the AP ammo is less useful. It is not a bad idea to carry HE ammo as well to fight lightly armoured and open top tanks like the [[M16 MGMC | + | The 3-inch (76 mm) cannon is a wonderful and powerful gun. APCBC ammo can penetrate any tank on the battlefield even from long range. Because APCBC has enough penetration, the AP ammo is less useful. It is not a bad idea to carry HE ammo as well to fight lightly armoured and open top tanks like the [[M16 MGMC]]. The powerful gun and potent ammunition make the M10 a good sniper vehicle at its battle rating, especially with its -10° gun depression, giving the M10 the ability to maximize a hull-down position. Unfortunately, even though this tank destroyer does feature a turret, its turret rotation speed is extremely slow (< 4.0°/s) due to its historic configuration of only possessing a hand crank for the turret traverse. |
{| class="wikitable" style="text-align:center" width="100%" | {| class="wikitable" style="text-align:center" width="100%" | ||
| Line 144: | Line 144: | ||
|- | |- | ||
|} | |} | ||
| − | Note: | + | '''Note''': |
* As they are modeled by sets of 2, shells disappear from the rack only after you fire both shells in the set. | * As they are modeled by sets of 2, shells disappear from the rack only after you fire both shells in the set. | ||
| Line 178: | Line 178: | ||
With a location like that, the M10 can utilise its -10° gun depression and use hull down. Its turret front and mantlet can consistently cause ricochets especially in a downtier. Looming behind bushes, an M10's well aimed shots should be able to knock out most enemy tanks at the battle-rating range from long range. Even if you get spotted, any slope or hard covers will provide protection for you. | With a location like that, the M10 can utilise its -10° gun depression and use hull down. Its turret front and mantlet can consistently cause ricochets especially in a downtier. Looming behind bushes, an M10's well aimed shots should be able to knock out most enemy tanks at the battle-rating range from long range. Even if you get spotted, any slope or hard covers will provide protection for you. | ||
| − | If fighting in a close quarter's environment, do not try to push forward without support. Stay behind friendly tanks in order to support them without being shot at. If in an urban scenario on maps like [[Poland (Ground Forces)|Poland]] or [[Normandy (Ground Forces)|Normandy]], utilize the tank's turning speed to rotate the turret to the right angle. But, the best option is still to find a hull down location. For example, in | + | If fighting in a close quarter's environment, do not try to push forward without support. Stay behind friendly tanks in order to support them without being shot at. If in an urban scenario on maps like [[Poland (Ground Forces)|Poland]] or [[Normandy (Ground Forces)|Normandy]], utilize the tank's turning speed to rotate the turret to the right angle. But, the best option is still to find a hull down location. For example, in Normandy, the best location is towards the C point, where there are hills and dips that can be used to hide the hull, while giving a good view of the battlefield. |
The M10 has a very slow turret rotation speed, but the M10 can traverse faster than it can rotate its turret and use its high speed when at high gear to produce some interesting skids via the physics engine to swerve the M10 and angle its gun at an enemy tank around the corner. It is recommended to understand and get a good feel of the M10's mobility and horsepower on dirt and paved roads before attempting this stunt. The low turret rotation speed means that a M10 player must always be aware of where the enemy tanks are, because they will not be able to turn the turret quickly if the enemy is able to flank the M10. In addition, the M10's side armour is weak, and the ammunition storage is in the hull sides, so if the enemy is able to shoot the M10 at that location, it is very likely to explode the ammo rack and destroy the tank with one shot. | The M10 has a very slow turret rotation speed, but the M10 can traverse faster than it can rotate its turret and use its high speed when at high gear to produce some interesting skids via the physics engine to swerve the M10 and angle its gun at an enemy tank around the corner. It is recommended to understand and get a good feel of the M10's mobility and horsepower on dirt and paved roads before attempting this stunt. The low turret rotation speed means that a M10 player must always be aware of where the enemy tanks are, because they will not be able to turn the turret quickly if the enemy is able to flank the M10. In addition, the M10's side armour is weak, and the ammunition storage is in the hull sides, so if the enemy is able to shoot the M10 at that location, it is very likely to explode the ammo rack and destroy the tank with one shot. | ||
| Line 184: | Line 184: | ||
'''Enemies worth noting:''' | '''Enemies worth noting:''' | ||
| − | [[R3 T20 FA-HS]]: this vehicle is the exact opposite tank when comparing to an M10: extremely high topspeed, great traverse and fast gun rotation. A well-manoeuvred R3 can easily circle around the M10 and shoot AP shells through the thin side, while the M10 struggles to get the gun on target even when traversing the hull with the gun. If you know an R3 is around, you better turn your hull towards the possible direction and be ready to engage. Move the hull with the gun to target quicker. Even if you miss, the M2 Browning can still penetrate the R3 and knock out its crews. Note that a side shot on the R3 does not guarantee a kill as the fuse might not get triggered, and the crew are pretty separated. The R3 can run away and repair for another attack. A frontal shot, however, is likely to one shot it as the crew are all lined up. | + | * [[R3 T20 FA-HS]]: this vehicle is the exact opposite tank when comparing to an M10: extremely high topspeed, great traverse and fast gun rotation. A well-manoeuvred R3 can easily circle around the M10 and shoot AP shells through the thin side, while the M10 struggles to get the gun on target even when traversing the hull with the gun. If you know an R3 is around, you better turn your hull towards the possible direction and be ready to engage. Move the hull with the gun to target quicker. Even if you miss, the M2 Browning can still penetrate the R3 and knock out its crews. Note that a side shot on the R3 does not guarantee a kill as the fuse might not get triggered, and the crew are pretty separated. The R3 can run away and repair for another attack. A frontal shot, however, is likely to one shot it as the crew are all lined up. |
| − | [[8,8 cm Flak 37 Sfl.]]: | + | * [[8,8 cm Flak 37 Sfl.]]: it is rather hard to knock out due to the fact that its armour is so thin that almost every shell will over-penetrate, dealing almost no critical damage. Plus this vehicle mostly face their side to the targets, making it even harder to kill them as the crew are all far apart. So it can usually take quite some hits and take out the shooters one by one. As the shooter, aim for the left side of its turret first to disable its gunner first, then knock out the rest of its crew (right turret & driving compartment). Do not hope that the M2 HB can knock out the crew members, the truck's armour is too thick for any MG to penetrate. |
=== Pros and cons === | === Pros and cons === | ||
| Line 193: | Line 193: | ||
'''Pros:''' | '''Pros:''' | ||
| − | * Main cannon penetration and damage is very good for the rank, can knock out many tanks in one hit. For example the Chi-Nu, Pz.IV | + | * Main cannon penetration and damage is very good for the rank, can knock out many tanks in one hit. For example the [[Chi-Nu]], [[Pz.IV F2]], [[StuG III F]] or even the [[Tiger H1]] when aiming carefully |
| − | * Good gun depression of -10°, perfect for hull-down positions | + | * Good gun depression of -10°, perfect for hull-down positions |
| − | * Front armour can resist certain shots: front glacis steeply sloped and the huge, V-shaped gun mantlet can often bounce / absorb shells ( | + | * Front armour can resist certain shots: front glacis steeply sloped and the huge, V-shaped gun mantlet can often bounce / absorb shells (e.g. 75 mm M3 and 76 mm F-34 / ZiS-5), as well as the large gun breech behind it further protecting the turret crew |
| − | * 5 | + | * 5 crew members, plus one more with [[Crew Replenishment]] modification |
| − | * Turreted purpose-built tank destroyer allows for wide field of fire compared to casemate designs | + | * Turreted purpose-built tank destroyer allows for wide field of fire compared to casemate designs |
| − | * Pintle mounted HMG can offer effective anti-aircraft fire | + | * Pintle-mounted HMG can offer effective anti-aircraft fire |
| − | * Access to | + | * Access to the [[Add-on Armor|add-on armour]] modification |
| − | * Has relatively no problem when getting uptiered | + | * Has relatively no problem when getting uptiered |
'''Cons:''' | '''Cons:''' | ||
* Very poor turret traverse speed combined with its rather sluggish hull traverse "locks" it as a long range sniper for most players- close quarters combat is very difficult and great situational awareness is required, as it often cannot get its gun on target in time. It is also vulnerable to flankers like the Sd.Kfz.234/2 | * Very poor turret traverse speed combined with its rather sluggish hull traverse "locks" it as a long range sniper for most players- close quarters combat is very difficult and great situational awareness is required, as it often cannot get its gun on target in time. It is also vulnerable to flankers like the Sd.Kfz.234/2 | ||
| − | * Base armour is quite thin, can get easily penetrated by common opponents like the | + | * Base armour is quite thin, can get easily penetrated by common opponents like the Pz.IV F2 or the US [[M10 GMC]] |
| − | * Open topped, vulnerable to aircraft strafing | + | * Open-topped, vulnerable to aircraft strafing and overpressure |
| − | * Poor reverse speed can sometimes get the | + | * Poor reverse speed can sometimes get the vehicle destroyed |
== History == | == History == | ||
| Line 221: | Line 221: | ||
;Skins | ;Skins | ||
| − | * [https://live.warthunder.com/feed/camouflages/? | + | * [https://live.warthunder.com/feed/camouflages/?vehicle=fr_m10 Skins and camouflages for the {{PAGENAME}} from live.warthunder.com.] |
;Videos | ;Videos | ||
| Line 234: | Line 234: | ||
* [[M10 (Family)]] | * [[M10 (Family)]] | ||
* [[M36 Jackson (Family)]] | * [[M36 Jackson (Family)]] | ||
| − | |||
| − | |||
| − | |||
== External links == | == External links == | ||
Revision as of 07:05, 24 April 2022
| This page is about the tank destroyer M10 GMC (France). For other versions, see M10 (Family). For other uses, see M10 (Disambiguation). |
.jpg)
Contents
Description
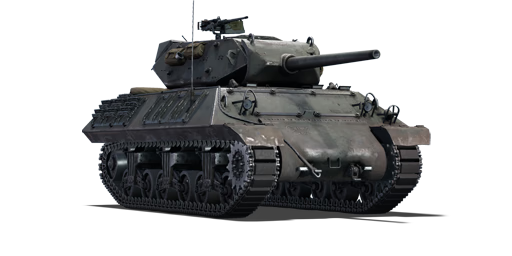
The ▄3-inch Gun Motor Carriage M10 (▄M10 GMC) is a rank French tank destroyer with a battle rating of (AB), (RB), and (SB). It was introduced in Update 1.75 "La Résistance".
The M10 GMC takes much from the M4A2 which it was derived from. The drivetrain is identical with the drive shaft running from the engine in the rear to the front transmission and sprockets. The hull is sloped to a larger degree. The 76 mm M7 cannon originally mounted on the experimental M6 Heavy Tank lacks the muzzle brake of the 76 mm M1A2 gun used on the later Rank III Sherman's and the M18 GMC. The turret is a pentagonal shaped M5 Mount type.
General info
Survivability and armour
The armour of the M10 GMC is essentially decent for the rank, and with proper angling is able to ricochet a lot of shells, however, the armour is not thick enough to resist any of the stronger tank weapons of Rank II and above. The sides and back are quite thin and are not able to resist most weapons stronger than a 12.7 mm machine gun. The front of the turret can often eat shells as the shell will fragment on the initial armour, and the massive breech of the 76 mm cannon will often absorb most if not all of the fragmentation, leaving the crew untouched, allowing for a retreat and repair without crew losses. The turret's top is open and because it that it is quite vulnerable to HE shells and planes, and artillery barrages.
Armour type:
- Rolled homogeneous armour
- Cast homogeneous armour (Gun mantlet, Transmission carter)
- Structural steel (Counterweight)
| Armour | Front (Slope angle) | Sides | Rear | Roof |
|---|---|---|---|---|
| Hull | 38.1 mm (55°) Upper glacis - Top 50.8 mm (55°) Upper glacis - Bottom 50.8 mm (cylindrical) Transmission carter 50.8 mm (51°) Lower glacis |
19.05 mm (38°) Top 25.4 mm Bottom |
19.05 mm (28°) Top 25.4 mm (7°) Lower plate 25.4 mm (51°) Lower glacis |
38.1 mm (35°) Front glacis 19.05 mm Centre half 9.5 mm Rear half |
| Turret | 25.4 mm (68-89°) Turret front 57.15 mm (44-45°) Gun mantlet |
100 mm Gun mantlet 25.4 mm (23°) |
25.4 mm (30-47°) Turret rear 50 mm (38°) Counterweight |
N/A |
Notes:
- Suspensions wheels and tracks are 20 mm thick while bogies are 10 mm thick.
- Belly armour is 12.7 mm thick.
- The turret ring is 25.4 mm thick.
- An internal 9.5 mm plate separates the crew compartment from the engine compartment.
- Hull underside above tracks is 9.5 mm thick.
- Hull sides are protected by add-on tracks and grousers that give 20 mm of extra armour.
Mobility
| Game Mode | Max Speed (km/h) | Weight (tons) | Engine power (horsepower) | Power-to-weight ratio (hp/ton) | ||||
|---|---|---|---|---|---|---|---|---|
| Forward | Reverse | Stock | AoA | Stock | Upgraded | Stock | Upgraded | |
| Arcade | -0.5 | 0.5 | 582 | -1164 | __.__ | |||
| Realistic | 363 | -726 | __.__ | |||||
The M10 GMC (France) has essentially the same mobility features as the M4 Sherman tank. When spaded, the tank is able to move quite fast in a straight line, going slightly below or even up to its max speed. The turning speed is not that great and the reverse speed does not have much going for it either. The M10 GMC (France) struggles while driving on inclines due to its narrow tracks. In conclusion, the mobility is average and it is able to reach wanted positions reasonably fast.
Modifications and economy
First off get all protection modifications: Parts and FPE. After that move on to research modifications from the Firepower tree: Horizontal Drive, Adjustment of Fire, and the Elevation Mechanism. Lastly research the Mobility tree: Tracks, Filters, Engine, Transmission, Suspension, Brake System.
Though the M79 shot stock is an available module in the modifications, it can be at the bottom of prioritization as it currently possess no advantage over the stock M62 shell, having the same shell velocity but with worse penetration at all distances and angles, shallower ricochet angle, higher shell cost.
Armaments
Main armament
The 3-inch (76 mm) cannon is a wonderful and powerful gun. APCBC ammo can penetrate any tank on the battlefield even from long range. Because APCBC has enough penetration, the AP ammo is less useful. It is not a bad idea to carry HE ammo as well to fight lightly armoured and open top tanks like the M16 MGMC. The powerful gun and potent ammunition make the M10 a good sniper vehicle at its battle rating, especially with its -10° gun depression, giving the M10 the ability to maximize a hull-down position. Unfortunately, even though this tank destroyer does feature a turret, its turret rotation speed is extremely slow (< 4.0°/s) due to its historic configuration of only possessing a hand crank for the turret traverse.
| 76 mm M7 | Turret rotation speed (°/s) | Reloading rate (seconds) | |||||||||||
|---|---|---|---|---|---|---|---|---|---|---|---|---|---|
| Mode | Capacity | Vertical | Horizontal | Stabilizer | Stock | Upgraded | Full | Expert | Aced | Stock | Full | Expert | Aced |
| Arcade | 54 | -10°/+30° | ±180° | N/A | 3.96 | 5.48 | 6.66 | 7.37 | 7.84 | 8.19 | 7.25 | 6.68 | 6.30 |
| Realistic | 2.68 | 3.15 | 3.83 | 4.23 | 4.50 | ||||||||
Ammunition
| Penetration statistics | |||||||
|---|---|---|---|---|---|---|---|
| Ammunition | Type of warhead |
Penetration @ 0° Angle of Attack (mm) | |||||
| 10 m | 100 m | 500 m | 1,000 m | 1,500 m | 2,000 m | ||
| M62 shell | APCBC | 149 | 146 | 133 | 119 | 106 | 95 |
| M42A1 shell | HE | 7 | 7 | 7 | 7 | 7 | 7 |
| M79 shot | AP | 134 | 132 | 121 | 109 | 99 | 89 |
| Shell details | |||||||||
|---|---|---|---|---|---|---|---|---|---|
| Ammunition | Type of warhead |
Velocity (m/s) |
Projectile Mass (kg) |
Fuse delay (m) |
Fuse sensitivity (mm) |
Explosive Mass (TNT equivalent) (g) |
Ricochet | ||
| 0% | 50% | 100% | |||||||
| M62 shell | APCBC | 792 | 7 | 1.2 | 14 | 63.7 | 48° | 63° | 71° |
| M42A1 shell | HE | 800 | 5.84 | 0 | 0.1 | 390 | 79° | 80° | 81° |
| M79 shot | AP | 792 | 6.8 | N/A | N/A | N/A | 47° | 60° | 65° |
Ammo racks

| Full ammo |
1st rack empty |
2nd rack empty |
3rd rack empty |
4th rack empty |
5th rack empty |
Visual discrepancy |
|---|---|---|---|---|---|---|
| 54 | 49 (+5) | 37 (+17) | 25 (+29) | 13 (+41) | 1 (+53) | No |
Note:
- As they are modeled by sets of 2, shells disappear from the rack only after you fire both shells in the set.
Machine guns
| 12.7 mm M2HB | ||||
|---|---|---|---|---|
| Mount | Capacity (Belt) | Fire rate | Vertical | Horizontal |
| Pintle | 300 (200) | 577 | -10°/+28° | ±60° |
The turret-mounted M2HB .50 cal heavy machine gun is very good at knocking out tracks, punching through lightly armoured vehicles and shooting down low-flying aircraft. Use it sparsely because of its low ammo count.
Usage in battles
The M10 is a support vehicle. Find a good sniping position and lay behind the team taking out enemy tanks from a distance. Try to stay away from enemy tanks to avoid getting destroyed quickly.
The M10 is a support vehicle. Find a good sniping position and lay behind the team taking out enemy tanks from a distance. Try to stay away from enemy tanks to avoid getting destroyed quickly. To make full use of its decent sniping capacity, find a spot that:
- overlooks key passageway / street / battle area
- is not too close to the frontline
- has slopes, hard covers or bushes
- is not too hard to get to
With a location like that, the M10 can utilise its -10° gun depression and use hull down. Its turret front and mantlet can consistently cause ricochets especially in a downtier. Looming behind bushes, an M10's well aimed shots should be able to knock out most enemy tanks at the battle-rating range from long range. Even if you get spotted, any slope or hard covers will provide protection for you.
If fighting in a close quarter's environment, do not try to push forward without support. Stay behind friendly tanks in order to support them without being shot at. If in an urban scenario on maps like Poland or Normandy, utilize the tank's turning speed to rotate the turret to the right angle. But, the best option is still to find a hull down location. For example, in Normandy, the best location is towards the C point, where there are hills and dips that can be used to hide the hull, while giving a good view of the battlefield.
The M10 has a very slow turret rotation speed, but the M10 can traverse faster than it can rotate its turret and use its high speed when at high gear to produce some interesting skids via the physics engine to swerve the M10 and angle its gun at an enemy tank around the corner. It is recommended to understand and get a good feel of the M10's mobility and horsepower on dirt and paved roads before attempting this stunt. The low turret rotation speed means that a M10 player must always be aware of where the enemy tanks are, because they will not be able to turn the turret quickly if the enemy is able to flank the M10. In addition, the M10's side armour is weak, and the ammunition storage is in the hull sides, so if the enemy is able to shoot the M10 at that location, it is very likely to explode the ammo rack and destroy the tank with one shot.
Enemies worth noting:
- R3 T20 FA-HS: this vehicle is the exact opposite tank when comparing to an M10: extremely high topspeed, great traverse and fast gun rotation. A well-manoeuvred R3 can easily circle around the M10 and shoot AP shells through the thin side, while the M10 struggles to get the gun on target even when traversing the hull with the gun. If you know an R3 is around, you better turn your hull towards the possible direction and be ready to engage. Move the hull with the gun to target quicker. Even if you miss, the M2 Browning can still penetrate the R3 and knock out its crews. Note that a side shot on the R3 does not guarantee a kill as the fuse might not get triggered, and the crew are pretty separated. The R3 can run away and repair for another attack. A frontal shot, however, is likely to one shot it as the crew are all lined up.
- 8,8 cm Flak 37 Sfl.: it is rather hard to knock out due to the fact that its armour is so thin that almost every shell will over-penetrate, dealing almost no critical damage. Plus this vehicle mostly face their side to the targets, making it even harder to kill them as the crew are all far apart. So it can usually take quite some hits and take out the shooters one by one. As the shooter, aim for the left side of its turret first to disable its gunner first, then knock out the rest of its crew (right turret & driving compartment). Do not hope that the M2 HB can knock out the crew members, the truck's armour is too thick for any MG to penetrate.
Pros and cons
Pros:
- Main cannon penetration and damage is very good for the rank, can knock out many tanks in one hit. For example the Chi-Nu, Pz.IV F2, StuG III F or even the Tiger H1 when aiming carefully
- Good gun depression of -10°, perfect for hull-down positions
- Front armour can resist certain shots: front glacis steeply sloped and the huge, V-shaped gun mantlet can often bounce / absorb shells (e.g. 75 mm M3 and 76 mm F-34 / ZiS-5), as well as the large gun breech behind it further protecting the turret crew
- 5 crew members, plus one more with Crew Replenishment modification
- Turreted purpose-built tank destroyer allows for wide field of fire compared to casemate designs
- Pintle-mounted HMG can offer effective anti-aircraft fire
- Access to the add-on armour modification
- Has relatively no problem when getting uptiered
Cons:
- Very poor turret traverse speed combined with its rather sluggish hull traverse "locks" it as a long range sniper for most players- close quarters combat is very difficult and great situational awareness is required, as it often cannot get its gun on target in time. It is also vulnerable to flankers like the Sd.Kfz.234/2
- Base armour is quite thin, can get easily penetrated by common opponents like the Pz.IV F2 or the US M10 GMC
- Open-topped, vulnerable to aircraft strafing and overpressure
- Poor reverse speed can sometimes get the vehicle destroyed
History
Combat usage
The M10 GMC was provided officially to the Free French Forces mostly through the lend-lease program from 1943. 227 M10 were delivered to the Free French Forces. They saw combat action in Italy, France and Western Germany in 1944 and 1945.
Media
- Skins
- Videos
See also
- Vehicles equipped with the same chassis
External links
| France tank destroyers | |
|---|---|
| Lorraine 40t derivatives | CA Lorraine · Lorraine 155 Mle.50 |
| ATGM | MEPHISTO · AMX-10M |
| Other | AMR.35 ZT3 · Lorraine 37L · SAu 40 · ARL-44 · ELC bis · AMX-50 Foch · AuF1 |
| USA | ▄M10 GMC · ▄M36B2 |
