Normandy
| Game Modes | ||||
|---|---|---|---|---|
Contents
Overview
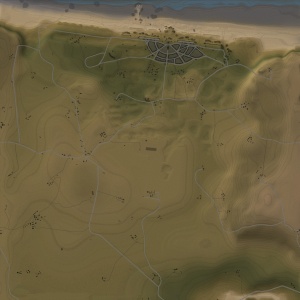
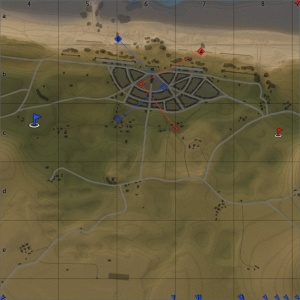
Normandy is a ground forces map available in all modes. The map was added in Update 1.49 "Weapons of Victory". As the name suggest the map is based on the Normandy beaches, where the Allies landed on D-Day. The map has a few distinct areas; in the North of the map consists of a beach, littered with fortifications and destroyed tanks. South of the beach there is a large town, where close quarters fighting takes place. In the area just south of the town there are a few small villages and rocky hills. Finally, in the south, the map opens up into large open fields, with thick hedgerows providing cover for advancing tanks and enemy tank destroyers. The southern area of the map is used as the battle area in the Fields of Normandy map.
The beach in the north of the map is quite open, sloping down from the seawall of the town, down to the sea. A raised rocky area in the middle of the beach blocks players from shooting across the entire length of the beach. Rocky areas and seawalls/fortifications can be used to provide cover for players looking to advance across the beach to flank enemy tanks in the town. The town's seawall opens up into the rocky area in the middle of the beach; this allows players in the town to shoot down onto the beach and also provides a way for players on the beach to advance (or just take opportunistic shots) into the town, however doing so leaves the player exposed to enemy fire from the other end of the beach, or from players hiding along the seawall, in the town.
The town is shaped like a large semi-circle, with a destroyed church and open area in the middle. Roads form "rings" around the town; one road runs around the edge of the open area in the centre; another cuts through the buildings in the middle of the town and a final runs around the edge of the town. A capture point is usually located in the open area in front of the church; destroyed tanks provide cover for those in the capture area, while players hiding deeper in the town try to attack the area from different angles. Close quarters fighting takes place in the streets of the town with players slowly advancing, using rubble as cover, until they can encircle the remaining enemy tanks in the town, and force them back towards their spawn.
The area immediately south of the town is more open, having a few small villages, with less densely placed buildings and open areas (with hedgerows) in between. To the east of the area, there is a rocky hill with a small village on top; a capture zone is sometimes present in this village. Players usually fight for control of the road running around the outside of the town, or to gain access through the area to the village on the hill. Tanks in the village will try to shoot down into this area to defend the capture point.
About midway down the map, there is road running east to west, connecting a few small villages. This road is the road seen in the north of the Fields of Normandy map. The area to the south of this road consists of open fields separated by thick hedgerows. The airship hangar is located in the very south of the playable area. In the normal configuration of the map, this area is seldom used aside from players looking to outflank the enemy, as it is far from the main battle area, with little reason for players to venture into it.
Outside of the usual battle area (but still within the tank map, seen to the right), the east and west become more hilly. The southern area remains open, as can be seen in the Fields of Normandy map. The tank battles map is 4 km x 4 km, however, is usually restricted to a 2.1 km x 2.1 km area in the North of the map, in battles. The air battles map is 65 km x 65 km.
Game Description
Operation Neptune is in full play, the Allies are advancing into the depths of Normandy but German forces are mounting a counterattack.
Historical Background
The map is set on Omaha Beach (according to its location in the air battles map). Although the structures in the tank battles map are modelled off of real-life structures in the Normandy area the layout of the tank battles map is fictional and not representative of the real Omaha Beach. The airship hangar, for example, is modelled accurately, however in real life is located at Écausseville, 10 km inland, nearest to Utah Beach (in-game it is 2 km inland at Omaha). The air map is a reasonably accurate representation of the real area.
The map takes place in a setting similar to the Normandy location where Operation Neptune took place on June 1944. The Allied forces invade Europe via a massive amphibious assault, today still the largest one to take place in history. In preparation for the offensive, years of planning and deception went into the operation. The day before the operation, airborne troops were landed at midnight, with the amphibious assault taking place the next day at around 6:30 AM. The invasion by the American, British, and Canadian forces attacked beach heads named Utah, Omaha, Gold, Juno, and Sword. These infantry waves were accompanied by modified DD tanks able to float in water to fight fortifications. Though none of the initial objectives was achieved on the first day, the Allies were able to establish five beachheads in Europe. After that, the troops landed continued on with the larger objective set before them, Operation Overlord, the Battle of Normandy and France.
Map configuration
Domination
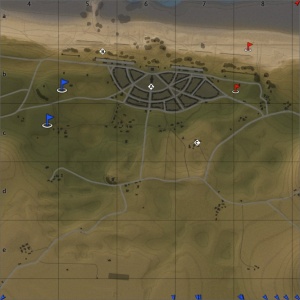
There are three Capture Points. Point A is in the centre of the town (in front of the church), B is among some rocks/fortifications on the west of the beach, and C is in the village on the hill, in the east.
Conquest
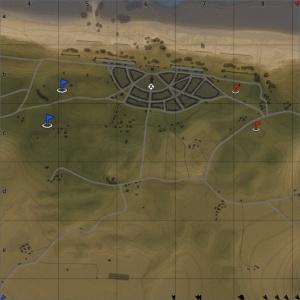
There are three configurations of the conquest mode, each with one Capture Point. The point will be either in front of the church (the A point from domination), on the rocky area in the middle of the beach, or in a village south of the main town.
Battle
There are two capture points, each owned by one of the teams. The points are in the west of the town and the est of the beach.
Break
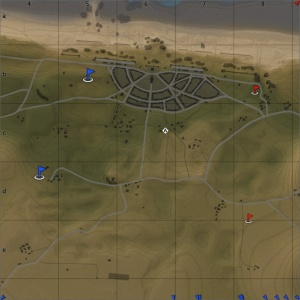
One capture point will be in the west of the beach, and another will be in the east of the beach. When captured they will unlock a capture point in the east and west of the central area of the town, respectively. When captured these points unlock the final capture zones, located in the villages to the southwest and southeast of the town, respectively.
Strategy
Normandy is a very diverse map, in terms of strategies. There is city combat, and large hilly area for flanking, as well as the relatively flat beach with few pieces of cover. Even within each area, there are various strategies, which are broken down below.
The City
Often the home to objective A, the city is the main location on the map, and the vast majority of encounters occur here. There are 3 main strategies around the city for both sides:
- Using the straight streets above the beach to attack enemies advancing via the same routes. Alternatively, you can rush up to the monument and control the enemy streets leading into the main open area in the city.
- This is a great strategy for light and medium tanks. You can quickly take your position and attack all enemies that were too slow to take proper cover. Moreover, the fastest vehicles can simply rush into the main open area by the large church and occupy that strategic position.
- Modern Soviet vehicles and all other low-silhouette tanks will not be able to snipe into the beach. Even if the silhouette allows it, gun depression is another limiting factor.
- At the end of the streets closest to the beach, small bunkers have slits that you can shoot through. If you position yourself accordingly, you won't be able to be hit because enemy rounds will hit the bunker.
- Entering the city via the circular streets going around it to try and flank into the main open area. However, enemies also take said route from their side and there will be encounters around the central (vertical) street.
- Careful! If you spawn on the Western side of the map, you may be hit from the monument by fast enemy tanks (around the small church on the outskirts of the city). It generally takes a couple of seconds longer for the Western side to get into position, unless playing Arcade Battles.
- This strategy is best fit for more armoured vehicles because there will be a stand-off against enemies with very limited cover (only small rubble). For the same reason, having good guns with strong rounds will help your team to advance against enemy heavy tanks.
- Going around the very outside is a viable flanking route, however, due to the circular nature of the city, the further you go the more exposed you are to enemy fire from unpredictable directions.
- Flanking around the city via the beach, entering on the enemy side of the city after passing the monument. This is a risky strategy as any enemies that spawned on the beach will have a clear view of you.
- Very uncommon strategy, but Western players have the opportunity to take the position around the lighthouse on the peninsula on the beach. The sniping position there has limited coverage, but it is very viable if a significant amount of enemies have gone beach-side.
- The only viable piece of cover is the collection of rocks in the middle of the map. That position also provides many sightlines into the enemy lines, especially around the main open area of the city. Be careful not to overextend, however.
The Field
Due to the openness of this area, there are no set positions or strategies. Generally, you should advance from cover to cover, trying to know every player's location around you. Rushing in is a bad idea because enemies will often camp and wait for players to enter their line of sight. Try playing slowly, but surely.
- From the Eastern spawn, most players go to the church on the hill and snipe into the city area, as well as any Western field flankers. However, it's possible to move further South than the church and go on a large flank.
- From the Western spawn, many players choose to flank around to the church, usually going by the road that goes horizontally from West to East.
Media
- Videos
See also
Links to the articles on the War Thunder Wiki that you think will be useful for the reader, for example:
- reference to related locations


