Difference between revisions of "Class 3 (P)"
(→Pros and cons) |
(DO NOT APPROVE, NOT DONE YET) (Tag: Visual edit) |
||
| Line 12: | Line 12: | ||
{{Specs-Tank-Armour}} | {{Specs-Tank-Armour}} | ||
<!-- ''Describe armour protection. Note the most well protected and key weak areas. Appreciate the layout of modules as well as the number and location of crew members. Is the level of armour protection sufficient, is the placement of modules helpful for survival in combat? If necessary use a visual template to indicate the most secure and weak zones of the armour.'' --> | <!-- ''Describe armour protection. Note the most well protected and key weak areas. Appreciate the layout of modules as well as the number and location of crew members. Is the level of armour protection sufficient, is the placement of modules helpful for survival in combat? If necessary use a visual template to indicate the most secure and weak zones of the armour.'' --> | ||
| − | + | Due to the massive size of the Class 3, it is able to withstand high caliber ammunitions due to the poor armor as it will not create enough spalling when penetrating. The crew spacing as well as the interior spacing makes it one of the hardest wheeled vehicles to kill in the game with only kinetic energy (KE) penetrators (APDS, APDSFS, etc etc). Center of mass shots from the front with KE shells will often take the driver and the engine liting it on fire, but due to the turret crew being elevated, they are most likely to survive, meaning the turret is operational ready to engage any enemy threats. Chemical penetrators (CE) are a tricky topic when it comes to the frontal armor. Depending on the ammunition used an the impact angle, the Class 3 will be able to withstand the impact or not. CE rounds are most likely to penetrate and be partially or fully stopped thanks to the inner spall shields at an perpendicular angle but will kill driver and disable or damage engine as well as igniting the ammo rack. For this same reason it is recommended to only carry ~26-28 rounds in the vehicle as it will empty most of the hull ammo racks but still keep the ready racks full in the turret. The armor is not to be relied on unless there are specific enemies (T-54's for example) as most of them will always penetrate your hull. The Class 3 is immune to autocannon fire from the front and turret sides compared to the rest of wheeled light armored vehicles in which 20mm and 30mm autocannons often penetrate and kill crew and inner components. | |
'''Armour type:''' <!-- The types of armour present on the vehicle and their general locations --> | '''Armour type:''' <!-- The types of armour present on the vehicle and their general locations --> | ||
| Line 22: | Line 22: | ||
! Armour !! Front (Slope angle) !! Sides !! Rear !! Roof | ! Armour !! Front (Slope angle) !! Sides !! Rear !! Roof | ||
|- | |- | ||
| − | | Hull || | + | | Hull || 30 mm glacis (76°) |
| + | 29 mm lower frontal plate (20°) | ||
| + | | 20 mm ''Top'' <br> 20 mm ''Bottom'' || 20 mm || 10 mm | ||
|- | |- | ||
| − | | Turret || | + | | Turret || 38 mm ''Turret front'' <br>80 mm ''Gun mantlet'' || 16 mm || 20 mm || 10 mm |
|- | |- | ||
| − | | Cupola || | + | | Cupola || 10 mm || 10 mm || 10 mm || 10 mm |
|- | |- | ||
|} | |} | ||
Revision as of 21:20, 5 January 2021
.jpg)
Contents
Description
The TH800 is a gift rank German tank destroyer with a battle rating of (AB), (RB), and (SB). It was introduced during Update "Hot Tracks" as a reward for the 2020 Operation W.I.N.T.E.R. event.
General info
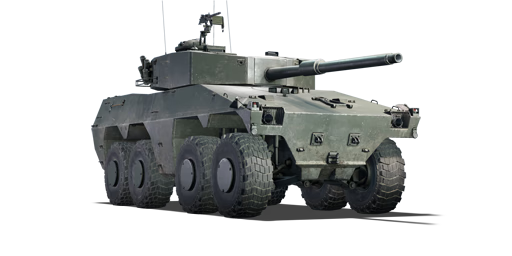
Survivability and armour
Due to the massive size of the Class 3, it is able to withstand high caliber ammunitions due to the poor armor as it will not create enough spalling when penetrating. The crew spacing as well as the interior spacing makes it one of the hardest wheeled vehicles to kill in the game with only kinetic energy (KE) penetrators (APDS, APDSFS, etc etc). Center of mass shots from the front with KE shells will often take the driver and the engine liting it on fire, but due to the turret crew being elevated, they are most likely to survive, meaning the turret is operational ready to engage any enemy threats. Chemical penetrators (CE) are a tricky topic when it comes to the frontal armor. Depending on the ammunition used an the impact angle, the Class 3 will be able to withstand the impact or not. CE rounds are most likely to penetrate and be partially or fully stopped thanks to the inner spall shields at an perpendicular angle but will kill driver and disable or damage engine as well as igniting the ammo rack. For this same reason it is recommended to only carry ~26-28 rounds in the vehicle as it will empty most of the hull ammo racks but still keep the ready racks full in the turret. The armor is not to be relied on unless there are specific enemies (T-54's for example) as most of them will always penetrate your hull. The Class 3 is immune to autocannon fire from the front and turret sides compared to the rest of wheeled light armored vehicles in which 20mm and 30mm autocannons often penetrate and kill crew and inner components.
Armour type:
| Armour | Front (Slope angle) | Sides | Rear | Roof |
|---|---|---|---|---|
| Hull | 30 mm glacis (76°)
29 mm lower frontal plate (20°) |
20 mm Top 20 mm Bottom |
20 mm | 10 mm |
| Turret | 38 mm Turret front 80 mm Gun mantlet |
16 mm | 20 mm | 10 mm |
| Cupola | 10 mm | 10 mm | 10 mm | 10 mm |
Notes:
Mobility
Write about the mobility of the ground vehicle. Estimate the specific power and manoeuvrability, as well as the maximum speed forwards and backwards.
| Game Mode | Max Speed (km/h) | Weight (tons) | Engine power (horsepower) | Power-to-weight ratio (hp/ton) | |||
|---|---|---|---|---|---|---|---|
| Forward | Reverse | Stock | Upgraded | Stock | Upgraded | ||
| Arcade | Expression error: Unexpected * operator. | 1,116 | Expression error: Unexpected round operator. | __.__ | |||
| Realistic | 695 | Expression error: Unexpected round operator. | __.__ | ||||
Modifications and economy
Armaments
Main armament
| 105 mm GT-3 | Turret rotation speed (°/s) | Reloading rate (seconds) | |||||||||||
|---|---|---|---|---|---|---|---|---|---|---|---|---|---|
| Mode | Capacity | Vertical | Horizontal | Stabilizer | Stock | Upgraded | Full | Expert | Aced | Stock | Full | Expert | Aced |
| Arcade | 54 | -8°/+15° | ±180° | Two-plane | __._ | __._ | __._ | __._ | __._ | _.__ | _.__ | _.__ | _.__ |
| Realistic | __._ | __._ | __._ | __._ | __._ | ||||||||
Ammunition
| Penetration statistics | |||||||
|---|---|---|---|---|---|---|---|
| Ammunition | Type of warhead |
Penetration @ 0° Angle of Attack (mm) | |||||
| 10 m | 100 m | 500 m | 1,000 m | 1,500 m | 2,000 m | ||
| DM12 | HEATFS | 400 | 400 | 400 | 400 | 400 | 400 |
| DM502 | HESH | 127 | 127 | 127 | 127 | 127 | 127 |
| DM23 | APFSDS | 337 | 335 | 330 | 322 | 314 | 306 |
| DM33 | APFSDS | 408 | 405 | 398 | 389 | 379 | 370 |
| Shell details | |||||||||
|---|---|---|---|---|---|---|---|---|---|
| Ammunition | Type of warhead |
Velocity (m/s) |
Projectile Mass (kg) |
Fuse delay (m) |
Fuse sensitivity (mm) |
Explosive Mass (TNT equivalent) (g) |
Ricochet | ||
| 0% | 50% | 100% | |||||||
| DM12 | HEATFS | 1,173 | 10.5 | 0.05 | 0.1 | 1,270 | 65° | 72° | 77° |
| DM502 | HESH | 732 | 14.85 | 0.05 | 0.1 | 4,310 | 73° | 77° | 80° |
| DM23 | APFSDS | 1,455 | 3.79 | N/A | N/A | N/A | 78° | 80° | 81° |
| DM33 | APFSDS | 1,455 | 3.79 | N/A | N/A | N/A | 78° | 80° | 81° |
Ammo racks
| Full ammo |
1st rack empty |
2nd rack empty |
3rd rack empty |
4th rack empty |
5th rack empty |
6th rack empty |
Visual discrepancy |
|---|---|---|---|---|---|---|---|
| 54 | __ (+__) | __ (+__) | __ (+__) | __ (+__) | __ (+__) | __ (+__) | __ |
Machine guns
| 7.62 mm Browning MG4 | ||||
|---|---|---|---|---|
| Mount | Capacity (Belt) | Fire rate | Vertical | Horizontal |
| Coaxial | 3,000 (250) | 500 | N/A | N/A |
| Pintle | 2,000 (250) | 500 | -8°/+20° | ±120° |
Usage in battles
Describe the tactics of playing in the vehicle, the features of using vehicles in the team and advice on tactics. Refrain from creating a "guide" - do not impose a single point of view but instead give the reader food for thought. Describe the most dangerous enemies and give recommendations on fighting them. If necessary, note the specifics of the game in different modes (AB, RB, SB).
Pros and cons
Pros:
- Fast
Cons:
- Prone to hull-breaking
- Huge size
History
Describe the history of the creation and combat usage of the vehicle in more detail than in the introduction. If the historical reference turns out to be too long, take it to a separate article, taking a link to the article about the vehicle and adding a block "/History" (example: https://wiki.warthunder.com/(Vehicle-name)/History) and add a link to it here using the main template. Be sure to reference text and sources by using <ref></ref>, as well as adding them at the end of the article with <references />. This section may also include the vehicle's dev blog entry (if applicable) and the in-game encyclopedia description (under === In-game description ===, also if applicable).
Media
Excellent additions to the article would be video guides, screenshots from the game, and photos.
See also
External links
| Germany tank destroyers | |
|---|---|
| Pz. I Derivatives | Panzerjäger I |
| Pz. II Derivatives | 15cm sIG 33 B Sfl |
| Pz. 38(t) Derivatives | Marder III · Marder III H · Jagdpanzer 38(t) |
| Pz. III Derivatives | StuG III A · StuG III F · StuG III G · StuH 42 G |
| Pz. IV Derivatives | Jagdpanzer IV · Panzer IV/70(A) · Panzer IV/70(V) · Dicker Max · Nashorn · Brummbär · VFW |
| Pz. V Derivatives | Jagdpanther G1 · Bfw. Jagdpanther G1 |
| Pz. VI Derivatives | Sturer Emil · Elefant · Ferdinand · 38 cm Sturmmörser · Jagdtiger |
| Wheeled/Half-track | 8,8 cm Flak 37 Sfl. · Sd.Kfz.251/9 · Sd.Kfz.251/10 · Sd.Kfz.251/22 · Sd.Kfz.234/3 · Sd.Kfz.234/4 · 15 cm Pz.W.42 |
| ATGM Carrier | RakJPz 2 · RakJPz 2 (HOT) · Wiesel 1A2 |
| Other | Waffenträger · M109G · JPz 4-5 · Raketenautomat · VT1-2 |
