Difference between revisions of "Eland 90 Mk.7"
(→Pros and cons: Increased detail) (Tag: Visual edit) |
(New Specs-Card Artimage. Old picture moved to Media: Images) |
||
| (13 intermediate revisions by 6 users not shown) | |||
| Line 1: | Line 1: | ||
{{Specs-Card | {{Specs-Card | ||
|code=uk_eland_90_mk_7 | |code=uk_eland_90_mk_7 | ||
| − | |images={{Specs-Card-Image|GarageImage_{{PAGENAME}}.jpg}} | + | |images={{Specs-Card-Image|GarageImage_{{PAGENAME}}.jpg|ArtImage2_{{PAGENAME}}.png}} |
}} | }} | ||
| Line 18: | Line 18: | ||
{{Specs-Tank-Armour}} | {{Specs-Tank-Armour}} | ||
<!-- ''Describe armour protection. Note the most well protected and key weak areas. Appreciate the layout of modules as well as the number and location of crew members. Is the level of armour protection sufficient, is the placement of modules helpful for survival in combat? If necessary use a visual template to indicate the most secure and weak zones of the armour.'' --> | <!-- ''Describe armour protection. Note the most well protected and key weak areas. Appreciate the layout of modules as well as the number and location of crew members. Is the level of armour protection sufficient, is the placement of modules helpful for survival in combat? If necessary use a visual template to indicate the most secure and weak zones of the armour.'' --> | ||
| − | + | The armour of the Eland 90 Mk.7 is little to nonexistent. The fact it only has 10 mm of armour gives it extremely low survivability, even 7.62 mm MG can penetrate the armour on some areas. The crew is compacted inside a really small box, making 90% of the rounds fired at it (both main gun and machine guns) one shot potential. While the thin armour might not trigger APHE fuses, it will surely trigger HE, HEAT. Regardless, not triggering an APHE fuse leaves any incoming shell to act as a solid shot, severely damaging the crew. | |
| − | '''Armour type:''' | + | '''Armour type:''' |
| − | + | ||
| − | * | + | *Rolled homogeneous armour (hull, turret) |
| + | *Structural steel (mudguards, storage boxes) | ||
| + | *Wheel (tires) | ||
{| class="wikitable" | {| class="wikitable" | ||
|- | |- | ||
| − | ! Armour !! Front (Slope angle) !! Sides !! Rear !! Roof | + | !Armour!!Front (Slope angle)!!Sides!!Rear!!Roof |
|- | |- | ||
| − | | Hull || | + | |Hull||10 mm (51°) ''Upper glacis''<br>10 mm (17°) ''Upper glacis'' |
| + | |10 mm (4°) ''Front half''<br>10 mm (6°) ''Rear half'' | ||
| + | |10 mm ''Upper plate''<br>10 mm (46°) ''Upper glacis''<br>10 mm (20°) ''Lower glacis'' | ||
| + | |10 mm (40°) ''Front glacis''<br>10 mm (44°) ''Rear glacis'' | ||
|- | |- | ||
| − | | Turret || | + | |Turret||12 mm (30°) ''Turret front''<br>12 mm (8°) ''Gun mantlet'' |
| + | |10 mm (17-21°)<br>10 mm ''Viewports'' | ||
| + | |10 mm (16°)||10 mm (16°) ''Front part''<br>10 mm ''Rear part''<br>8 mm ''Gunner hatch'' | ||
|- | |- | ||
| − | | Cupola || | + | |Cupola|| colspan="4" style="text-align:center" |8 mm (spherical) |
|- | |- | ||
|} | |} | ||
| − | '''Notes:''' | + | '''Notes:''' |
| − | + | ||
| + | *Wheels are 10 mm thick. | ||
| + | *Storage boxes and mudguards are 5 mm thick. | ||
| + | *The belly is 8 mm thick. | ||
| + | *The gun barrel is 20 mm thick. | ||
=== Mobility === | === Mobility === | ||
| Line 44: | Line 55: | ||
{{tankMobility|abMinHp=139|rbMinHp=80}} | {{tankMobility|abMinHp=139|rbMinHp=80}} | ||
| + | |||
| + | The Eland 90 Mk.7, similar to the AML-90, are Formula 1 cars compared to the tanks seen at the battle rating. The low profile, weight, and the fact they are wheeled makes this vehicle extremely fast. However, this '''only''' applies to asphalt or solid ground maps. The mobility is significantly reduced in mud, water, sand and snow, reducing the speed from nearly 100 km/h down to 20 km/h. | ||
=== Modifications and economy === | === Modifications and economy === | ||
| Line 54: | Line 67: | ||
<!-- ''Give the reader information about the characteristics of the main gun. Assess its effectiveness in a battle based on the reloading speed, ballistics and the power of shells. Do not forget about the flexibility of the fire, that is how quickly the cannon can be aimed at the target, open fire on it and aim at another enemy. Add a link to the main article on the gun: <code><nowiki>{{main|Name of the weapon}}</nowiki></code>. Describe in general terms the ammunition available for the main gun. Give advice on how to use them and how to fill the ammunition storage.'' --> | <!-- ''Give the reader information about the characteristics of the main gun. Assess its effectiveness in a battle based on the reloading speed, ballistics and the power of shells. Do not forget about the flexibility of the fire, that is how quickly the cannon can be aimed at the target, open fire on it and aim at another enemy. Add a link to the main article on the gun: <code><nowiki>{{main|Name of the weapon}}</nowiki></code>. Describe in general terms the ammunition available for the main gun. Give advice on how to use them and how to fill the ammunition storage.'' --> | ||
{{main|GT-2 (90 mm)}} | {{main|GT-2 (90 mm)}} | ||
| + | |||
| + | The Eland 90 uses the powerful 90 mm GT-2 low pressure cannon. The Eland 90 comes with a stock OCC 60-62 HEATFS ammunition, capable of penetrating most tanks at its BR at any distance. It should be noted that it only carries 29 rounds at max, 9 more rounds than the AML-90 but still a low count, and coupled with the poor survivability, commanders should always shoot to destroy in the least shots necessary, know center of mass, ammunition racks, etc to successfully engage a target. | ||
{| class="wikitable" style="text-align:center" width="100%" | {| class="wikitable" style="text-align:center" width="100%" | ||
| Line 72: | Line 87: | ||
==== Ammunition ==== | ==== Ammunition ==== | ||
| − | { | + | {{:GT-2 (90 mm)/Ammunition|OCC 60-62, OE 90 F1, OFUM PH90-F2}} |
| − | |||
| − | |||
| − | |||
| − | |||
| − | |||
| − | |||
| − | |||
| − | |||
| − | |||
| − | |||
| − | |||
| − | |||
| − | |||
| − | |||
| − | |||
| − | |||
| − | |||
| − | |||
| − | |||
| − | |||
| − | |||
| − | |||
| − | |||
| − | |||
| − | |||
| − | |||
| − | |||
| − | | OCC 60-62 | ||
| − | |||
| − | |||
| − | |||
| − | |||
| − | |||
| − | |||
| − | |||
| − | |||
| − | |||
| − | |||
| − | |||
| − | |||
| − | |||
| − | |||
| − | |||
| − | |||
| − | |||
| − | |||
==== [[Ammo racks]] ==== | ==== [[Ammo racks]] ==== | ||
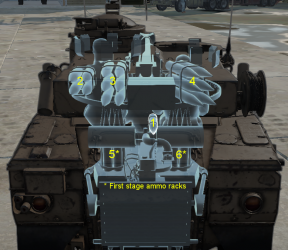
| − | + | [[File:Ammoracks_{{PAGENAME}}.png|right|thumb|x250px|[[Ammo racks]] of the {{PAGENAME}}]] | |
| − | <!-- '''Last updated:''' --> | + | <!-- '''Last updated: 2.7.0.173''' --> |
{| class="wikitable" style="text-align:center" | {| class="wikitable" style="text-align:center" | ||
|- | |- | ||
| Line 134: | Line 103: | ||
! Visual<br>discrepancy | ! Visual<br>discrepancy | ||
|- | |- | ||
| − | | '''29''' || | + | | '''29''' || 27 ''(+2)'' || 23 ''(+6)'' || 17 ''(+12)'' || 11 ''(+18)'' || 6 ''(+23)'' || 1 ''(+28)'' || No |
|- | |- | ||
|} | |} | ||
| + | '''Notes''': | ||
| + | |||
| + | * Shells are modeled individually and disappear after having been shot or loaded. | ||
| + | * Racks 5 and 6 are first stage ammo racks. They total 10 shells and get filled first when loading up the tank. | ||
| + | * These racks are also emptied early: the rack depletion order at full capacity is: 5 - 6 - 1 - 2 etc. until 4. | ||
| + | * Simply not firing when the gun is loaded will move ammo from racks 1 to 4 into racks 6 then 5. Firing will interrupt the restocking of the ready racks. | ||
=== Machine guns === | === Machine guns === | ||
| Line 150: | Line 125: | ||
! Mount !! Capacity (Belt) !! Fire rate !! Vertical !! Horizontal | ! Mount !! Capacity (Belt) !! Fire rate !! Vertical !! Horizontal | ||
|- | |- | ||
| − | | Coaxial || 3, | + | | Coaxial || 3,750 (250) || 500 || N/A || N/A |
|- | |- | ||
| Pintle || 2,000 (250) || 500 || -10°/+17° || ±120° | | Pintle || 2,000 (250) || 500 || -10°/+17° || ±120° | ||
| Line 158: | Line 133: | ||
== Usage in battles == | == Usage in battles == | ||
<!-- ''Describe the tactics of playing in the vehicle, the features of using vehicles in the team and advice on tactics. Refrain from creating a "guide" - do not impose a single point of view but instead give the reader food for thought. Describe the most dangerous enemies and give recommendations on fighting them. If necessary, note the specifics of the game in different modes (AB, RB, SB).'' --> | <!-- ''Describe the tactics of playing in the vehicle, the features of using vehicles in the team and advice on tactics. Refrain from creating a "guide" - do not impose a single point of view but instead give the reader food for thought. Describe the most dangerous enemies and give recommendations on fighting them. If necessary, note the specifics of the game in different modes (AB, RB, SB).'' --> | ||
| − | '' | + | The Eland should be primarily used as a scout flanking vehicle due to its high speed, low profile, scouting capabilities and firepower (tremendous for such a small vehicle). The Eland has primarily 3 uses: |
| + | |||
| + | '''Scouting:''' | ||
| + | |||
| + | When on large maps, the scouting ability should be used at its full potential. The low profile and high speed make it able to crawl to cover fast and without creating much suspicion, while marking targets for friendlies to engage. | ||
| + | |||
| + | '''Flanking:''' | ||
| + | |||
| + | Due to the high speed and really powerful gun, the Eland can be used to hit any enemy from the back. This tactic should be a "Hit n' Run", you should disable or destroy targets and leave before they can engage you. This is nothing hard for the Eland as long as the escape routes and alternative routes are clear and within easy access. | ||
| + | |||
| + | '''Sniping:''' | ||
| + | |||
| + | Despite the optics not having a huge zoom, it is enough to be able to detect, target, and engage enemy vehicles at all ranges thanks to the HEAT-FS round. Be aware of your ammo as it can only carry 29 shells, so make all shots count. It also creates a relatively small smoke trail when firing compared to other cannons at the battle rating (105 mm, other 90 mm, 122 mm) thanks to the muzzle brake. Bushes can also be used to make this vehicle nearly invisible, due to its already low profile. A bunch of branches can cover almost 70% of the front, making it a moving and deadly bush. It also creates a small engine sound that will be, most of the time, masked up by other tanks, giving you a stealth capability which can be exploited in urban combat. | ||
=== Pros and cons === | === Pros and cons === | ||
| Line 170: | Line 157: | ||
* Smoke shells and smoke grenades to enhanced protection and support role | * Smoke shells and smoke grenades to enhanced protection and support role | ||
* More lenient playstyle than the previous Ratel IFVs, thanks to reduced size while conserving firepower and mobility | * More lenient playstyle than the previous Ratel IFVs, thanks to reduced size while conserving firepower and mobility | ||
| − | * Small size significantly reduces probability of | + | * Small size significantly reduces probability of death via [[Artillery Support|artillery]] (unlike on the [[Ratel 90]] and [[Ratel 20|20]]) |
| − | |||
* It is essentially a slightly better [[AML-90]] - it has hydraulic brakes which allow for much needed reduction to braking distance | * It is essentially a slightly better [[AML-90]] - it has hydraulic brakes which allow for much needed reduction to braking distance | ||
| Line 177: | Line 163: | ||
* As a light wheeled vehicle, it has an unstable handling at high speed | * As a light wheeled vehicle, it has an unstable handling at high speed | ||
| − | * | + | * Very thin armour; easily destroyed by heavy machine guns and aircraft |
* No stabilizer; the vehicle cannot effectively use the speed and firepower at the same time | * No stabilizer; the vehicle cannot effectively use the speed and firepower at the same time | ||
* HEATFS damage is unreliable in some situations; the sensitivity of the fuse is the main concern | * HEATFS damage is unreliable in some situations; the sensitivity of the fuse is the main concern | ||
| Line 191: | Line 177: | ||
== Media == | == Media == | ||
<!-- ''Excellent additions to the article would be video guides, screenshots from the game, and photos.'' --> | <!-- ''Excellent additions to the article would be video guides, screenshots from the game, and photos.'' --> | ||
| − | + | ||
| + | ;Images | ||
| + | |||
| + | <gallery mode="packed-hover" heights="200"> | ||
| + | File:ArtImage Eland 90 Mk.7.jpg| | ||
| + | </gallery> | ||
| + | |||
| + | ;Skins | ||
| + | |||
| + | * [https://live.warthunder.com/feed/camouflages/?vehicle=uk_eland_90_mk_7 Skins and camouflages for the {{PAGENAME}} from live.warthunder.com.] | ||
== See also == | == See also == | ||
| Line 200: | Line 195: | ||
;Vehicles with similar chassis | ;Vehicles with similar chassis | ||
| − | * [[AML-90]] | + | * [[AML-90 (Family)]] |
;Related service history | ;Related service history | ||
| Line 214: | Line 209: | ||
* [[AEC Mk II]] | * [[AEC Mk II]] | ||
* [[Crusader III]] | * [[Crusader III]] | ||
| − | |||
* [[T18E2]] | * [[T18E2]] | ||
| Line 226: | Line 220: | ||
* ''other literature.'' | * ''other literature.'' | ||
| + | {{TankManufacturer Sandock-Austral}} | ||
{{Britain light tanks}} | {{Britain light tanks}} | ||
[[Category:Wheeled ground vehicles]] | [[Category:Wheeled ground vehicles]] | ||
Latest revision as of 07:06, 17 March 2024
Contents
Description
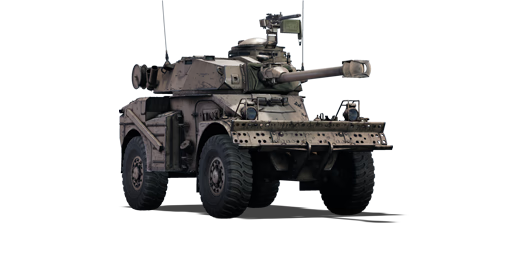
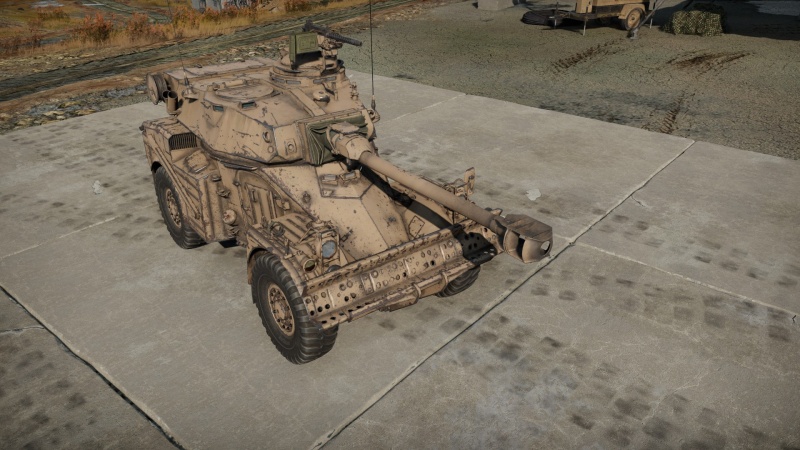
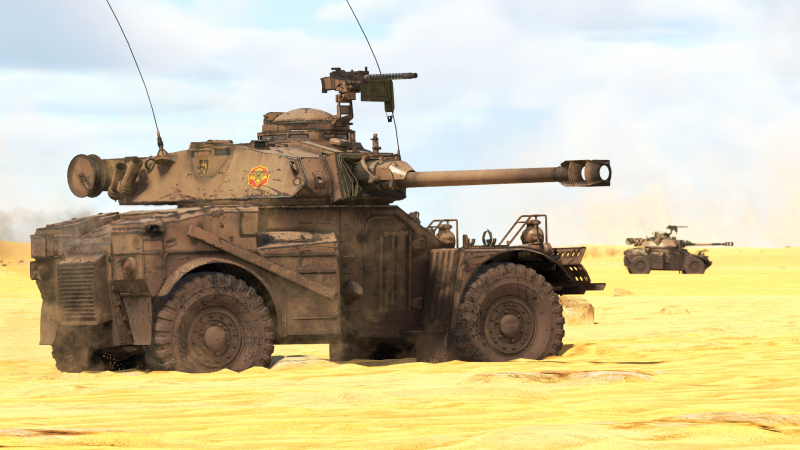
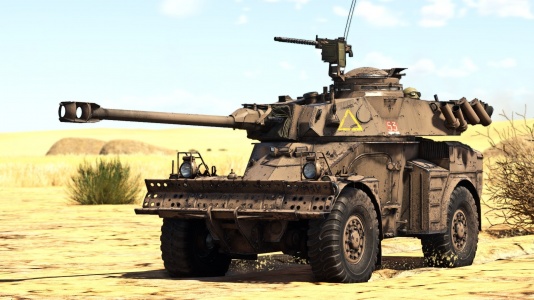
The Eland 90 Mk.7 is a rank British light tank with a battle rating of (AB), (RB), and (SB). It was introduced in Update "Ixwa Strike".
The Eland 90 Mk.7 is a light reconnaissance armoured car, built in 1962 by South Africa as a domestic variant of the French armoured car, the Panhard AML-90.
While the diminutive size and unpretentious look can be deceiving, this armoured car is sure to be one of the most agreeable light vehicles in the British ground forces. This combination of a remarkably mobile and small chassis plus satisfactory firepower is otherwise rarely found in British light vehicles; similarly to the reliable Crusader III and equal to the uncommon AEC Mk.II.
Meanwhile, Eland's weak armour is a problem for survival thus players will have to rely on flanking, scouting or ambushing tactics when engaging heavier armour.
General info
Survivability and armour
The armour of the Eland 90 Mk.7 is little to nonexistent. The fact it only has 10 mm of armour gives it extremely low survivability, even 7.62 mm MG can penetrate the armour on some areas. The crew is compacted inside a really small box, making 90% of the rounds fired at it (both main gun and machine guns) one shot potential. While the thin armour might not trigger APHE fuses, it will surely trigger HE, HEAT. Regardless, not triggering an APHE fuse leaves any incoming shell to act as a solid shot, severely damaging the crew.
Armour type:
- Rolled homogeneous armour (hull, turret)
- Structural steel (mudguards, storage boxes)
- Wheel (tires)
| Armour | Front (Slope angle) | Sides | Rear | Roof |
|---|---|---|---|---|
| Hull | 10 mm (51°) Upper glacis 10 mm (17°) Upper glacis |
10 mm (4°) Front half 10 mm (6°) Rear half |
10 mm Upper plate 10 mm (46°) Upper glacis 10 mm (20°) Lower glacis |
10 mm (40°) Front glacis 10 mm (44°) Rear glacis |
| Turret | 12 mm (30°) Turret front 12 mm (8°) Gun mantlet |
10 mm (17-21°) 10 mm Viewports |
10 mm (16°) | 10 mm (16°) Front part 10 mm Rear part 8 mm Gunner hatch |
| Cupola | 8 mm (spherical) | |||
Notes:
- Wheels are 10 mm thick.
- Storage boxes and mudguards are 5 mm thick.
- The belly is 8 mm thick.
- The gun barrel is 20 mm thick.
Mobility
| Game Mode | Max Speed (km/h) | Weight (tons) | Engine power (horsepower) | Power-to-weight ratio (hp/ton) | |||
|---|---|---|---|---|---|---|---|
| Forward | Reverse | Stock | Upgraded | Stock | Upgraded | ||
| Arcade | Expression error: Unexpected * operator. | 139 | Expression error: Unexpected round operator. | __.__ | |||
| Realistic | 80 | Expression error: Unexpected round operator. | __.__ | ||||
The Eland 90 Mk.7, similar to the AML-90, are Formula 1 cars compared to the tanks seen at the battle rating. The low profile, weight, and the fact they are wheeled makes this vehicle extremely fast. However, this only applies to asphalt or solid ground maps. The mobility is significantly reduced in mud, water, sand and snow, reducing the speed from nearly 100 km/h down to 20 km/h.
Modifications and economy
Armaments
Main armament
The Eland 90 uses the powerful 90 mm GT-2 low pressure cannon. The Eland 90 comes with a stock OCC 60-62 HEATFS ammunition, capable of penetrating most tanks at its BR at any distance. It should be noted that it only carries 29 rounds at max, 9 more rounds than the AML-90 but still a low count, and coupled with the poor survivability, commanders should always shoot to destroy in the least shots necessary, know center of mass, ammunition racks, etc to successfully engage a target.
| 90 mm GT-2 | Turret rotation speed (°/s) | Reloading rate (seconds) | |||||||||||
|---|---|---|---|---|---|---|---|---|---|---|---|---|---|
| Mode | Capacity | Vertical | Horizontal | Stabilizer | Stock | Upgraded | Full | Expert | Aced | Stock | Full | Expert | Aced |
| Arcade | 29 | -8°/+15° | ±180° | N/A | 23.8 | 32.9 | 40.0 | 44.2 | 47.1 | 8.71 | 7.70 | 7.10 | 6.70 |
| Realistic | 14.9 | 17.5 | 21.3 | 23.5 | 25.0 | ||||||||
Ammunition
| Penetration statistics | |||||||
|---|---|---|---|---|---|---|---|
| Ammunition | Type of warhead |
Penetration @ 0° Angle of Attack (mm) | |||||
| 10 m | 100 m | 500 m | 1,000 m | 1,500 m | 2,000 m | ||
| OCC 60-62 | HEATFS | 350 | 350 | 350 | 350 | 350 | 350 |
| OE 90 F1 | HE | 13 | 13 | 13 | 13 | 13 | 13 |
| Shell details | ||||||||||||
|---|---|---|---|---|---|---|---|---|---|---|---|---|
| Ammunition | Type of warhead |
Velocity (m/s) |
Projectile mass (kg) |
Fuse delay (m) |
Fuse sensitivity (mm) |
Explosive mass (TNT equivalent) (g) |
Ricochet | |||||
| 0% | 50% | 100% | ||||||||||
| OCC 60-62 | HEATFS | 800 | 3.65 | 0.05 | 0.1 | 877.7 | 65° | 72° | 77° | |||
| OE 90 F1 | HE | 640 | 5.27 | 0.2 | 0.1 | 945 | 79° | 80° | 81° | |||
| Smoke shell characteristics | ||||||
|---|---|---|---|---|---|---|
| Ammunition | Velocity (m/s) |
Projectile mass (kg) |
Screen radius (m) |
Screen deploy time (s) |
Screen hold time (s) |
Explosive mass (TNT equivalent) (g) |
| OFUM PH90-F2 | 640 | 5.4 | 9 | 5 | 20 | 50 |
Ammo racks
| Full ammo |
1st rack empty |
2nd rack empty |
3rd rack empty |
4th rack empty |
5th rack empty |
6th rack empty |
Visual discrepancy |
|---|---|---|---|---|---|---|---|
| 29 | 27 (+2) | 23 (+6) | 17 (+12) | 11 (+18) | 6 (+23) | 1 (+28) | No |
Notes:
- Shells are modeled individually and disappear after having been shot or loaded.
- Racks 5 and 6 are first stage ammo racks. They total 10 shells and get filled first when loading up the tank.
- These racks are also emptied early: the rack depletion order at full capacity is: 5 - 6 - 1 - 2 etc. until 4.
- Simply not firing when the gun is loaded will move ammo from racks 1 to 4 into racks 6 then 5. Firing will interrupt the restocking of the ready racks.
Machine guns
| 7.62 mm Browning MG4 | ||||
|---|---|---|---|---|
| Mount | Capacity (Belt) | Fire rate | Vertical | Horizontal |
| Coaxial | 3,750 (250) | 500 | N/A | N/A |
| Pintle | 2,000 (250) | 500 | -10°/+17° | ±120° |
Usage in battles
The Eland should be primarily used as a scout flanking vehicle due to its high speed, low profile, scouting capabilities and firepower (tremendous for such a small vehicle). The Eland has primarily 3 uses:
Scouting:
When on large maps, the scouting ability should be used at its full potential. The low profile and high speed make it able to crawl to cover fast and without creating much suspicion, while marking targets for friendlies to engage.
Flanking:
Due to the high speed and really powerful gun, the Eland can be used to hit any enemy from the back. This tactic should be a "Hit n' Run", you should disable or destroy targets and leave before they can engage you. This is nothing hard for the Eland as long as the escape routes and alternative routes are clear and within easy access.
Sniping:
Despite the optics not having a huge zoom, it is enough to be able to detect, target, and engage enemy vehicles at all ranges thanks to the HEAT-FS round. Be aware of your ammo as it can only carry 29 shells, so make all shots count. It also creates a relatively small smoke trail when firing compared to other cannons at the battle rating (105 mm, other 90 mm, 122 mm) thanks to the muzzle brake. Bushes can also be used to make this vehicle nearly invisible, due to its already low profile. A bunch of branches can cover almost 70% of the front, making it a moving and deadly bush. It also creates a small engine sound that will be, most of the time, masked up by other tanks, giving you a stealth capability which can be exploited in urban combat.
Pros and cons
Pros:
- Good mobility and acceleration with a dynamic reverse speed, even when stock
- Small size; perfect for ambushes
- 90 mm HEATFS provides great penetration; even more than the APDS found on the similarly ranked FV4202
- Smoke shells and smoke grenades to enhanced protection and support role
- More lenient playstyle than the previous Ratel IFVs, thanks to reduced size while conserving firepower and mobility
- Small size significantly reduces probability of death via artillery (unlike on the Ratel 90 and 20)
- It is essentially a slightly better AML-90 - it has hydraulic brakes which allow for much needed reduction to braking distance
Cons:
- As a light wheeled vehicle, it has an unstable handling at high speed
- Very thin armour; easily destroyed by heavy machine guns and aircraft
- No stabilizer; the vehicle cannot effectively use the speed and firepower at the same time
- HEATFS damage is unreliable in some situations; the sensitivity of the fuse is the main concern
- Only 3 crew members and ammo tightly storage within, likely to be disabled in a single hit
- Wide turning radius (cannot turn on the spot due to lack of tracks)
- Awful handling off-road, especially on snow and desert maps like Tunisia or Finland
- Prior to researching "Brake System" modification it suffers insufficient braking power, amplified by the high power-to-weight ratio
History
Describe the history of the creation and combat usage of the vehicle in more detail than in the introduction. If the historical reference turns out to be too long, take it to a separate article, taking a link to the article about the vehicle and adding a block "/History" (example: https://wiki.warthunder.com/(Vehicle-name)/History) and add a link to it here using the main template. Be sure to reference text and sources by using <ref></ref>, as well as adding them at the end of the article with <references />. This section may also include the vehicle's dev blog entry (if applicable) and the in-game encyclopedia description (under === In-game description ===, also if applicable).
Media
- Images
- Skins
See also
- Vehicles with similar chassis
- Related service history
- Similar playstyle and role
External links
Paste links to sources and external resources, such as:
- topic on the official game forum;
- other literature.
| Sandock-Austral | |
|---|---|
| Ratel | Ratel 90 · Ratel 20 · ZT3A2 |
| Eland | Eland 90 Mk.7 |
| Britain light tanks | |
|---|---|
| A13 | A13 Mk I · A13 Mk I (3rd R.T.R.) · A13 Mk II · A13 Mk II 1939 |
| A15 | Crusader II · Crusader "The Saint" · Crusader III |
| A17 | Tetrarch I |
| IFV | Warrior · Desert Warrior (Kuwait) |
| Wheeled | Daimler Mk II · AEC Mk II · Fox · Vickers Mk.11 |
| Other | VFM5 |
| South Africa | |
| SARC | SARC MkIVa · SARC MkVI (2pdr) · SARC MkVI (6pdr) |
| Ratel | Ratel 90 · Ratel 20 |
| Rooikat | Rooikat Mk.1D · Rooikat 105 · Rooikat MTTD |
| Other | Concept 3 · Eland 90 Mk.7 |
| USA | Stuart I · Stuart III |


