Difference between pages "F-1" and "HMCS Haida"
(→Usage in battles) (Tag: Visual edit) |
U105837429 (talk | contribs) m (→Description) |
||
| Line 1: | Line 1: | ||
| + | {{About | ||
| + | | about = British destroyer '''{{PAGENAME}}''' | ||
| + | |usage = other Tribal-class destroyers | ||
| + | |link = Tribal (Family) | ||
| + | }} | ||
{{Specs-Card | {{Specs-Card | ||
| − | |code= | + | |code=uk_destroyer_haida |
| − | |images={{Specs-Card-Image|GarageImage_{{PAGENAME}}.jpg | + | |images={{Specs-Card-Image|GarageImage_{{PAGENAME}}.jpg}} |
}} | }} | ||
== Description == | == Description == | ||
| − | <!-- ''In the description, | + | <!-- ''In the first part of the description, cover the history of the ship's creation and military application. In the second part, tell the reader about using this ship in the game. Add a screenshot: if a beginner player has a hard time remembering vehicles by name, a picture will help them identify the ship in question.'' --> |
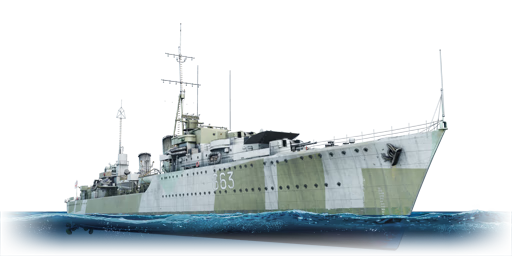
| − | The ''' | + | The '''HMCS Haida (41)''' is a member of the Tribal-class destroyers, named after the Haida tribe. She was a member of the Canadian Navy from 1943 to 1963, serving in both World War II and the Korean War. The HMCS Haida, as the only surviving Tribal-class destroyer out of 27 vessels, sank more enemy surface tonnage than any other Canadian vessel and is thus known as the "Fightingest Ship in the Royal Canadian Navy". She was designated a National Historic Site of Canada in 1984 and now serves as a museum ship in Hamilton, Ontario, next to HMCS Star, an active Royal Canadian Naval Reserve Division. The HMCS Haida was named the Canadian Navy's ceremonial flagship in 2018. |
| + | |||
| + | Introduced in [[Update 1.83 "Masters of the Sea"]] as a [[wt:en/news/5810-fleet-news-what-awaits-us-in-update-1-83-masters-of-the-sea-en|premium pack]] as part of the British fleet closed beta test, the HMCS Haida is a powerful destroyer, equipped with lethal anti-aircraft armaments and powerful torpedoes. Players should use its powerful ammunition to engage enemy destroyers and cover allies with its excellent anti-aircraft capability. However, in comparison to many other destroyers, its speed remains below average. This, combined with the subpar muzzle velocity of its main armaments, makes engaging targets at long range difficult. | ||
| − | It | + | The HMCS Haida was removed from the store after the [[wt:en/news/6464-shop-war-thunder-birthday-sale-en|2019 Anniversary sale]]. It has been made available for purchase with Golden Eagles {{ge}} in-game briefly during the 2023 [[wt:en/news/8296-special-decal-and-destroyer-for-canadian-armed-forces-day-en|"Canadian Armed Forces Day"]] and [[wt:en/news/8524-special-trafalgar-day-a-decal-and-hmcs-haida-to-celebrate-en|"Trafalgar Day"]] mini-events. |
== General info == | == General info == | ||
| − | === | + | === Survivability and armour === |
| − | {{Specs- | + | {{Specs-Fleet-Armour}} |
| − | <!-- '' | + | <!-- ''Talk about the vehicle's armour. Note the most well-defended and most vulnerable zones, e.g. the ammo magazine. Evaluate the composition of components and assemblies responsible for movement and manoeuvrability. Evaluate the survivability of the primary and secondary armaments separately. Don't forget to mention the size of the crew, which plays an important role in fleet mechanics. Save tips on preserving survivability for the "Usage in battles" section. If necessary, use a graphical template to show the most well-protected or most vulnerable points in the armour.'' --> |
| − | |||
| − | |||
| − | |||
| − | |||
| − | |||
| − | |||
| − | |||
| − | |||
| − | |||
| − | |||
| − | |||
| − | |||
| − | |||
| − | |||
| − | |||
| − | |||
| − | |||
| − | |||
| − | |||
| − | |||
| − | |||
| − | |||
| − | |||
| − | |||
| − | |||
| − | |||
| − | |||
| − | |||
| − | |||
| − | |||
| − | |||
| − | |||
| − | |||
| − | |||
| − | { | + | The {{PAGENAME}} is like most destroyers in the game; thin armour, good mobility and respectable firepower. The destroyer has 10 to 23 mm of hull armour all around and 3 mm of anti-fragmentation armour protecting the 120 mm main battery guns. The 40 mm 2-Pounder "Pom-Pom" and 20 mm Oerlikon anti-aircraft guns are protected by 12.7 mm of hardened steel. |
| − | |||
| − | |||
| − | |||
| − | |||
| − | |||
| − | |||
| − | |||
| − | |||
| − | |||
| − | |||
| − | |||
| − | |||
| − | |||
| − | + | === Mobility === | |
| − | + | {{Specs-Fleet-Mobility}} | |
| − | ! | + | <!-- ''Write about the ship's mobility. Evaluate its power and manoeuvrability, rudder rerouting speed, stopping speed at full tilt, with its maximum forward and reverse speed.'' --> |
| − | |||
| − | |||
| − | |||
| − | |||
| − | |||
| − | |||
| − | + | The Haida is by no means a slow ship. She is able to reach a top speed of 35.6 knots, but she is slower when compared to similar destroyers such as Leningrad, Fletcher, the Type 1936 / Type 1936B or even the Type 1934A. However, the rudder shift is very responsive with a shift time of around 2 seconds. This allows HMCS Haida to dodge its way through gunfights or during air attacks. | |
| − | |||
| − | |||
| − | |||
| − | |||
| − | |||
| − | |||
| − | |||
| − | |||
| − | |||
| − | |||
| − | |||
| − | |||
| − | |||
| − | |||
| − | |||
| − | |||
| − | |||
| − | |||
| − | |||
| − | |||
| − | |||
| − | |||
| − | |||
| − | |||
| − | |||
| − | |||
| − | |||
| − | |||
| − | |||
| − | |||
| − | |||
| − | |||
| − | |||
| − | + | {{NavalMobility}} | |
| − | {{ | ||
| − | |||
| − | |||
| − | |||
| − | |||
| − | |||
=== Modifications and economy === | === Modifications and economy === | ||
{{Specs-Economy}} | {{Specs-Economy}} | ||
| − | == | + | == Armament == |
| − | {{Specs- | + | {{Specs-Fleet-Armaments}} |
| − | + | === Primary armament === | |
| − | + | {{Specs-Fleet-Primary}} | |
| − | + | {{main|4.7 inch/45 Mk.XII (120 mm)}} | |
| − | |||
| − | |||
| − | |||
| − | |||
| − | |||
| − | |||
| − | |||
| − | {{Specs- | ||
| − | |||
| − | {{main| | ||
| − | + | ''Provide information about the characteristics of the primary armament. Evaluate their efficacy in battle based on their reload speed, ballistics and the capacity of their shells. Add a link to the main article about the weapon: <code><nowiki>{{main|Weapon name (calibre)}}</nowiki></code>. Broadly describe the ammunition available for the primary armament, and provide recommendations on how to use it and which ammunition to choose.'' | |
| − | + | {{:4.7 inch/45 Mk.XII (120 mm)/Ammunition|4.7 inch HE Mk.VIIA, 4.7 inch SAP Mk.VA, 4.7 inch HE-TF Mk.VIIA, 4.7 inch HE-VT Mk.VIIA}} | |
| − | + | === Secondary armament === | |
| + | {{Specs-Fleet-Secondary}} | ||
| + | {{main|4 inch/45 Mark XVI (102 mm)}} | ||
| − | + | ''Some ships are fitted with weapons of various calibres. Secondary armaments are defined as weapons chosen with the control <code>Select secondary weapon</code>. Evaluate the secondary armaments and give advice on how to use them. Describe the ammunition available for the secondary armament. Provide recommendations on how to use them and which ammunition to choose. Remember that any anti-air armament, even heavy calibre weapons, belong in the next section. If there is no secondary armament, remove this section.'' | |
| − | + | {{:4 inch/45 Mark XVI (102 mm)/Ammunition|4 inch HE, 4 inch SAP, 4 inch HE-TF, 4 inch HE-VT}} | |
| − | === | + | === Anti-aircraft armament === |
| − | {{Specs- | + | {{Specs-Fleet-AA}} |
| − | <!-- '' | + | <!-- ''An important part of the ship's armament responsible for air defence. Anti-aircraft armament is defined by the weapon chosen with the control <code>Select anti-aircraft weapons</code>. Talk about the ship's anti-air cannons and machine guns, the number of guns and their positions, their effective range, and about their overall effectiveness – including against surface targets. If there are no anti-aircraft armaments, remove this section.'' --> |
| − | {{main| | + | {{main|2pdr QF Mk.IIc (40 mm)|20 mm/70 Oerlikon Mark 24 (20 mm)}} |
| − | |||
| − | The | + | The Haida is no slouch when it comes to AAA batteries for a destroyer. She is armed with one quad 40 mm 2-Pounder "Pom-Pom" mount accompanied by six twin 20 mm Oerlikon mounts. These are also very useful for tearing apart enemy torpedo boats that happen to stray too close. In addition, the 102 mm secondary mount acts as a heavy AAA mount. The 102 mm mount can be armed with High Explosives with fuses set inside. |
| − | + | === Additional armament === | |
| − | + | {{Specs-Fleet-Additional}} | |
| − | + | <!-- ''Describe the available additional armaments of the ship: depth charges, mines, torpedoes. Talk about their positions, available ammunition and launch features such as dead zones of torpedoes. If there is no additional armament, remove this section.'' --> | |
| − | + | {{main|Mk.VIII (533 mm)|Mk.IX** (533 mm)|Y-gun Mk.VII depth charge}} | |
| − | |||
| − | * | ||
| − | |||
| − | |||
| − | + | The Haida is also armed with a single quad 533 mm torpedo launcher. The torpedoes travel at a top speed of 39.1 knots and have a maximum range of 7.32 km. The torpedoes have an arming distance of 50 m, so be careful about the distance to the target. In addition, the torpedoes themselves pack a powerful punch, boasting a 327 kg warhead in each torpedo. There is a major factor that all players using either HMCS Haida or her non-premium counterpart- HMS Eskimo: the torpedo tubes have to be fired from nearly broadside angles, otherwise the torpedo tubes will be obstructed. Take care should you choose to fire your torpedoes. | |
| − | |||
| − | |||
| − | |||
| − | |||
| − | |||
| − | |||
| − | |||
| − | |||
| − | |||
| − | |||
| − | |||
| − | |||
| − | |||
| − | |||
| − | |||
| − | |||
| − | |||
| − | |||
| − | |||
| − | |||
| − | |||
| − | |||
| − | |||
| − | |||
| − | |||
| − | |||
| − | |||
== Usage in battles == | == Usage in battles == | ||
| − | + | ''Describe the technique of using this ship, the characteristics of her use in a team and tips on strategy. Abstain from writing an entire guide – don't try to provide a single point of view, but give the reader food for thought. Talk about the most dangerous opponents for this vehicle and provide recommendations on fighting them. If necessary, note the specifics of playing with this vehicle in various modes (AB, RB, SB).'' | |
| + | |||
| + | === Pros and cons === | ||
| + | <!-- ''Summarise and briefly evaluate the vehicle in terms of its characteristics and combat effectiveness. Mark its pros and cons in the bulleted list. Try not to use more than 6 points for each of the characteristics. Avoid using categorical definitions such as "bad", "good" and the like - use substitutions with softer forms such as "inadequate" and "effective".'' --> | ||
| + | |||
| + | '''Pros:''' | ||
| − | + | * Hard-hitting High-Explosive shells | |
| + | * Lethal AAA mounts for a destroyer | ||
| + | * Relatively fast for her type | ||
| + | * Excellent manoeuvrability | ||
| + | * Powerful torpedo armaments | ||
| − | + | '''Cons:''' | |
| − | + | * Subpar speed compared to her counterparts of other nations | |
| + | * Muzzle velocity of the main cannons is sub-par when compared to those of German, Soviet and Japanese destroyers | ||
| + | * Terrible torpedo firing arcs: a player must practically fire torpedoes from broadsides | ||
| + | * AAA mounts tend to be lacking when compared to her American counterparts | ||
| − | + | == History == | |
| + | <!-- ''Describe the history of the creation and combat usage of the ship in more detail than in the introduction. If the historical reference turns out to be too long, take it to a separate article, taking a link to the article about the ship and adding a block "/History" (example: <nowiki>https://wiki.warthunder.com/(Ship-name)/History</nowiki>) and add a link to it here using the <code>main</code> template. Be sure to reference text and sources by using <code><nowiki><ref></ref></nowiki></code>, as well as adding them at the end of the article with <code><nowiki><references /></nowiki></code>. This section may also include the ship's dev blog entry (if applicable) and the in-game encyclopedia description (under <code><nowiki>=== In-game description ===</nowiki></code>, also if applicable).'' --> | ||
| − | + | [[File:HMCSHaidaHamiltonA.jpg|thumb|450x450px|HMCS Haida docked at Hamilton Harbour.]] | |
| + | HMCS Haida is a destroyer of the Tribal class of destroyers built for the British, Canadian and Australian navies during World War II. Named after the Haida people, HMCS Haida was commissioned in 1943 and had a storied service career, sinking the most enemy ship tonnage out of all Canadian ships in the Second World War. As such, she was nicknamed "The Fightingest ship in the Canadian Navy". Haida saw service during the Korean war and was eventually decommissioned and turned into a museum ship. She is still a museum ship today, berthed in Hamilton Harbour, and serves as the ceremonial flagship of the Royal Canadian Navy (RCN). | ||
| − | + | === Design and development === | |
| + | In the early 1940s, the British built the Tribal class jointly for their own navy and for the Canadian and Australian navies. The RCM ultimately settled on the Tribal class, as it was heavily armed and could essentially be used as a "small cruiser". In total the RCN ordered eight Tribal class destroyers, which were modified with a new ventilation system to make them more suited to the harsh conditions of Canadian winter service. Haida was built by Vickers Armstrong shipyards at Newcastle, and was commissioned by September 18th 1943. | ||
| − | + | Haida displaced 1959 tons standard and had a crew of 259 officers and men. Her main armament consisted of six 4.7-inch (119 mm) guns in three dual mounts, along with a secondary 4-inch (102 mm) dual mount. She had an anti-aircraft armament of 1 quadruple 40 mm 2-pounder Pom-Pom gun, as well as six 20 mm Oerlikon guns. She carried a single quadruple torpedo tube mounting, as well as depth charge racks to counter submarines. Powered by steam turbines, Haida could reach a maximum speed of 36.5 knots (68 km/h). | |
| − | |||
| − | |||
| − | |||
| − | |||
| − | |||
| − | |||
| − | |||
| − | |||
| − | |||
| − | |||
| − | |||
| − | |||
| − | |||
| − | |||
| − | |||
| − | |||
| − | |||
| − | |||
| − | |||
| − | |||
| − | |||
| − | === | + | === Operational history === |
| − | + | After her commissioning, Haida was based from the British Home Fleet, and immediately partook in convoy escort duties. She was part of the escort screen for convoy JW 55 B, and escorted the convoy away from the battleship Scharnhorst which was then destroyed by British battleships. Haida was subsequently reassigned to perform coastal sweeps of the English channel, in preparation for the D-Day landings of June 1944. During the evening of April 25th 1944, Haida saw her first action when her destroyer flotilla encountered a German torpedo boat flotilla with three Type 1939-class torpedo boats. Haida herself sank the T29 while T24 and T27 were damaged. | |
| − | + | Just a week later in the evening of April 29th, Haida and her sister ship Athabaskan encountered the T24 and T27 as they tried to flee from their port. In the ensuing engagement, the Athabaskan was destroyed by torpedoes fired from T24, but Haida was able to severely damage the T27, which was later destroyed by British MTBs. Haida rescued 44 survivors from the Athabaskan, while the remaining crewmembers were either killed or taken prisoner by the Germans. In June of 1944, Haida, along with her squadron, encountered another German destroyer flotilla and engaged them in what would become known as the Battle of Ushant. During this engagement, the German destroyer Z32 was sunk jointly by Haida and her sister ship Huron. | |
| − | + | In late June of 1944, Haida successfully sank the German submarine U-971 which had been spotted by British RAF Liberator bombers. In early July, she, along with the Polish destroyer ORP Blyskawica, encountered a German convoy and successfully sank two minesweepers and a merchant ship. Later on in August, the Haida encountered yet another convoy of German ships and sank two minesweepers and a patrol boat. | |
| − | |||
| − | |||
| − | |||
| − | |||
| − | |||
| − | + | After her service in the English channel, Haida returned to Halifax for a much-needed refit and was fitted with new sensors. She returned to the Atlantic theatre in April of 1945, and saw one of the last actions of RCN vessels when she was part of an escorting force that attacked two U-Boats that attempted to torpedo their convoy. Both U-Boats were sunk, for the loss of one frigate. | |
| − | + | After the cessation of hostilities in the European theatre, it had been intended that Haida be sent to the Pacific Theatre to serve in the American invasion of Japan. However, due to the dropping of Atomic bombs at Hiroshima and Nagasaki, there was no need for this, and the Haida was reduced to reserve in 1947. She later became the first Canadian destroyer to venture into the Hudson Bay. Following the start of the Korean War, Haida was reactivated and sent to the Korean theatre where she participated in several patrols, escorting aircraft carriers and shelling North Korean surface units. She later became part of the "Train Busters Club", a group of ships which had successfully destroyed North Korean trains by shelling them from the sea. She saw less service during the later part of the 1950s, as her ageing equipment began to deteriorate and malfunction. | |
| − | |||
| − | |||
| − | |||
| − | |||
| − | |||
| − | |||
| − | |||
| − | |||
| − | |||
| − | + | Haida was reduced to reserve again in 1962, and was intended to be scrapped. However, members of her crew were able to purchase the ship from the RCN, and converted it into a museum ship. Initially, the Haida was docked on the Toronto waterfront, but she has now been moved to Hamilton Harbour. Nicknamed "The Fightingest Ship in the Canadian Navy", Haida is still a museum ship and serves as the ceremonial flagship of the Royal Canadian Navy. | |
| − | |||
| − | |||
| − | + | === [[wt:en/news/5818-fleet-development-hmcs-haida-commonwealth-veteran-en|Devblog]] === | |
| + | HMCS Haida was laid down on the 29th September, 1941 at the Vickers-Armstrong dockyard in Newcastle-upon-Tyne. In August 1943, the ship was launched and entered RCN service shortly afterwards. Haida's early service life is marked by escort duties as part of various Arctic convoys. In spring 1944, Haida was tasked to perform sweeps along the French coastline. Haida scored her first kill, sinking the German T-29 destroyer along with other members of her task force in April. | ||
| − | + | Prior to D-Day, Haida continued to run sweeps along the French coast, periodically engaging in skirmishes with German destroyers and torpedo boats. After sinking a German U-boat, Haida paired up with the Polish destroyer, Blyskawica in actions against German surface vessels off the western coast of France. During one such raid in August, Haida was damaged by a German ship - a 10 5mm round hit the stern section and returned to Halifax in September. | |
| − | |||
| − | + | After repairs and refits, Haida continued her service off the coast of Norway in March 1945, serving as an escort and assisting in various operations. After the German surrender in May, Haida was sent to the Pacific in preparation for the invasion of the Japanese home islands. Whilst undergoing tropicalization refits however, Japan surrendered. This marked the end of WW2 and Haida's service as part of it. | |
| − | + | In the postwar years, Haida switched between reserve and active status as well as undergoing several refits and upgrades. The Korean War called for Haida's service one final time. There, the ship operated as a destroyer escort, primarily performing shoreline bombardment and patrols. | |
| − | |||
| − | |||
| − | + | After the Korean War, Haida was ultimately decommissioned from active service, but avoided being scrapped by being turned into a Toronto attraction in 1965. In the early 2000s, Haida underwent extensive restoration before becoming a National Historic Site at the Hamilton Waterfront. Today, HMCS Haida is the ceremonial flagship of the Royal Canadian Navy and still welcomes visitors from all over the globe. | |
== Media == | == Media == | ||
| Line 277: | Line 128: | ||
;Skins | ;Skins | ||
| − | * [https://live.warthunder.com/feed/camouflages/?vehicle= | + | * [https://live.warthunder.com/feed/camouflages/?vehicle=uk_destroyer_haida Skins and camouflages for the {{PAGENAME}} from live.warthunder.com.] |
| + | |||
| + | ;Images | ||
| + | <gallery mode="packed-hover" heights="200"> | ||
| + | File:HMCS Haida WTWallpaper001.jpg | ||
| + | File:HMCS Haida WTWallpaper002.jpg | ||
| + | File:HMCS Haida WTWallpaper003.jpg | ||
| + | File:HMCS Haida WTWallpaper004.jpg | ||
| + | File:HMCS Haida WTWallpaper005.jpg | ||
| + | File:HMCS Haida WTWallpaper006.jpg | ||
| + | </gallery> | ||
== See also == | == See also == | ||
| − | <!-- ''Links to | + | <!-- ''Links to articles on the War Thunder Wiki that you think will be useful for the reader, for example:'' |
| − | * ''reference to the series of the | + | * ''reference to the series of the ship;'' |
* ''links to approximate analogues of other nations and research trees.'' --> | * ''links to approximate analogues of other nations and research trees.'' --> | ||
| − | ; | + | ;Other Canadian naval vehicles present in the game |
| − | * [[ | + | * [[HMCS Brantford]] |
| − | + | * [[HMCS Terra Nova]] | |
| − | |||
| − | |||
| − | |||
| − | * [[ | ||
== External links == | == External links == | ||
| Line 298: | Line 155: | ||
* ''other literature.'' --> | * ''other literature.'' --> | ||
| − | * [ | + | * [[wt:en/news/5818-fleet-development-hmcs-haida-commonwealth-veteran-en|[Devblog] HMCS Haida - Commonwealth Veteran]] |
=== References === | === References === | ||
| − | |||
| − | |||
| − | |||
;Bibliography | ;Bibliography | ||
| − | * | + | * Parks Canada. (n.d.). HMCS Haida, National historic site. Retrieved January 19, 2021, from <nowiki>https://www.historicplaces.ca/en/rep-reg/place-lieu.aspx?id=7624</nowiki> |
| − | * | + | * Sarty, R. (2006, February 7). HMCS Haida. Retrieved January 19, 2021, from <nowiki>https://www.thecanadianencyclopedia.ca/en/article/haida-ship</nowiki> |
| − | {{Manufacturer | + | {{Manufacturer Vickers-Armstrongs}} |
| − | {{ | + | {{Britain destroyers}} |
| + | {{Britain premium ships}} | ||
Latest revision as of 12:31, 16 February 2024
| This page is about the British destroyer HMCS Haida. For other Tribal-class destroyers, see Tribal (Family). |

Contents
Description
The HMCS Haida (41) is a member of the Tribal-class destroyers, named after the Haida tribe. She was a member of the Canadian Navy from 1943 to 1963, serving in both World War II and the Korean War. The HMCS Haida, as the only surviving Tribal-class destroyer out of 27 vessels, sank more enemy surface tonnage than any other Canadian vessel and is thus known as the "Fightingest Ship in the Royal Canadian Navy". She was designated a National Historic Site of Canada in 1984 and now serves as a museum ship in Hamilton, Ontario, next to HMCS Star, an active Royal Canadian Naval Reserve Division. The HMCS Haida was named the Canadian Navy's ceremonial flagship in 2018.
Introduced in Update 1.83 "Masters of the Sea" as a premium pack as part of the British fleet closed beta test, the HMCS Haida is a powerful destroyer, equipped with lethal anti-aircraft armaments and powerful torpedoes. Players should use its powerful ammunition to engage enemy destroyers and cover allies with its excellent anti-aircraft capability. However, in comparison to many other destroyers, its speed remains below average. This, combined with the subpar muzzle velocity of its main armaments, makes engaging targets at long range difficult.
The HMCS Haida was removed from the store after the 2019 Anniversary sale. It has been made available for purchase with Golden Eagles ![]() in-game briefly during the 2023 "Canadian Armed Forces Day" and "Trafalgar Day" mini-events.
in-game briefly during the 2023 "Canadian Armed Forces Day" and "Trafalgar Day" mini-events.
General info
Survivability and armour
The HMCS Haida is like most destroyers in the game; thin armour, good mobility and respectable firepower. The destroyer has 10 to 23 mm of hull armour all around and 3 mm of anti-fragmentation armour protecting the 120 mm main battery guns. The 40 mm 2-Pounder "Pom-Pom" and 20 mm Oerlikon anti-aircraft guns are protected by 12.7 mm of hardened steel.
Mobility
The Haida is by no means a slow ship. She is able to reach a top speed of 35.6 knots, but she is slower when compared to similar destroyers such as Leningrad, Fletcher, the Type 1936 / Type 1936B or even the Type 1934A. However, the rudder shift is very responsive with a shift time of around 2 seconds. This allows HMCS Haida to dodge its way through gunfights or during air attacks.
| Mobility Characteristics | |||
|---|---|---|---|
| Game Mode | Upgrade Status | Maximum Speed (km/h) | |
| Forward | Reverse | ||
| AB | |||
| Upgraded | |||
| RB/SB | |||
| Upgraded | |||
Modifications and economy
Armament
Primary armament
Provide information about the characteristics of the primary armament. Evaluate their efficacy in battle based on their reload speed, ballistics and the capacity of their shells. Add a link to the main article about the weapon: {{main|Weapon name (calibre)}}. Broadly describe the ammunition available for the primary armament, and provide recommendations on how to use it and which ammunition to choose.
| Penetration statistics | |||||||
|---|---|---|---|---|---|---|---|
| Ammunition | Type of warhead |
Penetration @ 0° Angle of Attack (mm) | |||||
| 1,000 m | 2,500 m | 5,000 m | 7,500 m | 10,000 m | 15,000 m | ||
| HE Mk.VIIA | HE | 35 | 35 | 35 | 35 | 35 | 35 |
| SAP Mk.VA | SAP | 116 | 92 | 63 | 44 | 33 | 29 |
| HE-TF Mk.VIIA | HE-TF | 35 | 35 | 35 | 35 | 35 | 35 |
| HE-VT Mk.VIIA | HE-VT | 35 | 35 | 35 | 35 | 35 | 35 |
| Shell details | ||||||||||||
|---|---|---|---|---|---|---|---|---|---|---|---|---|
| Ammunition | Type of warhead |
Velocity (m/s) |
Projectile mass (kg) |
Fuse delay (s) |
Fuse sensitivity (mm) |
Explosive mass (TNT equivalent) (g) |
Ricochet | |||||
| 0% | 50% | 100% | ||||||||||
| HE Mk.VIIA | HE | 808 | 22.68 | 0 | 0.1 | 3,000 | 79° | 80° | 81° | |||
| SAP Mk.VA | SAP | 808 | 22.68 | 0.015 | 5 | 900 | 47° | 60° | 65° | |||
| HE-TF Mk.VIIA | HE-TF | 808 | 22.68 | 0 | 0.1 | 3,000 | 79° | 80° | 81° | |||
| Proximity-fused shell details | ||||||||||||
|---|---|---|---|---|---|---|---|---|---|---|---|---|
| Ammunition | Type of warhead |
Velocity (m/s) |
Projectile mass (kg) |
Fuse delay (m) |
Fuse sensitivity (mm) |
Arming distance (m) |
Trigger radius (m) |
Explosive mass (TNT equivalent) (g) |
Ricochet | |||
| 0% | 50% | 100% | ||||||||||
| HE-VT Mk.VIIA | HE-VT | 808 | 22.68 | 0 | 0.1 | 244 | 23 | 3,000 | 79° | 80° | 81° | |
Secondary armament
Some ships are fitted with weapons of various calibres. Secondary armaments are defined as weapons chosen with the control Select secondary weapon. Evaluate the secondary armaments and give advice on how to use them. Describe the ammunition available for the secondary armament. Provide recommendations on how to use them and which ammunition to choose. Remember that any anti-air armament, even heavy calibre weapons, belong in the next section. If there is no secondary armament, remove this section.
| Penetration statistics | |||||||
|---|---|---|---|---|---|---|---|
| Ammunition | Type of warhead |
Penetration @ 0° Angle of Attack (mm) | |||||
| 1,000 m | 2,500 m | 5,000 m | 7,500 m | 10,000 m | 15,000 m | ||
| 4 inch HE | HE | 20 | 20 | 20 | 20 | 20 | 20 |
| 4 inch SAP | SAP | 102 | 85 | 64 | 48 | 38 | 30 |
| 4 inch HE-TF | HE-TF | 20 | 20 | 20 | 20 | 20 | 20 |
| 4 inch HE-VT | HE-VT | 20 | 20 | 20 | 20 | 20 | 20 |
| Shell details | ||||||||||||
|---|---|---|---|---|---|---|---|---|---|---|---|---|
| Ammunition | Type of warhead |
Velocity (m/s) |
Projectile mass (kg) |
Fuse delay (s) |
Fuse sensitivity (mm) |
Explosive mass (TNT equivalent) (g) |
Ricochet | |||||
| 0% | 50% | 100% | ||||||||||
| 4 inch HE | HE | 811 | 15.88 | 0 | 0.1 | 1,550 | 79° | 80° | 81° | |||
| 4 inch SAP | SAP | 811 | 17.35 | 0.015 | 5 | 600 | 47° | 60° | 65° | |||
| 4 inch HE-TF | HE-TF | 811 | 15.88 | 0 | 0.1 | 1,550 | 79° | 80° | 81° | |||
| Proximity-fused shell details | ||||||||||||
|---|---|---|---|---|---|---|---|---|---|---|---|---|
| Ammunition | Type of warhead |
Velocity (m/s) |
Projectile mass (kg) |
Fuse delay (m) |
Fuse sensitivity (mm) |
Arming distance (m) |
Trigger radius (m) |
Explosive mass (TNT equivalent) (g) |
Ricochet | |||
| 0% | 50% | 100% | ||||||||||
| 4 inch HE-VT | HE-VT | 811 | 15.88 | 0 | 0.1 | 274 | 18 | 1,550 | 79° | 80° | 81° | |
Anti-aircraft armament
The Haida is no slouch when it comes to AAA batteries for a destroyer. She is armed with one quad 40 mm 2-Pounder "Pom-Pom" mount accompanied by six twin 20 mm Oerlikon mounts. These are also very useful for tearing apart enemy torpedo boats that happen to stray too close. In addition, the 102 mm secondary mount acts as a heavy AAA mount. The 102 mm mount can be armed with High Explosives with fuses set inside.
Additional armament
The Haida is also armed with a single quad 533 mm torpedo launcher. The torpedoes travel at a top speed of 39.1 knots and have a maximum range of 7.32 km. The torpedoes have an arming distance of 50 m, so be careful about the distance to the target. In addition, the torpedoes themselves pack a powerful punch, boasting a 327 kg warhead in each torpedo. There is a major factor that all players using either HMCS Haida or her non-premium counterpart- HMS Eskimo: the torpedo tubes have to be fired from nearly broadside angles, otherwise the torpedo tubes will be obstructed. Take care should you choose to fire your torpedoes.
Usage in battles
Describe the technique of using this ship, the characteristics of her use in a team and tips on strategy. Abstain from writing an entire guide – don't try to provide a single point of view, but give the reader food for thought. Talk about the most dangerous opponents for this vehicle and provide recommendations on fighting them. If necessary, note the specifics of playing with this vehicle in various modes (AB, RB, SB).
Pros and cons
Pros:
- Hard-hitting High-Explosive shells
- Lethal AAA mounts for a destroyer
- Relatively fast for her type
- Excellent manoeuvrability
- Powerful torpedo armaments
Cons:
- Subpar speed compared to her counterparts of other nations
- Muzzle velocity of the main cannons is sub-par when compared to those of German, Soviet and Japanese destroyers
- Terrible torpedo firing arcs: a player must practically fire torpedoes from broadsides
- AAA mounts tend to be lacking when compared to her American counterparts
History

HMCS Haida is a destroyer of the Tribal class of destroyers built for the British, Canadian and Australian navies during World War II. Named after the Haida people, HMCS Haida was commissioned in 1943 and had a storied service career, sinking the most enemy ship tonnage out of all Canadian ships in the Second World War. As such, she was nicknamed "The Fightingest ship in the Canadian Navy". Haida saw service during the Korean war and was eventually decommissioned and turned into a museum ship. She is still a museum ship today, berthed in Hamilton Harbour, and serves as the ceremonial flagship of the Royal Canadian Navy (RCN).
Design and development
In the early 1940s, the British built the Tribal class jointly for their own navy and for the Canadian and Australian navies. The RCM ultimately settled on the Tribal class, as it was heavily armed and could essentially be used as a "small cruiser". In total the RCN ordered eight Tribal class destroyers, which were modified with a new ventilation system to make them more suited to the harsh conditions of Canadian winter service. Haida was built by Vickers Armstrong shipyards at Newcastle, and was commissioned by September 18th 1943.
Haida displaced 1959 tons standard and had a crew of 259 officers and men. Her main armament consisted of six 4.7-inch (119 mm) guns in three dual mounts, along with a secondary 4-inch (102 mm) dual mount. She had an anti-aircraft armament of 1 quadruple 40 mm 2-pounder Pom-Pom gun, as well as six 20 mm Oerlikon guns. She carried a single quadruple torpedo tube mounting, as well as depth charge racks to counter submarines. Powered by steam turbines, Haida could reach a maximum speed of 36.5 knots (68 km/h).
Operational history
After her commissioning, Haida was based from the British Home Fleet, and immediately partook in convoy escort duties. She was part of the escort screen for convoy JW 55 B, and escorted the convoy away from the battleship Scharnhorst which was then destroyed by British battleships. Haida was subsequently reassigned to perform coastal sweeps of the English channel, in preparation for the D-Day landings of June 1944. During the evening of April 25th 1944, Haida saw her first action when her destroyer flotilla encountered a German torpedo boat flotilla with three Type 1939-class torpedo boats. Haida herself sank the T29 while T24 and T27 were damaged.
Just a week later in the evening of April 29th, Haida and her sister ship Athabaskan encountered the T24 and T27 as they tried to flee from their port. In the ensuing engagement, the Athabaskan was destroyed by torpedoes fired from T24, but Haida was able to severely damage the T27, which was later destroyed by British MTBs. Haida rescued 44 survivors from the Athabaskan, while the remaining crewmembers were either killed or taken prisoner by the Germans. In June of 1944, Haida, along with her squadron, encountered another German destroyer flotilla and engaged them in what would become known as the Battle of Ushant. During this engagement, the German destroyer Z32 was sunk jointly by Haida and her sister ship Huron.
In late June of 1944, Haida successfully sank the German submarine U-971 which had been spotted by British RAF Liberator bombers. In early July, she, along with the Polish destroyer ORP Blyskawica, encountered a German convoy and successfully sank two minesweepers and a merchant ship. Later on in August, the Haida encountered yet another convoy of German ships and sank two minesweepers and a patrol boat.
After her service in the English channel, Haida returned to Halifax for a much-needed refit and was fitted with new sensors. She returned to the Atlantic theatre in April of 1945, and saw one of the last actions of RCN vessels when she was part of an escorting force that attacked two U-Boats that attempted to torpedo their convoy. Both U-Boats were sunk, for the loss of one frigate.
After the cessation of hostilities in the European theatre, it had been intended that Haida be sent to the Pacific Theatre to serve in the American invasion of Japan. However, due to the dropping of Atomic bombs at Hiroshima and Nagasaki, there was no need for this, and the Haida was reduced to reserve in 1947. She later became the first Canadian destroyer to venture into the Hudson Bay. Following the start of the Korean War, Haida was reactivated and sent to the Korean theatre where she participated in several patrols, escorting aircraft carriers and shelling North Korean surface units. She later became part of the "Train Busters Club", a group of ships which had successfully destroyed North Korean trains by shelling them from the sea. She saw less service during the later part of the 1950s, as her ageing equipment began to deteriorate and malfunction.
Haida was reduced to reserve again in 1962, and was intended to be scrapped. However, members of her crew were able to purchase the ship from the RCN, and converted it into a museum ship. Initially, the Haida was docked on the Toronto waterfront, but she has now been moved to Hamilton Harbour. Nicknamed "The Fightingest Ship in the Canadian Navy", Haida is still a museum ship and serves as the ceremonial flagship of the Royal Canadian Navy.
Devblog
HMCS Haida was laid down on the 29th September, 1941 at the Vickers-Armstrong dockyard in Newcastle-upon-Tyne. In August 1943, the ship was launched and entered RCN service shortly afterwards. Haida's early service life is marked by escort duties as part of various Arctic convoys. In spring 1944, Haida was tasked to perform sweeps along the French coastline. Haida scored her first kill, sinking the German T-29 destroyer along with other members of her task force in April.
Prior to D-Day, Haida continued to run sweeps along the French coast, periodically engaging in skirmishes with German destroyers and torpedo boats. After sinking a German U-boat, Haida paired up with the Polish destroyer, Blyskawica in actions against German surface vessels off the western coast of France. During one such raid in August, Haida was damaged by a German ship - a 10 5mm round hit the stern section and returned to Halifax in September.
After repairs and refits, Haida continued her service off the coast of Norway in March 1945, serving as an escort and assisting in various operations. After the German surrender in May, Haida was sent to the Pacific in preparation for the invasion of the Japanese home islands. Whilst undergoing tropicalization refits however, Japan surrendered. This marked the end of WW2 and Haida's service as part of it.
In the postwar years, Haida switched between reserve and active status as well as undergoing several refits and upgrades. The Korean War called for Haida's service one final time. There, the ship operated as a destroyer escort, primarily performing shoreline bombardment and patrols.
After the Korean War, Haida was ultimately decommissioned from active service, but avoided being scrapped by being turned into a Toronto attraction in 1965. In the early 2000s, Haida underwent extensive restoration before becoming a National Historic Site at the Hamilton Waterfront. Today, HMCS Haida is the ceremonial flagship of the Royal Canadian Navy and still welcomes visitors from all over the globe.
Media
- Skins
- Images


See also
- Other Canadian naval vehicles present in the game
External links
References
- Bibliography
- Parks Canada. (n.d.). HMCS Haida, National historic site. Retrieved January 19, 2021, from https://www.historicplaces.ca/en/rep-reg/place-lieu.aspx?id=7624
- Sarty, R. (2006, February 7). HMCS Haida. Retrieved January 19, 2021, from https://www.thecanadianencyclopedia.ca/en/article/haida-ship
| Vickers-Armstrongs Limited | |
|---|---|
| Ships | |
| Tribal-class | HMS Eskimo · HMCS Haida |
| Invincible-class | HMS Invincible* |
| Kongō-class | IJN Kongo** |
| Tanks | |
| Light Tanks | VFM5*** · Vickers Mk.11*** |
| Light Tank Mk VI | Light AA Mk I |
| Light Tank Mk VII | Tetrarch I |
| Light Tank Mk VIII | Alecto I |
| Tank, Infantry, Valentine | Valentine I · Valentine IX · Valentine XI · Archer |
| Vickers MBT | Vickers Mk.1 · Vickers Mk.3 · Vickers Mk.7*** |
| Heavy Tanks | Independent**** |
| Export | ▂МК-IX "Valentine" · Vickers Mk.E**** |
| See also | Vickers-Armstrongs Aircraft Limited |
| *Previously Armstrong Whitworth | |
| **Built for Japan | |
| ***Vickers Defence Systems | |
| ****Previously Vickers Limited | |
| Britain destroyers | |
|---|---|
| Town-class | HMS Churchill · HMS Montgomery |
| V-class | HMS Valhalla · HMS Vega · HMS Verdun |
| G-class | HMS Grafton · ORP Garland |
| Hunt-class | HMS Calpe · HMS Brissenden |
| Tribal-class | HMCS Haida · HMS Eskimo · HMS Mohawk |
| J-class | HMS Jervis |
| K-class | HMS Kelvin |
| N-class | HMAS Nepal |
| Battle-class | HMS Armada · HMS Cadiz · HMAS Tobruk |
| Daring-class | HMS Daring · HMS Diamond · HMS Diana |
| Britain premium ships | |
|---|---|
| Motor torpedo boats | MTB-1(2) · MTB-422 · Fairmile D (5001) · HMS Gay Archer |
| Motor gun boats | MGB-75 · SGB Grey Goose |
| Gunboats | HMS Spey |
| Sub-chasers | LÉ Orla |
| Frigates | HMS Whitby |
| Destroyers | HMS Montgomery · HMS Valhalla · HMS Verdun · ORP Garland · HMS Jervis · HMCS Haida · HMS Mohawk · HMS Cadiz · HMS Diamond |
| Light cruisers | HMS Belfast |
| Battleships | HMS Iron Duke |
