Difference between pages "Swift F.7" and "Halifax B Mk IIIa"
U108409241 (talk | contribs) (Heavily altered Usage in Battles to provide more information and in much greater detail, with tactics that apply to the current meta and balance.) (Tag: Visual edit) |
U120610831 (talk | contribs) (→Suspended armament: Add note regarding bomb sequencing) (Tag: Visual edit) |
||
| Line 1: | Line 1: | ||
| − | |||
| − | |||
| − | |||
| − | |||
| − | |||
{{Specs-Card | {{Specs-Card | ||
| − | |code= | + | |code=halifax_mk3 |
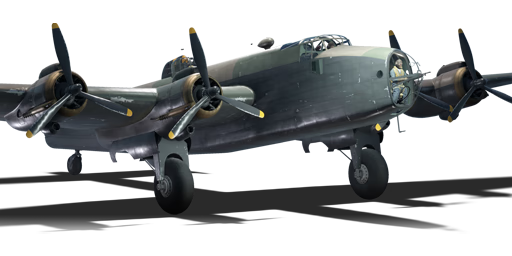
|images={{Specs-Card-Image|GarageImage_{{PAGENAME}}.jpg}} | |images={{Specs-Card-Image|GarageImage_{{PAGENAME}}.jpg}} | ||
}} | }} | ||
| Line 11: | Line 6: | ||
== Description == | == Description == | ||
<!-- ''In the description, the first part should be about the history of and the creation and combat usage of the aircraft, as well as its key features. In the second part, tell the reader about the aircraft in the game. Insert a screenshot of the vehicle, so that if the novice player does not remember the vehicle by name, he will immediately understand what kind of vehicle the article is talking about.'' --> | <!-- ''In the description, the first part should be about the history of and the creation and combat usage of the aircraft, as well as its key features. In the second part, tell the reader about the aircraft in the game. Insert a screenshot of the vehicle, so that if the novice player does not remember the vehicle by name, he will immediately understand what kind of vehicle the article is talking about.'' --> | ||
| − | The '''{{Specs|name}}''' is a rank {{Specs|rank}} British | + | The '''{{Specs|name}}''' is a rank {{Specs|rank}} British bomber {{Battle-rating}}. It was introduced in [[Update 1.59 "Flaming Arrows"]]. |
| − | The | + | The Halifax is an interesting member of the British bomber line. It is the first true British heavy bomber, a big change from its predecessors, which are all either flying boats, medium, or light bombers. With the transition to heavy bombers, comes a change in tactics. The Halifax will outclass almost every rank 2 and 3 bombers in terms of payload. It will also generally beat every same battle-rated bomber in the payload department as well. However, being a heavy bomber has its drawbacks. Compared to nearly all previous British bombers, this one is slower and has a noticeably slow climb rate. While the payload upgrade is nice, the Halifax is not very durable. Worse, the Halifax lacks effective defensive weapons, a flaw of nearly all British bombers. The main priority, as a result, should be targeting bases and avoiding opposing pilots as much as possible. Use high altitude and less direct travel routes to get to your targets. If you are engaged, your defensive guns can save you, but they are not very reliable. In addition, this bomber does not have any ventral turrets, leaving a massive defensive gap directly under the aircraft. You also only have one singular machine gun able to cover the fore-lower approach to your aircraft and little in the way of armour plating for the pilot other than a steel bulkhead that won't protect against cannon shells or rifle-calibre bullets well. However, if you can keep safe and deliver your payload, you will find this to be a very effective bomber. |
| − | |||
| − | The | ||
| − | |||
| − | |||
== General info == | == General info == | ||
| − | |||
=== Flight performance === | === Flight performance === | ||
{{Specs-Avia-Flight}} | {{Specs-Avia-Flight}} | ||
<!-- ''Describe how the aircraft behaves in the air. Speed, manoeuvrability, acceleration and allowable loads - these are the most important characteristics of the vehicle.'' --> | <!-- ''Describe how the aircraft behaves in the air. Speed, manoeuvrability, acceleration and allowable loads - these are the most important characteristics of the vehicle.'' --> | ||
| − | |||
| − | |||
| − | |||
| − | |||
| − | |||
{| class="wikitable" style="text-align:center" width="70%" | {| class="wikitable" style="text-align:center" width="70%" | ||
! rowspan="2" | Characteristics | ! rowspan="2" | Characteristics | ||
| − | ! colspan="2" | Max Speed<br>(km/h at | + | ! colspan="2" | Max Speed<br>(km/h at 4,115 m) |
! rowspan="2" | Max altitude<br>(metres) | ! rowspan="2" | Max altitude<br>(metres) | ||
! colspan="2" | Turn time<br>(seconds) | ! colspan="2" | Turn time<br>(seconds) | ||
| Line 41: | Line 26: | ||
|- | |- | ||
! Stock | ! Stock | ||
| − | | | + | | 436 || 420 || rowspan="2" | {{Specs|ceiling}} || 35.0 || 35.8 || 3.8 || 3.8 || rowspan="2" | 750 |
|- | |- | ||
! Upgraded | ! Upgraded | ||
| − | | | + | | 478 || 454 || 33.2 || 34.0 || 9.9 || 6.5 |
|- | |- | ||
|} | |} | ||
==== Details ==== | ==== Details ==== | ||
| + | [[File:Halifax 3.png|450px|right|thumb|A Halifax in action over Sicily.]] | ||
{| class="wikitable" style="text-align:center" width="50%" | {| class="wikitable" style="text-align:center" width="50%" | ||
|- | |- | ||
| − | ! colspan=" | + | ! colspan="5" | Features |
|- | |- | ||
| − | ! Combat flaps !! Take-off flaps !! Landing flaps !! Air brakes !! Arrestor gear | + | ! Combat flaps !! Take-off flaps !! Landing flaps !! Air brakes !! Arrestor gear |
|- | |- | ||
| − | | | + | | ✓ || ✓ || ✓ || X || X <!-- ✓ --> |
|- | |- | ||
|} | |} | ||
| Line 70: | Line 56: | ||
! Combat !! Take-off !! Landing !! + !! - | ! Combat !! Take-off !! Landing !! + !! - | ||
|- | |- | ||
| − | | {{Specs|destruction|body}} || {{Specs|destruction|gear}} || | + | | 541 <!-- {{Specs|destruction|body}} --> || {{Specs|destruction|gear}} || 491 || 454 || 260 || ~4 || ~3 |
|- | |- | ||
|} | |} | ||
| Line 80: | Line 66: | ||
! Ailerons !! Rudder !! Elevators !! Radiator | ! Ailerons !! Rudder !! Elevators !! Radiator | ||
|- | |- | ||
| − | | < | + | | < 350 || < 370 || < 350 || > 280 |
| − | |||
| − | |||
| − | |||
| − | |||
| − | |||
| − | |||
| − | |||
| − | |||
| − | |||
| − | |||
| − | |||
| − | |||
| − | |||
| − | |||
| − | |||
| − | |||
| − | |||
| − | |||
| − | |||
| − | |||
| − | |||
| − | |||
| − | |||
| − | |||
| − | |||
| − | |||
| − | |||
| − | |||
| − | |||
| − | |||
| − | |||
| − | |||
| − | |||
| − | |||
| − | |||
|- | |- | ||
|} | |} | ||
| Line 123: | Line 74: | ||
<!-- ''Examine the survivability of the aircraft. Note how vulnerable the structure is and how secure the pilot is, whether the fuel tanks are armoured, etc. Describe the armour, if there is any, and also mention the vulnerability of other critical aircraft systems.'' --> | <!-- ''Examine the survivability of the aircraft. Note how vulnerable the structure is and how secure the pilot is, whether the fuel tanks are armoured, etc. Describe the armour, if there is any, and also mention the vulnerability of other critical aircraft systems.'' --> | ||
| − | + | * 6.35 mm steel in front and floor of the cockpit | |
| − | + | * 8 mm steel behind the pilot and in rear fuselage bulkhead | |
| − | * | ||
| − | |||
| − | |||
| − | |||
=== Modifications and economy === | === Modifications and economy === | ||
| Line 135: | Line 82: | ||
== Armaments == | == Armaments == | ||
{{Specs-Avia-Armaments}} | {{Specs-Avia-Armaments}} | ||
| − | |||
| − | |||
| − | |||
| − | |||
| − | |||
| − | |||
| − | |||
| − | |||
| − | |||
| − | |||
| − | |||
| − | |||
=== Suspended armament === | === Suspended armament === | ||
{{Specs-Avia-Suspended}} | {{Specs-Avia-Suspended}} | ||
<!-- ''Describe the aircraft's suspended armament: additional cannons under the wings, bombs, rockets and torpedoes. This section is especially important for bombers and attackers. If there is no suspended weaponry remove this subsection.'' --> | <!-- ''Describe the aircraft's suspended armament: additional cannons under the wings, bombs, rockets and torpedoes. This section is especially important for bombers and attackers. If there is no suspended weaponry remove this subsection.'' --> | ||
| − | {{main| | + | {{main|G.P. Mk.IV (250 lb)|G.P. Mk.IV (500 lb)|S.A.P. Mk.II (500 lb)|M.C. Mk.I (1,000 lb)|A.P. Mk.I (2,000 lb)}} |
The '''''{{PAGENAME}}''''' can be outfitted with the following ordnance: | The '''''{{PAGENAME}}''''' can be outfitted with the following ordnance: | ||
| − | * | + | * 15 x 250 lb G.P. Mk.IV bombs (3,750 lb total) |
| − | * 2 x | + | * 15 x 500 lb G.P. Mk.IV bombs (7,500 lb total) |
| + | * 15 x 500 lb S.A.P. Mk.II bombs (7,500 lb total) | ||
| + | * 9 x 1,000 lb M.C. Mk.I bombs + 6 x 500 lb G.P. Mk.IV bombs (12,000 lb total) | ||
| + | * 4 x 2,000 lb A.P. Mk.I bombs (8,000 lb total) | ||
| + | |||
| + | Note: With the 9 x 1,000 lb + 6 x 500 lb load, the 500 lb bombs drop first from bays in the inner wings, then the 1,000 lb bombs from the ventral bomb bay. | ||
| − | + | === Defensive armament === | |
| + | {{Specs-Avia-Defensive}} | ||
| + | <!-- ''Defensive armament with turret machine guns or cannons, crewed by gunners. Examine the number of gunners and what belts or drums are better to use. If defensive weaponry is not available, remove this subsection.'' --> | ||
| + | {{main|Browning (7.7 mm)|Vickers K (7.7 mm)}} | ||
| − | + | The '''''{{PAGENAME}}''''' is defended by: | |
| − | + | * 1 x 7.7 mm Vickers K machine gun, nose turret (1,000 rpg) | |
| + | * 4 x 7.7 mm Browning machine guns, dorsal turret (600 rpg = 2,400 total) | ||
| + | * 4 x 7.7 mm Browning machine guns, tail turret (1,700 rpg = 6,800 total) | ||
== Usage in battles == | == Usage in battles == | ||
<!-- ''Describe the tactics of playing in the aircraft, the features of using aircraft in a team and advice on tactics. Refrain from creating a "guide" - do not impose a single point of view, but instead, give the reader food for thought. Examine the most dangerous enemies and give recommendations on fighting them. If necessary, note the specifics of the game in different modes (AB, RB, SB).'' --> | <!-- ''Describe the tactics of playing in the aircraft, the features of using aircraft in a team and advice on tactics. Refrain from creating a "guide" - do not impose a single point of view, but instead, give the reader food for thought. Examine the most dangerous enemies and give recommendations on fighting them. If necessary, note the specifics of the game in different modes (AB, RB, SB).'' --> | ||
| − | [[File: | + | [[File:Cool Halifax.png|alt=A Halifax landed on a hill at sunrise.|thumb|550x550px|A Halifax, landed on a hill, looking good.]] |
| − | The | + | The Halifax Mark IIIa is the first true "heavy" bomber that an Allied player will unlock. It has four engines that do well at higher altitudes- above the height of 4,000 m (13,000 ft) - and it has a large payload of around 12,000 pounds of bombs, going by weight. This is sufficient so that one Halifax can, on their own, annihilate all three minibases in a match and take a small chunk out of the enemy airfield, and otherwise, it can take a sizeable chunk out of the airfield- around three-quarters of the base's total HP. Two Halifaxes can annihilate all the bases and most of the airfield together in its BR bracket. Three Halifaxes can destroy everything in an uptier. Four Halifaxes, should they survive the trip to the enemy bases, can destroy everything they see on the map and result in a fast game-over. It dwarfs the payloads of contemporary 4.0 bombers, such as the [[Pe-2-83]], [[B-25J-1]], and the [[Yer-2 (M-105)]] with its overwhelmingly large bombload. |
| − | |||
| − | |||
| − | + | However, the Halifax is not all explosions, sunshine and rainbows. The aircraft requires you to play very defensively and requires you to be a crack shot with the turrets and able to know where enemies are going and be lucky enough to avoid their fire. The Halifax B Mk IIIa is a British bomber, and in-game, has a notorious reputation for carrying a lot of bombs, but being unable to avoid fighter aircraft (doesn't climb fast enough nor perform well enough at high altitude) or defend itself (four/eight 7.7 mm machine guns is absolutely inadequate at its BR). However, if your aim is extremely on point, you may be able to defeat one or two enemy fighter aircraft before being defeated yourself. While it does have a good bombload, pilots will find that it has problems in actually getting to the target. Sideclimbing can be a very useful tactic in the Halifax, as you can wait for some of the enemy fighters to lose altitude while gaining some yourself. | |
| − | + | One technique that some British pilots use to some degree of success are low-altitude dambusters-style raids flying at treetop level, just above terrain. This allows you to avoid Axis fighters (most of which climb too high to dive on you), but if you are unlucky , will simply leave you at the mercy of Bf 109s, Fw 190s, low-flying Japanese aircraft and all attackers which will enjoy the opportunity for a free kill. You need to be watching the skies and make course corrections to avoid enemy aircraft, since you do not have the weapons nor performance to take them out or outrun them. You need to pre-empt where enemy aircraft will be and make adjustments as such. You are also harder to see above water, above forests and above large urban areas (e.g. the cities on Ruhr) due to the bi-colour night-time camouflage. Use this to your advantage. | |
| − | + | When in air RB match, it is advised to sideclimb to 6500-7,000m to avoid interceptors (which usually only climb to 4,500 m and don't want to waste time climbing up to you) and approach one of the sets of two bases from an angle where you can take them both out in a single pass with 6 x 500 lb and 1 x 1,000 lb bombs for the first base and 3 x 1,000 lb bombs for the second. After that approach the other bases in the same manner (if they are not already destroyed) with 3 x 1,000 lb bombs for the first and the remaining 2 x 1,000 lb bombs on the second base. If the second set of bases have been bombed before you get to them, bomb the airfield and your remaining 4 x 1,000 lb bombs will take a hefty chunk out of the airfield's HP. | |
| − | |||
| − | |||
| − | |||
| + | === Manual Engine Control === | ||
{| class="wikitable" style="text-align:center" | {| class="wikitable" style="text-align:center" | ||
| − | |||
|- | |- | ||
| − | ! | + | ! colspan="7" | MEC elements |
| − | |||
| − | |||
| − | |||
|- | |- | ||
| − | | 2 | + | ! rowspan="2" | Mixer |
| + | ! rowspan="2" | Pitch | ||
| + | ! colspan="3" | Radiator | ||
| + | ! rowspan="2" | Supercharger | ||
| + | ! rowspan="2" | Turbocharger | ||
| + | |- | ||
| + | ! Oil !! Water !! Type | ||
| + | |- | ||
| + | | Not controllable || Controllable<br>Not auto controlled || Not controllable<br>Not auto controlled || Controllable<br>Not auto controlled || Combined || Controllable<br>2 gears || Not controllable | ||
|- | |- | ||
|} | |} | ||
| + | |||
| + | Vent the radiator and set prop pitch to 100% immediately after spawning in. Set supercharger gears to gear 2. | ||
| + | |||
| + | For some extra speed in level flight set prop pitch to 85%. | ||
=== Pros and cons === | === Pros and cons === | ||
| Line 196: | Line 145: | ||
'''Pros:''' | '''Pros:''' | ||
| − | * | + | * Versatile - It is capable of flying low-altitude runs for minibases, or high-altitude bombing runs. |
| − | * | + | * Can carry an overwhelming 12,000 lb of bombs, giving it the heaviest payload at ranks II-III, and outclasses many rank IV bombers |
| − | * | + | * In RB, the bomber can with a full payload take out three out of the four bases (and most of fourth base) without needing to rearm. |
| − | * | + | * Full payload can also take out 3/4 of an Airfield's HP in the BR bracket |
| − | * | + | * Fast and fairly manoeuvrable for a heavy bomber, with flaps that do not rip easily |
| − | * | + | * Performance is almost unaffected by payload options due to the internal payload carriage that doesn't create drag |
| − | * | + | * Fantastic climb rate with WEP; can easily reach 6,000 m (~20,000 ft), with full payload just by side climbing (which is heavily advised to minimize interception by enemies) |
| − | * | + | * Reliable engines that will not overheat with continuous WEP at 7,500 m (~25,000 ft) and above |
| + | * Can fly with two engines if needed - or even one, if trying to land | ||
| + | ** Dorsal and tail gunner can do a lot of damage to aircraft attacking from above if used correctly (typically BnZ fighters) | ||
| + | ** Tail gunner can fire almost directly down, underneath the turret, so unless an enemy goes under your airframe, you should have time to react and fire a few bursts | ||
| + | ** Both dorsal and tail turrets contain a lot of ammunition, capable of spraying enemies with waves of continuous gunfire | ||
| + | * The aircraft, if in the hands of a capable pilot, can continue to fly with horrific damage to control surfaces and engines | ||
'''Cons:''' | '''Cons:''' | ||
| − | * | + | * Being a large bomber with a heavy payload makes it a priority target in Air Battles |
| − | * | + | * Stock payload is useless for base bombing, and the plane isn't manoeuvrable enough to effectively attack smaller ground targets |
| − | * | + | * Nose is defended by a single 7.7 mm gun and the belly has no machine gun coverage, leaving them very vulnerable for enemy attacks |
| − | * | + | * Enemies attacking from below can deal serious damage to control surfaces and engines of the plane, making the plane difficult to manoeuvre |
| − | * | + | * 7.7 mm machine guns overall do not inflict a lot of damage, repeated hits are needed to disable an enemy plane |
| − | * | + | * Only one pilot, and no co-pilot unlike other heavy bombers. In addition, the pilot is not armoured, and is vulnerable to a head-on, since the only frontal defence is a single 7.7 mm Vickers K machine gun |
| − | * | + | * WEP causes overheating at low altitudes unless manual engine control is used to force radiators open |
| + | * Severe lack of armour for crew leaves them vulnerable | ||
| + | * The wings rip easily when under fire from anything larger than .50 cal MGs | ||
== History == | == History == | ||
<!-- ''Describe the history of the creation and combat usage of the aircraft in more detail than in the introduction. If the historical reference turns out to be too long, take it to a separate article, taking a link to the article about the vehicle and adding a block "/History" (example: <nowiki>https://wiki.warthunder.com/(Vehicle-name)/History</nowiki>) and add a link to it here using the <code>main</code> template. Be sure to reference text and sources by using <code><nowiki><ref></ref></nowiki></code>, as well as adding them at the end of the article with <code><nowiki><references /></nowiki></code>. This section may also include the vehicle's dev blog entry (if applicable) and the in-game encyclopedia description (under <code><nowiki>=== In-game description ===</nowiki></code>, also if applicable).'' --> | <!-- ''Describe the history of the creation and combat usage of the aircraft in more detail than in the introduction. If the historical reference turns out to be too long, take it to a separate article, taking a link to the article about the vehicle and adding a block "/History" (example: <nowiki>https://wiki.warthunder.com/(Vehicle-name)/History</nowiki>) and add a link to it here using the <code>main</code> template. Be sure to reference text and sources by using <code><nowiki><ref></ref></nowiki></code>, as well as adding them at the end of the article with <code><nowiki><references /></nowiki></code>. This section may also include the vehicle's dev blog entry (if applicable) and the in-game encyclopedia description (under <code><nowiki>=== In-game description ===</nowiki></code>, also if applicable).'' --> | ||
| − | |||
| − | + | The Handley Page Halifax was an archetypal British heavy bomber, making up nearly half of all that were produced. At the point of its maximum production, its operations enveloped 41 separate factories, 600 subcontractors and 51,000 employees, with one Halifax completed every hour. The peak of its usage saw 76 Halifax-equipped Bomber Command Squadrons. As with the rest of its kind, the Halifax was known for its huge, lumbering profile and punishing bomb load. During its service with Britain, it flew 82,773 operations and dropped 224,207 tons of bombs. A grand total of 6,178 Halifaxes of all variants were built, with 1,833 planes lost. | |
| − | + | During the mid-1930s, the British Air Ministry released Specification P.13/36, which detailed its need for a twin-engined medium/heavy bomber, suitable for "world-wide use". Multiple aircraft manufacturers submitted designs to meet its requirements, among them Handley Page, which submitted the HP56. By February 1937, the list of aircraft designed to meet specification was narrowed down to two candidates, Handley Page's HP56, and rival manufacturer Avro's Avro 679, with the possibility that both designs were to be selected. Ultimately, the 679 alone was selected for production and dubbed the "Manchester", as the Air Ministry had other plans for the HP56. After both American and Soviet engineers saw success in experimentation with four-engined bombers, the Air Ministry became interested in the concept. Accordingly, in 1936, it released Specification B.12/36, which detailed a four-engined heavy bomber with a range of 2,000 miles (~3,200 km), capable of carrying 14,000 lbs (6,350 kg) of ordnance. In 1937, as it prepared to select the 679 to meet P.13/36, the Air Ministry asked Handley Page to redesign the HP56 in order to meet B.12/36. By the end of the year, the initial design, designated the HP57, was complete. The RAF was so impressed with the design that in January of 1938, it ordered 100 of the aircraft into production. Construction of the prototype began in March 1938. It made its first flight on October 25, 1939, and after subsequent successful tests, was given the name "Halifax". It officially entered service in November of 1940, and flew its first combat mission, a bombing raid of the Le Havre docks, on March 10-11, 1941, but its existence was not confirmed by the RAF until it took part in a daylight bombing raid in July. Besides bombing raids, its duties included pathfinding, supply transport, paratroop transport, and, under Coastal Command, anti submarine, reconnaissance, and meteorological operations. Towards the end of the war in Europe, a few Halifaxes were modified for Allied use in the Pacific, but were ultimately too late to have any real effect on the outcome of that theatre. After the war, it was retired from British military service, and the majority of Halifaxes were scrapped. However, many found civilian use both at home and abroad. In addition, they remained in military service for the French, Egyptian, and Pakistani Air Forces. It remained in Pakistani service until 1961. | |
| − | + | The B Mk. III was the most produced variant of the Halifax, beginning service in November of 1943. The main improvement included replacing the underperforming Rolls-Royce Merlin X engine with the more powerful Bristol Hercules XVI. This allowed the Halifax to perform better and increased its ceiling, a critically needed change that allowed the Halifax to fly at altitudes needed to avoid enemy fighters, whose attacks were becoming increasingly effective by that point of the war. Other changes included the adoption of de Havilland Hydromatic propellers and rounded wing tips. A total 2,091 were built. | |
| − | |||
| − | |||
| − | |||
| − | |||
| − | |||
| − | |||
== Media == | == Media == | ||
| Line 236: | Line 185: | ||
;Skins | ;Skins | ||
| − | * [https://live.warthunder.com/feed/camouflages/? | + | * [https://live.warthunder.com/feed/camouflages/?vehicle=halifax_mk3 Skins and camouflages for the {{PAGENAME}} from live.warthunder.com.] |
| − | |||
| − | |||
| − | |||
| − | |||
| − | |||
| − | |||
;Videos | ;Videos | ||
| − | {{Youtube-gallery| | + | {{Youtube-gallery|VTLOUPW67to|'''Ultra Cheeky Sneaky Tea - Halifax B Mk III a''' - ''Napalmratte''}} |
== See also == | == See also == | ||
| − | + | ''Links to the articles on the War Thunder Wiki that you think will be useful for the reader, for example:'' | |
| + | |||
* ''reference to the series of the aircraft;'' | * ''reference to the series of the aircraft;'' | ||
| − | * ''links to approximate analogues of other nations and research trees.'' | + | * ''links to approximate analogues of other nations and research trees.'' |
| − | |||
| − | |||
| − | |||
| − | |||
| − | |||
| − | |||
| − | |||
| − | |||
| − | |||
| − | |||
| − | |||
| − | |||
| − | |||
| − | |||
| − | |||
== External links == | == External links == | ||
| Line 272: | Line 201: | ||
* ''other literature.'' --> | * ''other literature.'' --> | ||
| − | * [[wt:en/news/ | + | * [[wt:en/news/3750-development-halifax-the-knight-of-the-sky-en|[Devblog] Halifax: the Knight of the Sky]] |
| − | * [https://forum.warthunder.com/index.php?/topic/ | + | * [https://forum.warthunder.com/index.php?/topic/315766-handley-page-halifax-mk-iii/ Official data sheet - more details about the performance] |
| − | {{AirManufacturer | + | {{AirManufacturer Handley}} |
| − | {{Britain | + | {{Britain bombers}} |
Latest revision as of 21:59, 1 January 2024

Contents
Description
The Halifax B Mk IIIa is a rank British bomber with a battle rating of (AB), (RB), and (SB). It was introduced in Update 1.59 "Flaming Arrows".
The Halifax is an interesting member of the British bomber line. It is the first true British heavy bomber, a big change from its predecessors, which are all either flying boats, medium, or light bombers. With the transition to heavy bombers, comes a change in tactics. The Halifax will outclass almost every rank 2 and 3 bombers in terms of payload. It will also generally beat every same battle-rated bomber in the payload department as well. However, being a heavy bomber has its drawbacks. Compared to nearly all previous British bombers, this one is slower and has a noticeably slow climb rate. While the payload upgrade is nice, the Halifax is not very durable. Worse, the Halifax lacks effective defensive weapons, a flaw of nearly all British bombers. The main priority, as a result, should be targeting bases and avoiding opposing pilots as much as possible. Use high altitude and less direct travel routes to get to your targets. If you are engaged, your defensive guns can save you, but they are not very reliable. In addition, this bomber does not have any ventral turrets, leaving a massive defensive gap directly under the aircraft. You also only have one singular machine gun able to cover the fore-lower approach to your aircraft and little in the way of armour plating for the pilot other than a steel bulkhead that won't protect against cannon shells or rifle-calibre bullets well. However, if you can keep safe and deliver your payload, you will find this to be a very effective bomber.
General info
Flight performance
| Characteristics | Max Speed (km/h at 4,115 m) |
Max altitude (metres) |
Turn time (seconds) |
Rate of climb (metres/second) |
Take-off run (metres) | |||
|---|---|---|---|---|---|---|---|---|
| AB | RB | AB | RB | AB | RB | |||
| Stock | 436 | 420 | 35.0 | 35.8 | 3.8 | 3.8 | 750 | |
| Upgraded | 478 | 454 | 33.2 | 34.0 | 9.9 | 6.5 | ||
Details

| Features | ||||
|---|---|---|---|---|
| Combat flaps | Take-off flaps | Landing flaps | Air brakes | Arrestor gear |
| ✓ | ✓ | ✓ | X | X |
| Limits | ||||||
|---|---|---|---|---|---|---|
| Wings (km/h) | Gear (km/h) | Flaps (km/h) | Max Static G | |||
| Combat | Take-off | Landing | + | - | ||
| 541 | 491 | 454 | 260 | ~4 | ~3 | |
| Optimal velocities (km/h) | |||
|---|---|---|---|
| Ailerons | Rudder | Elevators | Radiator |
| < 350 | < 370 | < 350 | > 280 |
Survivability and armour
- 6.35 mm steel in front and floor of the cockpit
- 8 mm steel behind the pilot and in rear fuselage bulkhead
Modifications and economy
Armaments
Suspended armament
The Halifax B Mk IIIa can be outfitted with the following ordnance:
- 15 x 250 lb G.P. Mk.IV bombs (3,750 lb total)
- 15 x 500 lb G.P. Mk.IV bombs (7,500 lb total)
- 15 x 500 lb S.A.P. Mk.II bombs (7,500 lb total)
- 9 x 1,000 lb M.C. Mk.I bombs + 6 x 500 lb G.P. Mk.IV bombs (12,000 lb total)
- 4 x 2,000 lb A.P. Mk.I bombs (8,000 lb total)
Note: With the 9 x 1,000 lb + 6 x 500 lb load, the 500 lb bombs drop first from bays in the inner wings, then the 1,000 lb bombs from the ventral bomb bay.
Defensive armament
The Halifax B Mk IIIa is defended by:
- 1 x 7.7 mm Vickers K machine gun, nose turret (1,000 rpg)
- 4 x 7.7 mm Browning machine guns, dorsal turret (600 rpg = 2,400 total)
- 4 x 7.7 mm Browning machine guns, tail turret (1,700 rpg = 6,800 total)
Usage in battles

The Halifax Mark IIIa is the first true "heavy" bomber that an Allied player will unlock. It has four engines that do well at higher altitudes- above the height of 4,000 m (13,000 ft) - and it has a large payload of around 12,000 pounds of bombs, going by weight. This is sufficient so that one Halifax can, on their own, annihilate all three minibases in a match and take a small chunk out of the enemy airfield, and otherwise, it can take a sizeable chunk out of the airfield- around three-quarters of the base's total HP. Two Halifaxes can annihilate all the bases and most of the airfield together in its BR bracket. Three Halifaxes can destroy everything in an uptier. Four Halifaxes, should they survive the trip to the enemy bases, can destroy everything they see on the map and result in a fast game-over. It dwarfs the payloads of contemporary 4.0 bombers, such as the Pe-2-83, B-25J-1, and the Yer-2 (M-105) with its overwhelmingly large bombload.
However, the Halifax is not all explosions, sunshine and rainbows. The aircraft requires you to play very defensively and requires you to be a crack shot with the turrets and able to know where enemies are going and be lucky enough to avoid their fire. The Halifax B Mk IIIa is a British bomber, and in-game, has a notorious reputation for carrying a lot of bombs, but being unable to avoid fighter aircraft (doesn't climb fast enough nor perform well enough at high altitude) or defend itself (four/eight 7.7 mm machine guns is absolutely inadequate at its BR). However, if your aim is extremely on point, you may be able to defeat one or two enemy fighter aircraft before being defeated yourself. While it does have a good bombload, pilots will find that it has problems in actually getting to the target. Sideclimbing can be a very useful tactic in the Halifax, as you can wait for some of the enemy fighters to lose altitude while gaining some yourself.
One technique that some British pilots use to some degree of success are low-altitude dambusters-style raids flying at treetop level, just above terrain. This allows you to avoid Axis fighters (most of which climb too high to dive on you), but if you are unlucky , will simply leave you at the mercy of Bf 109s, Fw 190s, low-flying Japanese aircraft and all attackers which will enjoy the opportunity for a free kill. You need to be watching the skies and make course corrections to avoid enemy aircraft, since you do not have the weapons nor performance to take them out or outrun them. You need to pre-empt where enemy aircraft will be and make adjustments as such. You are also harder to see above water, above forests and above large urban areas (e.g. the cities on Ruhr) due to the bi-colour night-time camouflage. Use this to your advantage.
When in air RB match, it is advised to sideclimb to 6500-7,000m to avoid interceptors (which usually only climb to 4,500 m and don't want to waste time climbing up to you) and approach one of the sets of two bases from an angle where you can take them both out in a single pass with 6 x 500 lb and 1 x 1,000 lb bombs for the first base and 3 x 1,000 lb bombs for the second. After that approach the other bases in the same manner (if they are not already destroyed) with 3 x 1,000 lb bombs for the first and the remaining 2 x 1,000 lb bombs on the second base. If the second set of bases have been bombed before you get to them, bomb the airfield and your remaining 4 x 1,000 lb bombs will take a hefty chunk out of the airfield's HP.
Manual Engine Control
| MEC elements | ||||||
|---|---|---|---|---|---|---|
| Mixer | Pitch | Radiator | Supercharger | Turbocharger | ||
| Oil | Water | Type | ||||
| Not controllable | Controllable Not auto controlled |
Not controllable Not auto controlled |
Controllable Not auto controlled |
Combined | Controllable 2 gears |
Not controllable |
Vent the radiator and set prop pitch to 100% immediately after spawning in. Set supercharger gears to gear 2.
For some extra speed in level flight set prop pitch to 85%.
Pros and cons
Pros:
- Versatile - It is capable of flying low-altitude runs for minibases, or high-altitude bombing runs.
- Can carry an overwhelming 12,000 lb of bombs, giving it the heaviest payload at ranks II-III, and outclasses many rank IV bombers
- In RB, the bomber can with a full payload take out three out of the four bases (and most of fourth base) without needing to rearm.
- Full payload can also take out 3/4 of an Airfield's HP in the BR bracket
- Fast and fairly manoeuvrable for a heavy bomber, with flaps that do not rip easily
- Performance is almost unaffected by payload options due to the internal payload carriage that doesn't create drag
- Fantastic climb rate with WEP; can easily reach 6,000 m (~20,000 ft), with full payload just by side climbing (which is heavily advised to minimize interception by enemies)
- Reliable engines that will not overheat with continuous WEP at 7,500 m (~25,000 ft) and above
- Can fly with two engines if needed - or even one, if trying to land
- Dorsal and tail gunner can do a lot of damage to aircraft attacking from above if used correctly (typically BnZ fighters)
- Tail gunner can fire almost directly down, underneath the turret, so unless an enemy goes under your airframe, you should have time to react and fire a few bursts
- Both dorsal and tail turrets contain a lot of ammunition, capable of spraying enemies with waves of continuous gunfire
- The aircraft, if in the hands of a capable pilot, can continue to fly with horrific damage to control surfaces and engines
Cons:
- Being a large bomber with a heavy payload makes it a priority target in Air Battles
- Stock payload is useless for base bombing, and the plane isn't manoeuvrable enough to effectively attack smaller ground targets
- Nose is defended by a single 7.7 mm gun and the belly has no machine gun coverage, leaving them very vulnerable for enemy attacks
- Enemies attacking from below can deal serious damage to control surfaces and engines of the plane, making the plane difficult to manoeuvre
- 7.7 mm machine guns overall do not inflict a lot of damage, repeated hits are needed to disable an enemy plane
- Only one pilot, and no co-pilot unlike other heavy bombers. In addition, the pilot is not armoured, and is vulnerable to a head-on, since the only frontal defence is a single 7.7 mm Vickers K machine gun
- WEP causes overheating at low altitudes unless manual engine control is used to force radiators open
- Severe lack of armour for crew leaves them vulnerable
- The wings rip easily when under fire from anything larger than .50 cal MGs
History
The Handley Page Halifax was an archetypal British heavy bomber, making up nearly half of all that were produced. At the point of its maximum production, its operations enveloped 41 separate factories, 600 subcontractors and 51,000 employees, with one Halifax completed every hour. The peak of its usage saw 76 Halifax-equipped Bomber Command Squadrons. As with the rest of its kind, the Halifax was known for its huge, lumbering profile and punishing bomb load. During its service with Britain, it flew 82,773 operations and dropped 224,207 tons of bombs. A grand total of 6,178 Halifaxes of all variants were built, with 1,833 planes lost.
During the mid-1930s, the British Air Ministry released Specification P.13/36, which detailed its need for a twin-engined medium/heavy bomber, suitable for "world-wide use". Multiple aircraft manufacturers submitted designs to meet its requirements, among them Handley Page, which submitted the HP56. By February 1937, the list of aircraft designed to meet specification was narrowed down to two candidates, Handley Page's HP56, and rival manufacturer Avro's Avro 679, with the possibility that both designs were to be selected. Ultimately, the 679 alone was selected for production and dubbed the "Manchester", as the Air Ministry had other plans for the HP56. After both American and Soviet engineers saw success in experimentation with four-engined bombers, the Air Ministry became interested in the concept. Accordingly, in 1936, it released Specification B.12/36, which detailed a four-engined heavy bomber with a range of 2,000 miles (~3,200 km), capable of carrying 14,000 lbs (6,350 kg) of ordnance. In 1937, as it prepared to select the 679 to meet P.13/36, the Air Ministry asked Handley Page to redesign the HP56 in order to meet B.12/36. By the end of the year, the initial design, designated the HP57, was complete. The RAF was so impressed with the design that in January of 1938, it ordered 100 of the aircraft into production. Construction of the prototype began in March 1938. It made its first flight on October 25, 1939, and after subsequent successful tests, was given the name "Halifax". It officially entered service in November of 1940, and flew its first combat mission, a bombing raid of the Le Havre docks, on March 10-11, 1941, but its existence was not confirmed by the RAF until it took part in a daylight bombing raid in July. Besides bombing raids, its duties included pathfinding, supply transport, paratroop transport, and, under Coastal Command, anti submarine, reconnaissance, and meteorological operations. Towards the end of the war in Europe, a few Halifaxes were modified for Allied use in the Pacific, but were ultimately too late to have any real effect on the outcome of that theatre. After the war, it was retired from British military service, and the majority of Halifaxes were scrapped. However, many found civilian use both at home and abroad. In addition, they remained in military service for the French, Egyptian, and Pakistani Air Forces. It remained in Pakistani service until 1961.
The B Mk. III was the most produced variant of the Halifax, beginning service in November of 1943. The main improvement included replacing the underperforming Rolls-Royce Merlin X engine with the more powerful Bristol Hercules XVI. This allowed the Halifax to perform better and increased its ceiling, a critically needed change that allowed the Halifax to fly at altitudes needed to avoid enemy fighters, whose attacks were becoming increasingly effective by that point of the war. Other changes included the adoption of de Havilland Hydromatic propellers and rounded wing tips. A total 2,091 were built.
Media
- Skins
- Videos
See also
Links to the articles on the War Thunder Wiki that you think will be useful for the reader, for example:
- reference to the series of the aircraft;
- links to approximate analogues of other nations and research trees.
External links
| Handley Page Limited | |
|---|---|
| Bombers | Hampden Mk I · Hampden TB Mk I · Halifax B Mk IIIa |
| Export | ▂Hampden TB Mk I |
| Britain bombers | |
|---|---|
| Torpedo | Swordfish Mk I · Swordfish Mk II · ▄Avenger Mk II |
| Dive | V-156-B1 |
| Hydroplanes | ▄Catalina Mk IIIa · Sunderland Mk IIIa · Sunderland Mk V |
| Light | Blenheim Mk IV · Beaufort Mk VIII · ▄Hudson Mk V · Brigand B 1 |
| Based on A20 | ▄Havoc Mk I · ▄Boston Mk I · ▄DB-7 |
| Hampden | Hampden Mk I · Hampden TB Mk I |
| Wellington | Wellington Mk Ic · Wellington Mk Ic/L · Wellington Mk III · Wellington Mk X |
| Halifax | Halifax B Mk IIIa |
| Stirling | Stirling B Mk I · Stirling B Mk III |
| Lancaster | Lancaster B Mk I · Lancaster B Mk III |
| Lincoln | Lincoln B Mk II |
| Shackleton | Shackleton MR.Mk.2 |
