Difference between revisions of "HMS Diana"
(added survivability section) |
(→Description) |
||
| (13 intermediate revisions by 5 users not shown) | |||
| Line 6: | Line 6: | ||
== Description == | == Description == | ||
<!-- ''In the first part of the description, cover the history of the ship's creation and military application. In the second part, tell the reader about using this ship in the game. Add a screenshot: if a beginner player has a hard time remembering vehicles by name, a picture will help them identify the ship in question.'' --> | <!-- ''In the first part of the description, cover the history of the ship's creation and military application. In the second part, tell the reader about using this ship in the game. Add a screenshot: if a beginner player has a hard time remembering vehicles by name, a picture will help them identify the ship in question.'' --> | ||
| − | + | '''HMS Diana (D126)''' was a member of the [[Daring (Family)|Daring-class]] destroyers. She was designed and constructed amid World War II, incorporating experiences from the Pacific campaign, such as longer range and the ability to effectively replenish at sea. Yarrow and Co. Ltd. (Yard No. 1846) constructed HMS Diana in Clydebank, Glasgow. She was laid down on April 3, 1947, and launched on Thursday, May 8, 1952, by Lady McGrigor, the wife of Admiral of the Fleet Sir Rhoderick McGrigor. HMS Diana was first put into service on March 29, 1954. During construction, the originally planned name, HMS Druid, was renamed to HMS Diana. HMS Diana was almost as big as a pre-war light cruiser, so at its time, it was regarded as a large destroyer. Along with her sister ship, HMS Decoy, she was acquired by the Peruvian Navy in 1969 and served until 1993. | |
| − | + | Introduced in [[Update "Fire and Ice"]], HMS Diana and her predecessor share certain characteristics. She is far more resilient and durable due to her design for far-reaching operations. Nevertheless, HMS Diana is not an exception to the rule that the majority of early British destroyers lacked armour protection. This is a fatal flaw that greatly increases the risk of ammunition detonation, as the hull lacks any armour plates and the ammunition rack is situated above the waterline. To avoid being targeted, players should maintain some distance from the enemy. | |
| − | |||
| − | |||
== General info == | == General info == | ||
| Line 16: | Line 14: | ||
{{Specs-Fleet-Armour}} | {{Specs-Fleet-Armour}} | ||
<!-- ''Talk about the vehicle's armour. Note the most well-defended and most vulnerable zones, e.g. the ammo magazine. Evaluate the composition of components and assemblies responsible for movement and manoeuvrability. Evaluate the survivability of the primary and secondary armaments separately. Don't forget to mention the size of the crew, which plays an important role in fleet mechanics. Save tips on preserving survivability for the "Usage in battles" section. If necessary, use a graphical template to show the most well-protected or most vulnerable points in the armour.'' --> | <!-- ''Talk about the vehicle's armour. Note the most well-defended and most vulnerable zones, e.g. the ammo magazine. Evaluate the composition of components and assemblies responsible for movement and manoeuvrability. Evaluate the survivability of the primary and secondary armaments separately. Don't forget to mention the size of the crew, which plays an important role in fleet mechanics. Save tips on preserving survivability for the "Usage in battles" section. If necessary, use a graphical template to show the most well-protected or most vulnerable points in the armour.'' --> | ||
| − | When compared to her real life predecessor, the [[Battle ( | + | When compared to her real life predecessor, the [[Battle (Family)|Battle-class destroyer]], {{PAGENAME}} features similar characteristics along with some noticeable changes. She retains two forward-facing 4.5 inch turret of the Battle-class, but receives also an additional turret at the stern. Being designed for operation range and survivability, she is also considerably more resilient to enemy fire thanks to the compact crew compartment. |
| − | However, the Diana still | + | However, the Diana still shares the common weakness with other British WWII destroyers in terms of armour (or lack thereof). Her hull is almost devoid of any armour save for a thin layer of anti-fragmentation armour around the bridge and turrets. In addition, her anti-air and rear turret's shell room were located way above the waterline, both of them were fatal weak spot that will be exposed when doing broadsides and can be somewhat counterintuitive to the ship's additional firepower improvement. |
=== Mobility === | === Mobility === | ||
{{Specs-Fleet-Mobility}} | {{Specs-Fleet-Mobility}} | ||
<!-- ''Write about the ship's mobility. Evaluate its power and manoeuvrability, rudder rerouting speed, stopping speed at full tilt, with its maximum forward and reverse speed.'' --> | <!-- ''Write about the ship's mobility. Evaluate its power and manoeuvrability, rudder rerouting speed, stopping speed at full tilt, with its maximum forward and reverse speed.'' --> | ||
| − | Being optimized for operation range, the Diana's top speed is below average for a destroyer. In addition, the ship's displacement will also | + | Being optimized for operation range, the Diana's top speed is below average for a destroyer. In addition, the ship's displacement will also affect her mobility, making her a bit less manoeuvrable. |
{{NavalMobility}} | {{NavalMobility}} | ||
| Line 37: | Line 35: | ||
{{main|4.5 inch/45 QF Mark V (114 mm)}} | {{main|4.5 inch/45 QF Mark V (114 mm)}} | ||
| − | + | The Diana features six 4.5 inch QF Mark V guns as her main armament, mounted in three twin turrets arranged in A-Bs-X position. These were the same weapon system as [[HMAS Tobruk]] and thus shared the same automatic ramming system and shell choice from its Australian counterpart, providing great and consistent rate of fire at 20 rpm with no first-stage ammo rack. | |
| + | |||
| + | The gun has four shell choices: a HE shell with 2.32 kg of TNT equivalent, enough to cause damage to any unarmoured ship, a HE-TF and a HE-VT shell for anti-air purposes with the same filler as regular HE shell, and a SAP shell with largely the same performance as the one from British 5-inch guns. | ||
| + | |||
| + | As mentioned in the "Survivability and armour" section. While it is tempting to do broadsides to exploit the Diana's additional firepower at the rear, in doing so will expose her unprotected magazines at her bow and stern to the enemy. Thus, while in firefight, it is recommended to face her bow to the enemy at all times only use her frontal armament to minimize the risk of detonation. | ||
| − | { | + | {{:4.5 inch/45 QF Mark V (114 mm)/Ammunition|4.5 inch HE, 4.5 inch SAP, 4.5 inch HE-TF, 4.5 inch HE-VT}} |
| − | |||
| − | |||
| − | |||
| − | |||
| − | |||
| − | |||
| − | |||
| − | |||
| − | |||
| − | |||
| − | |||
| − | |||
| − | |||
| − | |||
| − | |||
| − | |||
| − | |||
| − | |||
| − | |||
| − | |||
| − | |||
| − | |||
| − | |||
| − | |||
| − | |||
| − | |||
| − | |||
| − | |||
| − | |||
| − | |||
| − | |||
| − | | 4.5 inch HE | ||
| − | |||
| − | |||
| − | |||
| − | |||
| − | |||
| − | |||
| − | |||
| − | |||
| − | |||
| − | |||
| − | |||
| − | |||
| − | |||
| − | |||
| − | |||
| − | |||
| − | |||
| − | |||
| − | |||
| − | |||
| − | |||
| − | |||
| − | |||
| − | |||
| − | |||
=== Secondary armament === | === Secondary armament === | ||
| Line 103: | Line 48: | ||
{{main|QF Mark V (40 mm)|QF STAAG Mark II (40 mm)}} | {{main|QF Mark V (40 mm)|QF STAAG Mark II (40 mm)}} | ||
| − | + | For dedicated anti-air defence, the Diana features six 40 mm Bofors autocannon in two STAAG dual mounts flanking the bridge and one Mk V mount located behind her second funnel. | |
| − | + | ||
| − | + | Compared to the Battle-class destroyers, the Diana's AA defense is somewhat of a downgrade due to the lower gun count and less coverage. Nevertheless, they still provide great defense against enemy aircraft, especially when used in tandem with the 4.5 inch guns. | |
| − | + | ||
| − | + | * '''Universal:''' {{Annotation|AP-T|Armour-piercing tracer}}{{-}}{{Annotation|HEFI-T|High-explosive fragmentation incendiary tracer}} | |
| − | + | * '''40 mm HE clips:''' {{Annotation|HEFI-T|High-explosive fragmentation incendiary tracer}}{{-}}{{Annotation|HEFI-T|High-explosive fragmentation incendiary tracer}}{{-}}{{Annotation|HEFI-T|High-explosive fragmentation incendiary tracer}}{{-}}{{Annotation|AP-T|Armour-piercing tracer}} | |
| − | |- | + | * '''40 mm AP clips:''' {{Annotation|AP-T|Armour-piercing tracer}}{{-}}{{Annotation|AP-T|Armour-piercing tracer}}{{-}}{{Annotation|AP-T|Armour-piercing tracer}}{{-}}{{Annotation|HEFI-T|High-explosive fragmentation incendiary tracer}} |
| − | + | ||
| − | |- | + | {{:QF Mark V (40 mm)/Ammunition|HEFI-T, AP-T}} |
| − | |||
| − | |- | ||
| − | |||
| − | |||
| − | |||
| − | {| | ||
| − | |||
| − | |- | ||
| − | |||
| − | |||
| − | |||
| − | |||
| − | |||
| − | |||
| − | |||
| − | |||
| − | |- | ||
| − | |||
| − | |- | ||
| − | |||
| − | |||
| − | | | ||
| − | |- | ||
| − | |||
=== Additional armament === | === Additional armament === | ||
| Line 142: | Line 63: | ||
{{main|Mk.IX** (533 mm)}} | {{main|Mk.IX** (533 mm)}} | ||
| − | + | As with other late British destroyers, the Diana is equipped with five 533 mm Mk.IX** torpedoes, launched from a single quintuple launcher located on the midship section. With 587.2 kg of TNT explosive equivalent and decent speed of 76 km/h, these powerful torpedoes are useful against any targets, especially at close range. However, the low quantity of torpedoes on board along with the launcher's poor firing arc significantly restrict its usefulness, as her captains will be forced to show the vulnerable broadsides to launch them. | |
== Usage in battles == | == Usage in battles == | ||
| Line 150: | Line 71: | ||
=== Pros and cons === | === Pros and cons === | ||
<!-- ''Summarise and briefly evaluate the vehicle in terms of its characteristics and combat effectiveness. Mark its pros and cons in the bulleted list. Try not to use more than 6 points for each of the characteristics. Avoid using categorical definitions such as "bad", "good" and the like - use substitutions with softer forms such as "inadequate" and "effective".'' --> | <!-- ''Summarise and briefly evaluate the vehicle in terms of its characteristics and combat effectiveness. Mark its pros and cons in the bulleted list. Try not to use more than 6 points for each of the characteristics. Avoid using categorical definitions such as "bad", "good" and the like - use substitutions with softer forms such as "inadequate" and "effective".'' --> | ||
| − | |||
'''Pros:''' | '''Pros:''' | ||
| − | * Six fast-firing and powerful 4.5 inch guns | + | * Six fast-firing and powerful 4.5 inch guns with no first-stage ammo racks |
* Turret has good traverse speed and coverage | * Turret has good traverse speed and coverage | ||
* Survivable against destroyers due to high crew count | * Survivable against destroyers due to high crew count | ||
| Line 162: | Line 82: | ||
* Critical modules were largely unarmoured, vulnerable to armour-piercing shells | * Critical modules were largely unarmoured, vulnerable to armour-piercing shells | ||
| − | * | + | * Auxiliary shell room at the bow and rear magazine is above the waterline, making it a fatal weak spot |
* Relatively sluggish for a destroyer due to high displacement | * Relatively sluggish for a destroyer due to high displacement | ||
* Carries only five torpedoes with restrictive firing arc | * Carries only five torpedoes with restrictive firing arc | ||
| Line 180: | Line 100: | ||
== Media == | == Media == | ||
<!-- ''Excellent additions to the article would be video guides, screenshots from the game, and photos.'' --> | <!-- ''Excellent additions to the article would be video guides, screenshots from the game, and photos.'' --> | ||
| − | + | ||
| + | ;Skins | ||
| + | |||
| + | * [https://live.warthunder.com/feed/camouflages/?vehicle=uk_destroyer_daring_class_diana Skins and camouflages for the {{PAGENAME}} from live.warthunder.com.] | ||
== See also == | == See also == | ||
| Line 200: | Line 123: | ||
* ''other literature.'' | * ''other literature.'' | ||
| + | {{ShipManufacturer Yarrow Shipbuilders}} | ||
{{Britain destroyers}} | {{Britain destroyers}} | ||
Latest revision as of 11:29, 25 November 2023

Contents
Description
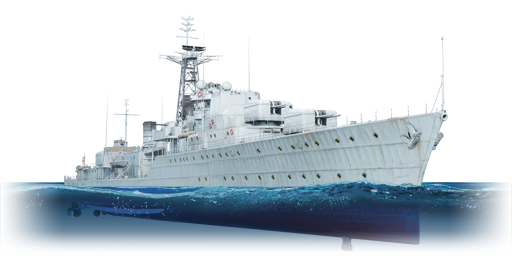
HMS Diana (D126) was a member of the Daring-class destroyers. She was designed and constructed amid World War II, incorporating experiences from the Pacific campaign, such as longer range and the ability to effectively replenish at sea. Yarrow and Co. Ltd. (Yard No. 1846) constructed HMS Diana in Clydebank, Glasgow. She was laid down on April 3, 1947, and launched on Thursday, May 8, 1952, by Lady McGrigor, the wife of Admiral of the Fleet Sir Rhoderick McGrigor. HMS Diana was first put into service on March 29, 1954. During construction, the originally planned name, HMS Druid, was renamed to HMS Diana. HMS Diana was almost as big as a pre-war light cruiser, so at its time, it was regarded as a large destroyer. Along with her sister ship, HMS Decoy, she was acquired by the Peruvian Navy in 1969 and served until 1993.
Introduced in Update "Fire and Ice", HMS Diana and her predecessor share certain characteristics. She is far more resilient and durable due to her design for far-reaching operations. Nevertheless, HMS Diana is not an exception to the rule that the majority of early British destroyers lacked armour protection. This is a fatal flaw that greatly increases the risk of ammunition detonation, as the hull lacks any armour plates and the ammunition rack is situated above the waterline. To avoid being targeted, players should maintain some distance from the enemy.
General info
Survivability and armour
When compared to her real life predecessor, the Battle-class destroyer, HMS Diana features similar characteristics along with some noticeable changes. She retains two forward-facing 4.5 inch turret of the Battle-class, but receives also an additional turret at the stern. Being designed for operation range and survivability, she is also considerably more resilient to enemy fire thanks to the compact crew compartment.
However, the Diana still shares the common weakness with other British WWII destroyers in terms of armour (or lack thereof). Her hull is almost devoid of any armour save for a thin layer of anti-fragmentation armour around the bridge and turrets. In addition, her anti-air and rear turret's shell room were located way above the waterline, both of them were fatal weak spot that will be exposed when doing broadsides and can be somewhat counterintuitive to the ship's additional firepower improvement.
Mobility
Being optimized for operation range, the Diana's top speed is below average for a destroyer. In addition, the ship's displacement will also affect her mobility, making her a bit less manoeuvrable.
| Mobility Characteristics | |||
|---|---|---|---|
| Game Mode | Upgrade Status | Maximum Speed (km/h) | |
| Forward | Reverse | ||
| AB | |||
| Upgraded | |||
| RB/SB | |||
| Upgraded | |||
Modifications and economy
Armament
Primary armament
The Diana features six 4.5 inch QF Mark V guns as her main armament, mounted in three twin turrets arranged in A-Bs-X position. These were the same weapon system as HMAS Tobruk and thus shared the same automatic ramming system and shell choice from its Australian counterpart, providing great and consistent rate of fire at 20 rpm with no first-stage ammo rack.
The gun has four shell choices: a HE shell with 2.32 kg of TNT equivalent, enough to cause damage to any unarmoured ship, a HE-TF and a HE-VT shell for anti-air purposes with the same filler as regular HE shell, and a SAP shell with largely the same performance as the one from British 5-inch guns.
As mentioned in the "Survivability and armour" section. While it is tempting to do broadsides to exploit the Diana's additional firepower at the rear, in doing so will expose her unprotected magazines at her bow and stern to the enemy. Thus, while in firefight, it is recommended to face her bow to the enemy at all times only use her frontal armament to minimize the risk of detonation.
| Penetration statistics | |||||||
|---|---|---|---|---|---|---|---|
| Ammunition | Type of warhead |
Penetration @ 0° Angle of Attack (mm) | |||||
| 1,000 m | 2,500 m | 5,000 m | 7,500 m | 10,000 m | 15,000 m | ||
| 4.5 inch HE | HE | 28 | 28 | 28 | 28 | 28 | 28 |
| 4.5 inch SAP | SAP | 117 | 100 | 77 | 61 | 50 | 41 |
| 4.5 inch HE-TF | HE-TF | 28 | 28 | 28 | 28 | 28 | 28 |
| 4.5 inch HE-VT | HE-VT | 28 | 28 | 28 | 28 | 28 | 28 |
| Shell details | ||||||||||||
|---|---|---|---|---|---|---|---|---|---|---|---|---|
| Ammunition | Type of warhead |
Velocity (m/s) |
Projectile mass (kg) |
Fuse delay (s) |
Fuse sensitivity (mm) |
Explosive mass (TNT equivalent) (g) |
Ricochet | |||||
| 0% | 50% | 100% | ||||||||||
| 4.5 inch HE | HE | 746 | 24.95 | 0 | 0.1 | 2,320 | 79° | 80° | 81° | |||
| 4.5 inch SAP | SAP | 746 | 23 | 0.015 | 5 | 910 | 47° | 60° | 65° | |||
| 4.5 inch HE-TF | HE-TF | 746 | 24.95 | 0 | 0.1 | 2,320 | 79° | 80° | 81° | |||
| Proximity-fused shell details | ||||||||||||
|---|---|---|---|---|---|---|---|---|---|---|---|---|
| Ammunition | Type of warhead |
Velocity (m/s) |
Projectile mass (kg) |
Fuse delay (m) |
Fuse sensitivity (mm) |
Arming distance (m) |
Trigger radius (m) |
Explosive mass (TNT equivalent) (g) |
Ricochet | |||
| 0% | 50% | 100% | ||||||||||
| 4.5 inch HE-VT | HE-VT | 746 | 24.95 | 0 | 0.1 | 244 | 23 | 2,320 | 79° | 80° | 81° | |
Secondary armament
For dedicated anti-air defence, the Diana features six 40 mm Bofors autocannon in two STAAG dual mounts flanking the bridge and one Mk V mount located behind her second funnel.
Compared to the Battle-class destroyers, the Diana's AA defense is somewhat of a downgrade due to the lower gun count and less coverage. Nevertheless, they still provide great defense against enemy aircraft, especially when used in tandem with the 4.5 inch guns.
- Universal: AP-T · HEFI-T
- 40 mm HE clips: HEFI-T · HEFI-T · HEFI-T · AP-T
- 40 mm AP clips: AP-T · AP-T · AP-T · HEFI-T
| Penetration statistics | |||||||
|---|---|---|---|---|---|---|---|
| Ammunition | Penetration @ 0° Angle of Attack (mm) | ||||||
| 10 m | 100 m | 500 m | 1,000 m | 1,500 m | 2,000 m | ||
| HEFI-T | 3 | 3 | 3 | 3 | 3 | 3 | |
| AP-T | 81 | 78 | 68 | 58 | 49 | 41 | |
| Shell details | ||||||||||||
|---|---|---|---|---|---|---|---|---|---|---|---|---|
| Ammunition | Velocity (m/s) |
Projectile mass (kg) |
Fuse delay (m) |
Fuse sensitivity (mm) |
Explosive mass (TNT equivalent) (g) |
Ricochet | ||||||
| 0% | 50% | 100% | ||||||||||
| HEFI-T | 874 | 0.9 | 0 | 0.1 | 67.13 | 79° | 80° | 81° | ||||
| AP-T | 874 | 0.89 | - | - | - | 47° | 60° | 65° | ||||
Additional armament
As with other late British destroyers, the Diana is equipped with five 533 mm Mk.IX** torpedoes, launched from a single quintuple launcher located on the midship section. With 587.2 kg of TNT explosive equivalent and decent speed of 76 km/h, these powerful torpedoes are useful against any targets, especially at close range. However, the low quantity of torpedoes on board along with the launcher's poor firing arc significantly restrict its usefulness, as her captains will be forced to show the vulnerable broadsides to launch them.
Usage in battles
Describe the technique of using this ship, the characteristics of her use in a team and tips on strategy. Abstain from writing an entire guide – don't try to provide a single point of view, but give the reader food for thought. Talk about the most dangerous opponents for this vehicle and provide recommendations on fighting them. If necessary, note the specifics of playing with this vehicle in various modes (AB, RB, SB).
Pros and cons
Pros:
- Six fast-firing and powerful 4.5 inch guns with no first-stage ammo racks
- Turret has good traverse speed and coverage
- Survivable against destroyers due to high crew count
- Good anti-air coverage
Cons:
- Critical modules were largely unarmoured, vulnerable to armour-piercing shells
- Auxiliary shell room at the bow and rear magazine is above the waterline, making it a fatal weak spot
- Relatively sluggish for a destroyer due to high displacement
- Carries only five torpedoes with restrictive firing arc
History
HMS Diana was laid down at Clydebank, Glasgow on 3rd April 1947, launched on 8th May 1952, and was commissioned on 29th March 1954. Originally planned to be named Druid, this was changed to Diana during construction. HMS Diana was considered a large destroyer, with the design coming from lessons of the Pacific War where long endurance was very important.
With a main armament of six 4.5 inch (114 mm) dual-purpose guns in 3 fully enclosed twin turrets and being fully radar-controlled, the fire control system was considered the most advanced in the Royal Navy at the time. The guns were regarded as highly accurate with a high rate of fire. Completing the armament were 2 x 40 mm Bofors, 5 torpedo tubes and a triple "Squid" anti-submarine mortar.
Seeing combat in the Suez Crisis, HMS Diana was involved with the sinking of Egyptian frigate Domiat, which was engaged in a gun duel with the cruiser HMS Newfoundland. This engagement marked the last time in conflict a ship was sunk by another by gunfire only.
In 1968, Diana was diverted from her route to assist in the search for the British-made, Israeli-ordered submarine Dakar. During this search, Diana diverted again to assist Spanish tanker MV Bahia Blanca which was on fire.
In 1969, HMS Diana was sold to the Peruvian navy, renamed BAP Palacios, and refitted at Cammell Laird with new radar and 8 Exocet missiles.
Media
- Skins
See also
Links to articles on the War Thunder Wiki that you think will be useful for the reader, for example:
- reference to the series of the ship;
- links to approximate analogues of other nations and research trees.
External links
Paste links to sources and external resources, such as:
- topic on the official game forum;
- other literature.
| Yarrow Shipbuilders Limited | |
|---|---|
| Torpedo/Gun Boats | |
| Steam Gun Boat (SGB) | SGB Grey Fox |
| Destroyers | |
| Daring-class | HMS Diana |
| Britain destroyers | |
|---|---|
| Town-class | HMS Churchill · HMS Montgomery |
| V-class | HMS Valhalla · HMS Vega · HMS Verdun |
| G-class | HMS Grafton · ORP Garland |
| Hunt-class | HMS Calpe · HMS Brissenden |
| Tribal-class | HMCS Haida · HMS Eskimo · HMS Mohawk |
| J-class | HMS Jervis |
| K-class | HMS Kelvin |
| N-class | HMAS Nepal |
| Battle-class | HMS Armada · HMS Cadiz · HMAS Tobruk |
| Daring-class | HMS Daring · HMS Diamond · HMS Diana |
