Difference between pages "Strv 81" and "T-34 (1943) (China)"
(→History) (Tag: Visual edit) |
m (Minor consistency updates) (Tag: Visual edit) |
||
| Line 1: | Line 1: | ||
| + | {{About | ||
| + | | about = Chinese medium tank '''{{PAGENAME}}''' | ||
| + | | usage = other variants | ||
| + | | link = T-34 (Family) | ||
| + | }} | ||
{{Specs-Card | {{Specs-Card | ||
| − | |code= | + | |code=cn_t_34_1942 |
|images={{Specs-Card-Image|GarageImage_{{PAGENAME}}.jpg}} | |images={{Specs-Card-Image|GarageImage_{{PAGENAME}}.jpg}} | ||
}} | }} | ||
| Line 6: | Line 11: | ||
== Description == | == Description == | ||
<!-- ''In the description, the first part should be about the history of the creation and combat usage of the vehicle, as well as its key features. In the second part, tell the reader about the ground vehicle in the game. Insert a screenshot of the vehicle, so that if the novice player does not remember the vehicle by name, he will immediately understand what kind of vehicle the article is talking about.'' --> | <!-- ''In the description, the first part should be about the history of the creation and combat usage of the vehicle, as well as its key features. In the second part, tell the reader about the ground vehicle in the game. Insert a screenshot of the vehicle, so that if the novice player does not remember the vehicle by name, he will immediately understand what kind of vehicle the article is talking about.'' --> | ||
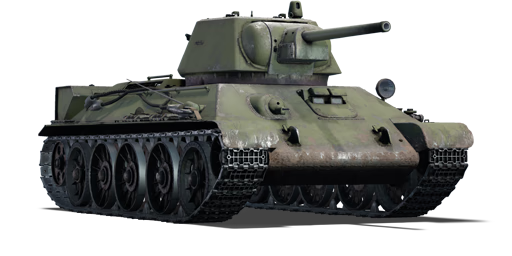
| − | The ''' | + | The '''T-34 (1943)''' is the fourth variant of the [[T-34 (Family)|T-34 medium tank family]]. Built in 1943 and armed with a 76.2 mm F-34 tank gun, its was more powerful than its contemporaries when it was introduced, and its 60-degree sloping armour provided excellent protection against anti-tank weapons. In general, the T-34s had an enormous impact on the Eastern Front battle and had a long-lasting impact on tank design. During World War II, the Soviet Union sent a small amount of the T-34 (1943) to China. Some were also left behind by the Soviets during the Soviet invasion of Manchuria, which resulted in the defeat of Japan's Kwantung Army (関東軍/かんとうぐん/关东军). However, the T-34 (1943) saw extremely limited action in China, as the main variant used by the Chinese People's Liberation Army was the T-34-85 (S-53), a considerable remodelling of the original T-34 that increased firepower through the introduction of the 85 mm Zavod imeni Stalina (ZiS) S-53 tank gun. |
| + | |||
| + | Introduced in [[Update 1.91 "Night Vision"]], the T-34 (1943) provides Chinese Army ground forces players with outstanding off-road mobility, defence, and firepower, allowing players to easily engage any adversaries. However, players should be cautious when fighting against German tanks during battles, as the German tanks' firepower improved significantly starting at rank II with the arrival of the [[Pz.IV F2|Panzer IV F2]]. Nonetheless, in the hands of an experienced player, the T-34 (1943) is a formidable tank. | ||
== General info == | == General info == | ||
| Line 15: | Line 22: | ||
* Rolled homogeneous armour (Hull, Turret roof) | * Rolled homogeneous armour (Hull, Turret roof) | ||
| − | * Cast homogeneous armour (Turret) | + | * Cast homogeneous armour (Turret, Driver's hatch, Machine gun mount) |
{| class="wikitable" | {| class="wikitable" | ||
| − | |||
| − | |||
| − | |||
| − | |||
| − | |||
| − | |||
| − | |||
| − | |||
| − | |||
| − | |||
| − | |||
|- | |- | ||
| − | + | ! Armour !! Front !! Sides !! Rear !! Roof | |
| − | |||
| − | |||
| − | |||
| − | |||
| − | |||
|- | |- | ||
| − | + | | Hull || 45 mm (61°) ''Front glacis'' <br> 99 mm (5-35°) ''Welded glacis joint'' <br> 45 mm (52°) ''Lower glacis'' <br> 60 mm (1-73°) ''Machine gun ball mount'' <br> 75 mm (60°) ''Driver's hatch'' || 40 mm (40°) ''Top'' <br> 45 mm (0°) ''Lower'' || 40 mm (47-49°) ''Top'' <br> 40 mm (47°) ''Bottom'' || 16 mm | |
| − | |||
| − | |||
| − | |||
|- | |- | ||
| − | | | + | | Turret || 53 mm (3-58°) ''Turret front'' <br> 45 mm (2-78°) ''Gun mantlet'' || 53 mm (21-22°) || 53 mm (18-20°) || 15 mm |
| − | | | ||
| − | | | ||
|- | |- | ||
|} | |} | ||
| + | '''Notes:''' | ||
| + | |||
| + | * Suspensions wheels and tracks are 20 mm thick. | ||
| + | |||
| + | ==== Hull armour ==== | ||
| + | The 1943 model has a very similar hull armour profile to the [[T-34 (1941)|1941]] model, relying on angling instead of sheer thickness for protection. There are two key differences: the machine gun ball mount has an increased thickness of 60 mm of armour (compared to 45 mm on earlier models), as does the driver's hatch (75 mm, compared to 45 mm on earlier models). The weak spots created by the driver's optics on earlier models have also been removed. The driver's hatch has the thickest armour on any part of the T-34 and can be quite resilient to enemy fire if hit. | ||
| + | |||
| + | It should be noted that due to the relatively thin plate thickness used (40–45 mm), the T-34's hull is vulnerable can be vulnerable to overmatching from 75 mm and larger guns. | ||
| + | |||
| + | ==== Turret armour ==== | ||
| + | The new hexagonal turret features thicker armour than on the 1941 model. However, there are a few caveats: | ||
| + | |||
| + | * The angling is noticeably worse, and there are some relatively flat spots on the front that can be vulnerable to penetrations from even relatively weak guns at close ranges. | ||
| + | * The turret front, side, and rear armour is made of cast armour instead of rolled plate, which is slightly weaker. | ||
| + | |||
| + | Overall, the turret armour is not a significant improvement over the earlier models and is in some ways weaker. | ||
| + | |||
| + | ==== Module/crew layout ==== | ||
| + | The bulk of the T-34's main gun ammunition is carried low in the hull, making it relatively hard to detonate the ammunition of a T-34, especially if it is carrying a reduced ammunition load. However, the T-34's hull sides are spanned by relatively large fuel tanks; thus, side penetrations can cause the diesel fuel to catch fire. | ||
| + | |||
| + | The crew are seated in a quite compact manner inside the tank, and successful penetrations are likely to disable multiple crew members at once. | ||
=== Mobility === | === Mobility === | ||
| Line 52: | Line 59: | ||
<!-- ''Write about the mobility of the ground vehicle. Estimate the specific power and manoeuvrability, as well as the maximum speed forwards and backwards.'' --> | <!-- ''Write about the mobility of the ground vehicle. Estimate the specific power and manoeuvrability, as well as the maximum speed forwards and backwards.'' --> | ||
| − | {{tankMobility|abMinHp= | + | {{tankMobility|abMinHp=775|rbMinHp=442|AoAweight=0.25}} |
=== Modifications and economy === | === Modifications and economy === | ||
| Line 62: | Line 69: | ||
{{Specs-Tank-Weapon|1}} | {{Specs-Tank-Weapon|1}} | ||
<!-- ''Give the reader information about the characteristics of the main gun. Assess its effectiveness in a battle based on the reloading speed, ballistics and the power of shells. Do not forget about the flexibility of the fire, that is how quickly the cannon can be aimed at the target, open fire on it and aim at another enemy. Add a link to the main article on the gun: <code><nowiki>{{main|Name of the weapon}}</nowiki></code>. Describe in general terms the ammunition available for the main gun. Give advice on how to use them and how to fill the ammunition storage.'' --> | <!-- ''Give the reader information about the characteristics of the main gun. Assess its effectiveness in a battle based on the reloading speed, ballistics and the power of shells. Do not forget about the flexibility of the fire, that is how quickly the cannon can be aimed at the target, open fire on it and aim at another enemy. Add a link to the main article on the gun: <code><nowiki>{{main|Name of the weapon}}</nowiki></code>. Describe in general terms the ammunition available for the main gun. Give advice on how to use them and how to fill the ammunition storage.'' --> | ||
| − | {{main| | + | {{main|F-34 (76 mm)}} |
{| class="wikitable" style="text-align:center" width="100%" | {| class="wikitable" style="text-align:center" width="100%" | ||
|- | |- | ||
| − | ! colspan="5" | [[ | + | ! colspan="5" | [[F-34 (76 mm)|76 mm F-34]] || colspan="5" | Turret rotation speed (°/s) || colspan="4" | Reloading rate (seconds) |
|- | |- | ||
! Mode !! Capacity !! Vertical !! Horizontal !! Stabilizer | ! Mode !! Capacity !! Vertical !! Horizontal !! Stabilizer | ||
| Line 73: | Line 80: | ||
|- | |- | ||
! ''Arcade'' | ! ''Arcade'' | ||
| − | | rowspan="2" | | + | | rowspan="2" | 100 || rowspan="2" | -5°/+30° || rowspan="2" | ±180° || rowspan="2" | N/A || 23.80 || 32.94 || 40.00 || 44.24 || 47.06 || rowspan="2" | 8.45 || rowspan="2" | 7.48 || rowspan="2" | 6.89 || rowspan="2" | 6.50 |
|- | |- | ||
! ''Realistic'' | ! ''Realistic'' | ||
| − | | | + | | 14.88 || 17.50 || 21.25 || 23.50 || 25.00 |
|- | |- | ||
|} | |} | ||
==== Ammunition ==== | ==== Ammunition ==== | ||
| − | + | ||
| − | + | * '''BR-350A (MD-5 fuze)''': APHEBC; high explosive mass will knock out any tank it penetrates with a single shot, however penetration is mediocre | |
| − | + | * '''BR-350B (MD-8 fuze)''': APHEBC; increased penetration at the cost of slightly less explosive mass | |
| − | + | * '''BR-350SP''': APBC; a solid shot that is somewhat more lethal than APCR, but with less penetration | |
| − | + | * '''BR-354P''': APCR; best penetrating shell, at the cost of no post-penetration damage | |
| − | + | * '''BP-353A''': HEAT; best penetration beyond 1,000 m, but the T-34s generally do not fare well in long-range duels | |
| − | + | * '''OF-350M''': HE; useful for breaking the hulls of lightly armoured/unarmoured vehicles | |
| − | + | * '''Sh-354T''': Shrapnel; useful against vehicles that are resistant to the HE shell but too thinly armoured to trigger the fuzes of APHE shells | |
| − | + | ||
| − | + | {{:F-34 (76 mm)/Ammunition|BR-350A (MD-5 fuze), BR-350B (MD-8 fuze), BR-350SP, BR-354P, BP-353A, OF-350M, Sh-354T, D-350A}} | |
| − | |||
| − | |||
| − | |||
| − | |||
| − | |||
| − | |||
| − | { | ||
| − | |||
| − | |||
| − | |||
| − | |||
| − | |||
| − | |||
| − | |||
| − | |||
| − | |||
| − | |||
| − | |||
| − | |||
| − | |||
| − | |||
| − | |||
| − | |||
| − | |||
| − | |||
| − | |||
| − | |||
| − | |||
| − | |||
| − | |||
| − | |||
| − | |||
| − | |||
| − | |||
| − | |||
| − | |||
| − | |||
| − | |||
| − | |||
| − | |||
| − | |||
==== [[Ammo racks]] ==== | ==== [[Ammo racks]] ==== | ||
| − | [[File: | + | [[File:Ammoracks T-34 (1942).png|right|thumb|x250px|[[Ammo racks]] of the {{PAGENAME}}]] |
<!-- '''Last updated:''' --> | <!-- '''Last updated:''' --> | ||
{| class="wikitable" style="text-align:center" | {| class="wikitable" style="text-align:center" | ||
| Line 148: | Line 114: | ||
! Visual<br>discrepancy | ! Visual<br>discrepancy | ||
|- | |- | ||
| − | | ''' | + | | '''100''' || 97 ''(+3)'' || 77 ''(+23)'' || 73 ''(+27)'' || 69 ''(+31)'' || 49 ''(+51)'' || 25 ''(+75)'' || 1 ''(+99)'' || No |
|- | |- | ||
|} | |} | ||
| + | '''Notes''': | ||
| + | |||
| + | * As they are modeled by sets of 2, shells disappear from the rack only after you fire both shells in the set. | ||
| + | * Taking 69 ''(+31)'' rounds will leave only the ammunition racks at the bottom of the hull, decreasing the risk of ammunition detonation if penetrated. | ||
| − | |||
| − | |||
| − | |||
| − | |||
| − | |||
| − | |||
| − | |||
| − | |||
| − | |||
| − | |||
| − | |||
| − | |||
| − | |||
| − | |||
| − | |||
=== Machine guns === | === Machine guns === | ||
{{Specs-Tank-Weapon|2}} | {{Specs-Tank-Weapon|2}} | ||
<!-- ''Offensive and anti-aircraft machine guns not only allow you to fight some aircraft but also are effective against lightly armoured vehicles. Evaluate machine guns and give recommendations on its use.'' --> | <!-- ''Offensive and anti-aircraft machine guns not only allow you to fight some aircraft but also are effective against lightly armoured vehicles. Evaluate machine guns and give recommendations on its use.'' --> | ||
| − | {{main| | + | {{main|DT (7.62 mm)}} |
| + | |||
| + | The T-34 (1943) is armed with a 7.62 mm DT machine gun, which is only useful for gunning down unarmoured AAA vehicles. | ||
{| class="wikitable" style="text-align:center" width="50%" | {| class="wikitable" style="text-align:center" width="50%" | ||
|- | |- | ||
| − | ! colspan="5" | [[ | + | ! colspan="5" | [[DT (7.62 mm)|7.62 mm DT]] |
|- | |- | ||
! Mount !! Capacity (Belt) !! Fire rate !! Vertical !! Horizontal | ! Mount !! Capacity (Belt) !! Fire rate !! Vertical !! Horizontal | ||
|- | |- | ||
| − | | Coaxial || | + | | Coaxial || 1,890 (63) || 600 || N/A || N/A |
|- | |- | ||
|} | |} | ||
| Line 184: | Line 141: | ||
== Usage in battles == | == Usage in battles == | ||
<!-- ''Describe the tactics of playing in the vehicle, the features of using vehicles in the team and advice on tactics. Refrain from creating a "guide" - do not impose a single point of view but instead give the reader food for thought. Describe the most dangerous enemies and give recommendations on fighting them. If necessary, note the specifics of the game in different modes (AB, RB, SB).'' --> | <!-- ''Describe the tactics of playing in the vehicle, the features of using vehicles in the team and advice on tactics. Refrain from creating a "guide" - do not impose a single point of view but instead give the reader food for thought. Describe the most dangerous enemies and give recommendations on fighting them. If necessary, note the specifics of the game in different modes (AB, RB, SB).'' --> | ||
| − | + | Like the previous T-34 models, the 1943 model excels at close to medium range fighting, utilizing its outstanding mobility for a medium tank to rapidly close the distance and relocate to attack from unexpected directions. The sloped hull armour has a good chance of ricocheting hastily aimed shots and helps increase the odds of the T-34 surviving when moving in to engage. The lethal BR-350B APHEBC round complements this playstyle, having about enough penetration to deal with the flanks of most enemies likely to be encountered; a single penetrating hit is usually fatal for the target. In close combat, the fast turret traverses and quick reload allow the T-34 to respond quickly towards changing situations, usually helping to ensure it will be the first to get its gun on the target. | |
| + | |||
| + | Conversely, the T-34 fares poorly in long-range combat; both the BR-350B APHEBC and BR-354P APCR rounds have poor penetration at long ranges, and the BP-353A HEAT round is quite underwhelming as well. | ||
| + | |||
| + | === Against the T-34 (1943) === | ||
| + | '''Light tank/SPAA''': lower tier light tanks/SPAA (e.g. [[M5A1]]) will find the waves of T-34 hard to counter. If your penetration is above ~65 mm, target the turret ring as it is only 53 mm. Avoid shooting at the sloped hull armour at all sides as it is very likely to bounce small calibre shells. If the T-34 does not know your presence and is exposing its side to you, target the vertical hull side between the mudguard and the roadwheels, as it is only 45 mm thick and a shot there can disable both turret crew and drivers. These are the only weak spots if your penetration is low, even the rear of a T-34 is heavily sloped. | ||
| + | |||
| + | '''Medium tank''': perhaps the most common medium tanks used around this BR is the [[M4]] series with short 75 mm cannons. When the T-34 is not angling, you can punch straight through the upper front plate and knock it out with a single shot, but do avoid the MG port and driver's hatch as they very much like to absorb shells. The turret ring is also a weak spot. The turret/gun mantlet, however, will be quite tricky to penetrate especially if the T-34 is at a distance or hull down. On the spherical gun mantlet there are small sections where the curve becomes almost vertical, making them a weak spot, but your shell is likely to impact the huge bulge joining the mantlet and the gun barrel before hitting where you aim at. That is the housing for the hydraulic recoil cylinders, if you target that specifically you can disable its gun breech. There are also small corners of the turret around the gun mantlet, but they are spread out and tiny, therefore harder to hit. For an angling T-34, if their angle is a bit too much and too much side profile is exposed, fire at the lower, vertical side between the roadwheels and the upper mudguard. | ||
| − | + | '''Heavy tank/tank destroyer''': it is fairly easy to destroy a T-34 in a well-protected tank or a tank hunter. Heavy tanks such as [[Pz.Kpfw. Churchill (Germany)|▀Pz.Kpfw. Churchill]] and [[KV-IB (Germany)|▀KV-IB]] will not have a hard time as they are tough enough to easily take some hits from the short 76 mm F-34 of the T-34. Still, target the hull where the T-34 is not angling, or the turret ring. Tank destroyers like the [[M10 (Family)|M10]] will find it even easier to pierce through the armour of a T-34, but play carefully since tank destroyers are not well armoured. | |
| − | + | === Common opponents === | |
| + | |||
| + | * [[M4]], [[M4A2]], [[M4A4 (France)]] - The T-34's 76 mm gun cannot penetrate the welded hull M4s reliably from the front, while the 75 mm gun on the M4s can penetrate the T-34's turret and disable or cripple it. They do have very weak lower side hull armour (only 38 mm) that can be overmatched by the 76 mm APHEBC round if exposed, and the flat areas on the turret can also be penetrated fairly reliably if they can be hit. Generally avoid head-on engagements, especially if they are hull-down. | ||
| + | |||
| + | * [[M4A1]], [[Sherman II]]: Similar to the M4/M4A2, except that the cast hull is weaker than the welded hull, and can be penetrated frontally. Otherwise, the same advice applies. | ||
| + | |||
| + | * [[Pz.IV F2]], [[Pz.IV G|G]], [[Pz.IV H|H]], [[Pz.IV J|J]] - The Ausf. F2 variant is the first Panzer IV to mount a long-barreled 75 mm gun. This gun is one of the most dangerous of any tank at the T-34's BR range, and it is easily capable of penetrating the T-34 at most ranges. However, the Ausf. F2 has very weak armour, and is something of a glass cannon. The Ausf. G, H, and J have up-armoured hulls that are quite difficult to penetrate, but their turrets are as weak as the one on the F2. The Ausf. J, in particular, has manual turret traverse and is very vulnerable to being flanked. Avoid long-range duels with them. | ||
| + | |||
| + | * [[Chi-Nu II]] - The Chi-Nu's gun will cut through your entire tank from the front. However, the Chi-Nu has no armour and aiming center mass will most likely knock it out with a single shot. | ||
| + | |||
| + | * [[Churchill III]], [[Pz.Kpfw. Churchill (Germany)|▀Churchill]] - The 6-pounder gun on the Churchill will be hard-pressed to penetrate the sloped T-34 hull, but it can easily penetrate the turret and disable the turret crew. It is difficult to penetrate the frontal armour of the Churchill at long ranges. However, it is a slow, cumbersome heavy tank, and is easy to outflank and dispatch with shots to the side armour. | ||
| + | |||
| + | * [[Churchill VII]] - The Churchill VII is virtually immune to the T-34 from the front, while its 75 mm gun can penetrate the T-34's turret fairly easily. Even from the side, it has 95 mm of armour that cannot be penetrated by the BR-350B APHEBC round except at very close range, and even slight angling will render it all but immune. It is even slower than the Churchill III, however, and thus easy to avoid and outflank. | ||
=== Pros and cons === | === Pros and cons === | ||
| Line 195: | Line 171: | ||
'''Pros:''' | '''Pros:''' | ||
| − | * | + | * Excellent post-penetration effect with the BR-350B, easily knocking out most tanks in a single shot |
| − | * | + | * The BR-354P APCR can effectively penetrate heavily armoured targets (e.g. [[Churchill III]]) at close range at the cost of post-penetration damage |
| − | * | + | * Very fast turret traverse, good for urban combat |
| − | + | * Sloped hull armour provides good protection against small calibre / low-penetration shells (e.g. 75 mm M3, 50 mm KwK39), and even large calibre guns when angled correctly | |
| − | * | + | * Nearly impossible to damage the transmission and immobilize it from the front |
| − | * | + | * 49 km/h top speed allows it to change position quickly and outrun lots of other medium tanks |
| − | * | ||
| − | |||
| − | |||
| − | |||
'''Cons:''' | '''Cons:''' | ||
| − | * | + | * -5 degrees gun depression is below average, making it ineffective to combat in hills comparing to the [[M4]] with -10 degrees depression |
| − | * | + | * BR-350A & BR-350B both lack the penetration against more heavily armoured foes like the Churchills |
| − | * | + | * Relatively slow reload time compared to similar tanks |
| − | * | + | * The 4 crew members are very close together making it easily knocked out by with a single shot by common guns like the German 76 mm, US 75 mm, etc. when penetrated from the front / side hull, or even the turret |
| − | * | + | * Large fuel tanks scattered at the sides of the hull, tend to catch fire if being hit |
| − | |||
| − | |||
== History == | == History == | ||
| − | <!-- Describe the history of the creation and combat usage of the vehicle in more detail than in the introduction. If the historical reference turns out to be too long, take it to a separate article, taking a link to the article about the vehicle and adding a block "/History" (example: https://wiki.warthunder.com/(Vehicle-name)/History) and add a link to it here using the main template. Be sure to reference text and sources by using <ref></ref>, as well as adding them at the end of the article with <references />. This section may also include the vehicle's dev blog entry (if applicable) and the in-game encyclopedia description (under === In-game description ===, also if applicable). --> | + | <!-- ''Describe the history of the creation and combat usage of the vehicle in more detail than in the introduction. If the historical reference turns out to be too long, take it to a separate article, taking a link to the article about the vehicle and adding a block "/History" (example: <nowiki>https://wiki.warthunder.com/(Vehicle-name)/History</nowiki>) and add a link to it here using the <code>main</code> template. Be sure to reference text and sources by using <code><nowiki><ref></ref></nowiki></code>, as well as adding them at the end of the article with <code><nowiki><references /></nowiki></code>. This section may also include the vehicle's dev blog entry (if applicable) and the in-game encyclopedia description (under <code><nowiki>=== In-game description ===</nowiki></code>, also if applicable).'' --> |
| − | + | {{main|T-34 (1942)#History|l1=History of the Soviet T-34 (1942)}} | |
| + | In Soviet official documents, little difference was made between the T-34 Model 1942 (German designation T-34/76C) and the T-34 Model 1943 (German designations T-34/76D, E and F); most of the differences between the models were because they were produced at different facilities. | ||
| + | |||
| + | Despite its position in the Chinese tech tree, it has to be noted that the T-34 (1943) is not, in fact, a Chinese vehicle. All currently available sources indicate that the PLA never operated the F-34 armed version of the T-34, and the best available documents, compiled by Dr. Martin Andrew, indicate that 1837 T-34s were delivered by the Soviets to the PLA between 1950 and 1954, all of which were the T-34-85 variant. | ||
| + | |||
| + | It is thought that the PLA indeed obtained a small number of F-34 armed T-34 tanks for training purposes, likely left by the Soviets when they withdrew from China in 1955. Some are still kept as exhibits in the Harbin Tank Academy. | ||
| − | + | However, the T-34 (1943) did see service in North Korea, with deliveries starting in 1949. Following the proclamation of the Democratic People's Republic of Korea on September 9th 1948, North Korea's first armoured unit, the 105th Armored Battalion was established in October of 1948, increasing to regimental strength in May of 1949 before being rebaptised as the 105th Armored Brigade prior to the outbreak of the Korean War in 1950. Due to the lack of official North Korean sources on the subject, it is unclear how many T-34 (1943) saw service with the DPRK; evidence does exist that a number of them were committed to the original June 1950 assault on South Korea, with a number of knocked-out short-barrelled T-34s being photographed on the battlefield. | |
| − | The | + | The nature of combat in Korea meant that tank losses were high for the DPRK, and out of 120 tanks reported on strength in June of 1950, nearly all had been lost by December that year. Replacements were delivered by the Soviet Union, all of these later deliveries covering the T-34-85 variant. |
| − | + | Following the end of the Korean War, a reconstruction program was started to bring the DPRK's army back to strength, with additional deliveries of T-34s arriving from the Soviet Union. Again the lack of reliable North Korean sources makes it impossible to work out what was delivered, but sources indicate that despite the delivery of T-34-85s, which remained the mainstay of the North Korean Army until it first received T-54/55s and Type 59 tanks in 1967, a number of older T-34-76s remained in service, either being rebuilds of recovered vehicles or, more likely, new deliveries from their Soviet allies. Most tellingly, a widely circulated still from a late 1960s North Korean propaganda film shows military manoeuvres involving at least two T-34-76s, both showing signs of modernisation such as T-34-85-type saddle fuel tanks and starfish roadwheels (first introduced 1969). As such, it can be surmised that at least some T-34 (1943)s remained in North Korean service into the 1970s in some sort of reserve or training capacity. | |
== Media == | == Media == | ||
| − | ''Excellent additions to the article would be video guides, screenshots from the game, and photos.'' | + | <!-- ''Excellent additions to the article would be video guides, screenshots from the game, and photos.'' --> |
| + | |||
| + | ;Skins | ||
| + | |||
| + | * [https://live.warthunder.com/feed/camouflages/?vehicle=cn_t_34_1942 Skins and camouflages for the {{PAGENAME}} from live.warthunder.com.] | ||
== See also == | == See also == | ||
| Line 239: | Line 218: | ||
* ''topic on the official game forum;'' | * ''topic on the official game forum;'' | ||
| − | |||
* ''other literature.'' | * ''other literature.'' | ||
| − | {{ | + | {{TankManufacturer Morozov}} |
| + | {{China medium tanks}} | ||
Latest revision as of 03:11, 29 August 2023
| This page is about the Chinese medium tank T-34 (1943) (China). For other variants, see T-34 (Family). |
_(China).jpg)
Contents
Description
The T-34 (1943) is the fourth variant of the T-34 medium tank family. Built in 1943 and armed with a 76.2 mm F-34 tank gun, its was more powerful than its contemporaries when it was introduced, and its 60-degree sloping armour provided excellent protection against anti-tank weapons. In general, the T-34s had an enormous impact on the Eastern Front battle and had a long-lasting impact on tank design. During World War II, the Soviet Union sent a small amount of the T-34 (1943) to China. Some were also left behind by the Soviets during the Soviet invasion of Manchuria, which resulted in the defeat of Japan's Kwantung Army (関東軍/かんとうぐん/关东军). However, the T-34 (1943) saw extremely limited action in China, as the main variant used by the Chinese People's Liberation Army was the T-34-85 (S-53), a considerable remodelling of the original T-34 that increased firepower through the introduction of the 85 mm Zavod imeni Stalina (ZiS) S-53 tank gun.
Introduced in Update 1.91 "Night Vision", the T-34 (1943) provides Chinese Army ground forces players with outstanding off-road mobility, defence, and firepower, allowing players to easily engage any adversaries. However, players should be cautious when fighting against German tanks during battles, as the German tanks' firepower improved significantly starting at rank II with the arrival of the Panzer IV F2. Nonetheless, in the hands of an experienced player, the T-34 (1943) is a formidable tank.
General info
Survivability and armour
Armour type:
- Rolled homogeneous armour (Hull, Turret roof)
- Cast homogeneous armour (Turret, Driver's hatch, Machine gun mount)
| Armour | Front | Sides | Rear | Roof |
|---|---|---|---|---|
| Hull | 45 mm (61°) Front glacis 99 mm (5-35°) Welded glacis joint 45 mm (52°) Lower glacis 60 mm (1-73°) Machine gun ball mount 75 mm (60°) Driver's hatch |
40 mm (40°) Top 45 mm (0°) Lower |
40 mm (47-49°) Top 40 mm (47°) Bottom |
16 mm |
| Turret | 53 mm (3-58°) Turret front 45 mm (2-78°) Gun mantlet |
53 mm (21-22°) | 53 mm (18-20°) | 15 mm |
Notes:
- Suspensions wheels and tracks are 20 mm thick.
Hull armour
The 1943 model has a very similar hull armour profile to the 1941 model, relying on angling instead of sheer thickness for protection. There are two key differences: the machine gun ball mount has an increased thickness of 60 mm of armour (compared to 45 mm on earlier models), as does the driver's hatch (75 mm, compared to 45 mm on earlier models). The weak spots created by the driver's optics on earlier models have also been removed. The driver's hatch has the thickest armour on any part of the T-34 and can be quite resilient to enemy fire if hit.
It should be noted that due to the relatively thin plate thickness used (40–45 mm), the T-34's hull is vulnerable can be vulnerable to overmatching from 75 mm and larger guns.
Turret armour
The new hexagonal turret features thicker armour than on the 1941 model. However, there are a few caveats:
- The angling is noticeably worse, and there are some relatively flat spots on the front that can be vulnerable to penetrations from even relatively weak guns at close ranges.
- The turret front, side, and rear armour is made of cast armour instead of rolled plate, which is slightly weaker.
Overall, the turret armour is not a significant improvement over the earlier models and is in some ways weaker.
Module/crew layout
The bulk of the T-34's main gun ammunition is carried low in the hull, making it relatively hard to detonate the ammunition of a T-34, especially if it is carrying a reduced ammunition load. However, the T-34's hull sides are spanned by relatively large fuel tanks; thus, side penetrations can cause the diesel fuel to catch fire.
The crew are seated in a quite compact manner inside the tank, and successful penetrations are likely to disable multiple crew members at once.
Mobility
| Game Mode | Max Speed (km/h) | Weight (tons) | Engine power (horsepower) | Power-to-weight ratio (hp/ton) | ||||
|---|---|---|---|---|---|---|---|---|
| Forward | Reverse | Stock | AoA | Stock | Upgraded | Stock | Upgraded | |
| Arcade | -0.3 | 0.25 | 775 | -3100 | __.__ | |||
| Realistic | 442 | -1768 | __.__ | |||||
Modifications and economy
Armaments
Main armament
| 76 mm F-34 | Turret rotation speed (°/s) | Reloading rate (seconds) | |||||||||||
|---|---|---|---|---|---|---|---|---|---|---|---|---|---|
| Mode | Capacity | Vertical | Horizontal | Stabilizer | Stock | Upgraded | Full | Expert | Aced | Stock | Full | Expert | Aced |
| Arcade | 100 | -5°/+30° | ±180° | N/A | 23.80 | 32.94 | 40.00 | 44.24 | 47.06 | 8.45 | 7.48 | 6.89 | 6.50 |
| Realistic | 14.88 | 17.50 | 21.25 | 23.50 | 25.00 | ||||||||
Ammunition
- BR-350A (MD-5 fuze): APHEBC; high explosive mass will knock out any tank it penetrates with a single shot, however penetration is mediocre
- BR-350B (MD-8 fuze): APHEBC; increased penetration at the cost of slightly less explosive mass
- BR-350SP: APBC; a solid shot that is somewhat more lethal than APCR, but with less penetration
- BR-354P: APCR; best penetrating shell, at the cost of no post-penetration damage
- BP-353A: HEAT; best penetration beyond 1,000 m, but the T-34s generally do not fare well in long-range duels
- OF-350M: HE; useful for breaking the hulls of lightly armoured/unarmoured vehicles
- Sh-354T: Shrapnel; useful against vehicles that are resistant to the HE shell but too thinly armoured to trigger the fuzes of APHE shells
| Penetration statistics | |||||||
|---|---|---|---|---|---|---|---|
| Ammunition | Type of warhead |
Penetration @ 0° Angle of Attack (mm) | |||||
| 10 m | 100 m | 500 m | 1,000 m | 1,500 m | 2,000 m | ||
| BR-350A (MD-5 fuse) | APHEBC | 87 | 85 | 77 | 69 | 62 | 55 |
| BR-350B (MD-8 fuse) | APHEBC | 96 | 94 | 84 | 74 | 64 | 56 |
| BR-350SP | APBC | 99 | 96 | 87 | 76 | 66 | 58 |
| BR-354P | APCR | 125 | 117 | 87 | 60 | 41 | 28 |
| BP-353A | HEAT | 80 | 80 | 80 | 80 | 80 | 80 |
| OF-350M | HE | 10 | 10 | 10 | 10 | 10 | 10 |
| Sh-354T | Shrapnel | 35 | 34 | 30 | 26 | 22 | 19 |
| Shell details | ||||||||||||
|---|---|---|---|---|---|---|---|---|---|---|---|---|
| Ammunition | Type of warhead |
Velocity (m/s) |
Projectile mass (kg) |
Fuse delay (m) |
Fuse sensitivity (mm) |
Explosive mass (TNT equivalent) (g) |
Ricochet | |||||
| 0% | 50% | 100% | ||||||||||
| BR-350A (MD-5 fuse) | APHEBC | 662 | 6.3 | 1.2 | 14 | 150 | 48° | 63° | 71° | |||
| BR-350B (MD-8 fuse) | APHEBC | 655 | 6.5 | 0.9 | 14 | 100.1 | 48° | 63° | 71° | |||
| BR-350SP | APBC | 655 | 6.5 | - | - | - | 48° | 63° | 71° | |||
| BR-354P | APCR | 950 | 3.02 | - | - | - | 66° | 70° | 72° | |||
| BP-353A | HEAT | 355 | 3.94 | 0.05 | 0.1 | 600 | 62° | 69° | 73° | |||
| OF-350M | HE | 680 | 6.2 | 0.05 | 0.1 | 621 | 79° | 80° | 81° | |||
| Sh-354T | Shrapnel | 618 | 6.44 | 1.2 | 14 | 85 | 62° | 69° | 73° | |||
| Smoke shell characteristics | ||||||
|---|---|---|---|---|---|---|
| Ammunition | Velocity (m/s) |
Projectile mass (kg) |
Screen radius (m) |
Screen deploy time (s) |
Screen hold time (s) |
Explosive mass (TNT equivalent) (g) |
| D-350A | 680 | 6.45 | 13 | 5 | 20 | 50 |
Ammo racks
.png)
| Full ammo |
1st rack empty |
2nd rack empty |
3rd rack empty |
4th rack empty |
5th rack empty |
6th rack empty |
7th rack empty |
Visual discrepancy |
|---|---|---|---|---|---|---|---|---|
| 100 | 97 (+3) | 77 (+23) | 73 (+27) | 69 (+31) | 49 (+51) | 25 (+75) | 1 (+99) | No |
Notes:
- As they are modeled by sets of 2, shells disappear from the rack only after you fire both shells in the set.
- Taking 69 (+31) rounds will leave only the ammunition racks at the bottom of the hull, decreasing the risk of ammunition detonation if penetrated.
Machine guns
The T-34 (1943) is armed with a 7.62 mm DT machine gun, which is only useful for gunning down unarmoured AAA vehicles.
| 7.62 mm DT | ||||
|---|---|---|---|---|
| Mount | Capacity (Belt) | Fire rate | Vertical | Horizontal |
| Coaxial | 1,890 (63) | 600 | N/A | N/A |
Usage in battles
Like the previous T-34 models, the 1943 model excels at close to medium range fighting, utilizing its outstanding mobility for a medium tank to rapidly close the distance and relocate to attack from unexpected directions. The sloped hull armour has a good chance of ricocheting hastily aimed shots and helps increase the odds of the T-34 surviving when moving in to engage. The lethal BR-350B APHEBC round complements this playstyle, having about enough penetration to deal with the flanks of most enemies likely to be encountered; a single penetrating hit is usually fatal for the target. In close combat, the fast turret traverses and quick reload allow the T-34 to respond quickly towards changing situations, usually helping to ensure it will be the first to get its gun on the target.
Conversely, the T-34 fares poorly in long-range combat; both the BR-350B APHEBC and BR-354P APCR rounds have poor penetration at long ranges, and the BP-353A HEAT round is quite underwhelming as well.
Against the T-34 (1943)
Light tank/SPAA: lower tier light tanks/SPAA (e.g. M5A1) will find the waves of T-34 hard to counter. If your penetration is above ~65 mm, target the turret ring as it is only 53 mm. Avoid shooting at the sloped hull armour at all sides as it is very likely to bounce small calibre shells. If the T-34 does not know your presence and is exposing its side to you, target the vertical hull side between the mudguard and the roadwheels, as it is only 45 mm thick and a shot there can disable both turret crew and drivers. These are the only weak spots if your penetration is low, even the rear of a T-34 is heavily sloped.
Medium tank: perhaps the most common medium tanks used around this BR is the M4 series with short 75 mm cannons. When the T-34 is not angling, you can punch straight through the upper front plate and knock it out with a single shot, but do avoid the MG port and driver's hatch as they very much like to absorb shells. The turret ring is also a weak spot. The turret/gun mantlet, however, will be quite tricky to penetrate especially if the T-34 is at a distance or hull down. On the spherical gun mantlet there are small sections where the curve becomes almost vertical, making them a weak spot, but your shell is likely to impact the huge bulge joining the mantlet and the gun barrel before hitting where you aim at. That is the housing for the hydraulic recoil cylinders, if you target that specifically you can disable its gun breech. There are also small corners of the turret around the gun mantlet, but they are spread out and tiny, therefore harder to hit. For an angling T-34, if their angle is a bit too much and too much side profile is exposed, fire at the lower, vertical side between the roadwheels and the upper mudguard.
Heavy tank/tank destroyer: it is fairly easy to destroy a T-34 in a well-protected tank or a tank hunter. Heavy tanks such as ▀Pz.Kpfw. Churchill and ▀KV-IB will not have a hard time as they are tough enough to easily take some hits from the short 76 mm F-34 of the T-34. Still, target the hull where the T-34 is not angling, or the turret ring. Tank destroyers like the M10 will find it even easier to pierce through the armour of a T-34, but play carefully since tank destroyers are not well armoured.
Common opponents
- M4, M4A2, M4A4 (France) - The T-34's 76 mm gun cannot penetrate the welded hull M4s reliably from the front, while the 75 mm gun on the M4s can penetrate the T-34's turret and disable or cripple it. They do have very weak lower side hull armour (only 38 mm) that can be overmatched by the 76 mm APHEBC round if exposed, and the flat areas on the turret can also be penetrated fairly reliably if they can be hit. Generally avoid head-on engagements, especially if they are hull-down.
- M4A1, Sherman II: Similar to the M4/M4A2, except that the cast hull is weaker than the welded hull, and can be penetrated frontally. Otherwise, the same advice applies.
- Pz.IV F2, G, H, J - The Ausf. F2 variant is the first Panzer IV to mount a long-barreled 75 mm gun. This gun is one of the most dangerous of any tank at the T-34's BR range, and it is easily capable of penetrating the T-34 at most ranges. However, the Ausf. F2 has very weak armour, and is something of a glass cannon. The Ausf. G, H, and J have up-armoured hulls that are quite difficult to penetrate, but their turrets are as weak as the one on the F2. The Ausf. J, in particular, has manual turret traverse and is very vulnerable to being flanked. Avoid long-range duels with them.
- Chi-Nu II - The Chi-Nu's gun will cut through your entire tank from the front. However, the Chi-Nu has no armour and aiming center mass will most likely knock it out with a single shot.
- Churchill III, ▀Churchill - The 6-pounder gun on the Churchill will be hard-pressed to penetrate the sloped T-34 hull, but it can easily penetrate the turret and disable the turret crew. It is difficult to penetrate the frontal armour of the Churchill at long ranges. However, it is a slow, cumbersome heavy tank, and is easy to outflank and dispatch with shots to the side armour.
- Churchill VII - The Churchill VII is virtually immune to the T-34 from the front, while its 75 mm gun can penetrate the T-34's turret fairly easily. Even from the side, it has 95 mm of armour that cannot be penetrated by the BR-350B APHEBC round except at very close range, and even slight angling will render it all but immune. It is even slower than the Churchill III, however, and thus easy to avoid and outflank.
Pros and cons
Pros:
- Excellent post-penetration effect with the BR-350B, easily knocking out most tanks in a single shot
- The BR-354P APCR can effectively penetrate heavily armoured targets (e.g. Churchill III) at close range at the cost of post-penetration damage
- Very fast turret traverse, good for urban combat
- Sloped hull armour provides good protection against small calibre / low-penetration shells (e.g. 75 mm M3, 50 mm KwK39), and even large calibre guns when angled correctly
- Nearly impossible to damage the transmission and immobilize it from the front
- 49 km/h top speed allows it to change position quickly and outrun lots of other medium tanks
Cons:
- -5 degrees gun depression is below average, making it ineffective to combat in hills comparing to the M4 with -10 degrees depression
- BR-350A & BR-350B both lack the penetration against more heavily armoured foes like the Churchills
- Relatively slow reload time compared to similar tanks
- The 4 crew members are very close together making it easily knocked out by with a single shot by common guns like the German 76 mm, US 75 mm, etc. when penetrated from the front / side hull, or even the turret
- Large fuel tanks scattered at the sides of the hull, tend to catch fire if being hit
History
In Soviet official documents, little difference was made between the T-34 Model 1942 (German designation T-34/76C) and the T-34 Model 1943 (German designations T-34/76D, E and F); most of the differences between the models were because they were produced at different facilities.
Despite its position in the Chinese tech tree, it has to be noted that the T-34 (1943) is not, in fact, a Chinese vehicle. All currently available sources indicate that the PLA never operated the F-34 armed version of the T-34, and the best available documents, compiled by Dr. Martin Andrew, indicate that 1837 T-34s were delivered by the Soviets to the PLA between 1950 and 1954, all of which were the T-34-85 variant.
It is thought that the PLA indeed obtained a small number of F-34 armed T-34 tanks for training purposes, likely left by the Soviets when they withdrew from China in 1955. Some are still kept as exhibits in the Harbin Tank Academy.
However, the T-34 (1943) did see service in North Korea, with deliveries starting in 1949. Following the proclamation of the Democratic People's Republic of Korea on September 9th 1948, North Korea's first armoured unit, the 105th Armored Battalion was established in October of 1948, increasing to regimental strength in May of 1949 before being rebaptised as the 105th Armored Brigade prior to the outbreak of the Korean War in 1950. Due to the lack of official North Korean sources on the subject, it is unclear how many T-34 (1943) saw service with the DPRK; evidence does exist that a number of them were committed to the original June 1950 assault on South Korea, with a number of knocked-out short-barrelled T-34s being photographed on the battlefield.
The nature of combat in Korea meant that tank losses were high for the DPRK, and out of 120 tanks reported on strength in June of 1950, nearly all had been lost by December that year. Replacements were delivered by the Soviet Union, all of these later deliveries covering the T-34-85 variant.
Following the end of the Korean War, a reconstruction program was started to bring the DPRK's army back to strength, with additional deliveries of T-34s arriving from the Soviet Union. Again the lack of reliable North Korean sources makes it impossible to work out what was delivered, but sources indicate that despite the delivery of T-34-85s, which remained the mainstay of the North Korean Army until it first received T-54/55s and Type 59 tanks in 1967, a number of older T-34-76s remained in service, either being rebuilds of recovered vehicles or, more likely, new deliveries from their Soviet allies. Most tellingly, a widely circulated still from a late 1960s North Korean propaganda film shows military manoeuvres involving at least two T-34-76s, both showing signs of modernisation such as T-34-85-type saddle fuel tanks and starfish roadwheels (first introduced 1969). As such, it can be surmised that at least some T-34 (1943)s remained in North Korean service into the 1970s in some sort of reserve or training capacity.
Media
- Skins
See also
Links to the articles on the War Thunder Wiki that you think will be useful for the reader, for example:
- reference to the series of the vehicles;
- links to approximate analogues of other nations and research trees.
External links
Paste links to sources and external resources, such as:
- topic on the official game forum;
- other literature.
| Kharkov Design Bureau for Mechanical Engineering named after A. A. Morozov | |
|---|---|
| Light Tanks | |
| BT-5 | BT-5 · RBT-5 |
| BT-7 | BT-7 · BT-7M · BT-7A (F-32) |
| Medium Tanks | |
| T-34-76 | T-34 (Prototype) · T-34 (1940) · T-34 (1941) · T-34 (1st Gv.T.Br.) · T-34 (1942) · T-34E STZ · T-34E |
| T-34-57 | T-34-57 · T-34-57 (1943) |
| T-34-85 | T-34-85 (D-5T) · T-34-85 · T-34-85E |
| T-34-100 | T-34-100 |
| T-44 | T-44 · T-44-100 · T-44-122 |
| Main Battle Tanks | |
| T-54 | T-54 (1947) · T-54 (1949) · T-54 (1951) |
| T-64 | T-64A (1971) · T-64B |
| Export/Captured | |
| T-34 | ▀T 34 747 (r) · ▄T-34 · ▄T-34-85 · ␗T-34 (1943) · ␗Т-34-85 (S-53) |
| T-54 | ▄T-54 |
| See Also | Uralmashzavod · Uralvagonzavod |
| China medium tanks | |
|---|---|
| ZTZ59 | Type 59 · ZTZ59A · ZTZ59D1 |
| ZTZ69 | Type 69 · Type 69-IIa |
| ZTZ88/96 | ZTZ88A · ZTZ88B |
| ZTZ96 · ZTZ96A · ZTZ96A (P) | |
| ZTZ99 | ZTZ99-II · ZTZ99-III |
| ZTZ99A | ZTZ99A · WZ1001(E) LCT |
| Export series | MBT-2000 · VT4A1 |
| ROC | CM11 |
| Other | Т-34-85 Gai · Object 122MT "MC" |
| Bangladesh | T-69 II G |
| Japan | ␗Chi-Ha · ␗Chi-Ha Kai |
| Pakistan | Al-Khalid-I |
| USA | ␗M4A4 · ␗M4A4 (1st PTG) · ␗M4A1 (75) W · ␗M48A1 · ␗M60A3 TTS |
| USSR | ␗T-34 (1943) · ␗Т-34-85 (S-53) · T-34-85 No.215 · Т-62 №545 |
