Churchill VII
| This page is about the British heavy tank Churchill VII. For other versions, see Churchill (Family). |
Contents
Description
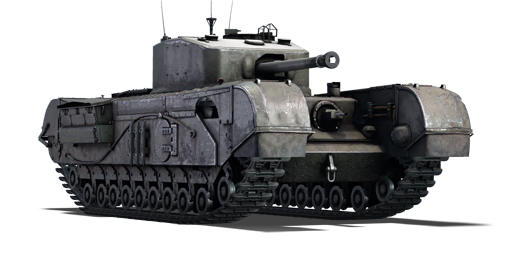
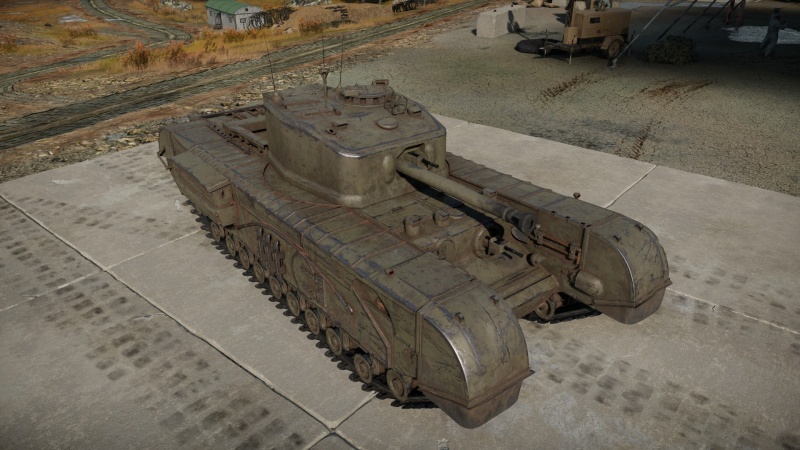
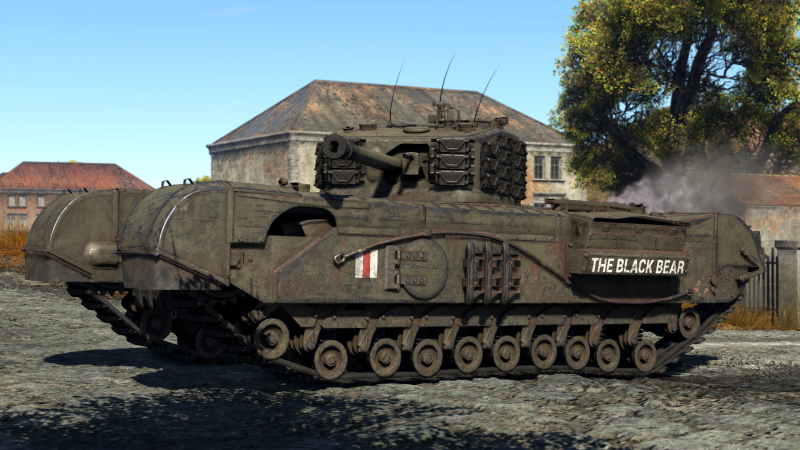
The Tank, Infantry, Mk IV, Churchill VII (A22F) (or just Churchill VII) is a rank British heavy tank with a battle rating of (AB), (RB), and (SB). It was introduced in Update 1.55 "Royal Armour" along with the rest of the initial British Ground Forces Tree. A lumbering beast made of pure steel, the Churchill Mk VII is the epitome of a "walking giant" which you do not want to have staring down at you. With 152 mm of armour, it is one of the most heavily protected tanks in Rank III, even if its firepower seems pitiful for such a tank.
General info
Survivability and armour
Armour type:
- Rolled homogeneous armour
- Cast homogeneous armour (Machine gun port, Driver's hatch, Turret)
| Armour | Front | Sides | Rear | Roof |
|---|---|---|---|---|
| Hull | 152 mm (1°) Front plate 57.15 mm (66-67°) Front glacis 139 mm (24°) Lower glacis 102 mm Machine gun port |
95 mm | 50.8 mm (1°) Top 25.4 mm (64°) Bottom |
15.875 mm |
| Turret | 152 mm (1-20°) Turret front 152 mm (1-54°) Gun mantlet |
95.25 mm | 95.25 mm (0-1°) | 20 mm |
| Cupola | 152 mm | 152 mm | 152 mm | 20 mm |
Notes:
- Suspension wheels are 20 mm thick while tracks are 30 mm thick.
If you are using vehicle below 4.7 BR do not attempt to fire at the Churchill Mk VII at the front (unless you have a very high penetration shell for your cannon). There is no benefit of attempting to penetrate the Churchill Mk VII from its front without aiming for thinner sides or weak points, that 152 mm of armour will chew up shells like nothing. The saving grace is that the Churchill has a gun that belongs to Rank II and low top speed, so it is possible to outmanoeuvre it in the terrain. Flank the tank to get a good shot on its weak side armour. Eliminate the turret crew to immobilise their firepower, then move in for the easy points.
Side armour of the hull and turret's sides and flat parts of frontal armour are the most significant weaknesses on the Churchill, as their effective thickness is much lower. It is also technically possible to penetrate the roof if an enemy tank's profile is high enough. The turret is entirely bare, and a hit could disable the entire turret crew, losing half of your total crew. For this reason, Churchill VII needs armour and smoke upgrades as soon as possible.
A hit in the hull is a hit or miss, but it seems that a hit there is also likely to hit your tracks and suspensions, which would mitigate the round if it caught it. The rear of the vehicle is also vulnerable, but if an enemy can come around and smack the Churchill from behind, even with all the allies and smoke screens around, it probably wasn't your day anyway.
As with other Churchill tanks, a single rocket to the engine deck is often fatal for this tank due to the irremovable ammo racks.
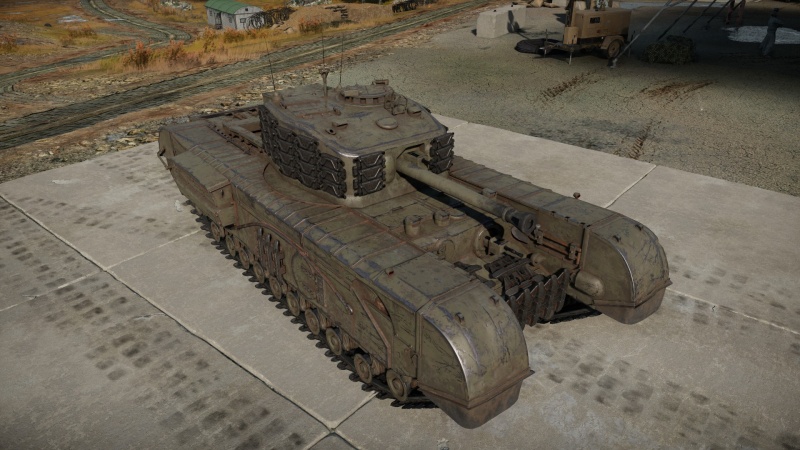
It is also worth noting that installing additional track armour makes ammo rack weak spots extremely obvious for people who know about it, although anything below SPG grade cannon will likely fail to penetrate until the track gets destroyed by concentrated fire. However, the tracks are a must-have to bolster frontal hull and side turret armour, so this upgrade should be used regardless for their benefits.
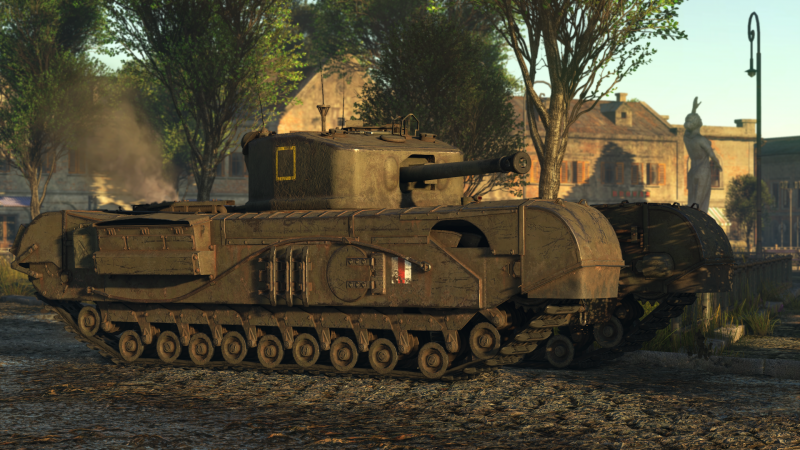
The long leading tracks often glitch out and fail to stop a shell which hits them from the front at flat angle, so it is entirely possible to get knocked out with a single shot through them even by an AMX-13 (FL11). This is surprisingly common, especially in AB, and so correct angling is always effective.
For all these reasons, Churchill VII must always drive at an angle and slightly turn away its turret from opponents after shot, and in Arcade mode it must always smoke up the battlefield, whether their teammates will be mad or not. Angling vehicle makes Churchill VII nearly invulnerable to vehicles below battle rating 5.0, while smoke screens blind opponents and make firing at weak spots and judging attack angle near to impossible, which prolongs tank's life significantly. To reduce amount of teammate's frustration generated by spamming smokes, you'll have to try to land them in such way, that teammates can still see something from the sides, but effectively disabling aim assist and direct sight between you and your enemy.
Mobility
| Game Mode | Max Speed (km/h) | Weight (tons) | Engine power (horsepower) | Power-to-weight ratio (hp/ton) | ||||
|---|---|---|---|---|---|---|---|---|
| Forward | Reverse | Stock | AoA | Stock | Upgraded | Stock | Upgraded | |
| Arcade | -0.5 | 0.5 | 452 | -904 | __.__ | |||
| Realistic | 310 | -620 | __.__ | |||||
Modifications and economy
Armaments
Main armament
| 75 mm OQF Mk.V | Turret rotation speed (°/s) | Reloading rate (seconds) | |||||||||||
|---|---|---|---|---|---|---|---|---|---|---|---|---|---|
| Mode | Capacity | Vertical | Horizontal | Stabilizer | Stock | Upgraded | Full | Expert | Aced | Stock | Full | Expert | Aced |
| Arcade | 84 | -12°/+20° | ±180° | N/A | 19.42 | 26.88 | 32.64 | 36.10 | 38.40 | 6.50 | 5.75 | 5.30 | 5.00 |
| Realistic | 14.28 | 16.80 | 20.40 | 22.56 | 24.00 | ||||||||
Ammunition
| Penetration statistics | |||||||
|---|---|---|---|---|---|---|---|
| Ammunition | Type of warhead |
Penetration @ 0° Angle of Attack (mm) | |||||
| 10 m | 100 m | 500 m | 1,000 m | 1,500 m | 2,000 m | ||
| M72 shot | AP | 91 | 88 | 78 | 67 | 57 | 49 |
| M61 shot | APCBC | 103 | 100 | 89 | 77 | 66 | 57 |
| M48 shell | HE | 10 | 10 | 10 | 10 | 10 | 10 |
| Shell details | ||||||||||||
|---|---|---|---|---|---|---|---|---|---|---|---|---|
| Ammunition | Type of warhead |
Velocity (m/s) |
Projectile mass (kg) |
Fuse delay (m) |
Fuse sensitivity (mm) |
Explosive mass (TNT equivalent) (g) |
Ricochet | |||||
| 0% | 50% | 100% | ||||||||||
| M72 shot | AP | 619 | 6.3 | - | - | - | 47° | 60° | 65° | |||
| M61 shot | APCBC | 618 | 6.53 | - | - | - | 48° | 63° | 71° | |||
| M48 shell | HE | 463 | 6.3 | 0 | 0.1 | 666 | 79° | 80° | 81° | |||
| Smoke shell characteristics | ||||||
|---|---|---|---|---|---|---|
| Ammunition | Velocity (m/s) |
Projectile mass (kg) |
Screen radius (m) |
Screen deploy time (s) |
Screen hold time (s) |
Explosive mass (TNT equivalent) (g) |
| M89 | 259 | 3 | 13 | 5 | 20 | 50 |
Ammo racks
| Full ammo |
1st rack empty |
2nd rack empty |
3rd rack empty |
4th rack empty |
5th rack empty |
Visual discrepancy |
|---|---|---|---|---|---|---|
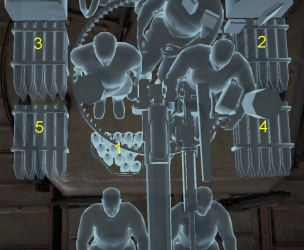
| 84 | 71 (+13) | 51 (+33) | 31 (+53) | 16 (+68) | 1 (+83) | No |
Notes:
- Racks disappear after you've fired all shells in the rack.
- Pack 16 (+68) shells to keep most of the hull empty.
Optics
| Churchill VII Optics | ||
|---|---|---|
| Which ones | Default magnification | Maximum magnification |
| Main Gun optics | x3 | x6 |
| Comparable optics | VFW | |
The first tank in Heavy Tank British tech line to have X6 scope. It will not get any better than this until rank VI, so get used to it - it will be the same across entire tech tree for a while with SPAA being the only exception.
At rank III, this scope is slightly or moderately superior to most medium and heavy tanks, but do not expect to outrange German SPG as they have same optics or even better.
Machine guns
| 7.92 mm BESA | ||||
|---|---|---|---|---|
| Mount | Capacity (Belt) | Fire rate | Vertical | Horizontal |
| Coaxial | 9,450 (225) | 600 | N/A | N/A |
Usage in battles
The Churchill Mk VII is a slow and manoeuvrable turtle, you're not going to break any speed records, but rest assured that if the frontal armour is facing toward the enemy, most of their shells are not able to penetrate the front of the hull and turret at your BR and below. In an uptier, you really should avoid enemy SPGs and to be careful with medium tanks, as they can destroy or fatally cripple the tank, even when you are angled.
The 75 mm gun may not be able to easily take on some of the tanks you may encounter at the rank, but with the high degree of protection, you can leisurely take your time picking out the weaknesses of your enemy to deal precise blow as you hear their rounds bounce off of your frontal armour. With the best ammunition, you can defeat or annoy even other heavy tanks without having to drive close to them. If the enemy team is using open topped SPGs like M36 GMC, Pvkv m/43 (1946), 8,8 cm Flak 37 Sfl., Pvkv II and such, start firing HE - the main gun can fire as often as each 5 seconds and HE can destroy any of them in one hit almost anywhere regardless of range via overpressure, while they do not expect you to deal any at all, meaning that ironically the weakest gun around can be the strongest if underestimated enough.
If nothing else, the Churchill VII can take a lot of smoke shells and make its opponent's life much worse, by driving up to capture points and smoking down snipers and passages, then proceed to blind fire at those unfortunate enough to be close to it. No matter what, do not let the enemy land a straight shot at you. In downtier, they may struggle with you for a long time even if you got surrounded.
When encountering enemies in close quarters, different considerations are to be made depending on the type of tank and what they bring to the battlefield. Don't stay in the same spot for too long, keep moving and "hull-dancing" to make it harder for your enemies to shoot at a weak spot such as the MG port or the thin roof armour. Beware of enemies trying to flank and shoot at your sides. It is recommended to research the "Add-on armour" modification as soon as possible. You can also resort to a lesser extent to sidescraping and angling.
Germany
German tanks always pose a threat. Almost every German tank you'll face is armed with the long barrel 75 mm gun, which can penetrate the Churchill Mk VII from the front with the APCR shot (unangled). Even worse, you may face dedicated SPGs such as the Dicker Max with its 105 mm gun. When using Pzgr.rot it will be deadly and will slice through your armour. Also, the Panzer IV/70(V)/(A) a terrifying threat. They carry the same gun as the Panther and will be able to penetrate you under 1,000 m easily. Luckily, common German tanks like the Panzer IV can be easily penetrated by your 75 mm gun. The same cannot be said for their tank destroyers: the Jagdpanzer 38(t), Jagdpanzer IV and the Panzer IV/70(V) or (A). They have thick, sloped armour and will easily bounce your hits. The Panther A, D and G have stock rounds that can penetrate up to 192 mm of armour, enough to take you out. It is recommended to rally and team up with other tanks that have better firepower while you soak up the damage. As for Tiger Is, it can penetrate you at point blank range but you won't be penetrating any Tiger beyond 100 metres.
USSR
Soviet tanks can be tough enemies to take on. Tanks in the T-34 line have sloped armour and are highly mobile. Early models with the 76 mm gun will not be able to penetrate you. They will try to go around the sides and to your rear. The T-34-85 is more of a threat, but even the 85 mm gun will not be able to penetrate your frontal armour unless aimed at your machine gun port. The SU-85 is less of a threat with slightly less mobility and no turret. The thing about the Soviets is that they love their big guns, in particular, the KV-2 and the SU-152 with their massive 152 mm howitzers. Their HE shells alone will prove devastating to the Churchill, which has very thin top armour. Expect your game to very suddenly end when you come across either of these vehicles.
The Soviets also have very useful heavy tanks. You can come upon some slightly awkward stalemates when facing vehicles like the KV-1 ZiS-5. You will struggle to penetrate their armour, and they will fight to penetrate yours. Stalemates are a common situation with Churchill Mk VII. It is important to have back up so that you can soak up damage for your teammates with more powerful guns, and to protect you from being overwhelmed if the KV brought more tanks to flank you. You may also encounter IS-1s which you will struggle to deal with. Soviet tanks are frustrating to deal with. Their armour is sloped, and you will often have to aim for weak spots with your 75 mm gun. If the armour is not sloped, it is usually too thick to penetrate. This is easier said than done in some circumstances.
Special notes for the IS-2: it carries a very deadly cannon that can knock out literally anything with a single shot, including the Black Prince. Its 122 mm gun can easily go through your frontal hull and turret, subsequently knocking out everyone inside. The best way to avoid that is to angle your hull so that your long, large tracks cover up the frontal hull, exposing your angled side and luring the IS-2 into firing at your side armour. The side armour of the Black Prince resembles the Churchills' which are quite complex, with some weird internal structures soaking up lots of shells, increasing your survivability. Against an IS-2 1943, aim at the hull armour that curves and blends into the side, or the turret cheeks. Its crew are closely packed and even the British solid shells can knock them all out at once. Against a 1944 model, only shoot at its turret as the hull is quite strong.
Japan
As a whole, Japanese tanks are easier to deal with. Their armour is quite thin and usually quite easy to penetrate. Tanks to note are the Chi-To and Chi-Ri II. They can penetrate 155 mm of armour at 100 m, which is just enough to get through your frontal armour. The Na-To is also a threat with its APCR, which can penetrate you frontally under 500 m. Finally, the low-rank Ho-Ro is dangerous, with its powerful 150 mm howitzer, but not many people will be using it at this rank.
Pros and cons
Pros:
- Thick frontal armour (152 mm) makes it impervious to all kinetic shells at its BR
- The 75 mm gun is effective at close-range combat and can be armed with utility shells
- Able to smoke up the entire battlefield in a matter of seconds if necessary
- Ability to pivot steer
- Balanced weight dispersion leads to amazing hill-climbing capabilities
- Great gun depression allows for firing over hills from relative safety
- Gunsight zoom is high, so aiming for weak spots is easier
Cons:
- Poor mobility: speed is capped at 20 km/h, slow acceleration, subpar -3 km/h reverse, and cannot scale obstacles properly
- Is very long, harder to navigate through confined spaces (e.g. urban maps)
- Inadequate firepower: 75 mm AP shells lack explosive filler, have slow velocity and are therefore dropping fast with distance, weak spalling, and low penetration
- Still has frontal weak spots: machine gun ports both on the hull and turret are only 50 mm thick
- Turret side armour is weak
- Extremely vulnerable to coordinated flanking, as penetrations to the sides typically cause catastrophic damage to ammo racks located below the turret
- Requires good coordination with a team to unlock full potential
- Turret roof visible from the front is a weakspot
History
Development
The General Staff specification A20 was implemented before World War II and was meant to replace the Matilda III and Valentine infantry tanks. The specification was based around the British infantry tank doctrine, and with the expectation that the coming war would be based on the World War I trench warfare. Thus the tank was needed to travel across unfavourable terrain and able to destroy enemy defences and infantry obstacles. As speed and heavy firepower were not taken with priority, the vehicle was to have two 2-pounder guns on side sponson mounts with a coaxial machine gun, with another machine gun and smoke dischargers on the front hull, armour was about 60 mm on the turret. Four prototypes were made by June 1940 by Harland and Wolff. The front hull would see an upgrade in armament with a 3-inch howitzer during the prototype stages, the 43-ton tank had a 300 hp Meadows engine from the Covenanter tank and was made the tank underpowered. The A20 project was cancelled with the Battle of France, which saw the emergency evacuation of the British Expeditionary Force from Dunkirk that left a majority of their heavy equipment behind.
The Battle of France proved that the coming World War II was not going to be a stagnant battlefield like the trench warfare from World War I. The entire concept had to be redesigned and was done so by Henry Merrit, the director of Tank Design at Woolwich Arsenal. His new concept, the A22 or Infantry Tank Mark IV Churchill, was given to Vauxhall Motors in June 1940. War Office requested that the A22 be ready to enter production within the year due to the growing pressure of a German invasion of Britain. The designs were prepared in July 1940, and the prototypes were made by December of the same year, production soon followed in June 1941. The rushed development was acknowledged in the company to being the cause of many faults and defects in the tank, but the demand by the government was so high that it must be carried out, with the expectation that the issues will be fixed during production. The Churchill tank suffered from an underpowered engine, weak armament, and mechanical problems. The weak weapon from a 2-pounder was replaced with the arming of a 6-pounder on the Churchill, but the other issues caused poor performance of the Churchill in the battlefield. The Churchill production was almost cancelled in favour of the Cromwell due to its issues, but its usage in the Second Battle of El Alamein proved its value and kept it in service.
The Churchill would carry on the rest of the war as one of the most versatile tank design in British service, serving in many specialist roles other than its tank role. Altogether, a total of 7,568 Churchill units produced from 1941 to 1945, with 5,968 as tanks.
Variants
The Churchill, used in a multitude of roles, is made into many different variants. Twelve different kinds of tank variants were produced for combat roles, with 11 more variants in specific roles ranging from armoured personnel carrier, a bridge-layer, mine clearer, a Gun Carrier (3-in), flamethrower tank, and an armoured recovery vehicle.
Combat usage
The Churchill tank was first used in the Dieppe Raid in August 1942. While it was a test on how an opposed landing would work, the 60 Churchill tanks to support the Canadian units suffered from mechanical issues, and those that did work are not able to penetrate past the sea wall due to impassable defences. None of the Churchill tanks that landed returned from the beaches and with a 70% casualty rate, the raid's attempt to establish a beachhead was a failure.
The next use of the Churchill was in North Africa during the Second Battle of El Alamein. At this point, the Churchills have been upgraded to the Mk.III variants with 6-pounders as their main armament. The detachment, code-named "King Force", help supported the 7th Motor Brigade in their attack. The Churchills were fired upon by many German anti-tank weapons, but none were taken out with only one receiving noteworthy damage. "King Force", as a test bed for the feasibility of Churchills operating in the desert environment, was disbanded with the establishment of the 25th Army Tank Brigade with the Churchills to see action in February 1943 in Tunisia. In the German offensive Operation Ochsenkpf, two Churchill Mk.III from the 51st Royal Tank Regiment came across an entire German transport column that they ambushed. The result was a loss of twelve artillery pieces, 25 wheeled vehicles, two Panzer IIIs and 200 casualties on the British side with no losses. The Churchill also played a crucial role in the Battle of Longstop Hill, where Churchill tanks in the 48th Royal Tank Regiment faced off with Germany's newest heavy tank Tiger I. Though suffering losses, a lucky 6-pounder shot from the Churchill ended up jamming the Tiger's turret and turret ring that injured the crew, forcing them to abandon the tank. The Tiger tank was captured by the British for intelligence purpose on Germany's armoured forces. The Tiger Tank is named Tiger 131.
After the North African campaign, the Churchill began to see widespread usage in the British army as a support unit for the infantry. The Churchill saw much more operation hours than any other British tank in service. It was at this point that the Churchill Mk.III began conversion into the 75 mm guns that were used on the American M4 Sherman tanks. These conversions, known as NA75, were a resourceful solution for increasing the firepower of the Churchill tanks using readily available equipment. Some Churchills were also converted into close support vehicles with 95 mm howitzers as their main armaments. In response to the growing German anti-tank firepower in the later years of World War II, the Churchill tanks were also upgraded in armour by a large degree, though their engines were also upgraded to compensate for the additional weight. The Churchill Mk VII, for example, has armour ranging up to 152 mm thick in the front, in comparison to the Mk.III 89 mm thick front hull. The Churchills also saw service in Europe during Operation Overlord. At the time, it was considered that the Churchill would become severely outdated with the growing tank technology, so an experimental program under specification A43, otherwise known as the Black Prince, to up-armour and up-gun the Churchill. While this experimented seem fruitful, the development of more agile tanks with the same level of protection and armament such as the Centurion rendered the project obsolete.
The Churchills were also given out to the Allies to help combat the Axis forces. The Australian Army received a handful of Churchills for testing alongside the M4 Sherman with the Matilda II as the basis, to which proved that the Churchill was superior in jungle warfare. Of the 510 Churchills ordered by the Australians in the war, only 46 arrived in time and were not used in the Pacific War; the rest were cancelled with the end of World War II. The USSR also used the Churchills given by the British as part of the Lend-Lease act. 301 Churchills were sent, but 43 were lost to the sea by German naval forces. Of those that arrived, the Soviets gave the Churchills to the 5th Guards Tank Army in the Battle of Prokhorovka during the Kursk Offensive.
After World War II, the Churchill stuck around in the British Army until the Korean War, where the British sent the Churchill Crocodile Squadron (C squadron of the 7th Royal Tank Regiment) to Korea to fight with the Allied coalition. They fought as gun tanks in battle such as the Third Battle of Seoul. The Churchills were instrumental in some victories and were widely praised by both British and American forces and historians. After the Korean war, the Churchills remains in combat service until 1952, with the specific bridge-layer variant staying until the 1970s. The Irish Army also received three Churchill tanks in 1948 and another in 1949 as rentals until 1954, where they were purchased after trials with the vehicles. Despite running out of spare parts for the Churchill, the Irish Army took them in and experimented with using different engines to keep them functional, though this ended with failure and by 1967, only one was still functional. All were retired in 1969, and one was preserved at the Curragh Camp.
Media
- Skins
- Videos
See also
- Other vehicles of similar configuration and role
External links
| Vauxhall Motors Limited | |
|---|---|
| Infantry Tanks | |
| Tank, Infantry, Mk IV, Churchill (A22) | Churchill I · Churchill III · Churchill VII · Churchill Crocodile |
| Tank, Infantry, Black Prince (A43) | Black Prince |
| Tank Destroyers | Gun Carrier (3-in) |
| Captured | ▀Pz.Kpfw. Churchill |
| Britain heavy tanks | |
|---|---|
| Matilda | Matilda III · Matilda Hedgehog |
| Churchill | Churchill I · Churchill III · Churchill VII · Churchill Crocodile · Churchill NA75 · Black Prince |
| Post-war | Caernarvon · Conqueror |
| Other | Independent · Excelsior · TOG II |


