Difference between pages "VS-10" and "SF40 Light"
(Edits) |
(Edits) |
||
| Line 1: | Line 1: | ||
| + | {{About | ||
| + | | about = German anti-air ferry '''{{PAGENAME}}''' | ||
| + | | usage = the 88 mm version | ||
| + | | link = SF40 Heavy | ||
| + | }} | ||
{{Specs-Card | {{Specs-Card | ||
| − | |code= | + | |code=germ_sf40_leichte_flakkampffaehre |
|images={{Specs-Card-Image|GarageImage_{{PAGENAME}}.jpg}} | |images={{Specs-Card-Image|GarageImage_{{PAGENAME}}.jpg}} | ||
}} | }} | ||
| Line 6: | Line 11: | ||
== Description == | == Description == | ||
<!-- ''In the first part of the description, cover the history of the ship's creation and military application. In the second part, tell the reader about using this ship in the game. Add a screenshot: if a beginner player has a hard time remembering vehicles by name, a picture will help them identify the ship in question.'' --> | <!-- ''In the first part of the description, cover the history of the ship's creation and military application. In the second part, tell the reader about using this ship in the game. Add a screenshot: if a beginner player has a hard time remembering vehicles by name, a picture will help them identify the ship in question.'' --> | ||
| − | The '''{{Specs|name}}''' is a rank {{Specs|rank}} German | + | The '''{{Specs|name}}''' is a rank {{Specs|rank}} German anti-air ferry {{Battle-rating}}. It was introduced in [[Update 1.79 "Project X"]] in the fleet closed beta test. |
== General info == | == General info == | ||
| Line 12: | Line 17: | ||
{{Specs-Fleet-Armour}} | {{Specs-Fleet-Armour}} | ||
<!-- ''Talk about the vehicle's armour. Note the most well-defended and most vulnerable zones, e.g. the ammo magazine. Evaluate the composition of components and assemblies responsible for movement and manoeuvrability. Evaluate the survivability of the primary and secondary armaments separately. Don't forget to mention the size of the crew, which plays an important role in fleet mechanics. Save tips on preserving survivability for the "Usage in battles" section. If necessary, use a graphical template to show the most well-protected or most vulnerable points in the armour.'' --> | <!-- ''Talk about the vehicle's armour. Note the most well-defended and most vulnerable zones, e.g. the ammo magazine. Evaluate the composition of components and assemblies responsible for movement and manoeuvrability. Evaluate the survivability of the primary and secondary armaments separately. Don't forget to mention the size of the crew, which plays an important role in fleet mechanics. Save tips on preserving survivability for the "Usage in battles" section. If necessary, use a graphical template to show the most well-protected or most vulnerable points in the armour.'' --> | ||
| − | + | SF40 Leichte has the following armour layout: | |
| + | |||
| + | * [[2 cm/65 Flakvierling 38 (20 mm)|2 cm/65 Flakvierling 38]] gunshields: 12 mm, hardened armour | ||
| + | * [[3,7 cm FlaK-Lafette C/36 (37 mm)|3,7 cm FlaK-Lafette C/36]] gunshield: 8 mm, hardened armour | ||
| + | * Main turret platforms: 10 mm, rolled homogeneous armour | ||
| + | * Deckhouse: 10 mm, rolled homogeneous armour | ||
| + | * Hull: {{Annotation|15 mm|6.75 mm RHA}}, steel | ||
| + | * Superstructure: {{Annotation|20 mm|0.8 mm RHA}}, wood | ||
| + | |||
| + | {{Notice|Steel has an armour multiplier of 0.45, and wood has an armour multiplier of 0.04. The hull and superstructure are equivalent to 6.75 mm and 0.8 mm {{Annotation|RHA|rolled homogeneous armour}}, respectively.}} | ||
| + | |||
| + | [[File:SF40 Leichte internals.png|thumb|SF40 Leichte internals (starboard side)]] | ||
| + | |||
| + | While the SF40 Leichte certainly has above average armour for its battle rating, like many other rank I and II naval vessels, its armour is mostly negligible. Almost any weapon it faces can punch right through its armour without much issue. However, with its rather high crew complement of 42, SF40 Leichte proves to be quite survivable. With a stock crew, SF40 Leichte can lose 26 of its crew, and with an aced crew, this increases to a maximum loss of 30. In addition, due to its large size, the crew of SF40 Leichte is spread out, meaning that the loss of a single compartment isn't as significant as with smaller vessels. | ||
| + | |||
| + | Despite that, there are a few notable weaknesses. The first is the central deckhouse just behind the bridge, which large, lightly armoured, and contains roughly half of the available crew. The second weakness is the four ammo racks, two in each pontoon. These are located one at the waterline below the front turret and one at the waterline below the back end of the deckhouse. These ammo racks are only partially underwater and, thanks to the reference points mentioned, are relatively easy to spot. Destroying these ammo racks is a quick and guaranteed way to destroy the SF40 Leichte. | ||
| + | |||
| + | Aside from the wood, the bridge of SF40 Leichte is unarmoured. Being rather prominent, this commonly leads to loss of control. | ||
=== Mobility === | === Mobility === | ||
| Line 18: | Line 40: | ||
<!-- ''Write about the ship's mobility. Evaluate its power and manoeuvrability, rudder rerouting speed, stopping speed at full tilt, with its maximum forward and reverse speed.'' --> | <!-- ''Write about the ship's mobility. Evaluate its power and manoeuvrability, rudder rerouting speed, stopping speed at full tilt, with its maximum forward and reverse speed.'' --> | ||
| − | + | Like all other barges in the game, SF40 Leichte is incredibly slow going both forwards and backwards. Because of its slow speed, turning is also extremely sluggish. | |
| − | + | ||
| − | + | SF40 Leichte has a total displacement of 160 tons: above average, but nowhere close to the highest at its battle rating, despite its size and apparent lack of speed. | |
| − | |||
| − | |||
| − | |||
| − | + | {{NavalMobility}} | |
=== Modifications and economy === | === Modifications and economy === | ||
| Line 34: | Line 53: | ||
=== Primary armament === | === Primary armament === | ||
{{Specs-Fleet-Primary}} | {{Specs-Fleet-Primary}} | ||
| − | |||
<!-- ''Provide information about the characteristics of the primary armament. Evaluate their efficacy in battle based on their reload speed, ballistics and the capacity of their shells. Add a link to the main article about the weapon: <code><nowiki>{{main|Weapon name (calibre)}}</nowiki></code>. Broadly describe the ammunition available for the primary armament, and provide recommendations on how to use it and which ammunition to choose.'' --> | <!-- ''Provide information about the characteristics of the primary armament. Evaluate their efficacy in battle based on their reload speed, ballistics and the capacity of their shells. Add a link to the main article about the weapon: <code><nowiki>{{main|Weapon name (calibre)}}</nowiki></code>. Broadly describe the ammunition available for the primary armament, and provide recommendations on how to use it and which ammunition to choose.'' --> | ||
| − | + | {{main|2 cm/65 Flakvierling 38 (20 mm)}} | |
| + | |||
| + | SF40 Leichte has four Flakvierling 38 turrets, each with four 20 mm cannons, in each corner of its rectangular deck for a total of 16 guns. Each gun has a rate of fire of 450 rounds per minute and has a magazine capacity of 40 rounds. They each have 2,000 rounds of ammunition available, for a total of 32,000 rounds. With a stock crew, they can be reloaded in 6.41 seconds, 5.5 seconds with an aced crew. The turrets can traverse both horizontally and vertically at a rate of 40°/s. | ||
| + | |||
| + | {{Notice|Turrets are named sequentially, clockwise, starting at the bow}} | ||
| + | |||
| + | {| class="wikitable" style="text-align:center" width="100%" | ||
| + | ! colspan="8" | '''Guidance for the Main Gun Turrets''' | ||
| + | |- | ||
| + | ! colspan="2" rowspan="1" | No.1 Turret (front-right) | ||
| + | ! colspan="2" rowspan="1" | No.2 Turret (back-right) | ||
| + | ! colspan="2" rowspan="1" | No.3 Turret (back-left) | ||
| + | ! colspan="2" rowspan="1" | No.4 Turret (front-left) | ||
| + | |- | ||
| + | ! Horizontal !! Vertical !! Horizontal !! Vertical !! Horizontal !! Vertical !! Horizontal !! Vertical | ||
| + | |- | ||
| + | | ±180° || -3°/+88° || ±180° || -3°/+88° || ±180° || -3°/+88° || ±180° || -3°/+88° | ||
| + | |- | ||
| + | |} | ||
There are three ammunition types available: | There are three ammunition types available: | ||
| − | * Universal: {{Annotation| | + | * '''Universal:''' {{Annotation|AP-T|Armour-piercing tracer}}{{-}}{{Annotation|AP|Armour-piercing}}{{-}}{{Annotation|HEF-T|High-explosive fragmentation tracer}}{{-}}{{Annotation|HEF|High-explosive fragmentation}} |
| − | * | + | * '''20 mm HET magazines:''' {{Annotation|HEF|High-explosive fragmentation}}{{-}}{{Annotation|HEF-T|High-explosive fragmentation tracer}}{{-}}{{Annotation|HEF|High-explosive fragmentation}}{{-}}{{Annotation|AP|Armour-piercing}} |
| − | * | + | * '''20 mm APT magazines:''' {{Annotation|AP|Armour-piercing}}{{-}}{{Annotation|AP-T|Armour-piercing tracer}}{{-}}{{Annotation|AP|Armour-piercing}}{{-}}{{Annotation|HEF|High-explosive fragmentation}} |
| + | |||
| + | {{:2 cm/65 Flakvierling 38 (20 mm)/Ammunition|HEF-T, AP, AP-T, HEF}} | ||
| + | |||
| + | === Secondary armament === | ||
| + | {{Specs-Fleet-Secondary}} | ||
| + | <!-- ''Some ships are fitted with weapons of various calibres. Secondary armaments are defined as weapons chosen with the control <code>Select secondary weapon</code>. Evaluate the secondary armaments and give advice on how to use them. Describe the ammunition available for the secondary armament. Provide recommendations on how to use them and which ammunition to choose. Remember that any anti-air armament, even heavy calibre weapons, belong in the next section. If there is no secondary armament, remove this section.'' --> | ||
| + | {{main|3.7 cm FlaK-Lafette C/36 (37 mm)}} | ||
| + | |||
| + | SF40 has a single 3,7 cm FlaK-Lafette C/36 atop its central deckhouse. It has a rate of fire of 250 rounds per minute and fires from a 5-round magazine, with a total of 2,000 rounds of ammunition available. The gun can be reloaded in 0.25 seconds with a stock crew and in 0.13 seconds with an aced crew. It can traverse horizontally at a rate of 50°/s and vertically at a rate of 70°/s. | ||
| + | |||
| + | {| class="wikitable" style="text-align:center" | ||
| + | ! colspan="2" | '''Guidance for the Secondary Gun Turret''' | ||
| + | |- | ||
| + | ! Horizontal !! Vertical | ||
| + | |- | ||
| + | | ±180° || +1°/+80° | ||
| + | |- | ||
| + | |} | ||
| − | + | There are three choices of ammunition available: | |
| − | |||
| − | |||
| − | |||
| − | + | * '''Universal:''' {{Annotation|AP-T|Armour-piercing tracer}}{{-}}{{Annotation|HEF-I|High-explosive fragmentation incendiary}} | |
| + | * '''37 mm HE clips:''' {{Annotation|HEF-I|High-explosive fragmentation incendiary}}{{-}}{{Annotation|HEF-I|High-explosive fragmentation incendiary}}{{-}}{{Annotation|HEF-I|High-explosive fragmentation incendiary}}{{-}}{{Annotation|HEF-I|High-explosive fragmentation incendiary}}{{-}}{{Annotation|AP-T|Armour-piercing tracer}} | ||
| + | * '''37 mm APT clips:''' {{Annotation|AP-T|Armour-piercing tracer}}{{-}}{{Annotation|AP-T|Armour-piercing tracer}}{{-}}{{Annotation|AP-T|Armour-piercing tracer}}{{-}}{{Annotation|AP-T|Armour-piercing tracer}}{{-}}{{Annotation|HEF-I|High-explosive fragmentation incendiary}} | ||
| + | |||
| + | {{:FlaK.43 (37 mm)/Ammunition|HEF-I, AP-T}} | ||
== Usage in battles == | == Usage in battles == | ||
<!-- ''Describe the technique of using this ship, the characteristics of her use in a team and tips on strategy. Abstain from writing an entire guide – don't try to provide a single point of view, but give the reader food for thought. Talk about the most dangerous opponents for this vehicle and provide recommendations on fighting them. If necessary, note the specifics of playing with this vehicle in various modes (AB, RB, SB).'' --> | <!-- ''Describe the technique of using this ship, the characteristics of her use in a team and tips on strategy. Abstain from writing an entire guide – don't try to provide a single point of view, but give the reader food for thought. Talk about the most dangerous opponents for this vehicle and provide recommendations on fighting them. If necessary, note the specifics of playing with this vehicle in various modes (AB, RB, SB).'' --> | ||
| − | + | Because of its very slow speed, the SF40 Light will never be first to action in battle. Going full speed ahead, it can still take several minutes to reach the capture points on even small maps. How well the SF40 Light does in the battle depends not on how many enemies it can find, but rather how many enemies happen to run into it. To maximize this, the SF40 Light should be sailed towards the centre of action on every map right from spawn, whether that be capture points or likely paths that enemy boats may take. Here, the SF40 Light can leverage its high survivability and overwhelm its opponents with firepower. | |
| − | + | The 20 mm Flakvierling 38 cannons are among the best in the game. Compared to other 20 mm naval cannons in the game, these have the largest explosive mass in the HE rounds, the greatest AP penetration with the AP rounds, as well as a decent rate of fire and muzzle velocity. Altogether, this allows the SF40 Light to quickly destroy any enemy boat with a single burst, especially since 12 guns can be brought on target at once. Two problems exist for this gun: the relatively small 40-round magazines (which means frequent reloads), and the maximum range of roughly 2.5 km (common for most guns of this calibre). The latter is a much greater issue. Whereas faster vessels with such a problem can evade or quickly get behind cover, the SF40 Light is essentially a stationary target for weapons like [[Bofors L/60 Mark 1 (40 mm)]] or large-calibre cannons (3-inch or larger). Boats armed with these can comfortably sit outside the SF40 Light's range and gradually chip away at the crew. This is even further accentuated when faced with destroyers, since they carry much larger guns and are generally unaffected by the SF40 Light's own 20 mm cannons (albeit you would still be able to kill their crew off by aiming at their superstructure). Armoured targets may also be an issue, despite the above-average penetration of the 20 mm cannons. While the 3,7 cm FlaK-Lafette C/36, with its higher penetration, can be used against such enemies, it cannot be fired directly forwards, nor can it hit any targets within approximately 1.5 km due to its maximum depression being 1° above the neutral position. It's often better to just pepper such targets with 20 mm AP and leave the 37 mm for anti-aircraft purposes. | |
| − | === Pros and cons === | + | The SF40 Light should obviously be angled in such a way that three of four turrets are on target at once to maximize damage. At the same time, though, it should be angled as little as possible. This not only shows as little of the side and as possible, but it also allows the middle of the three Flakvierling 38's to block the line-of-sight to the deckhouse. Protecting the deckhouse is vital because it contains roughly half of the available crew. However, if it has already been destroyed, angling like this is no longer so important. The other major weakness is the ammo racks, which cannot be removed by taking less ammunition. Close-range enemies on the side are a big threat, since here, it is easiest to hit the ammo racks, especially when taking advantage of the hit cam. Though ammo rack destruction is quite rare in practice, a knowledgeable enemy player can still quickly eliminate the SF40 Light with this method. Aside from these points, survivability of the SF40 Light tends to be very high because of its size and large crew complement. |
| + | |||
| + | Enemy MTB torpedoes can be a threat, but only if launched at close-range, where the SF40 Light won't be able to evade in time. In this respect, long-range torpedo attacks aren't much of an issue, provided that they are spotted early enough. Even if torpedoes cannot be completely avoided, torpedoes can pass under the centre of the SF40 Light if necessary, between the two pontoons. Comparatively, greater threats are aerial torpedoes and rockets, guided bombs like the [[PC 1400 X (1,400 kg)|Fritz X]], and large bombs like the [[H.C. Mk.II (4,000 lb)|4,000 lb H.C. Mk.II]] or the [[FAB-5000 (5,000 kg)|FAB-5000]]. Because of the SF40 Light's large size and slow movement, it makes for a perfect target, since the SF40 Light's sluggishness may make evasion of these entirely impossible. Enemy aircraft should be prioritized. | ||
| + | |||
| + | ====Ammunition Choices==== | ||
| + | For the 20 mm Flakvierling 38 guns, 20 mm HET magazines should be the primary ammunition choice, since it contains the highest ratio of HE to AP rounds and, thus, is the most effective against enemy boats and aircraft. The maximum range of the HE rounds is roughly 2.0 km, while the AP rounds can reach a little further to 2.3 km, though there isn't much point in using the 20 mm APT magazines for this purpose. Still, several 20 mm APT magazines should for the occasional armoured targets. | ||
| + | |||
| + | The primary ammunition choice of the 37 mm FlaK-Lafette C/36, or rather the only one that should really be taken, is 37 mm HE clips, again because of the higher HE to AP ratio. While the AP in this gun is more powerful than that of the 20 mm guns, there isn't much point to using it against surface targets because of its awkward firing arcs. It is, however, fantastic as an anti-aircraft gun. | ||
| + | |||
| + | ====Enemies worth noting:==== | ||
| + | * Various destroyers ([[Leopard]], [[USS Barker]], [[Frunze]]): due to its BR, the SF40 Light will face early destroyers with high-calibre guns that can be very deadly. Furthermore, the SF40 Light will be occasionally pitted in a larger maps that will further worsen its range and speed disadvantage, especially in encounter/conquest mode where you will be pretty much useless as everyone can outrange you. However, in a smaller map in domination mode, the SF40 Light's range and speed problem is somewhat negligible as everyone is closer to each other and that the larger vessels have to navigate through shallow waters to capture the base and bring themselves into your effective range of fire. | ||
| + | |||
| + | === Pros and cons === | ||
<!-- ''Summarise and briefly evaluate the vehicle in terms of its characteristics and combat effectiveness. Mark its pros and cons in the bulleted list. Try not to use more than 6 points for each of the characteristics. Avoid using categorical definitions such as "bad", "good" and the like - use substitutions with softer forms such as "inadequate" and "effective".'' --> | <!-- ''Summarise and briefly evaluate the vehicle in terms of its characteristics and combat effectiveness. Mark its pros and cons in the bulleted list. Try not to use more than 6 points for each of the characteristics. Avoid using categorical definitions such as "bad", "good" and the like - use substitutions with softer forms such as "inadequate" and "effective".'' --> | ||
| − | |||
'''Pros:''' | '''Pros:''' | ||
| − | * | + | * Very large amount of 20 mm guns, 12 on target at once, 16 total |
| − | * | + | * Strongest 20 mm HE and AP rounds compared to other 20 mm guns |
| − | * | + | * High rate of fire and relatively quick reload time |
| − | * | + | * High survivability |
| − | * | + | * Great anti-aircraft coverage |
| − | * | + | * Very high ammunition capacity |
'''Cons:''' | '''Cons:''' | ||
| − | * | + | * Very low maximum speed and bad manoeuvrability |
| − | * | + | * Approximately 2.5 km maximum range against small targets, 3.5 km against destroyers. |
| − | * | + | * 3,7 cm FlaK-Lafette C/36 is inadequate against surface targets |
| − | * | + | * May struggle against armoured targets due to lack of large-calibre armament |
| − | * | + | * Large, high-priority target, easily spotted and attracts enemy bombs and torpedoes |
| − | * | + | * If catching fire, it has a high chance of getting destroyed by ammunition detonation |
| − | |||
== History == | == History == | ||
<!-- ''Describe the history of the creation and combat usage of the ship in more detail than in the introduction. If the historical reference turns out to be too long, take it to a separate article, taking a link to the article about the ship and adding a block "/History" (example: <nowiki>https://wiki.warthunder.com/(Ship-name)/History</nowiki>) and add a link to it here using the <code>main</code> template. Be sure to reference text and sources by using <code><nowiki><ref></ref></nowiki></code>, as well as adding them at the end of the article with <code><nowiki><references /></nowiki></code>. This section may also include the ship's dev blog entry (if applicable) and the in-game encyclopedia description (under <code><nowiki>=== In-game description ===</nowiki></code>, also if applicable).'' --> | <!-- ''Describe the history of the creation and combat usage of the ship in more detail than in the introduction. If the historical reference turns out to be too long, take it to a separate article, taking a link to the article about the ship and adding a block "/History" (example: <nowiki>https://wiki.warthunder.com/(Ship-name)/History</nowiki>) and add a link to it here using the <code>main</code> template. Be sure to reference text and sources by using <code><nowiki><ref></ref></nowiki></code>, as well as adding them at the end of the article with <code><nowiki><references /></nowiki></code>. This section may also include the ship's dev blog entry (if applicable) and the in-game encyclopedia description (under <code><nowiki>=== In-game description ===</nowiki></code>, also if applicable).'' --> | ||
| + | In July 1940, in preparation for Operation Seelöwe (Operation Sea Lion), the German Wehrmacht required a large amount of ocean-going transport and landing craft for the planned invasion of Great Britain. With no suitable craft available within the Kriegsmarine, the task also fell to other branches of the German military. Design proposals were submitted by the Heer and Luftwaffe, where the idea piqued the interest of aircraft designer Friedrich Siebel. | ||
| + | |||
| + | He soon produced and presented a prototype, a catamaran made from two pontoons taken from an existing pontoon bridge design. The two pontoons were separated six metres apart and spanned by a wooden deck, with the entire craft powered by two aircraft engines. The design was seen as unsatisfactory due to its flimsy construction and low top speed of only 4 knots (7.4 km/h). Siebel produced another prototype in August 1940, this time with a steel-reinforced deck, the spacing between the pontoons reduced to 5.5 m, and the craft powered by two BMW 6U aircraft engines. This version solved the stability and speed problems of the previous prototype, increasing its top speed to 8 knots (14.8 km/h), and was met with enthusiasm by the Wehrmacht. | ||
| − | The | + | Named after its creator, the Siebelfähre (Siebel Ferry) proved to be a rather stable firing platform due to its catamaran design and wide width. The Luftwaffe experimented with an anti-aircraft version, mounting various anti-aircraft guns from 20 mm autocannons to the 8.8 cm Flak 36. These AAA versions were planned to provide anti-aircraft cover for the main landing force in the invasion. An order for 400 Siebelfähren was placed; however, in October 1940, Operation Seelöwe was cancelled before the order could be completed. Nevertheless, in 1941, the Luftwaffe continued to produce Siebelfähren. These new ones, along with any that had already been built, would be used by the Luftwaffe and Heer as transport craft, minelayers, AAA barges, and gunboats in the Mediterranean Sea, the Black Sea, and the Baltic Sea until the end of the war in 1945. |
== Media == | == Media == | ||
| Line 88: | Line 156: | ||
;Skins | ;Skins | ||
| + | * [https://live.warthunder.com/feed/camouflages/?vehicle=germ_sf40_leichte_flakkampffaehre Skins and camouflages for the {{PAGENAME}} from live.warthunder.com.] | ||
| − | + | ;Videos | |
| + | {{Youtube-gallery|SDDxf3pr0c0|'''Naval CBT - SF40 Light/Heavy review''' - ''TheCat PlaysGamez''|WOik7xFnNHQ|'''Unmatched Firepower - SF40 Leichte Flak Barge - Naval Forces''' - ''Virus''}} | ||
== See also == | == See also == | ||
| − | ''Links to articles on the War Thunder Wiki that you think will be useful for the reader, for example:'' | + | <!-- ''Links to articles on the War Thunder Wiki that you think will be useful for the reader, for example:'' |
| + | * ''reference to the series of the ship;'' | ||
| + | * ''links to approximate analogues of other nations and research trees.'' --> | ||
| − | * | + | * [[SF40 Heavy]] |
| − | |||
== External links == | == External links == | ||
| Line 102: | Line 173: | ||
* ''other literature.'' --> | * ''other literature.'' --> | ||
| − | * [http://www. | + | * [[wikipedia:Siebel_ferry|[Wikipedia] Siebel ferry]] |
| + | * [http://www.german-navy.de/kriegsmarine/ships/landingcrafts/siebel/index.html <nowiki>[German Naval History]</nowiki> Siebel Fähre History] | ||
| − | + | {{Germany barges}} | |
| − | {{Germany | ||
Revision as of 16:49, 7 March 2023
| This page is about the German anti-air ferry SF40 Light. For the 88 mm version, see SF40 Heavy. |

Contents
Description
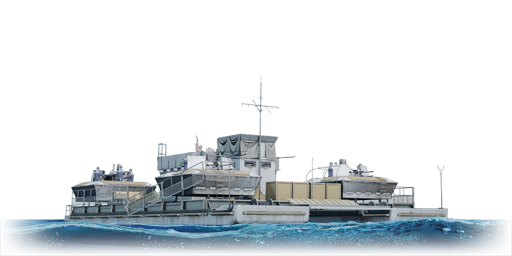
The Siebelfähre 40 Light is a rank German anti-air ferry with a battle rating of (AB), (RB), and (SB). It was introduced in Update 1.79 "Project X" in the fleet closed beta test.
General info
Survivability and armour
SF40 Leichte has the following armour layout:
- 2 cm/65 Flakvierling 38 gunshields: 12 mm, hardened armour
- 3,7 cm FlaK-Lafette C/36 gunshield: 8 mm, hardened armour
- Main turret platforms: 10 mm, rolled homogeneous armour
- Deckhouse: 10 mm, rolled homogeneous armour
- Hull: 15 mm, steel
- Superstructure: 20 mm, wood
| Steel has an armour multiplier of 0.45, and wood has an armour multiplier of 0.04. The hull and superstructure are equivalent to 6.75 mm and 0.8 mm RHA, respectively. |

While the SF40 Leichte certainly has above average armour for its battle rating, like many other rank I and II naval vessels, its armour is mostly negligible. Almost any weapon it faces can punch right through its armour without much issue. However, with its rather high crew complement of 42, SF40 Leichte proves to be quite survivable. With a stock crew, SF40 Leichte can lose 26 of its crew, and with an aced crew, this increases to a maximum loss of 30. In addition, due to its large size, the crew of SF40 Leichte is spread out, meaning that the loss of a single compartment isn't as significant as with smaller vessels.
Despite that, there are a few notable weaknesses. The first is the central deckhouse just behind the bridge, which large, lightly armoured, and contains roughly half of the available crew. The second weakness is the four ammo racks, two in each pontoon. These are located one at the waterline below the front turret and one at the waterline below the back end of the deckhouse. These ammo racks are only partially underwater and, thanks to the reference points mentioned, are relatively easy to spot. Destroying these ammo racks is a quick and guaranteed way to destroy the SF40 Leichte.
Aside from the wood, the bridge of SF40 Leichte is unarmoured. Being rather prominent, this commonly leads to loss of control.
Mobility
Like all other barges in the game, SF40 Leichte is incredibly slow going both forwards and backwards. Because of its slow speed, turning is also extremely sluggish.
SF40 Leichte has a total displacement of 160 tons: above average, but nowhere close to the highest at its battle rating, despite its size and apparent lack of speed.
| Mobility Characteristics | |||
|---|---|---|---|
| Game Mode | Upgrade Status | Maximum Speed (km/h) | |
| Forward | Reverse | ||
| AB | |||
| Upgraded | |||
| RB/SB | |||
| Upgraded | |||
Modifications and economy
Armament
Primary armament
SF40 Leichte has four Flakvierling 38 turrets, each with four 20 mm cannons, in each corner of its rectangular deck for a total of 16 guns. Each gun has a rate of fire of 450 rounds per minute and has a magazine capacity of 40 rounds. They each have 2,000 rounds of ammunition available, for a total of 32,000 rounds. With a stock crew, they can be reloaded in 6.41 seconds, 5.5 seconds with an aced crew. The turrets can traverse both horizontally and vertically at a rate of 40°/s.
| Turrets are named sequentially, clockwise, starting at the bow |
| Guidance for the Main Gun Turrets | |||||||
|---|---|---|---|---|---|---|---|
| No.1 Turret (front-right) | No.2 Turret (back-right) | No.3 Turret (back-left) | No.4 Turret (front-left) | ||||
| Horizontal | Vertical | Horizontal | Vertical | Horizontal | Vertical | Horizontal | Vertical |
| ±180° | -3°/+88° | ±180° | -3°/+88° | ±180° | -3°/+88° | ±180° | -3°/+88° |
There are three ammunition types available:
- Universal: AP-T · AP · HEF-T · HEF
- 20 mm HET magazines: HEF · HEF-T · HEF · AP
- 20 mm APT magazines: AP · AP-T · AP · HEF
| Penetration statistics | |||||||
|---|---|---|---|---|---|---|---|
| Ammunition | Penetration @ 0° Angle of Attack (mm) | ||||||
| 10 m | 100 m | 500 m | 1,000 m | 1,500 m | 2,000 m | ||
| HEF-T | 2 | 2 | 2 | 2 | 2 | 2 | |
| AP | 36 | 35 | 27 | 20 | 15 | 11 | |
| AP-T | 36 | 35 | 27 | 20 | 15 | 11 | |
| HEF | 2 | 2 | 2 | 2 | 2 | 2 | |
| Shell details | ||||||||||||
|---|---|---|---|---|---|---|---|---|---|---|---|---|
| Ammunition | Velocity (m/s) |
Projectile mass (kg) |
Fuse delay (m) |
Fuse sensitivity (mm) |
Explosive mass (TNT equivalent) (g) |
Ricochet | ||||||
| 0% | 50% | 100% | ||||||||||
| HEF-T | 835 | 0.12 | 0 | 0.1 | 10.54 | 79° | 80° | 81° | ||||
| AP | 785 | 0.15 | - | - | - | 47° | 60° | 65° | ||||
| AP-T | 785 | 0.15 | - | - | - | 47° | 60° | 65° | ||||
| HEF | 835 | 0.12 | 0 | 0.1 | 10.54 | 79° | 80° | 81° | ||||
Secondary armament
SF40 has a single 3,7 cm FlaK-Lafette C/36 atop its central deckhouse. It has a rate of fire of 250 rounds per minute and fires from a 5-round magazine, with a total of 2,000 rounds of ammunition available. The gun can be reloaded in 0.25 seconds with a stock crew and in 0.13 seconds with an aced crew. It can traverse horizontally at a rate of 50°/s and vertically at a rate of 70°/s.
| Guidance for the Secondary Gun Turret | |
|---|---|
| Horizontal | Vertical |
| ±180° | +1°/+80° |
There are three choices of ammunition available:
- Universal: AP-T · HEF-I
- 37 mm HE clips: HEF-I · HEF-I · HEF-I · HEF-I · AP-T
- 37 mm APT clips: AP-T · AP-T · AP-T · AP-T · HEF-I
| Penetration statistics | |||||||
|---|---|---|---|---|---|---|---|
| Ammunition | Penetration @ 0° Angle of Attack (mm) | ||||||
| 10 m | 100 m | 500 m | 1,000 m | 1,500 m | 2,000 m | ||
| HEF-I | 3 | 3 | 3 | 3 | 3 | 3 | |
| AP-T | 67 | 64 | 53 | 42 | 33 | 26 | |
| Shell details | ||||||||||||
|---|---|---|---|---|---|---|---|---|---|---|---|---|
| Ammunition | Velocity (m/s) |
Projectile mass (kg) |
Fuse delay (m) |
Fuse sensitivity (mm) |
Explosive mass (TNT equivalent) (g) |
Ricochet | ||||||
| 0% | 50% | 100% | ||||||||||
| HEF-I | 845 | 0.62 | 0 | 0.1 | 44.03 | 79° | 80° | 81° | ||||
| AP-T | 815 | 0.7 | - | - | - | 47° | 60° | 65° | ||||
Usage in battles
Because of its very slow speed, the SF40 Light will never be first to action in battle. Going full speed ahead, it can still take several minutes to reach the capture points on even small maps. How well the SF40 Light does in the battle depends not on how many enemies it can find, but rather how many enemies happen to run into it. To maximize this, the SF40 Light should be sailed towards the centre of action on every map right from spawn, whether that be capture points or likely paths that enemy boats may take. Here, the SF40 Light can leverage its high survivability and overwhelm its opponents with firepower.
The 20 mm Flakvierling 38 cannons are among the best in the game. Compared to other 20 mm naval cannons in the game, these have the largest explosive mass in the HE rounds, the greatest AP penetration with the AP rounds, as well as a decent rate of fire and muzzle velocity. Altogether, this allows the SF40 Light to quickly destroy any enemy boat with a single burst, especially since 12 guns can be brought on target at once. Two problems exist for this gun: the relatively small 40-round magazines (which means frequent reloads), and the maximum range of roughly 2.5 km (common for most guns of this calibre). The latter is a much greater issue. Whereas faster vessels with such a problem can evade or quickly get behind cover, the SF40 Light is essentially a stationary target for weapons like Bofors L/60 Mark 1 (40 mm) or large-calibre cannons (3-inch or larger). Boats armed with these can comfortably sit outside the SF40 Light's range and gradually chip away at the crew. This is even further accentuated when faced with destroyers, since they carry much larger guns and are generally unaffected by the SF40 Light's own 20 mm cannons (albeit you would still be able to kill their crew off by aiming at their superstructure). Armoured targets may also be an issue, despite the above-average penetration of the 20 mm cannons. While the 3,7 cm FlaK-Lafette C/36, with its higher penetration, can be used against such enemies, it cannot be fired directly forwards, nor can it hit any targets within approximately 1.5 km due to its maximum depression being 1° above the neutral position. It's often better to just pepper such targets with 20 mm AP and leave the 37 mm for anti-aircraft purposes.
The SF40 Light should obviously be angled in such a way that three of four turrets are on target at once to maximize damage. At the same time, though, it should be angled as little as possible. This not only shows as little of the side and as possible, but it also allows the middle of the three Flakvierling 38's to block the line-of-sight to the deckhouse. Protecting the deckhouse is vital because it contains roughly half of the available crew. However, if it has already been destroyed, angling like this is no longer so important. The other major weakness is the ammo racks, which cannot be removed by taking less ammunition. Close-range enemies on the side are a big threat, since here, it is easiest to hit the ammo racks, especially when taking advantage of the hit cam. Though ammo rack destruction is quite rare in practice, a knowledgeable enemy player can still quickly eliminate the SF40 Light with this method. Aside from these points, survivability of the SF40 Light tends to be very high because of its size and large crew complement.
Enemy MTB torpedoes can be a threat, but only if launched at close-range, where the SF40 Light won't be able to evade in time. In this respect, long-range torpedo attacks aren't much of an issue, provided that they are spotted early enough. Even if torpedoes cannot be completely avoided, torpedoes can pass under the centre of the SF40 Light if necessary, between the two pontoons. Comparatively, greater threats are aerial torpedoes and rockets, guided bombs like the Fritz X, and large bombs like the 4,000 lb H.C. Mk.II or the FAB-5000. Because of the SF40 Light's large size and slow movement, it makes for a perfect target, since the SF40 Light's sluggishness may make evasion of these entirely impossible. Enemy aircraft should be prioritized.
Ammunition Choices
For the 20 mm Flakvierling 38 guns, 20 mm HET magazines should be the primary ammunition choice, since it contains the highest ratio of HE to AP rounds and, thus, is the most effective against enemy boats and aircraft. The maximum range of the HE rounds is roughly 2.0 km, while the AP rounds can reach a little further to 2.3 km, though there isn't much point in using the 20 mm APT magazines for this purpose. Still, several 20 mm APT magazines should for the occasional armoured targets.
The primary ammunition choice of the 37 mm FlaK-Lafette C/36, or rather the only one that should really be taken, is 37 mm HE clips, again because of the higher HE to AP ratio. While the AP in this gun is more powerful than that of the 20 mm guns, there isn't much point to using it against surface targets because of its awkward firing arcs. It is, however, fantastic as an anti-aircraft gun.
Enemies worth noting:
- Various destroyers (Leopard, USS Barker, Frunze): due to its BR, the SF40 Light will face early destroyers with high-calibre guns that can be very deadly. Furthermore, the SF40 Light will be occasionally pitted in a larger maps that will further worsen its range and speed disadvantage, especially in encounter/conquest mode where you will be pretty much useless as everyone can outrange you. However, in a smaller map in domination mode, the SF40 Light's range and speed problem is somewhat negligible as everyone is closer to each other and that the larger vessels have to navigate through shallow waters to capture the base and bring themselves into your effective range of fire.
Pros and cons
Pros:
- Very large amount of 20 mm guns, 12 on target at once, 16 total
- Strongest 20 mm HE and AP rounds compared to other 20 mm guns
- High rate of fire and relatively quick reload time
- High survivability
- Great anti-aircraft coverage
- Very high ammunition capacity
Cons:
- Very low maximum speed and bad manoeuvrability
- Approximately 2.5 km maximum range against small targets, 3.5 km against destroyers.
- 3,7 cm FlaK-Lafette C/36 is inadequate against surface targets
- May struggle against armoured targets due to lack of large-calibre armament
- Large, high-priority target, easily spotted and attracts enemy bombs and torpedoes
- If catching fire, it has a high chance of getting destroyed by ammunition detonation
History
In July 1940, in preparation for Operation Seelöwe (Operation Sea Lion), the German Wehrmacht required a large amount of ocean-going transport and landing craft for the planned invasion of Great Britain. With no suitable craft available within the Kriegsmarine, the task also fell to other branches of the German military. Design proposals were submitted by the Heer and Luftwaffe, where the idea piqued the interest of aircraft designer Friedrich Siebel.
He soon produced and presented a prototype, a catamaran made from two pontoons taken from an existing pontoon bridge design. The two pontoons were separated six metres apart and spanned by a wooden deck, with the entire craft powered by two aircraft engines. The design was seen as unsatisfactory due to its flimsy construction and low top speed of only 4 knots (7.4 km/h). Siebel produced another prototype in August 1940, this time with a steel-reinforced deck, the spacing between the pontoons reduced to 5.5 m, and the craft powered by two BMW 6U aircraft engines. This version solved the stability and speed problems of the previous prototype, increasing its top speed to 8 knots (14.8 km/h), and was met with enthusiasm by the Wehrmacht.
Named after its creator, the Siebelfähre (Siebel Ferry) proved to be a rather stable firing platform due to its catamaran design and wide width. The Luftwaffe experimented with an anti-aircraft version, mounting various anti-aircraft guns from 20 mm autocannons to the 8.8 cm Flak 36. These AAA versions were planned to provide anti-aircraft cover for the main landing force in the invasion. An order for 400 Siebelfähren was placed; however, in October 1940, Operation Seelöwe was cancelled before the order could be completed. Nevertheless, in 1941, the Luftwaffe continued to produce Siebelfähren. These new ones, along with any that had already been built, would be used by the Luftwaffe and Heer as transport craft, minelayers, AAA barges, and gunboats in the Mediterranean Sea, the Black Sea, and the Baltic Sea until the end of the war in 1945.
Media
- Skins
- Videos
See also
External links
| Germany barges | |
|---|---|
| Anti-air ferries | SF40 Light · SF40 Heavy |
| Naval ferry barges | AF D1 · AF D3 |
