Difference between pages "AMX-13 (SS.11)" and "SC-497"
(Well, I added an image of the tank and where it can be hit, and I wrote a little in the "Survivability and Armour" and "Mobility" paragraphs.) (Tag: Visual edit) |
(→Ammunition: Converted to transclusion) |
||
| Line 1: | Line 1: | ||
| − | {{Specs-Card|code= | + | {{Specs-Card |
| − | {{ | + | |code=us_sc_497 |
| − | | | + | |images={{Specs-Card-Image|GarageImage_{{PAGENAME}}.jpg}} |
| − | |||
| − | |||
}} | }} | ||
== Description == | == Description == | ||
| − | <!--''In the description, | + | <!-- ''In the first part of the description, cover the history of the ship's creation and military application. In the second part, tell the reader about using this ship in the game. Add a screenshot: if a beginner player has a hard time remembering vehicles by name, a picture will help them identify the ship in question.'' --> |
| − | + | The '''{{Specs|name}}''' is a rank {{Specs|rank}} American sub-chaser {{Battle-rating}}. It was introduced in [[Update 1.79 "Project X"]] as part of the fleet closed beta test. | |
| − | |||
| − | The '''{{ | ||
| − | |||
| − | |||
== General info == | == General info == | ||
=== Survivability and armour === | === Survivability and armour === | ||
| − | <!--'' | + | {{Specs-Fleet-Armour}} |
| + | <!-- ''Talk about the vehicle's armour. Note the most well-defended and most vulnerable zones, e.g. the ammo magazine. Evaluate the composition of components and assemblies responsible for movement and manoeuvrability. Evaluate the survivability of the primary and secondary armaments separately. Don't forget to mention the size of the crew, which plays an important role in fleet mechanics. Save tips on preserving survivability for the "Usage in battles" section. If necessary, use a graphical template to show the most well-protected or most vulnerable points in the armour.'' --> | ||
| − | + | Being a wooden-hulled ship, the SC-497 will not be able to handle much gunfire. Her only armour consists of .50 inch (12.7 mm) anti-fragmentation armour on the three Oerlikon mounts. As a result, her survivability is very lacking, and any firefights should be avoided if possible. | |
| − | ''' | + | In terms of vital components, the SC-497 doesn't fare well either. Her gun ammunition magazines lie completely above the water, meaning that any precisely-made shots from an enemy craft could detonate your ammunition storage. The engines are lower-mounted in the hull, but could still possibly be damaged by well-placed hits. The SC-497 has just 22 crewmen, which is rather mediocre for a ship of it's class. In general, survivability isn't your strength, and any firefights should be avoided if possible. |
| − | + | === Mobility === | |
| − | + | {{Specs-Fleet-Mobility}} | |
| + | <!-- ''Write about the ship's mobility. Evaluate its power and manoeuvrability, rudder rerouting speed, stopping speed at full tilt, with its maximum forward and reverse speed.'' --> | ||
| + | Manoeuvrability is very good for size (if a bit slow). Turn, start, stop, all happen quick enough to counter threats, duck into cover, or get ideal fire angles. | ||
| − | { | + | {{NavalMobility}} |
| − | |||
| − | |||
| − | |||
| − | |||
| − | |||
| − | |||
| − | |||
| − | |||
| − | |||
| − | |||
| − | |||
| − | |||
| − | |||
| − | + | === Modifications and economy === | |
| − | + | {{Specs-Economy}} | |
| − | |||
| − | |||
| − | === | + | == Armament == |
| − | <!-- '' | + | {{Specs-Fleet-Armaments}} |
| + | === Primary armament === | ||
| + | {{Specs-Fleet-Primary}} | ||
| + | <!-- ''Provide information about the characteristics of the primary armament. Evaluate their efficacy in battle based on their reload speed, ballistics and the capacity of their shells. Add a link to the main article about the weapon: <code><nowiki>{{main|Weapon name (calibre)}}</nowiki></code>. Broadly describe the ammunition available for the primary armament, and provide recommendations on how to use it and which ammunition to choose.'' --> | ||
| + | {{main|Bofors L/60 Mark 3 (40 mm)}} | ||
| + | |||
| + | This ship is armed with an excellent 40 mm Bofors gun. The gun is great at clearing out PT boats, and with good aim can pop PT boats in a single hit with ammo detonations. The gun however does jam quite often under sustained fire. Use the default mixed belt, as it gives a good balance between AP and HE shells. | ||
| − | {{ | + | * '''Universal:''' {{Annotation|AP-T|Armour-piercing tracer}}{{-}}{{Annotation|HEFI-T|High-explosive fragmentation incendiary tracer}} |
| + | * '''40 mm AP clips:''' {{Annotation|AP-T|Armour-piercing tracer}}{{-}}{{Annotation|AP-T|Armour-piercing tracer}}{{-}}{{Annotation|AP-T|Armour-piercing tracer}}{{-}}{{Annotation|HEFI-T|High-explosive fragmentation incendiary tracer}} | ||
| + | * '''40 mm HE clips:''' {{Annotation|HEFI-T|High-explosive fragmentation incendiary tracer}}{{-}}{{Annotation|HEFI-T|High-explosive fragmentation incendiary tracer}}{{-}}{{Annotation|HEFI-T|High-explosive fragmentation incendiary tracer}}{{-}}{{Annotation|AP-T|Armour-piercing tracer}} | ||
| − | + | {{:Bofors L/60 Mark 3 (40 mm)/Ammunition|HEFI-T, AP-T}} | |
| − | |||
| − | |||
| − | |||
| − | + | === Secondary armament === | |
| − | + | {{Specs-Fleet-Secondary}} | |
| − | + | <!-- ''Some ships are fitted with weapons of various calibres. Secondary armaments are defined as weapons chosen with the control <code>Select secondary weapon</code>. Evaluate the secondary armaments and give advice on how to use them. Describe the ammunition available for the secondary armament. Provide recommendations on how to use them and which ammunition to choose. Remember that any anti-air armament, even heavy calibre weapons, belong in the next section. If there is no secondary armament, remove this section.'' --> | |
| − | + | {{main|20 mm/70 Oerlikon Mk.II (20 mm)}} | |
| − | |||
| − | |||
| − | |||
| − | |||
| − | |||
| − | |||
| − | |||
| − | ! | ||
| − | |||
| − | |||
| − | |||
| − | |||
| − | |||
| − | |||
| − | |||
| − | |||
| − | |||
| − | |||
| − | |||
| − | |||
| − | |||
| − | |||
| − | |||
| − | |||
| − | |||
| − | |||
| − | |||
| − | |||
| − | |||
| − | |||
| − | + | The ship has three Oerlikon 20 mm cannons for a secondary armament. These are great guns that will deal well against aircraft and PT boats, but they will rip into larger ships with ease. As with the Bofors, keep them on the default mixed belt for the same reasons listed above. | |
| − | |||
| − | |||
| − | |||
| − | |||
| − | |||
| − | |||
| − | |||
| − | |||
| − | |||
| − | |||
| − | |||
| − | |||
| − | |||
| − | |||
| − | |||
| − | |||
| − | |||
| − | |||
| − | |||
| − | |||
| − | |||
| − | |||
| − | |||
| − | |||
| − | |||
| − | |||
| − | |||
| − | |||
| − | |||
| − | |||
| − | |||
| − | |||
| − | |||
| − | |||
| − | |||
| − | |||
| − | |||
| − | |||
| − | |||
| − | |||
| − | |||
| − | |||
| − | |||
| − | |||
| − | |||
| − | |||
| − | |||
| − | |||
| − | + | * '''Universal:''' {{Annotation|HEF-T|High-explosive fragmentation tracer}}{{-}}{{Annotation|HEF-I|High-explosive fragmentation incendiary}}{{-}}{{Annotation|AP-T|Armour-piercing tracer}} | |
| − | + | * '''20 mm HE:''' {{Annotation|HEF-T|High-explosive fragmentation tracer}}{{-}}{{Annotation|HEF-I|High-explosive fragmentation incendiary}}{{-}}{{Annotation|AP-T|Armour-piercing tracer}}{{-}}{{Annotation|HEF-I|High-explosive fragmentation incendiary}} | |
| − | {| | + | * '''20 mm AP:''' {{Annotation|AP-T|Armour-piercing tracer}}{{-}}{{Annotation|AP-T|Armour-piercing tracer}}{{-}}{{Annotation|AP-T|Armour-piercing tracer}}{{-}}{{Annotation|HEF-I|High-explosive fragmentation incendiary}} |
| − | |- | ||
| − | |||
| − | |||
| − | |||
| − | |||
| − | |||
| − | |||
| − | |||
| − | |||
| − | |||
| − | |- | ||
| − | |||
| − | |- | ||
| − | |||
| − | + | {{:20 mm/70 Oerlikon Mk.II (20 mm)/Ammunition|HEF-T, AP-T, HEF-I}} | |
=== Additional armament === | === Additional armament === | ||
| − | <!--'' | + | {{Specs-Fleet-Additional}} |
| − | {| | + | <!-- ''Describe the available additional armaments of the ship: depth charges, mines, torpedoes. Talk about their positions, available ammunition and launch features such as dead zones of torpedoes. If there is no additional armament, remove this section.'' --> |
| − | + | {{main|Mk.6 depth charge|K-gun Mk.9 depth charge|7.2 in T37}} | |
| − | |||
| − | |||
| − | |||
| − | |||
| − | |||
| − | |||
| − | |||
| − | |||
| − | |||
| − | |} | ||
| − | + | The ship has "Mouse cage" (like "Hedgehog") charge launchers and depth charges. These are not very useful, and can be detonated by enemy gunfire. However, they pack a large punch if aimed right at close range. | |
| − | |||
| − | |||
| − | |||
| − | |||
| − | |||
| − | |||
| − | |||
| − | |||
| − | |||
| − | |||
| − | |||
| − | |||
| − | |||
| − | |||
| − | |||
| − | |||
| − | |||
== Usage in battles == | == Usage in battles == | ||
| − | <!--''Describe the | + | <!-- ''Describe the technique of using this ship, the characteristics of her use in a team and tips on strategy. Abstain from writing an entire guide – don't try to provide a single point of view, but give the reader food for thought. Talk about the most dangerous opponents for this vehicle and provide recommendations on fighting them. If necessary, note the specifics of playing with this vehicle in various modes (AB, RB, SB).'' --> |
| − | + | She is an incredibly well-balanced ship in game. Small, good speed, powerful weapons, manoeuvrable. | |
| − | The | + | Use her as your first boat or your last in the match. The highly accurate and powerful 40 mm Bofors will let you pick off the small, fast torpedo boats as they rush a cap. One can also get early damage to larger ships, but do not stay exposed for too long. The 40 mm can overheat, but quickly cools down. Toward the end of the matches, players often take out small boats or aircraft, and that is where SC-497 shines. The cluster of 3 x 20 mm will easily take down any aircraft that comes close. Equipping depth charges is very individual, as successful use depends on playstyle. As long as one uses her smartly, one will do brilliantly. |
| − | + | === Pros and cons === | |
| − | + | <!-- ''Summarise and briefly evaluate the vehicle in terms of its characteristics and combat effectiveness. Mark its pros and cons in the bulleted list. Try not to use more than 6 points for each of the characteristics. Avoid using categorical definitions such as "bad", "good" and the like - use substitutions with softer forms such as "inadequate" and "effective".'' --> | |
| − | |||
| − | |||
| − | |||
'''Pros:''' | '''Pros:''' | ||
| − | |||
| − | + | * Powerful 40 mm Bofors gun forward mount with excellent fire arc | |
| − | + | * Excellent AA defence with 3 x 20 mm cannons | |
| − | + | * Option to use depth charges, K-gun (side launched) and forward firing "Hedgehog" like "Mousetrap" mortar depth charges | |
| − | + | * Small size, hard to hit | |
| − | + | * Very good manoeuvrability for size | |
| − | + | * Wooden hull (floats longer if damaged) | |
| − | + | * Full calibre AP shells tend to pass right through without causing too much damage due to the light armour, APHE shells cant even trigger their fuse | |
| − | |||
| − | * | ||
| − | |||
| − | |||
| − | |||
| − | * | ||
| − | * | ||
| − | * | ||
| − | * | ||
| − | * | ||
| − | |||
'''Cons:''' | '''Cons:''' | ||
| − | * | + | * Wooden hull (no protection from fire) |
| − | * | + | * No armour, can be easily shredded by heavy machine guns, when close enough even light machine guns can go trough |
| − | + | * Average speed, even when fully upgraded | |
| − | * | + | * 40 mm gun may overheat |
| − | * | + | * Depth charges have limited use, could cause ammo explosions if hit |
| − | * | + | * Mousetrap range is too short to be useful |
| − | * | + | * No artillery support |
| − | |||
| − | |||
| − | |||
| − | |||
| − | * | ||
== History == | == History == | ||
| − | <!--''Describe the history of the creation and combat usage of the | + | <!-- ''Describe the history of the creation and combat usage of the ship in more detail than in the introduction. If the historical reference turns out to be too long, take it to a separate article, taking a link to the article about the ship and adding a block "/History" (example: <nowiki>https://wiki.warthunder.com/(Ship-name)/History</nowiki>) and add a link to it here using the <code>main</code> template. Be sure to reference text and sources by using <code><nowiki><ref></ref></nowiki></code>, as well as adding them at the end of the article with <code><nowiki><references /></nowiki></code>. This section may also include the ship's dev blog entry (if applicable) and the in-game encyclopedia description (under <code><nowiki>=== In-game description ===</nowiki></code>, also if applicable).'' --> |
| − | + | The SC-497 is the first of the 110 foot long, wooden hull sub-chaser class closely based on the experimental SC-493. She was built by the Fisher Boat Company of Detroit, possibly a forgotten division of the gargantuan General Motors manufacturing conglomerate. Eventually 438 units where built and used worldwide and extensively as one of the "Splinter fleet" (for its wooden hull). It was eventually decided to call wooden hull boats sub-hunters "SC" (steel hull were called PC). One third (142) of this boats were lent to allies as part of the Lend-Lease program, with 78 to the Soviet Union, 50 to France, 8 to Brazil, 3 to Mexico, and 3 to Norway. The three for Norway was shipped (placed on a ship and literally shipped) to UK and given to the Free Norwegian navy used for supplying resistance groups in Norway. Service continued a few years after the war, others sold to other navies serving for a few more years before eventually disappearing. Today only 2 exist, the charter boat MV Cape Pine, and the Royal Norwegian Navy HNoMS Hitra (formerly SC-718) which is in her WW2 configuration (she is active RN boat, but operates as a museum). | |
| − | + | == Media == | |
| − | + | <!-- ''Excellent additions to the article would be video guides, screenshots from the game, and photos.'' --> | |
| − | ''- | ||
| − | = | + | ;Skins |
| − | + | * [https://live.warthunder.com/feed/camouflages/?vehicle=us_sc_497 Skins and camouflages for the {{PAGENAME}} from live.warthunder.com.] | |
| − | {{ | ||
== See also == | == See also == | ||
| − | ''Links to | + | ''Links to articles on the War Thunder Wiki that you think will be useful for the reader, for example:'' |
| − | + | * ''reference to the series of the ship;'' | |
| − | * ''reference to the series of the | ||
* ''links to approximate analogues of other nations and research trees.'' | * ''links to approximate analogues of other nations and research trees.'' | ||
== External links == | == External links == | ||
| − | + | ''Paste links to sources and external resources, such as:'' | |
* ''topic on the official game forum;'' | * ''topic on the official game forum;'' | ||
| − | + | * ''other literature.'' | |
| − | * ''other literature.'' | ||
| − | |||
| − | |||
| − | {{ | + | {{ShipManufacturer Westergard Boat Works, Inc.}} |
| − | {{ | + | {{USA sub-chasers}} |
| − | |||
Latest revision as of 22:08, 5 March 2023

Contents
Description
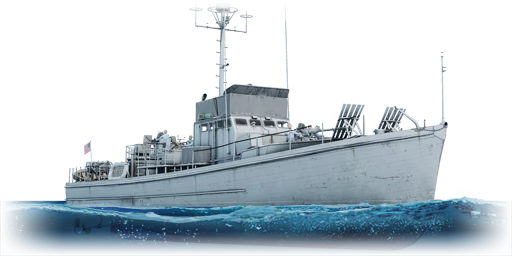
The 110 ft SC-497 is a rank American sub-chaser with a battle rating of (AB), (RB), and (SB). It was introduced in Update 1.79 "Project X" as part of the fleet closed beta test.
General info
Survivability and armour
Being a wooden-hulled ship, the SC-497 will not be able to handle much gunfire. Her only armour consists of .50 inch (12.7 mm) anti-fragmentation armour on the three Oerlikon mounts. As a result, her survivability is very lacking, and any firefights should be avoided if possible.
In terms of vital components, the SC-497 doesn't fare well either. Her gun ammunition magazines lie completely above the water, meaning that any precisely-made shots from an enemy craft could detonate your ammunition storage. The engines are lower-mounted in the hull, but could still possibly be damaged by well-placed hits. The SC-497 has just 22 crewmen, which is rather mediocre for a ship of it's class. In general, survivability isn't your strength, and any firefights should be avoided if possible.
Mobility
Manoeuvrability is very good for size (if a bit slow). Turn, start, stop, all happen quick enough to counter threats, duck into cover, or get ideal fire angles.
| Mobility Characteristics | |||
|---|---|---|---|
| Game Mode | Upgrade Status | Maximum Speed (km/h) | |
| Forward | Reverse | ||
| AB | |||
| Upgraded | |||
| RB/SB | |||
| Upgraded | |||
Modifications and economy
Armament
Primary armament
This ship is armed with an excellent 40 mm Bofors gun. The gun is great at clearing out PT boats, and with good aim can pop PT boats in a single hit with ammo detonations. The gun however does jam quite often under sustained fire. Use the default mixed belt, as it gives a good balance between AP and HE shells.
- Universal: AP-T · HEFI-T
- 40 mm AP clips: AP-T · AP-T · AP-T · HEFI-T
- 40 mm HE clips: HEFI-T · HEFI-T · HEFI-T · AP-T
| Penetration statistics | |||||||
|---|---|---|---|---|---|---|---|
| Ammunition | Penetration @ 0° Angle of Attack (mm) | ||||||
| 10 m | 100 m | 500 m | 1,000 m | 1,500 m | 2,000 m | ||
| HEFI-T | 3 | 3 | 3 | 3 | 3 | 3 | |
| AP-T | 81 | 78 | 68 | 58 | 49 | 41 | |
| Shell details | ||||||||||||
|---|---|---|---|---|---|---|---|---|---|---|---|---|
| Ammunition | Velocity (m/s) |
Projectile mass (kg) |
Fuse delay (m) |
Fuse sensitivity (mm) |
Explosive mass (TNT equivalent) (g) |
Ricochet | ||||||
| 0% | 50% | 100% | ||||||||||
| HEFI-T | 874 | 0.9 | 0 | 0.1 | 67.13 | 79° | 80° | 81° | ||||
| AP-T | 874 | 0.89 | - | - | - | 47° | 60° | 65° | ||||
Secondary armament
The ship has three Oerlikon 20 mm cannons for a secondary armament. These are great guns that will deal well against aircraft and PT boats, but they will rip into larger ships with ease. As with the Bofors, keep them on the default mixed belt for the same reasons listed above.
- Universal: HEF-T · HEF-I · AP-T
- 20 mm HE: HEF-T · HEF-I · AP-T · HEF-I
- 20 mm AP: AP-T · AP-T · AP-T · HEF-I
| Penetration statistics | |||||||
|---|---|---|---|---|---|---|---|
| Ammunition | Penetration @ 0° Angle of Attack (mm) | ||||||
| 10 m | 100 m | 500 m | 1,000 m | 1,500 m | 2,000 m | ||
| HEF-T | 2 | 2 | 2 | 2 | 2 | 2 | |
| AP-T | 34 | 32 | 24 | 17 | 12 | 8 | |
| HEF-I | 2 | 2 | 2 | 2 | 2 | 2 | |
| Shell details | ||||||||||||
|---|---|---|---|---|---|---|---|---|---|---|---|---|
| Ammunition | Velocity (m/s) |
Projectile mass (kg) |
Fuse delay (m) |
Fuse sensitivity (mm) |
Explosive mass (TNT equivalent) (g) |
Ricochet | ||||||
| 0% | 50% | 100% | ||||||||||
| HEF-T | 830 | 0.12 | 0 | 0.1 | 6.57 | 79° | 80° | 81° | ||||
| AP-T | 830 | 0.12 | - | - | - | 47° | 60° | 65° | ||||
| HEF-I | 830 | 0.12 | 0 | 0.1 | 11.17 | 79° | 80° | 81° | ||||
Additional armament
The ship has "Mouse cage" (like "Hedgehog") charge launchers and depth charges. These are not very useful, and can be detonated by enemy gunfire. However, they pack a large punch if aimed right at close range.
Usage in battles
She is an incredibly well-balanced ship in game. Small, good speed, powerful weapons, manoeuvrable.
Use her as your first boat or your last in the match. The highly accurate and powerful 40 mm Bofors will let you pick off the small, fast torpedo boats as they rush a cap. One can also get early damage to larger ships, but do not stay exposed for too long. The 40 mm can overheat, but quickly cools down. Toward the end of the matches, players often take out small boats or aircraft, and that is where SC-497 shines. The cluster of 3 x 20 mm will easily take down any aircraft that comes close. Equipping depth charges is very individual, as successful use depends on playstyle. As long as one uses her smartly, one will do brilliantly.
Pros and cons
Pros:
- Powerful 40 mm Bofors gun forward mount with excellent fire arc
- Excellent AA defence with 3 x 20 mm cannons
- Option to use depth charges, K-gun (side launched) and forward firing "Hedgehog" like "Mousetrap" mortar depth charges
- Small size, hard to hit
- Very good manoeuvrability for size
- Wooden hull (floats longer if damaged)
- Full calibre AP shells tend to pass right through without causing too much damage due to the light armour, APHE shells cant even trigger their fuse
Cons:
- Wooden hull (no protection from fire)
- No armour, can be easily shredded by heavy machine guns, when close enough even light machine guns can go trough
- Average speed, even when fully upgraded
- 40 mm gun may overheat
- Depth charges have limited use, could cause ammo explosions if hit
- Mousetrap range is too short to be useful
- No artillery support
History
The SC-497 is the first of the 110 foot long, wooden hull sub-chaser class closely based on the experimental SC-493. She was built by the Fisher Boat Company of Detroit, possibly a forgotten division of the gargantuan General Motors manufacturing conglomerate. Eventually 438 units where built and used worldwide and extensively as one of the "Splinter fleet" (for its wooden hull). It was eventually decided to call wooden hull boats sub-hunters "SC" (steel hull were called PC). One third (142) of this boats were lent to allies as part of the Lend-Lease program, with 78 to the Soviet Union, 50 to France, 8 to Brazil, 3 to Mexico, and 3 to Norway. The three for Norway was shipped (placed on a ship and literally shipped) to UK and given to the Free Norwegian navy used for supplying resistance groups in Norway. Service continued a few years after the war, others sold to other navies serving for a few more years before eventually disappearing. Today only 2 exist, the charter boat MV Cape Pine, and the Royal Norwegian Navy HNoMS Hitra (formerly SC-718) which is in her WW2 configuration (she is active RN boat, but operates as a museum).
Media
- Skins
See also
Links to articles on the War Thunder Wiki that you think will be useful for the reader, for example:
- reference to the series of the ship;
- links to approximate analogues of other nations and research trees.
External links
Paste links to sources and external resources, such as:
- topic on the official game forum;
- other literature.
| Westergard Boat Works, Inc | |
|---|---|
| Submarine Chasers | |
| 110’ SC | SC-497 |
| USA sub-chasers | |
|---|---|
