Difference between pages "T-72A" and "Type T-14 (mod. 1)"
(Tag: Visual edit) |
|||
| Line 1: | Line 1: | ||
| − | {{Specs-Card|code= | + | {{About |
| + | | about = premium Japanese motor torpedo boat '''{{PAGENAME}}''' | ||
| + | | usage = the regular version | ||
| + | | link = Type T-14 | ||
| + | }} | ||
| + | {{Specs-Card | ||
| + | |code=jp_t14_class_mod01 | ||
| + | |images={{Specs-Card-Image|GarageImage_{{PAGENAME}}.jpg}} | ||
| + | }} | ||
== Description == | == Description == | ||
| − | <!--In the description, | + | <!-- ''In the first part of the description, cover the history of the ship's creation and military application. In the second part, tell the reader about using this ship in the game. Add a screenshot: if a beginner player has a hard time remembering vehicles by name, a picture will help them identify the ship in question.'' --> |
| − | + | The '''{{Specs|name}}''' is a premium rank {{Specs|rank}} Japanese motor torpedo boat {{Battle-rating}}. It was introduced in [[Update 1.89 "Imperial Navy"]] with the [[wt:en/game/changelog/current/999|release of the Japanese fleet open beta test]]. The Type T-14 (Mod. 01) differs from the standard Type T-14 variant by possessing a 25 mm Type 96 autocannon, whereas the standard version has a 13.2 mm Type 93 machine gun. | |
| − | |||
| − | The '''{{Specs|name}}''' is a rank {{Specs|rank}} | ||
== General info == | == General info == | ||
=== Survivability and armour === | === Survivability and armour === | ||
| − | <!-- | + | {{Specs-Fleet-Armour}} |
| + | <!-- ''Talk about the vehicle's armour. Note the most well-defended and most vulnerable zones, e.g. the ammo magazine. Evaluate the composition of components and assemblies responsible for movement and manoeuvrability. Evaluate the survivability of the primary and secondary armaments separately. Don't forget to mention the size of the crew, which plays an important role in fleet mechanics. Save tips on preserving survivability for the "Usage in battles" section. If necessary, use a graphical template to show the most well-protected or most vulnerable points in the armour.'' --> | ||
| + | [[File:Jp t14 class mod01.jpg|thumb|In-game art of the T-14 (Mod. 01)]] | ||
| + | The Type T-14 has no armour, just a wooden hull which is 40 mm thick along with a 15 mm thick wooden superstructure. With 7 crew members, the boat cannot take many hits despite its small profile and survive. The crew compartment is located on frontal half of the boat while the ammunition supply, engine and fuel compartment sits on the rear half of the boat where the area is slightly above the water level. On top of the crew, compartment is a 25 mm turret free from obstruction by the boat's obstruction, giving it a complete 360-degree firepower coverage around the boat at the expense of protection. The torpedo bays, along with the depth charge racks, rest on the boat's rear half-section and are susceptible to explosion by gunfire. | ||
| − | + | === Mobility === | |
| − | + | {{Specs-Fleet-Mobility}} | |
| − | + | <!-- ''Write about the ship's mobility. Evaluate its power and manoeuvrability, rudder rerouting speed, stopping speed at full tilt, with its maximum forward and reverse speed.'' --> | |
| − | + | The {{PAGENAME}} has a top speed of 61 km/h (38 mph) which can be reached within 10 seconds. The boat also can go from 0 km/h to its top speed in reverse (20 km/h or 12.5 mph) in 7 seconds when in full back throttle. It takes approximately 12 seconds to halt the boat from its maximum forward speed. Its top speed doesn't quite stack up when compared to the other low tier MTBs, as it's one of the slowest in game. However its ability to turn and its general agility is great, and can comfortably dodge torpedoes or hazardous terrain. | |
| − | |||
| − | + | {{NavalMobility}} | |
| − | |||
| − | + | === Modifications and economy === | |
| − | + | {{Specs-Economy}} | |
| − | |||
| − | |||
| − | |||
| − | |||
| − | |||
| − | |||
| − | |||
| − | |||
| − | |||
| − | |||
| − | |||
| − | |||
| − | |||
| − | |||
| − | |||
| − | |||
| − | |||
| − | |||
| − | |||
| − | |||
| − | |||
| − | |||
| − | |||
| − | |||
| − | |||
| − | |||
| − | |||
| − | |||
| − | |||
| − | |||
| − | |||
| − | |||
| − | |||
| − | |||
| − | |||
| − | |||
| − | |||
| − | |||
| − | == | + | == Armament == |
| − | === | + | {{Specs-Fleet-Armaments}} |
| − | <!-- | + | === Primary armament === |
| − | {{main| | + | {{Specs-Fleet-Primary}} |
| + | <!-- ''Provide information about the characteristics of the primary armament. Evaluate their efficacy in battle based on their reload speed, ballistics and the capacity of their shells. Add a link to the main article about the weapon: <code><nowiki>{{main|Weapon name (calibre)}}</nowiki></code>. Broadly describe the ammunition available for the primary armament, and provide recommendations on how to use it and which ammunition to choose.'' --> | ||
| + | {{main|25 mm/60 Type 96 (25 mm)}} | ||
| − | + | The cream of the crop is the boat's fearsome 25 mm Type 96 autocannon, which makes the boat a bane against any boats/ships around its BR range. The HE type rounds this gun fires will have no trouble knocking out PT boats and even larger support vessels, sometimes even wiping out an enemy boat in one magazine. The cannon has a great fire arc, being able to traverse 360 degrees, which makes knocking out ships sneaking up on your rear a lot easier. Additionally due to the HE this boat can engage targets at range and still do damage. However, the gun is not stabilised and will bounce around a lot in rougher seas, and this combined the slow rate of fire means a lot of your shots will commonly miss, but when a shot lands it will do a lot of damage, the cannon comes with three belts: universal, APT belts and HEI belts. | |
| − | |||
| − | |||
| − | |||
| − | |||
| − | |||
| − | |||
| − | |||
| − | |||
| − | |||
| − | |||
| − | |||
| − | |||
| − | |||
| − | |||
| − | |||
| − | |||
| − | |||
| − | |||
| − | |||
| − | |||
| − | |||
| − | |||
| − | |||
| − | |||
| − | |||
| − | |||
| − | |||
| − | |||
| − | |||
| − | |||
| − | |||
| − | |||
| − | |||
| − | |||
| − | + | * '''Universal:''' {{Annotation|HEF-T*|High-explosive fragmentation tracer (self-destroying)}}{{-}}{{Annotation|HEF|High-explosive fragmentation}}{{-}}{{Annotation|AP-T|Armour-piercing tracer}}{{-}}{{Annotation|HEI|High-explosive incendiary}} | |
| − | {| | + | * '''25 mm APT belt:''' {{Annotation|AP-T|Armour-piercing tracer}}{{-}}{{Annotation|AP-T|Armour-piercing tracer}}{{-}}{{Annotation|AP-T|Armour-piercing tracer}}{{-}}{{Annotation|HEF|High-explosive fragmentation}} - Recommended against Russian armoured river boats. |
| − | + | * '''25 mm HEIT belts:''' {{Annotation|HEF-T*|High-explosive fragmentation tracer (self-destroying)}}{{-}}{{Annotation|HEI|High-explosive incendiary}}{{-}}{{Annotation|HEI|High-explosive incendiary}}{{-}}{{Annotation|HEI|High-explosive incendiary}} - Recommended belt | |
| − | |- | + | {{:25 mm/60 Type 96 (25 mm)/Ammunition|HEF-T*, HEI, HEF, AP-T}} |
| − | + | === Additional armament === | |
| − | + | [[File:T 14 Mod 01 3.jpg|thumb|The T-14 (Mod. 01) Firing]] | |
| − | + | {{Specs-Fleet-Additional}} | |
| − | |- | + | <!-- ''Describe the available additional armaments of the ship: depth charges, mines, torpedoes. Talk about their positions, available ammunition and launch features such as dead zones of torpedoes. If there is no additional armament, remove this section.'' --> |
| − | + | {{main|Type 2 (450 mm)|Type 95 depth charge}} | |
| − | |||
| − | |||
| − | |||
| − | |||
| − | |||
| − | |- | ||
| − | |||
| − | |- | ||
| − | |||
| − | |- | ||
| − | |||
| − | |||
| − | |||
| − | |- | ||
| − | |||
| − | |- | ||
| − | |||
| − | { | ||
| − | |||
| − | |- | ||
| − | |||
| − | |||
| − | |||
| − | |||
| − | |||
| − | '' | ||
| − | |||
| − | |||
| − | |||
| − | |||
| − | |||
| − | |- | ||
| − | |||
| − | |||
| − | |||
| − | |||
| − | | | ||
| − | |- | ||
| − | |||
| − | |||
| − | |||
| − | |||
| − | |||
| − | |||
| − | | | ||
| − | |||
| − | |} | ||
| − | + | The Type T-14 is armed with two Type 2 torpedoes, they will easily destroy any large vessel at the lower tiers, but as the maximum range is only 3 kilometers you'll need to get a bit closer to the target or choke point than you would with other torpedoes. | |
| − | |||
| − | |||
| − | + | The boat can carry six Type 95 depth charges, which can be dropped to maim other naval targets, they have rather limited viability though as most MTBs will be able to outrun the explosion, however they are useful for sneaking up on the larger ships, as if you can reach them unnoticed one or two of these depth charges will sink the vessel. | |
| − | |||
| − | |||
| − | |||
| − | |||
| − | |||
| − | |||
| − | |||
| − | |||
| − | |||
| − | |||
| − | |||
| − | |||
| − | |||
| − | |||
| − | |||
| − | |||
| − | |||
| − | |||
| − | |||
| − | |||
| − | |||
| − | |||
| − | |||
| − | |||
| − | |||
| − | |||
| − | |||
== Usage in battles == | == Usage in battles == | ||
| − | <!--Describe the | + | <!-- ''Describe the technique of using this ship, the characteristics of her use in a team and tips on strategy. Abstain from writing an entire guide – don't try to provide a single point of view, but give the reader food for thought. Talk about the most dangerous opponents for this vehicle and provide recommendations on fighting them. If necessary, note the specifics of playing with this vehicle in various modes (AB, RB, SB).'' --> |
| − | + | This ship has the advantage of being fairly versatile, it can engage targets at close to mid range and deal considerable damage across distances. However, at this range the cannon is fairly hard to aim accurately unless you're fighting larger vessels. At close range your cannon will be much easier to land accurately, but in tandem you'll take more damage from enemies firing back at you. Aim to spread your shots over all compartments on enemy vessels, as your cannon will deal considerable structural damage to your enemies, try to avoid firing at the same section over and over. If you're more confident with how to lead the cannon try fighting at range, as you'll be able to dish out more damage than you'll likely take, keeping you in the fight longer. If you're not so familiar with the gun playing at close range is also a good idea, as the gun is much easier to aim at closer range, allowing you to take out small enemy boats in one or two magazines. Alternatively, you can reduce the throttle of the ship (to full ahead or slower) to stabilise the ship in rough condition, allowing you to aim easier. Also, make sure you always flush your magazine to reload it after every engagement, your fire time on target is quite short, and you're going to want to maximize it as much as possible, you don't want to engage with half a magazine, as the following reload will severely cut your potential damage. | |
=== Pros and cons === | === Pros and cons === | ||
| − | <!--Summarise and briefly evaluate the vehicle in terms of its characteristics and combat effectiveness. Mark its pros and cons in | + | <!-- ''Summarise and briefly evaluate the vehicle in terms of its characteristics and combat effectiveness. Mark its pros and cons in the bulleted list. Try not to use more than 6 points for each of the characteristics. Avoid using categorical definitions such as "bad", "good" and the like - use substitutions with softer forms such as "inadequate" and "effective".'' --> |
'''Pros:''' | '''Pros:''' | ||
| − | * | + | * Small profile compared to other equivalent boats |
| − | + | * Excellent armament for a premium reserve boat - huge firepower improvement over its non-premium counterpart. | |
| − | * | + | * Manoeuvrable and responsive |
| − | * | + | * 25 mm autocannon's HEI belts don't have a lot of tracers, useful for attacking enemies unnoticed |
| − | * | + | * AP belts for fighting armoured craft |
| − | * | + | * Main gun is small, and hard to knock out |
| + | * 360 degree fire arc | ||
| + | * Can engage targets at range | ||
'''Cons:''' | '''Cons:''' | ||
| − | * | + | * Not the fastest boat compared to its contemporaries |
| − | * | + | * Poor survivability due to low crew count |
| − | * | + | * Poor compartment spacing, allowing the enemies to damage multiple compartments of the boat quickly |
| − | * | + | * Main gun is very unstable in rougher sea conditions |
| − | * | + | * Slow rate of fire |
| − | * | + | * Low ammo count in the magazine |
| − | + | * 25 mm autocannon's HEI belts have little amount of tracers, which makes aiming harder[[File:T 14 Mod 01 1.jpg|thumb|T-14 (Mod. 01) Engaging an R-Boot]] | |
== History == | == History == | ||
| − | + | ''Describe the history of the creation and combat usage of the ship in more detail than in the introduction. If the historical reference turns out to be too long, take it to a separate article, taking a link to the article about the ship and adding a block "/History" (example: <nowiki>https://wiki.warthunder.com/(Ship-name)/History</nowiki>) and add a link to it here using the <code>main</code> template. Be sure to reference text and sources by using <code><nowiki><ref></ref></nowiki></code>, as well as adding them at the end of the article with <code><nowiki><references /></nowiki></code>. This section may also include the ship's dev blog entry (if applicable) and the in-game encyclopedia description (under <code><nowiki>=== In-game description ===</nowiki></code>, also if applicable).'' | |
| − | + | == Media == | |
| − | + | <!-- ''Excellent additions to the article would be video guides, screenshots from the game, and photos.'' --> | |
| − | |||
| − | |||
| − | |||
| − | |||
| − | |||
| − | |||
| − | |||
| − | |||
| − | ''- | ||
| − | = | + | ;Skins |
| − | + | * [https://live.warthunder.com/feed/camouflages/?vehicle=jp_t14_class_mod01 Skins and camouflages for the {{PAGENAME}} from live.warthunder.com.] | |
== See also == | == See also == | ||
| − | ''Links to | + | ''Links to articles on the War Thunder Wiki that you think will be useful for the reader, for example:'' |
| − | + | * ''reference to the series of the ship;'' | |
| − | * ''reference to the series of the | ||
* ''links to approximate analogues of other nations and research trees.'' | * ''links to approximate analogues of other nations and research trees.'' | ||
== External links == | == External links == | ||
| − | <!--''Paste links to sources and external resources, such as:'' | + | <!-- ''Paste links to sources and external resources, such as:'' |
* ''topic on the official game forum;'' | * ''topic on the official game forum;'' | ||
| − | + | * ''other literature.'' --> | |
| − | * ''other literature.''--> | ||
| − | * [[wt:en/news/ | + | * [[wt:en/news/4303-development-t-14-class-torpedo-boat-single-engine-seafarer-en/|[Development<nowiki>]</nowiki> T-14 Class torpedo boat: Single-Engine Seafarer]] |
| − | {{ | + | {{Japan boats}} |
| + | {{Japan premium ships}} | ||
Latest revision as of 23:41, 14 February 2023
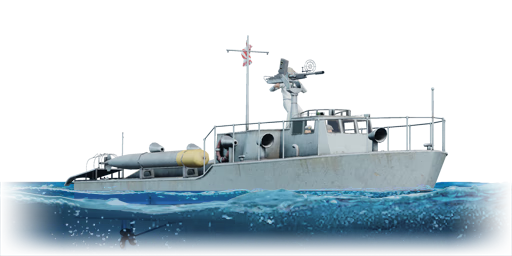
| This page is about the premium Japanese motor torpedo boat Type T-14 (mod. 1). For the regular version, see Type T-14. |
.jpg)
Contents
Description
The Type T-14 (mod. 1) is a premium rank Japanese motor torpedo boat with a battle rating of (AB), (RB), and (SB). It was introduced in Update 1.89 "Imperial Navy" with the release of the Japanese fleet open beta test. The Type T-14 (Mod. 01) differs from the standard Type T-14 variant by possessing a 25 mm Type 96 autocannon, whereas the standard version has a 13.2 mm Type 93 machine gun.
General info
Survivability and armour

The Type T-14 has no armour, just a wooden hull which is 40 mm thick along with a 15 mm thick wooden superstructure. With 7 crew members, the boat cannot take many hits despite its small profile and survive. The crew compartment is located on frontal half of the boat while the ammunition supply, engine and fuel compartment sits on the rear half of the boat where the area is slightly above the water level. On top of the crew, compartment is a 25 mm turret free from obstruction by the boat's obstruction, giving it a complete 360-degree firepower coverage around the boat at the expense of protection. The torpedo bays, along with the depth charge racks, rest on the boat's rear half-section and are susceptible to explosion by gunfire.
Mobility
The Type T-14 (mod. 1) has a top speed of 61 km/h (38 mph) which can be reached within 10 seconds. The boat also can go from 0 km/h to its top speed in reverse (20 km/h or 12.5 mph) in 7 seconds when in full back throttle. It takes approximately 12 seconds to halt the boat from its maximum forward speed. Its top speed doesn't quite stack up when compared to the other low tier MTBs, as it's one of the slowest in game. However its ability to turn and its general agility is great, and can comfortably dodge torpedoes or hazardous terrain.
| Mobility Characteristics | |||
|---|---|---|---|
| Game Mode | Upgrade Status | Maximum Speed (km/h) | |
| Forward | Reverse | ||
| AB | |||
| Upgraded | |||
| RB/SB | |||
| Upgraded | |||
Modifications and economy
Armament
Primary armament
The cream of the crop is the boat's fearsome 25 mm Type 96 autocannon, which makes the boat a bane against any boats/ships around its BR range. The HE type rounds this gun fires will have no trouble knocking out PT boats and even larger support vessels, sometimes even wiping out an enemy boat in one magazine. The cannon has a great fire arc, being able to traverse 360 degrees, which makes knocking out ships sneaking up on your rear a lot easier. Additionally due to the HE this boat can engage targets at range and still do damage. However, the gun is not stabilised and will bounce around a lot in rougher seas, and this combined the slow rate of fire means a lot of your shots will commonly miss, but when a shot lands it will do a lot of damage, the cannon comes with three belts: universal, APT belts and HEI belts.
- Universal: HEF-T* · HEF · AP-T · HEI
- 25 mm APT belt: AP-T · AP-T · AP-T · HEF - Recommended against Russian armoured river boats.
- 25 mm HEIT belts: HEF-T* · HEI · HEI · HEI - Recommended belt
| Penetration statistics | |||||||
|---|---|---|---|---|---|---|---|
| Ammunition | Penetration @ 0° Angle of Attack (mm) | ||||||
| 10 m | 100 m | 500 m | 1,000 m | 1,500 m | 2,000 m | ||
| HEF-T* | 2 | 2 | 2 | 2 | 2 | 2 | |
| HEI | 2 | 2 | 2 | 2 | 2 | 2 | |
| HEF | 2 | 2 | 2 | 2 | 2 | 2 | |
| AP-T | 55 | 53 | 43 | 33 | 25 | 19 | |
| Shell details | ||||||||||||
|---|---|---|---|---|---|---|---|---|---|---|---|---|
| Ammunition | Velocity (m/s) |
Projectile mass (kg) |
Fuse delay (m) |
Fuse sensitivity (mm) |
Explosive mass (TNT equivalent) (g) |
Ricochet | ||||||
| 0% | 50% | 100% | ||||||||||
| HEF-T* | 900 | 0.24 | 0 | 0.1 | 8.5 | 79° | 80° | 81° | ||||
| HEI | 900 | 0.26 | 0 | 0.1 | 5.52 | 79° | 80° | 81° | ||||
| HEF | 900 | 0.25 | 0 | 0.1 | 23.93 | 79° | 80° | 81° | ||||
| AP-T | 900 | 0.28 | - | - | - | 47° | 60° | 65° | ||||
Additional armament

The Type T-14 is armed with two Type 2 torpedoes, they will easily destroy any large vessel at the lower tiers, but as the maximum range is only 3 kilometers you'll need to get a bit closer to the target or choke point than you would with other torpedoes.
The boat can carry six Type 95 depth charges, which can be dropped to maim other naval targets, they have rather limited viability though as most MTBs will be able to outrun the explosion, however they are useful for sneaking up on the larger ships, as if you can reach them unnoticed one or two of these depth charges will sink the vessel.
Usage in battles
This ship has the advantage of being fairly versatile, it can engage targets at close to mid range and deal considerable damage across distances. However, at this range the cannon is fairly hard to aim accurately unless you're fighting larger vessels. At close range your cannon will be much easier to land accurately, but in tandem you'll take more damage from enemies firing back at you. Aim to spread your shots over all compartments on enemy vessels, as your cannon will deal considerable structural damage to your enemies, try to avoid firing at the same section over and over. If you're more confident with how to lead the cannon try fighting at range, as you'll be able to dish out more damage than you'll likely take, keeping you in the fight longer. If you're not so familiar with the gun playing at close range is also a good idea, as the gun is much easier to aim at closer range, allowing you to take out small enemy boats in one or two magazines. Alternatively, you can reduce the throttle of the ship (to full ahead or slower) to stabilise the ship in rough condition, allowing you to aim easier. Also, make sure you always flush your magazine to reload it after every engagement, your fire time on target is quite short, and you're going to want to maximize it as much as possible, you don't want to engage with half a magazine, as the following reload will severely cut your potential damage.
Pros and cons
Pros:
- Small profile compared to other equivalent boats
- Excellent armament for a premium reserve boat - huge firepower improvement over its non-premium counterpart.
- Manoeuvrable and responsive
- 25 mm autocannon's HEI belts don't have a lot of tracers, useful for attacking enemies unnoticed
- AP belts for fighting armoured craft
- Main gun is small, and hard to knock out
- 360 degree fire arc
- Can engage targets at range
Cons:
- Not the fastest boat compared to its contemporaries
- Poor survivability due to low crew count
- Poor compartment spacing, allowing the enemies to damage multiple compartments of the boat quickly
- Main gun is very unstable in rougher sea conditions
- Slow rate of fire
- Low ammo count in the magazine
- 25 mm autocannon's HEI belts have little amount of tracers, which makes aiming harder

History
Describe the history of the creation and combat usage of the ship in more detail than in the introduction. If the historical reference turns out to be too long, take it to a separate article, taking a link to the article about the ship and adding a block "/History" (example: https://wiki.warthunder.com/(Ship-name)/History) and add a link to it here using the main template. Be sure to reference text and sources by using <ref></ref>, as well as adding them at the end of the article with <references />. This section may also include the ship's dev blog entry (if applicable) and the in-game encyclopedia description (under === In-game description ===, also if applicable).
Media
- Skins
See also
Links to articles on the War Thunder Wiki that you think will be useful for the reader, for example:
- reference to the series of the ship;
- links to approximate analogues of other nations and research trees.
External links
| Japan boats | |
|---|---|
| Motor torpedo boats | Type T-1 · Type T-14 · Type T-14 (mod. 1) · Type T-38 · Type T-51a · Type T-51b |
| PT-802 · PT-808 · PT-15 | |
| Motor gun boats | Ha-Go (mod. 1) · Type 4 (mod. 2) · Type 4 (Mod 4) |
| Asagao (YTE-01) · PG 02 | |
| Armoured gun boats | Soukou-Tei · Soukou-Tei No.4 |
| Gunboats | Chidori |
| Japan premium ships | |
|---|---|
| Motor torpedo boats | Type T-14 (mod. 1) · Type T-51a |
| Motor gun boats | Type 4 (Mod 4) · PG 02 |
| Sub-chasers | Type K-8 No.13 |
| Frigates | Akebono |
| Destroyers | IJN Satsuki · IJN Nenohi · IJN Hayanami · IJN Kiyoshimo · IJN Yuudachi · JDS Yūgure (DD-184) |
| Light cruisers | IJN Yubari · IJN Mikuma |
| Heavy cruisers | IJN Myoko |
| Battleships | IJN Yamashiro |
