Difference between revisions of "F2A-1"
U178117757 (talk | contribs) m (→Flight performance: RB stock performance) (Tag: Visual edit) |
(Tag: Visual edit) |
||
| (40 intermediate revisions by 16 users not shown) | |||
| Line 1: | Line 1: | ||
| − | + | {{Specs-Card|code=f2a-1}} | |
| − | |||
| − | |||
| − | |||
| − | |||
| − | {{Specs-Card | ||
| − | |code=f2a-1 | ||
| − | |||
| − | |||
| − | }} | ||
== Description == | == Description == | ||
| − | <!-- ''In the description, the first part | + | <!--''In the description, the first part needs to be about the history of and the creation and combat usage of the aircraft, as well as its key features. In the second part, tell the reader about the aircraft in the game. Insert screenshot of the vehicle. If the novice player does not remember the vehicle by name, he will immediately understand what kind of vehicle it is talking about.''--> |
| − | The | + | [[File:GarageImage_{{PAGENAME}}.jpg|420px|thumb|left]] |
| + | {{break}} | ||
| + | The '''F2A-1 Buffalo''' is a Rank I American naval fighter with a battle rating of 2.0 (AB/SB) and 2.3 (RB). It was in the game since the start of the Open Beta Test prior to Update 1.29. | ||
| − | The Brewster F2A Buffalo was | + | The Brewster F2A Buffalo was the first carrier based monoplane of the US fleet, made to replace the outdated biplanes in service with the US navy. It had a 950 horsepower engine and a total of four machine guns. The nose armament consists of two machine guns of different caliber, a 0.50 caliber (12.7 mm) and a 0.30 caliber (7.62 mm). Each wing is also equipped with a 0.50 caliber for two more machine guns. Many countries ordered the Buffalo, including the Finnish Air Force which was highly successful with the theirs against Russian fighters. But by the time WW2 started, and the attack on Pearl Harbor, the F2A was outclassed by the Japanese [[A6M2|A6M2]] and [[Ki-43-I|Ki-43s]]. |
| − | + | The F2A-1 is a competitive machine, if using the proper tactics versus the proper enemy. The Buffalo can outrun biplanes and can out-turn most monoplanes. This plane will get a pilot used to the American style of playing using Boom & Zoom, and armaments of .50 caliber machine guns. | |
== General info == | == General info == | ||
| − | === Flight | + | === Flight Performance === |
| − | + | <!--''Describe how the aircraft behaves in the air. Maximum speed, maneuverability, speed and allowable loads - these are the most important characteristics of the vehicle.''--> | |
| − | <!-- ''Describe how the aircraft behaves in the air. | + | {| class="wikitable" style="text-align:center" |
| − | {| class="wikitable" style="text-align:center" | + | |- |
| − | ! | + | ! colspan="8" | Characteristics |
| + | |- | ||
| + | ! colspan="8" | ''Stock'' | ||
| + | |- | ||
! colspan="2" | Max Speed<br>(km/h at 4,600 m) | ! colspan="2" | Max Speed<br>(km/h at 4,600 m) | ||
| − | ! rowspan="2" | Max altitude<br>( | + | ! rowspan="2" | Max altitude<br>(meters) |
! colspan="2" | Turn time<br>(seconds) | ! colspan="2" | Turn time<br>(seconds) | ||
| − | ! colspan="2" | Rate of climb<br>( | + | ! colspan="2" | Rate of climb<br>(meters/second) |
| − | ! rowspan="2" | Take-off run<br>( | + | ! rowspan="2" |Take-off run<br>(meters) |
| + | |- | ||
| + | ! AB | ||
| + | ! RB | ||
| + | ! AB | ||
| + | ! RB | ||
| + | ! AB | ||
| + | ! RB | ||
|- | |- | ||
| − | + | | 479 || 468 || 8,000 || 19.1 || 19.4 || 7.4 || 7.4 || 250 | |
|- | |- | ||
| − | ! | + | ! colspan="8" | ''Upgraded'' |
| − | |||
|- | |- | ||
| − | ! | + | ! colspan="2" | Max Speed<br>(km/h at 4,600 m) |
| − | | | + | ! rowspan="2" |Max altitude (meters) |
| + | ! colspan="2" | Turn time (seconds) | ||
| + | ! colspan="2" | Rate of climb<br>(meters/second) | ||
| + | ! rowspan="2" |Take-off run (meters) | ||
| + | |- | ||
| + | ! AB | ||
| + | ! RB | ||
| + | ! AB | ||
| + | ! RB | ||
| + | ! AB | ||
| + | ! RB | ||
| + | |- | ||
| + | | 530 || 504 || 8,000 || 18.0 || 18.2 || 18.7 || 10.9 || 250 | ||
|- | |- | ||
|} | |} | ||
| − | ==== Details ==== | + | ====Details==== |
| − | + | {| class="wikitable" style="text-align:center" | |
| − | {| class="wikitable" style="text-align:center | ||
|- | |- | ||
! colspan="5" | Features | ! colspan="5" | Features | ||
|- | |- | ||
| − | ! Combat | + | ! Combat flap |
| + | ! Take-off flap | ||
| + | ! Landing flap | ||
| + | ! Air brakes | ||
| + | ! Arrestor gear | ||
|- | |- | ||
| ✓ || ✓ || ✓ || X || ✓ <!-- ✓ --> | | ✓ || ✓ || ✓ || X || ✓ <!-- ✓ --> | ||
| Line 52: | Line 69: | ||
|} | |} | ||
| − | {| class="wikitable" style="text-align:center | + | {| class="wikitable" style="text-align:center" |
|- | |- | ||
| − | ! colspan=" | + | ! colspan="5" | Limits |
|- | |- | ||
| − | ! rowspan="2" | | + | ! rowspan="2" | Wing-break speed<br>(km/h) |
| − | ! rowspan="2" | Gear (km/h) | + | ! rowspan="2" | Gear limit<br>(km/h) |
| − | ! | + | ! rowspan="2" | Combat flap<br> (km/h) |
! colspan="2" | Max Static G | ! colspan="2" | Max Static G | ||
|- | |- | ||
| − | + | ! + | |
| + | ! - | ||
|- | |- | ||
| − | | | + | | 761 || 720 || 460 || ~22 || ~11 |
|- | |- | ||
|} | |} | ||
| Line 69: | Line 87: | ||
{| class="wikitable" style="text-align:center" | {| class="wikitable" style="text-align:center" | ||
|- | |- | ||
| − | ! colspan="4" | Optimal velocities | + | ! colspan="4" | Optimal velocities |
|- | |- | ||
| − | ! Ailerons | + | ! Ailerons<br>(km/h) |
| + | ! Rudder<br>(km/h) | ||
| + | ! Elevators<br>(km/h) | ||
| + | ! Radiator<br>(km/h) | ||
|- | |- | ||
| − | | < 405 || < 400 || < 380 || > | + | | < 405 || < 400 || < 380 || > 200 |
|- | |- | ||
|} | |} | ||
| Line 87: | Line 108: | ||
! WEP Engine power | ! WEP Engine power | ||
|- | |- | ||
| − | | 1,800 m || 860 hp || 963 hp | + | | 1,800 m || 860 hp || 963 hp |
|- | |- | ||
! colspan="3" | Setting 2 | ! colspan="3" | Setting 2 | ||
| Line 95: | Line 116: | ||
! WEP Engine power | ! WEP Engine power | ||
|- | |- | ||
| − | | 4,650 m || | + | | 4,650 m || 7,60 hp || 851 hp |
|- | |- | ||
| + | <!--! colspan="3" | Setting 3 | ||
| + | |- | ||
| + | ! Optimal altitude | ||
| + | ! 100% Engine power | ||
| + | ! WEP Engine power | ||
| + | |- | ||
| + | | ?,??? m || ?,??? hp || ?,??? hp | ||
| + | |- --> | ||
|} | |} | ||
=== Survivability and armour === | === Survivability and armour === | ||
| − | + | <!--''Examine the survivability of the aircraft. Note how vulnerable the structure is and how secure the pilot is, whether the fuel tanks are armoured. Describe the armour, if there is any, also mention the vulnerability of other critical aircraft systems.''--> | |
| − | <!-- ''Examine the survivability of the aircraft. Note how vulnerable the structure is and how secure the pilot is, whether the fuel tanks are armoured | ||
| − | |||
| − | |||
| − | |||
| − | + | * No armour plating | |
| − | + | * No armour glazing | |
| + | * Critical components located at front of aircraft (fuel, pilot, engine, controls) | ||
| + | * More fuel tanks located in wings near fuselage | ||
== Armaments == | == Armaments == | ||
| − | |||
=== Offensive armament === | === Offensive armament === | ||
| − | + | <!--''Describe the offensive armament of the aircraft, if any. Describe how effective the cannons and machine guns are in a battle, and also what belts or drums are better to use. If there is no offensive weaponry, delete this subsection.''--> | |
| − | <!-- ''Describe the offensive armament of the aircraft, if any. Describe how effective the cannons and machine guns are in a battle, and also what belts or drums are better to use. If there is no offensive weaponry, delete this subsection.'' --> | + | {{main|Browning M2 (12.7 mm)|Browning (7.62 mm)}} |
| − | {{main|M2 | ||
The '''''{{PAGENAME}}''''' is armed with: | The '''''{{PAGENAME}}''''' is armed with: | ||
| − | * 1 x 12.7 mm M2 | + | * 1 x 12.7 mm Browning M2 machine gun, nose-mounted (250 rpg) |
| − | * 2 x 12.7 mm M2 | + | * 2 x 12.7 mm Browning M2 machine gun, wing-mounted (400 rpg = 800 total) |
* 1 x 7.62 mm Browning machine gun, nose-mounted (450 rpg) | * 1 x 7.62 mm Browning machine gun, nose-mounted (450 rpg) | ||
| − | == | + | <!--=== Suspended armament === |
| − | + | ''Describe the aircraft's suspended armament: additional cannons under the wings, bombs, rockets and torpedoes. This section is especially important for bombers and attackers. If there is no suspended weaponry remove this subsection.'' | |
| − | |||
| − | |||
| − | + | === Defensive armament === | |
| + | ''Defensive armament with turret machine guns or cannons, crewed by gunners. Examine the number of gunners and what belts or drums are better to use. If defensive weaponry is not available remove this subsection.'' | ||
| + | --> | ||
| + | == Usage in the battles == | ||
| + | <!--''Describe the tactics of playing in an aircraft, the features of using vehicles in a team and advice on tactics. Refrain from creating a "guide" - do not impose a single point of view but give the reader food for thought. Examine the most dangerous enemies and give recommendations on fighting them. If necessary, note the specifics of the game in different modes (AB, RB, SB).''--> | ||
| + | The best way to fly this aircraft would be as a Boom & Zoom or ''energy fighter''; it can outrun most aircraft it faces, unless it is uptiered and faces something like the [[Bf 109 F-1]]. In such a scenario the best way to destroy more advanced vehicles is through boom and zoom tactics. | ||
| − | In the common low | + | In '''Arcade''', there is no need to worry about ammo count as much as in Realistic Battles (RB) and Simulator (SB) since the planes can reload in the air. The target-lead indicator, which shows approximately where there enemy plane will when when the bullets reach the target, also eases with aiming. For arcade, the ammo belts are really useful, it is suggested to use Omni purpose ammo for the .50 calibre (12.7 mm) machine gun and stealth for the .30 cal (7.62 mm) machine gun, however another option is to try going all stealth so the F2A can surprise the enemy with bullets they can't see. There are a variety of enemy planes that the F2A-1 faces, ranging from biplanes to low rank monoplanes. In the common low rank arcade battle we get fur-balls going on at low altitude with planes trying to get on each other's tail, a perfect set up for a Boom & Zoomer like the Buffalo, first set the attack angle, which could be from directly above the enemy that is targeted, or from behind (it should be priority to target enemy planes that are chasing friendly planes or for a dangerous threat like, [[MiG-3-15|MiG-3s]], [[LaGG-3 (Disambiguation)|LaGG-3s]], [[Hurricane Mk I/L|Hurricane]], [[Bf 109 B-1/L|Bf 109s]] or another Buffalo). Once the F2A is nearing towards the enemy plane, know what type of enemy they are, depending on what plane they are flying, is what determines what to do after an attack run. Lets say with a dive on an enemy, but the attack didn't destroy them on the first pass, if the enemy was a biplane, then keep up the speed and vacant the area, and set up another pass. If the enemy was a monoplane in the same situation, the F2A can choose to either clear the area, or turn onto their tail, but it is advisable to leave the area and look and see if the enemy noticed the attacking F2A, if he didn't and he is chasing a friendly or going for ground targets then latch on to his tail and shoot him down! |
| − | In '''Realistic Battles & Simulator Battles''', most of the tactics against fighters would be the same as in | + | In '''Realistic Battles & Simulator Battles''', most of the tactics against fighters would be the same as in arcade, only with a few restrictions. |
| − | # Do not dive too fast, the F2A | + | # Do not dive too fast, or the F2A wont be able to pull up or the plane's wings will break. |
| − | # No Enemy-Lead indicator, pilot skill and intuition will | + | # No Enemy-Lead indicator, pilot skill and intuition will have to guess where the enemy plane will be when the bullets reach the targets. |
| − | # Very limited ammo, | + | # Very limited ammo, on top of that the armament isn't reliable outside of 400 meters. |
| − | So how does one play this in RB with all these | + | So how does one play this in RB with all these draw backs? A few very simple things will help with those problems, at the beginning of the match in RB, climb at about a 15 degree angle until about 3,000-4,000 m in altitude. When an enemy is spotted, if a biplane the F2A will have to take up a Boom & Zoom tactic, do not attempt to turn fight. If the enemy is a monoplane, turnfighting can be a valid tactic; unless they are the British Hurricane or Japanese [[A5M4|A5M]] (not to confuse with [[A6M2|A6M]] much superior to the Buffalo) or [[Ki-43-I|Ki-43]], then do not turn fight these monoplanes. For the most part, Russian monoplanes are safe to turn fight ([[I-16_type_5|I-16s]], late [[I-16_type_24|I-16s]], MiG-3 and LaGG-3s). When diving on an enemy, put the throttle to 0% so the F2A does not accelerate too fast. If a shot can't be gained on the enemy, pull out by putting throttle at 100% and point the nose up to gain altitude. Once on the tail of an enemy, no matter the plane, open fire only at close ranges, firing at 300 meters or less would help conserve the ammo and there won't have to lead as much, therefore easier to aim and make each shot more effective. |
| − | |||
| − | |||
| − | This can apply to all three game-modes: When someone is on the F2A | + | This can apply to all three game-modes: When someone is on the F2A tail and bullets fly past the plane, with the right altitude, make a short steep dive. With that little dive, it can dodge enemies bullets and it gives an opportunity to take a look back at the offending enemy. If the aircraft is a biplane, continue the dive and get out of range of their guns. If it is a monoplane, attempt to turn fight, but the F2A is still effective in diving away from even faster monoplanes, which will be effective against maneuverable monoplanes like the Hurricane and A5M4. Learning the gun sounds also helps, sometimes the sound will help identify the enemy plane so as to make a move more instinctively. |
| − | === Manual Engine Control === | + | ===Manual Engine Control=== |
{| class="wikitable" style="text-align:center" | {| class="wikitable" style="text-align:center" | ||
|- | |- | ||
! colspan="7" | MEC elements | ! colspan="7" | MEC elements | ||
|- | |- | ||
| − | ! rowspan="2" | Mixer | + | ! rowspan="2" |Mixer |
| − | ! rowspan="2" | Pitch | + | ! rowspan="2" |Pitch |
| − | ! colspan="3" | Radiator | + | ! colspan="3" |Radiator |
| − | ! rowspan="2" | Supercharger | + | ! rowspan="2" |Supercharger |
| − | ! rowspan="2" | Turbocharger | + | ! rowspan="2" |Turbocharger |
|- | |- | ||
! Oil | ! Oil | ||
! Water | ! Water | ||
| − | ! Type | + | ! Type |
| + | |- | ||
| + | | Controllable || rowspan="2" | Controllable | ||
| + | No automatic pitch | ||
| + | | rowspan="2" | Not controllable || rowspan="2" | Controllable | ||
| + | No auto radiator | ||
| + | | rowspan="2" | Separate || rowspan="2" |Controllable | ||
| + | 2 gears | ||
| + | | rowspan="2" | Not controllable | ||
| + | |- | ||
| + | |} | ||
| + | |||
| + | ===Modules=== | ||
| + | {| class="wikitable" | ||
| + | ! colspan="1" | Tier | ||
| + | ! colspan="2" | Flight performance | ||
| + | ! colspan="1" | Survivability | ||
| + | ! colspan="1" | Weaponry | ||
| + | |- | ||
| + | | I | ||
| + | | Fuselage Repair | ||
| + | | Radiator | ||
| + | | | ||
| + | | Offensive 7 mm | ||
| + | |- | ||
| + | | II | ||
| + | | | ||
| + | | Comrpessor | ||
| + | | Airframe | ||
| + | | New 7 mm MGs | ||
| + | |- | ||
| + | | III | ||
| + | | Wings Repair | ||
| + | | Engine | ||
| + | | | ||
| + | | Offensive 12 mm | ||
|- | |- | ||
| − | | | + | | IV |
| + | | | ||
| + | | Engine Injection | ||
| + | | Cover | ||
| + | | New 12 mm MGs | ||
|- | |- | ||
|} | |} | ||
=== Pros and cons === | === Pros and cons === | ||
| − | <!-- '' | + | <!--''Summarize and briefly evaluate the vehicle in terms of its characteristics and combat effectiveness. Mark its pros and cons in the bulleted list. Do not use more than 6 points for each of the characteristics. Avoid using categorical definitions such as "bad", "good" and the like - they have a substitution in the form of softer "inadequate", "effective".''--> |
'''Pros:''' | '''Pros:''' | ||
* Fairly fast | * Fairly fast | ||
| − | * | + | * Maneuverable compared to most monoplanes it can face |
* Good diver | * Good diver | ||
* Good climber (ironic since it was considered overweight in real life) | * Good climber (ironic since it was considered overweight in real life) | ||
| − | * Can land on a | + | * Can land on a carriers |
| − | * Powerful | + | * Powerful 50 caliber machine guns |
'''Cons:''' | '''Cons:''' | ||
| − | + | * No armorplating or armor for pilot | |
| − | * No | + | * The telescopic sight is a bit of an annoyance in Simulator battles, as these have to be used when zoomed in |
| − | * The telescopic sight is a bit of an annoyance in | ||
| − | |||
== History == | == History == | ||
| − | <!-- ''Describe the history of the creation and combat usage of the aircraft in more detail than in the introduction. If the historical reference turns out to be too | + | <!--''Describe the history of the creation and combat usage of the aircraft in more detail than in the introduction. If the historical reference turns out to be too big, take it to a separate article, taking a link to an article about the vehicle and adding a block "/ historical reference" (example: https://wiki.warthunder.com/Name-vehicles/historical reference) and add a link to it here using the <code>main</code> template. Be sure to include links to sources at the end of the article.''--> |
| − | + | The Brewster F2A-1 buffalo was designed to replace the Grumman F3F biplane fighter. In a competition between the Grumman XF4F1 and the XF2A-1(the P35 lost early on), the XF2A-1 won as it was more advanced than the Grumman aircraft, so it went into production as F2A-1. | |
| − | + | ||
| − | The Brewster F2A-1 buffalo was designed to replace the Grumman F3F biplane fighter. In a competition between the Grumman XF4F1 and the XF2A-1 (the | + | Although the F2A buffalo fought only a few battles with the US Military, it fought important ones. In the battle of Midway it was one of the main fighter planes of the US fleet (the other being the F4F Wildcat), it played an important role(along with the other planes)in the battle of Midway, and showed that the F2A and F4F where no match to the A6M, and where soon replaced by more advanced F6F and F4U Corsair. |
| − | + | ||
| − | Although the F2A buffalo fought only a few battles with the US | + | Many Nations acquired the F2A in there air forces, the most successful country with the type was Finland. From January to February 1940, the Finns received there F2A-1s (Designated B239), in total they received 44 Buffalos. During the Continuation War the Finnish Air Force was highly successful with the type, they developed tactics that the Russians couldn't counter. One tactic they used was baiting, where 2 Buffalos are low and act as bait, as 2 others dive on attacking enemy planes. In the Continuation War, Squadron 24 of Finland, some sources state, had a victory ratio of 26-to-1. Buffalo's of 24 squadron claimed 477 confirmed kills to 15 Buffalos destroyed. |
| − | |||
| − | Many | ||
| − | |||
| − | |||
| − | |||
| − | |||
| − | |||
| − | |||
| − | |||
| − | |||
| − | |||
| − | |||
| − | |||
| − | |||
| − | |||
| − | |||
| − | |||
| − | |||
| − | |||
| − | |||
== Media == | == Media == | ||
| − | + | ''An excellent addition to the article will be video guides, as well as screenshots from the game and photos.'' | |
| − | + | == Read also == | |
| + | ''Links to the articles on the War Thunder Wiki that you think will be useful for the reader, for example,'' | ||
| − | |||
| − | |||
| − | |||
| − | |||
| − | |||
| − | |||
| − | |||
* ''reference to the series of the aircraft;'' | * ''reference to the series of the aircraft;'' | ||
| − | * ''links to approximate analogues of other nations and research trees.'' --> | + | * ''links to approximate analogues of other nations and research trees.'' |
| − | + | <!--''ETC.''--> | |
| − | |||
| − | + | == Sources == | |
| + | ''Paste links to sources and external resources, such as:'' | ||
| − | |||
| − | |||
* ''topic on the official game forum;'' | * ''topic on the official game forum;'' | ||
| − | * ''other literature.'' | + | * ''page on aircraft encyclopedia;'' |
| − | + | * ''other literature.'' | |
| − | |||
| − | |||
{{USA fighters}} | {{USA fighters}} | ||
Revision as of 20:08, 18 February 2019
Contents
Description

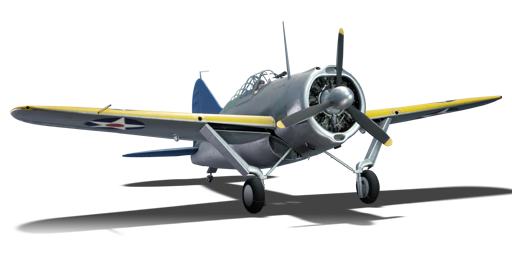
The F2A-1 Buffalo is a Rank I American naval fighter with a battle rating of 2.0 (AB/SB) and 2.3 (RB). It was in the game since the start of the Open Beta Test prior to Update 1.29.
The Brewster F2A Buffalo was the first carrier based monoplane of the US fleet, made to replace the outdated biplanes in service with the US navy. It had a 950 horsepower engine and a total of four machine guns. The nose armament consists of two machine guns of different caliber, a 0.50 caliber (12.7 mm) and a 0.30 caliber (7.62 mm). Each wing is also equipped with a 0.50 caliber for two more machine guns. Many countries ordered the Buffalo, including the Finnish Air Force which was highly successful with the theirs against Russian fighters. But by the time WW2 started, and the attack on Pearl Harbor, the F2A was outclassed by the Japanese A6M2 and Ki-43s.
The F2A-1 is a competitive machine, if using the proper tactics versus the proper enemy. The Buffalo can outrun biplanes and can out-turn most monoplanes. This plane will get a pilot used to the American style of playing using Boom & Zoom, and armaments of .50 caliber machine guns.
General info
Flight Performance
| Characteristics | |||||||
|---|---|---|---|---|---|---|---|
| Stock | |||||||
| Max Speed (km/h at 4,600 m) |
Max altitude (meters) |
Turn time (seconds) |
Rate of climb (meters/second) |
Take-off run (meters) | |||
| AB | RB | AB | RB | AB | RB | ||
| 479 | 468 | 8,000 | 19.1 | 19.4 | 7.4 | 7.4 | 250 |
| Upgraded | |||||||
| Max Speed (km/h at 4,600 m) |
Max altitude (meters) | Turn time (seconds) | Rate of climb (meters/second) |
Take-off run (meters) | |||
| AB | RB | AB | RB | AB | RB | ||
| 530 | 504 | 8,000 | 18.0 | 18.2 | 18.7 | 10.9 | 250 |
Details
| Features | ||||
|---|---|---|---|---|
| Combat flap | Take-off flap | Landing flap | Air brakes | Arrestor gear |
| ✓ | ✓ | ✓ | X | ✓ |
| Limits | ||||
|---|---|---|---|---|
| Wing-break speed (km/h) |
Gear limit (km/h) |
Combat flap (km/h) |
Max Static G | |
| + | - | |||
| 761 | 720 | 460 | ~22 | ~11 |
| Optimal velocities | |||
|---|---|---|---|
| Ailerons (km/h) |
Rudder (km/h) |
Elevators (km/h) |
Radiator (km/h) |
| < 405 | < 400 | < 380 | > 200 |
| Compressor (RB/SB) | ||
|---|---|---|
| Setting 1 | ||
| Optimal altitude | 100% Engine power | WEP Engine power |
| 1,800 m | 860 hp | 963 hp |
| Setting 2 | ||
| Optimal altitude | 100% Engine power | WEP Engine power |
| 4,650 m | 7,60 hp | 851 hp |
Survivability and armour
- No armour plating
- No armour glazing
- Critical components located at front of aircraft (fuel, pilot, engine, controls)
- More fuel tanks located in wings near fuselage
Armaments
Offensive armament
The F2A-1 is armed with:
- 1 x 12.7 mm Browning M2 machine gun, nose-mounted (250 rpg)
- 2 x 12.7 mm Browning M2 machine gun, wing-mounted (400 rpg = 800 total)
- 1 x 7.62 mm Browning machine gun, nose-mounted (450 rpg)
Usage in the battles
The best way to fly this aircraft would be as a Boom & Zoom or energy fighter; it can outrun most aircraft it faces, unless it is uptiered and faces something like the Bf 109 F-1. In such a scenario the best way to destroy more advanced vehicles is through boom and zoom tactics.
In Arcade, there is no need to worry about ammo count as much as in Realistic Battles (RB) and Simulator (SB) since the planes can reload in the air. The target-lead indicator, which shows approximately where there enemy plane will when when the bullets reach the target, also eases with aiming. For arcade, the ammo belts are really useful, it is suggested to use Omni purpose ammo for the .50 calibre (12.7 mm) machine gun and stealth for the .30 cal (7.62 mm) machine gun, however another option is to try going all stealth so the F2A can surprise the enemy with bullets they can't see. There are a variety of enemy planes that the F2A-1 faces, ranging from biplanes to low rank monoplanes. In the common low rank arcade battle we get fur-balls going on at low altitude with planes trying to get on each other's tail, a perfect set up for a Boom & Zoomer like the Buffalo, first set the attack angle, which could be from directly above the enemy that is targeted, or from behind (it should be priority to target enemy planes that are chasing friendly planes or for a dangerous threat like, MiG-3s, LaGG-3s, Hurricane, Bf 109s or another Buffalo). Once the F2A is nearing towards the enemy plane, know what type of enemy they are, depending on what plane they are flying, is what determines what to do after an attack run. Lets say with a dive on an enemy, but the attack didn't destroy them on the first pass, if the enemy was a biplane, then keep up the speed and vacant the area, and set up another pass. If the enemy was a monoplane in the same situation, the F2A can choose to either clear the area, or turn onto their tail, but it is advisable to leave the area and look and see if the enemy noticed the attacking F2A, if he didn't and he is chasing a friendly or going for ground targets then latch on to his tail and shoot him down!
In Realistic Battles & Simulator Battles, most of the tactics against fighters would be the same as in arcade, only with a few restrictions.
- Do not dive too fast, or the F2A wont be able to pull up or the plane's wings will break.
- No Enemy-Lead indicator, pilot skill and intuition will have to guess where the enemy plane will be when the bullets reach the targets.
- Very limited ammo, on top of that the armament isn't reliable outside of 400 meters.
So how does one play this in RB with all these draw backs? A few very simple things will help with those problems, at the beginning of the match in RB, climb at about a 15 degree angle until about 3,000-4,000 m in altitude. When an enemy is spotted, if a biplane the F2A will have to take up a Boom & Zoom tactic, do not attempt to turn fight. If the enemy is a monoplane, turnfighting can be a valid tactic; unless they are the British Hurricane or Japanese A5M (not to confuse with A6M much superior to the Buffalo) or Ki-43, then do not turn fight these monoplanes. For the most part, Russian monoplanes are safe to turn fight (I-16s, late I-16s, MiG-3 and LaGG-3s). When diving on an enemy, put the throttle to 0% so the F2A does not accelerate too fast. If a shot can't be gained on the enemy, pull out by putting throttle at 100% and point the nose up to gain altitude. Once on the tail of an enemy, no matter the plane, open fire only at close ranges, firing at 300 meters or less would help conserve the ammo and there won't have to lead as much, therefore easier to aim and make each shot more effective.
This can apply to all three game-modes: When someone is on the F2A tail and bullets fly past the plane, with the right altitude, make a short steep dive. With that little dive, it can dodge enemies bullets and it gives an opportunity to take a look back at the offending enemy. If the aircraft is a biplane, continue the dive and get out of range of their guns. If it is a monoplane, attempt to turn fight, but the F2A is still effective in diving away from even faster monoplanes, which will be effective against maneuverable monoplanes like the Hurricane and A5M4. Learning the gun sounds also helps, sometimes the sound will help identify the enemy plane so as to make a move more instinctively.
Manual Engine Control
| MEC elements | ||||||
|---|---|---|---|---|---|---|
| Mixer | Pitch | Radiator | Supercharger | Turbocharger | ||
| Oil | Water | Type | ||||
| Controllable | Controllable
No automatic pitch |
Not controllable | Controllable
No auto radiator |
Separate | Controllable
2 gears |
Not controllable |
Modules
| Tier | Flight performance | Survivability | Weaponry | |
|---|---|---|---|---|
| I | Fuselage Repair | Radiator | Offensive 7 mm | |
| II | Comrpessor | Airframe | New 7 mm MGs | |
| III | Wings Repair | Engine | Offensive 12 mm | |
| IV | Engine Injection | Cover | New 12 mm MGs | |
Pros and cons
Pros:
- Fairly fast
- Maneuverable compared to most monoplanes it can face
- Good diver
- Good climber (ironic since it was considered overweight in real life)
- Can land on a carriers
- Powerful 50 caliber machine guns
Cons:
- No armorplating or armor for pilot
- The telescopic sight is a bit of an annoyance in Simulator battles, as these have to be used when zoomed in
History
The Brewster F2A-1 buffalo was designed to replace the Grumman F3F biplane fighter. In a competition between the Grumman XF4F1 and the XF2A-1(the P35 lost early on), the XF2A-1 won as it was more advanced than the Grumman aircraft, so it went into production as F2A-1.
Although the F2A buffalo fought only a few battles with the US Military, it fought important ones. In the battle of Midway it was one of the main fighter planes of the US fleet (the other being the F4F Wildcat), it played an important role(along with the other planes)in the battle of Midway, and showed that the F2A and F4F where no match to the A6M, and where soon replaced by more advanced F6F and F4U Corsair.
Many Nations acquired the F2A in there air forces, the most successful country with the type was Finland. From January to February 1940, the Finns received there F2A-1s (Designated B239), in total they received 44 Buffalos. During the Continuation War the Finnish Air Force was highly successful with the type, they developed tactics that the Russians couldn't counter. One tactic they used was baiting, where 2 Buffalos are low and act as bait, as 2 others dive on attacking enemy planes. In the Continuation War, Squadron 24 of Finland, some sources state, had a victory ratio of 26-to-1. Buffalo's of 24 squadron claimed 477 confirmed kills to 15 Buffalos destroyed.
Media
An excellent addition to the article will be video guides, as well as screenshots from the game and photos.
Read also
Links to the articles on the War Thunder Wiki that you think will be useful for the reader, for example,
- reference to the series of the aircraft;
- links to approximate analogues of other nations and research trees.
Sources
Paste links to sources and external resources, such as:
- topic on the official game forum;
- page on aircraft encyclopedia;
- other literature.
| USA fighters | |
|---|---|
| P-26 Peashooter | P-26A-33 · P-26A-34 · P-26A-34 M2 · P-26B-35 |
| P-36 Hawk | P-36A · Rasmussen's P-36A · P-36C · ○P-36C · P-36G |
| P-39 Airacobra | P-400 · P-39N-0 · P-39Q-5 |
| P-40 | P-40C · P-40E-1 · P-40E-1 TD · P-40F-10 |
| P-43 Lancer | P-43A-1 |
| P-47 Thunderbolt | P-47D-22-RE · P-47D-25 · P-47D-28 · P-47M-1-RE · ⋠P-47M-1-RE · P-47N-15 |
| P-51 Mustang | P-51 · P-51A (Thunder League) · P-51C-10 · P-51D-5 · P-51D-10 · P-51D-20-NA · P-51D-30 · P-51H-5-NA |
| P-63 Kingcobra | P-63A-5 · P-63A-10 · P-63C-5 · ␠Kingcobra |
| Prototypes | XP-55 |
| F2A Buffalo | F2A-1 · Thach's F2A-1 · F2A-3 |
| BF2C | BF2C-1 |
| F3F | F3F-2 · Galer's F3F-2 |
| F4F Wildcat | F4F-3 · F4F-4 |
| F4U Corsair | F4U-1A · F4U-1A (USMC) · F4U-1D · F4U-1C · F4U-4 · F4U-4B · F4U-4B VMF-214 · F2G-1 |
| F6F Hellcat | F6F-5 · F6F-5N |
| F8F Bearcat | F8F-1 · F8F-1B |
| Other countries | ▃Ki-43-II · ▃Ki-61-Ib · ▃A6M2 · ▃Bf 109 F-4 · ▃Fw 190 A-8 · ▃Spitfire LF Mk IXc |
