Difference between pages "M24 (Italy)" and "Sho't Kal Dalet (Great Britain)"
m (→In-game description) (Tag: Visual edit) |
(→Ammunition) |
||
| Line 1: | Line 1: | ||
| − | {{Specs-Card|code= | + | {{About |
| + | | about = medium tank '''{{PAGENAME}}''' | ||
| + | | usage = other versions | ||
| + | | link = Sho't (Family) | ||
| + | }} | ||
| + | {{Specs-Card | ||
| + | |code=uk_centurion_shot_kal_d | ||
| + | |images={{Specs-Card-Image|GarageImage_{{PAGENAME}}.jpg|StoreImage_{{PAGENAME}}_001.jpg|StoreImage_{{PAGENAME}}_003.jpg|StoreImage_{{PAGENAME}}_004.jpg|StoreImage_{{PAGENAME}}_005.jpg}} | ||
| + | }} | ||
== Description == | == Description == | ||
<!-- ''In the description, the first part should be about the history of the creation and combat usage of the vehicle, as well as its key features. In the second part, tell the reader about the ground vehicle in the game. Insert a screenshot of the vehicle, so that if the novice player does not remember the vehicle by name, he will immediately understand what kind of vehicle the article is talking about.'' --> | <!-- ''In the description, the first part should be about the history of the creation and combat usage of the vehicle, as well as its key features. In the second part, tell the reader about the ground vehicle in the game. Insert a screenshot of the vehicle, so that if the novice player does not remember the vehicle by name, he will immediately understand what kind of vehicle the article is talking about.'' --> | ||
| − | + | The '''{{Specs|name}}''' is a premium gift rank {{Specs|rank}} British medium tank {{Battle-rating}}. It was introduced as a [[wt:en/news/5912-development-sho-t-kal-dalet-conquering-the-desert-en|premium pack]] in [[Update 1.85 "Supersonic"]]. It was removed from the store at the start of the Israeli [[wt:en/news/7573-development-zachlam-m3-tager-half-track-abroad-en|ground forces CBT]]. | |
| − | + | ||
| − | The '''{{Specs|name}}''' is a rank {{Specs|rank}} | + | While based on the Centurion tank, it differs from it by its new gun stabilizer, new fire control system, additional ERA armour and a new Continental diesel engine (whose integration brought modifications to the rear part of the hull). |
== General info == | == General info == | ||
=== Survivability and armour === | === Survivability and armour === | ||
| + | {{Specs-Tank-Armour}} | ||
<!-- ''Describe armour protection. Note the most well protected and key weak areas. Appreciate the layout of modules as well as the number and location of crew members. Is the level of armour protection sufficient, is the placement of modules helpful for survival in combat? If necessary use a visual template to indicate the most secure and weak zones of the armour.'' --> | <!-- ''Describe armour protection. Note the most well protected and key weak areas. Appreciate the layout of modules as well as the number and location of crew members. Is the level of armour protection sufficient, is the placement of modules helpful for survival in combat? If necessary use a visual template to indicate the most secure and weak zones of the armour.'' --> | ||
| − | The | + | |
| + | The base survivability towards various forms of APDS and APHE/APCBC is virtually the same as that of the [[Centurion Mk 10]] in the regular tech tree, but now you will encounter less of these munitions, with HEAT and APFSDS rounds being your primary threat now. The upper front plate and the turret "forehead" will easily bounce APDS and APCBC/APHE rounds from various 100 mm and 105 mm guns at beyond 500 m range. APFSDS rounds, however, will penetrate through your tank at any angle and at any range. | ||
| + | |||
| + | But the really interesting and unique aspect about Sho't Kal Dalet is the entire array of ERA tiles that cover the front and side of the tank. They even cover the turret "forehead", turret cheeks and most importantly, the turret ring. Apart from the ERA themselves, there is a considerable amount of air gap behind the ERA tiles and the tank skin which acts as an additional spaced armour against HEAT projectiles. This setup makes your tank immune to any HEAT, ATGM and HEATFS round that penetrates 400-450 mm RHAe by default, easily eliminating the threat posed by 105 mm DM12, 100 mm 3BK17M and 3BK5 rounds (most commonly used chemical energy rounds at this BR). ATGMs and higher calibre HEAT rounds(like the 650 mm penetration 120 mm DM12 round from Leopard 1A1A1 L/44) will have no trouble penetrating your ERA tiles. | ||
| + | |||
| + | Protection against autocannon fire with virtually any belt is mediocre at best, with frontal protection somewhat decent but side armour is too thin for APDS belts of cannon fire from BMP-2 and Gepards. | ||
| + | |||
| + | The interior layout suffers from the same drawback as the regular Centurion, with ammunition littered throughout the fighting compartment. Any penetration in the hull at the centre of mass is sure to hit the ammo rack resulting in a catastrophic explosion of the tank. The ammunition rack next to the driver can be eliminated by taking less number of rounds but doesn't help the survivability much. | ||
| + | |||
| + | The commander in Sho't Kal Dalet sits in a pretty exposed position on the turret with his head directly behind the commander's cupola, resulting in him getting knocked out pretty often by potshots when the tank is in a hull down position. | ||
'''Armour type:''' | '''Armour type:''' | ||
| − | *Rolled homogeneous armour | + | * Rolled homogeneous armour (Hull, Roof, Turret roof, Cupola roof, Side skirts, Smoke launchers) |
| − | *Cast homogeneous armour (Gun mantlet) | + | * Cast homogeneous armour (Turret, Gun mantlet, Cupola sides) |
{| class="wikitable" | {| class="wikitable" | ||
| Line 21: | Line 39: | ||
! Armour !! Front (Slope angle) !! Sides !! Rear !! Roof | ! Armour !! Front (Slope angle) !! Sides !! Rear !! Roof | ||
|- | |- | ||
| − | | Hull || | + | | Hull || 127.2 mm (57°) ''Upper glacis'' <br> 76.2 mm (46°) ''Lower glacis'' || 50.8 mm (12°) || 38 mm (8°) ''Top'' <br> 20 mm (62°) ''Bottom'' || 5 - 29 mm |
| − | |||
| − | |||
|- | |- | ||
| − | + | | Turret || 89 mm ''Turret front'' <br> 100 - 200 mm ''Gun mantlet'' || 89 mm || 89 mm || 29 - 50.8 mm | |
|- | |- | ||
| − | | Cupola || | + | | Cupola || 152 mm || 90 - 152 mm || 90 mm || 29 mm |
|- | |- | ||
|} | |} | ||
| + | |||
'''Notes:''' | '''Notes:''' | ||
| − | * | + | * Tracks and suspension wheels are both 20 mm thick. |
| − | * | + | * The steel boxes around the turret and the hull give a 4 mm additional protection, though this seems to be a negligible addition. |
| − | * | + | * Skirting are placed on the sides of the Centurion, giving an additional 6 mm of side protection and can act as spaced armour. |
| − | * | + | * An internal structural plate of 17 mm thickness separates the forward ammo rack from the driver as seen in X-ray mode. |
| + | * Another internal 17 mm structural plate with large openings separates the driving compartment from the fighting compartment. | ||
| + | * Each block Blazer ERA provides 260 mm worth of Chemical Energy protection | ||
=== Mobility === | === Mobility === | ||
| + | {{Specs-Tank-Mobility}} | ||
<!-- ''Write about the mobility of the ground vehicle. Estimate the specific power and manoeuvrability, as well as the maximum speed forwards and backwards.'' --> | <!-- ''Write about the mobility of the ground vehicle. Estimate the specific power and manoeuvrability, as well as the maximum speed forwards and backwards.'' --> | ||
| − | {{tankMobility|abMinHp= | + | When it comes to mobility, the {{PAGENAME}} has an edge over every other British MBT at a similar BR thanks to its decent 750 hp Continental diesel engine with 2,400 RPM. It can reverse itself at a decent -12 km/h (2 gears) and hit speeds up to 48 km/h (5 gears) in RB. While it's not the best as compared to [[Leopard A1A1]] and [[Centauro]], it is more than enough to get you into a good firing position early in the match or switch firing positions after scoring a few kills. |
| + | |||
| + | {{tankMobility|abMinHp=1,162|rbMinHp=663}} | ||
| − | + | === Modifications and economy === | |
| + | {{Specs-Economy}} | ||
== Armaments == | == Armaments == | ||
| + | {{Specs-Tank-Armaments}} | ||
=== Main armament === | === Main armament === | ||
| + | {{Specs-Tank-Weapon|1}} | ||
<!-- ''Give the reader information about the characteristics of the main gun. Assess its effectiveness in a battle based on the reloading speed, ballistics and the power of shells. Do not forget about the flexibility of the fire, that is how quickly the cannon can be aimed at the target, open fire on it and aim at another enemy. Add a link to the main article on the gun: <code><nowiki>{{main|Name of the weapon}}</nowiki></code>. Describe in general terms the ammunition available for the main gun. Give advice on how to use them and how to fill the ammunition storage.'' --> | <!-- ''Give the reader information about the characteristics of the main gun. Assess its effectiveness in a battle based on the reloading speed, ballistics and the power of shells. Do not forget about the flexibility of the fire, that is how quickly the cannon can be aimed at the target, open fire on it and aim at another enemy. Add a link to the main article on the gun: <code><nowiki>{{main|Name of the weapon}}</nowiki></code>. Describe in general terms the ammunition available for the main gun. Give advice on how to use them and how to fill the ammunition storage.'' --> | ||
| − | {{main| | + | {{main|Sharir (105 mm)}} |
| − | The | + | The main gun of the Sho't Kal is the Israeli modification of the legendary Royal Ordnance L7 cannon, dubbed as [[Sharir (105 mm)]]. It can fire an assortment of APFSDS, HEATFS, HESH and Smoke rounds, effectively making you an effective hunter for virtually every tank at your BR. The gun is devastatingly accurate and quick firing, taking only 6.7 seconds for each shot at 8.3 BR. |
{| class="wikitable" style="text-align:center" width="100%" | {| class="wikitable" style="text-align:center" width="100%" | ||
|- | |- | ||
| − | ! colspan="5" | [[ | + | ! colspan="5" | [[Sharir (105 mm)|105 mm Sharir]] || colspan="5" | Turret rotation speed (°/s) || colspan="4" | Reloading rate (seconds) |
|- | |- | ||
! Mode !! Capacity !! Vertical !! Horizontal !! Stabilizer | ! Mode !! Capacity !! Vertical !! Horizontal !! Stabilizer | ||
| Line 60: | Line 85: | ||
|- | |- | ||
! ''Arcade'' | ! ''Arcade'' | ||
| − | | rowspan="2" | | + | | rowspan="2" | 72 || rowspan="2" | -10°/+18° || rowspan="2" | ±180° || rowspan="2" | Two-plane || 22.85 || 31.62 || 38.40 || 42.47 || 45.18 || rowspan="2" | 8.71 || rowspan="2" | 7.70 || rowspan="2" | 7.10 || rowspan="2" | 6.70 |
|- | |- | ||
! ''Realistic'' | ! ''Realistic'' | ||
| Line 68: | Line 93: | ||
==== Ammunition ==== | ==== Ammunition ==== | ||
| − | { | + | {{:Sharir (105 mm)/Ammunition|M152, M156, M111, M416}} |
| − | + | ||
| − | + | Your main round for most of the situations is the M111 "Hetz" APFSDS. It can penetrate 195mm RHAe at 60 degrees at point blank range and 177mm RHAe at 60 degrees at 2,000 m, and comes with a muzzle velocity of 1,455 m/s, making the M111 one of the strongest penetrating kinetic rounds at 8.3 BR against sloped surfaces. You'll use this round 9/10 times in your engagements. It'll chew up Leopards, T-54s, T-55s, OF-40, Centauros, IS-3s, AMX-30s, STBs and Type 74s at all ranges. | |
| − | + | ||
| − | + | This round will struggle to penetrate T-10M, IS-4M, IS-7 and Maus if facing from an "awkward angle". In such a scenario, disable the gun barrel and reposition yourself to take a side shot if the situation permits or disengage from combat. | |
| − | + | ||
| − | + | The default round, the M152 HEATFS round, is a very good round overall, penetrating 400 m at 0 degrees and 200 mm at 60 degrees at any range. However, its usefulness is mitigated by the fact that it has low muzzle velocity than the APFSDS and can be detonated by fences and walls in its path. Carry a few of them to deal with T-10M, IS-4M and Maus at long ranges. Don't try to use the M152 against IS-7 as it has a very complex array of spaced armour behind its main armour. | |
| − | + | ||
| − | + | The M156 is a typical British 105 mm HESH round found on all tanks using the L7 guns and its derivatives. Like any HESH round, use it against tanks with surfaces directly in contact with crew and modules(i.e no spaced armour or side skirts). M156 works best against surfaces 100-150 mm in thickness and sloped at 30-60 degrees. This creates the maximum amount of spalling and results in catastrophic damage to crew and modules. | |
| − | + | ||
| − | + | For example, if you're facing an AMX-30 or T-54/55 from front, hitting the left side of the lower front plate is an easy temptation for initiating an ammo rack explosion, however, players keep forgetting that the ammunition rack is surrounded in front by a fuel tank, which will absorb shaped charges and HESH spalling, making HEAT and HESH rounds not worth the attempt (APFSDS and higher calibre APDS rounds, like the ones from Conqueror, Conway, Chieftains and Challenger Mk.2 will, however, punch through and blow up the ammo rack anyway). You can, however, fire the HESH on the sloped but thin turret, which will surely kill at least two crew members in the turret and disable the gun breech. | |
| − | + | ||
| − | + | Remember, as with HEAT rounds, it can be triggered by obstacles in its path and spaced armour will nullify its effectiveness. | |
| − | + | ||
| − | + | Use the M156 primarily to destroy enemy IFVs and SPAAAs at close to medium ranges. | |
| − | + | ||
| − | + | The final round is the M416 smoke round, an often neglected but very useful round. Be creative with this round and use it to harass enemy snipers or cover friendly axis of advances. | |
| − | + | ||
| − | + | All in all, the Sho't by virtue of the M111 and a quick firing Sharir cannon, has one of the most brutal firepowers at long range at its BR. | |
| − | |||
| − | |||
| − | |||
| − | |||
| − | |||
| − | |||
| − | |||
| − | |||
| − | |||
| − | |||
| − | |||
| − | |||
| − | |||
| − | |||
| − | |||
| − | |||
| − | |||
| − | |||
| − | |||
| − | |||
| − | |||
| − | |||
| − | |||
| − | |||
| − | |||
| − | |||
| − | |||
| − | |||
| − | |||
| − | |||
| − | |||
| − | |||
==== [[Ammo racks]] ==== | ==== [[Ammo racks]] ==== | ||
| − | [[File: | + | [[File:Ammoracks_{{PAGENAME}}.png|right|thumb|x250px|[[Ammo racks]] of the {{PAGENAME}}]] |
| + | <!-- '''Last updated: 2.17.0.42''' --> | ||
{| class="wikitable" style="text-align:center" | {| class="wikitable" style="text-align:center" | ||
|- | |- | ||
| Line 127: | Line 121: | ||
! 1st<br>rack empty | ! 1st<br>rack empty | ||
! 2nd<br>rack empty | ! 2nd<br>rack empty | ||
| + | ! 3rd<br>rack empty | ||
| + | ! 4th<br>rack empty | ||
| + | ! 5th<br>rack empty | ||
| + | ! 6th<br>rack empty | ||
| + | ! 7th<br>rack empty | ||
! Visual<br>discrepancy | ! Visual<br>discrepancy | ||
|- | |- | ||
| − | | ''' | + | | '''72''' || 68 ''(+4)'' || 63 ''(+9)'' || 33 ''(+39)'' || 25 ''(+47)'' || 12 ''(+60)'' || 5 ''(+67)'' || 1 ''(+71)'' || No |
|- | |- | ||
|} | |} | ||
| + | '''Notes''': | ||
| + | |||
| + | * Racks 6 and 7 are first stage ammo racks. They total 11 shells and get filled first when loading up the tank. | ||
| + | * These racks are also emptied early: the rack depletion order at full capacity is: 6 - 7 - 1 - 2 - 3 - 4 - 5 | ||
| + | * To go into battle with the frontal ammo rack empty, pack 33 ''(+39)'' shells. | ||
=== Machine guns === | === Machine guns === | ||
| + | {{Specs-Tank-Weapon|2}} | ||
| + | {{Specs-Tank-Weapon|3}} | ||
| + | {{Specs-Tank-Weapon|4}} | ||
<!-- ''Offensive and anti-aircraft machine guns not only allow you to fight some aircraft but also are effective against lightly armoured vehicles. Evaluate machine guns and give recommendations on its use.'' --> | <!-- ''Offensive and anti-aircraft machine guns not only allow you to fight some aircraft but also are effective against lightly armoured vehicles. Evaluate machine guns and give recommendations on its use.'' --> | ||
| − | {{main|M2HB (12.7 mm)| | + | {{main|M2HB (12.7 mm)|FN MAG 60-40 (7.62 mm)}} |
| − | The | + | The Sho't comes with 2 coaxial machine guns and 2 roof-mounted machine guns, providing an extremely concentrated stream of small arms and heavy machine-gun fire to target harassing aircraft and helicopters. Although not as effective as the 20 mm autocannons on some other tanks, it's still quite useful. |
{| class="wikitable" style="text-align:center" width="50%" | {| class="wikitable" style="text-align:center" width="50%" | ||
| Line 145: | Line 152: | ||
! Mount !! Capacity (Belt) !! Fire rate !! Vertical !! Horizontal | ! Mount !! Capacity (Belt) !! Fire rate !! Vertical !! Horizontal | ||
|- | |- | ||
| − | | | + | | Coaxial || 1,000 (200) || 577 || N/A || N/A |
|- | |- | ||
|} | |} | ||
{| class="wikitable" style="text-align:center" width="50%" | {| class="wikitable" style="text-align:center" width="50%" | ||
|- | |- | ||
| − | ! colspan="5" | [[ | + | ! colspan="5" | [[FN MAG 60-40 (7.62 mm)|7.62 mm FN MAG 60-40]] |
|- | |- | ||
! Mount !! Capacity (Belt) !! Fire rate !! Vertical !! Horizontal | ! Mount !! Capacity (Belt) !! Fire rate !! Vertical !! Horizontal | ||
|- | |- | ||
| − | | Coaxial || 1, | + | | Coaxial || 1,200 (200) || 600 || N/A || N/A |
| + | |- | ||
| + | | Pintle (loader) || 1,800 (200) || 600 || -10°/+5° || -120°/+80° | ||
| + | |- | ||
| + | | Pintle (commander) || 1,800 (200) || 600 || -10°/+50° || -80°/+120° | ||
|- | |- | ||
|} | |} | ||
| Line 160: | Line 171: | ||
== Usage in battles == | == Usage in battles == | ||
<!-- ''Describe the tactics of playing in the vehicle, the features of using vehicles in the team and advice on tactics. Refrain from creating a "guide" - do not impose a single point of view but instead give the reader food for thought. Describe the most dangerous enemies and give recommendations on fighting them. If necessary, note the specifics of the game in different modes (AB, RB, SB).'' --> | <!-- ''Describe the tactics of playing in the vehicle, the features of using vehicles in the team and advice on tactics. Refrain from creating a "guide" - do not impose a single point of view but instead give the reader food for thought. Describe the most dangerous enemies and give recommendations on fighting them. If necessary, note the specifics of the game in different modes (AB, RB, SB).'' --> | ||
| − | The | + | The Sho't Kal Dalet should be played in a reserved role, taking advantage of its reliable long-ranged Sharir cannon and exceptional protection against shaped charges. Its frontal armour is suited to withstand most HEAT warheads commonly found around its BR. |
| − | + | The Sho't Kal Dalet's main armament is perfectly capable of disposing of '''all''' threats it encounters thanks to its M111 APFSDS round. Well placed centre of mass attacks will take out even the mighty IS-7 from the front. At long ranges, up to 2,200 m, the Sho't Kal Dalet's rangefinder provides accurate target information (with rangefinding crew skills) to engage even the heaviest targets accurately. | |
| − | + | [[File:ShotKalDalet_WurstSalat_001.jpg|thumb|right|432x432px|Hull down on "Berlin"]] | |
| + | Its armour, while good, is not reliable and only provides protection from ATGMS or HEAT attacks. | ||
| − | + | Paired with its good gun depression Sho't Kal Dalet's strengths clearly lie in long-ranged engagements preferably in hull-down positions. | |
| − | ' | + | That does not mean Sho't Kal Dalet is not capable of close-range fast-paced engagements. |
| − | + | The Sho't Kal Dalet is a true MBT as it is versatile in its playstyles and not just a long-ranged fighter, | |
| − | + | it has decent mobility and a fully stabilized L7 at its disposal which makes it a decent close combat platform as well, but a reserved careful approach is still needed to not find itself at a disadvantage to faster opponents. | |
| − | + | Otherwise, the slow turret and hull traverse can leave its vulnerable side exposed very quickly. Thanks to its generous arsenal of smoke dispensers and reverse speed it is possible to disengage if needed fairly well. | |
| − | |||
| − | + | But the Sho't Kal Dalet does not have the mobility to evade faster opponents like the Leopard family. | |
| − | |||
| − | |||
| − | |||
| − | |||
| − | |||
| − | |||
| − | |||
| − | |||
| − | |||
| − | |||
| − | |||
| − | |||
| − | |||
| − | |||
| − | |||
| − | |||
| − | |||
| − | |||
| − | |||
| − | |||
| − | |||
| − | |||
| − | |||
| − | |||
| − | |||
| − | |||
| − | |||
| − | |||
| − | |||
| − | |||
| − | |||
| − | |||
| − | |||
| − | |||
| − | |||
| − | |||
| − | |||
| − | |||
| − | |||
=== Pros and cons === | === Pros and cons === | ||
| − | <!-- ''Summarise and briefly evaluate the vehicle in terms of its characteristics and combat effectiveness. Mark its pros and cons in a bulleted list. Try not to use more than 6 points for each of the characteristics. Avoid using categorical definitions such as "bad", "good" and the like - use substitutions with softer forms such as "inadequate" and "effective".'' --> | + | <!-- ''Summarise and briefly evaluate the vehicle in terms of its characteristics and combat effectiveness. Mark its pros and cons in a bulleted list. Try not to use more than 6 points for each of the characteristics. Avoid using categorical definitions such as "bad", "good" and the like - use substitutions with softer forms such as "inadequate" and "effective".'' --> |
| − | + | '''Pros:''' | |
| − | + | ||
| − | * | + | * Great fully stabilized 105 mm L7 cannon |
| − | * | + | * E.R.A. grants improved protection against HEAT warheads |
| − | * | + | * Four machine guns in total; good for warding off pesky low-flying planes and helicopters |
| − | + | * Decent mobility compared to other British MBTs at the same BR | |
| − | * | ||
| − | |||
| − | |||
'''Cons:''' | '''Cons:''' | ||
| − | * | + | * Somewhat slow in comparison to other medium tanks at its rank |
| − | |||
| − | |||
| − | |||
| − | |||
| − | |||
== History == | == History == | ||
<!-- ''Describe the history of the creation and combat usage of the vehicle in more detail than in the introduction. If the historical reference turns out to be too long, take it to a separate article, taking a link to the article about the vehicle and adding a block "/History" (example: <nowiki>https://wiki.warthunder.com/(Vehicle-name)/History</nowiki>) and add a link to it here using the <code>main</code> template. Be sure to reference text and sources by using <code><nowiki><ref></ref></nowiki></code>, as well as adding them at the end of the article with <code><nowiki><references /></nowiki></code>. This section may also include the vehicle's dev blog entry (if applicable) and the in-game encyclopedia description (under <code><nowiki>=== In-game description ===</nowiki></code>, also if applicable).'' --> | <!-- ''Describe the history of the creation and combat usage of the vehicle in more detail than in the introduction. If the historical reference turns out to be too long, take it to a separate article, taking a link to the article about the vehicle and adding a block "/History" (example: <nowiki>https://wiki.warthunder.com/(Vehicle-name)/History</nowiki>) and add a link to it here using the <code>main</code> template. Be sure to reference text and sources by using <code><nowiki><ref></ref></nowiki></code>, as well as adding them at the end of the article with <code><nowiki><references /></nowiki></code>. This section may also include the vehicle's dev blog entry (if applicable) and the in-game encyclopedia description (under <code><nowiki>=== In-game description ===</nowiki></code>, also if applicable).'' --> | ||
| − | + | {{main|Centurion_Mk_10#History|l1=History of the Centurion Mk 10}} | |
| − | |||
| − | In | + | In the late 1950s, Israel struck a deal with Great Britain to purchase a number of Centurion Mk.5 tanks as a response to Egypt's own rearmament efforts at the time. Deliveries continued well into the 1960s, with Israel fielding more than 300 Centurion tanks prior to the Six-Day War in 1967. |
| − | + | Although the Centurion, or Sho't as it was called by the Israelis, was the most modern tank in service with the IDF at the time, it wasn't very liked among Israeli tank crews due to its low reliability in desert conditions. Therefore, the decision was made to modernize the vehicles in May 1967 by replacing the petrol engine with a more powerful and reliable Continental diesel engine. Further upgrades included the fitting of a new transmission, larger fuel tanks and other minor improvements. | |
| − | |||
| − | + | In the following Middle Eastern conflicts of the late '60s and early '70s, the Sho't had proven its effectiveness in combat. However, after the devastating tank losses of the Yom Kippur War, Israeli engineers realized the importance of crew protection and work on an indigenous tank design, that would become the Merkava, began. | |
| − | + | In the meantime, the vehicles that were already in service had to be modernized in order to prevent a repeat of the high losses of the Yom Kippur War in potential future conflicts. This modernization effort primarily focused on the addition of the Blazer ERA package to the Sho't Kal and Magach tanks, which would reduce the effectiveness of chemical munitions fired at the vehicles. | |
| − | The ' | + | The upgraded Sho't Kal Dalet, as it was known, proved the effectiveness of the upgrade during the Israeli invasion of Lebanon in 1982, where it fared well against ATGMs and RPGs. |
| − | + | The Sho't Kal Dalet was the last mass-produced modification of the Israeli Centurion before it was replaced by the more modern Merkava tank models. In total, Israel had purchased and used over 1,100 Centurion tanks, with some still being in limited service today as APCs, ARVs or CEVs. | |
| − | |||
| − | + | ''- From [[wt:en/news/5912-development-sho-t-kal-dalet-conquering-the-desert-en|Devblog]]'' | |
| − | |||
| − | |||
| − | |||
| − | |||
| − | |||
| − | |||
| − | |||
| − | |||
| − | |||
== Media == | == Media == | ||
| Line 275: | Line 227: | ||
;Skins | ;Skins | ||
| − | * [https://live.warthunder.com/feed/camouflages/? | + | * [https://live.warthunder.com/feed/camouflages/?vehicle=uk_centurion_shot_kal_d Skins and camouflages for the {{PAGENAME}} from live.warthunder.com.] |
;Videos | ;Videos | ||
| − | {{Youtube-gallery| | + | {{Youtube-gallery|YzUXH6GmH2E|'''The Shooting Range #130''' - ''Metal Beasts'' section at 01:05 discusses the {{Specs|name}}.|738ayWyFsEs|'''{{Specs|name}} Tank Review''' - ''Napalmratte''}} |
== See also == | == See also == | ||
| Line 287: | Line 239: | ||
;Vehicles equipped with the same chassis | ;Vehicles equipped with the same chassis | ||
| − | * [[ | + | * [[Centurion (Family)]] |
| − | |||
| − | |||
| − | |||
| − | |||
;Other vehicles of similar configuration and role | ;Other vehicles of similar configuration and role | ||
| − | * [[AMX- | + | * [[M60A1 RISE (P)]] |
| + | * [[AMX-30B2 BRENUS]] | ||
== External links == | == External links == | ||
<!-- ''Paste links to sources and external resources, such as:'' | <!-- ''Paste links to sources and external resources, such as:'' | ||
* ''topic on the official game forum;'' | * ''topic on the official game forum;'' | ||
| − | |||
* ''other literature.'' --> | * ''other literature.'' --> | ||
| − | |||
| − | * ' | + | * [[wt:en/news/5912-development-sho-t-kal-dalet-conquering-the-desert-en|[Devblog] Sho't Kal Dalet: Conquering the Desert]] |
| − | * '' | + | * [[wikipedia:Sho't#Sho't_Kal_Alef/Bet/Gimel/Dalet|[Wikipedia] Sho't Kal Dalet]] |
| − | * | + | * [https://tanks-encyclopedia.com/modern/Israel/Shot-MBT.php <nowiki>[Tanks Encyclopedia]</nowiki> Sho't MBT] |
| − | {{ | + | {{TankManufacturer Israeli Ordnance Corps}} |
| + | {{Britain medium tanks}} | ||
| + | {{Britain premium ground vehicles}} | ||
Latest revision as of 21:30, 16 January 2023
| This page is about the medium tank Sho't Kal Dalet (Great Britain). For other versions, see Sho't (Family). |
.jpg)
_001.jpg)
_003.jpg)
_004.jpg)
_005.jpg)
Contents
Description
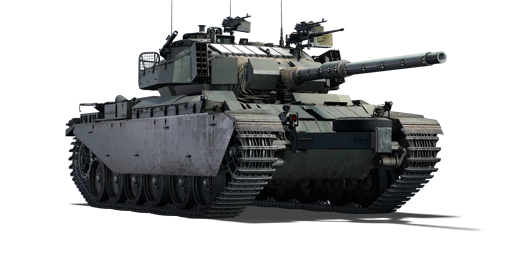
The ▄Sho't Kal Dalet is a premium gift rank British medium tank with a battle rating of (AB), (RB), and (SB). It was introduced as a premium pack in Update 1.85 "Supersonic". It was removed from the store at the start of the Israeli ground forces CBT.
While based on the Centurion tank, it differs from it by its new gun stabilizer, new fire control system, additional ERA armour and a new Continental diesel engine (whose integration brought modifications to the rear part of the hull).
General info
Survivability and armour
The base survivability towards various forms of APDS and APHE/APCBC is virtually the same as that of the Centurion Mk 10 in the regular tech tree, but now you will encounter less of these munitions, with HEAT and APFSDS rounds being your primary threat now. The upper front plate and the turret "forehead" will easily bounce APDS and APCBC/APHE rounds from various 100 mm and 105 mm guns at beyond 500 m range. APFSDS rounds, however, will penetrate through your tank at any angle and at any range.
But the really interesting and unique aspect about Sho't Kal Dalet is the entire array of ERA tiles that cover the front and side of the tank. They even cover the turret "forehead", turret cheeks and most importantly, the turret ring. Apart from the ERA themselves, there is a considerable amount of air gap behind the ERA tiles and the tank skin which acts as an additional spaced armour against HEAT projectiles. This setup makes your tank immune to any HEAT, ATGM and HEATFS round that penetrates 400-450 mm RHAe by default, easily eliminating the threat posed by 105 mm DM12, 100 mm 3BK17M and 3BK5 rounds (most commonly used chemical energy rounds at this BR). ATGMs and higher calibre HEAT rounds(like the 650 mm penetration 120 mm DM12 round from Leopard 1A1A1 L/44) will have no trouble penetrating your ERA tiles.
Protection against autocannon fire with virtually any belt is mediocre at best, with frontal protection somewhat decent but side armour is too thin for APDS belts of cannon fire from BMP-2 and Gepards.
The interior layout suffers from the same drawback as the regular Centurion, with ammunition littered throughout the fighting compartment. Any penetration in the hull at the centre of mass is sure to hit the ammo rack resulting in a catastrophic explosion of the tank. The ammunition rack next to the driver can be eliminated by taking less number of rounds but doesn't help the survivability much.
The commander in Sho't Kal Dalet sits in a pretty exposed position on the turret with his head directly behind the commander's cupola, resulting in him getting knocked out pretty often by potshots when the tank is in a hull down position.
Armour type:
- Rolled homogeneous armour (Hull, Roof, Turret roof, Cupola roof, Side skirts, Smoke launchers)
- Cast homogeneous armour (Turret, Gun mantlet, Cupola sides)
| Armour | Front (Slope angle) | Sides | Rear | Roof |
|---|---|---|---|---|
| Hull | 127.2 mm (57°) Upper glacis 76.2 mm (46°) Lower glacis |
50.8 mm (12°) | 38 mm (8°) Top 20 mm (62°) Bottom |
5 - 29 mm |
| Turret | 89 mm Turret front 100 - 200 mm Gun mantlet |
89 mm | 89 mm | 29 - 50.8 mm |
| Cupola | 152 mm | 90 - 152 mm | 90 mm | 29 mm |
Notes:
- Tracks and suspension wheels are both 20 mm thick.
- The steel boxes around the turret and the hull give a 4 mm additional protection, though this seems to be a negligible addition.
- Skirting are placed on the sides of the Centurion, giving an additional 6 mm of side protection and can act as spaced armour.
- An internal structural plate of 17 mm thickness separates the forward ammo rack from the driver as seen in X-ray mode.
- Another internal 17 mm structural plate with large openings separates the driving compartment from the fighting compartment.
- Each block Blazer ERA provides 260 mm worth of Chemical Energy protection
Mobility
When it comes to mobility, the Sho't Kal Dalet (Great Britain) has an edge over every other British MBT at a similar BR thanks to its decent 750 hp Continental diesel engine with 2,400 RPM. It can reverse itself at a decent -12 km/h (2 gears) and hit speeds up to 48 km/h (5 gears) in RB. While it's not the best as compared to Leopard A1A1 and Centauro, it is more than enough to get you into a good firing position early in the match or switch firing positions after scoring a few kills.
| Game Mode | Max Speed (km/h) | Weight (tons) | Engine power (horsepower) | Power-to-weight ratio (hp/ton) | |||
|---|---|---|---|---|---|---|---|
| Forward | Reverse | Stock | Upgraded | Stock | Upgraded | ||
| Arcade | Expression error: Unexpected * operator. | 1,162 | Expression error: Unexpected round operator. | __.__ | |||
| Realistic | 663 | Expression error: Unexpected round operator. | __.__ | ||||
Modifications and economy
Armaments
Main armament
The main gun of the Sho't Kal is the Israeli modification of the legendary Royal Ordnance L7 cannon, dubbed as Sharir (105 mm). It can fire an assortment of APFSDS, HEATFS, HESH and Smoke rounds, effectively making you an effective hunter for virtually every tank at your BR. The gun is devastatingly accurate and quick firing, taking only 6.7 seconds for each shot at 8.3 BR.
| 105 mm Sharir | Turret rotation speed (°/s) | Reloading rate (seconds) | |||||||||||
|---|---|---|---|---|---|---|---|---|---|---|---|---|---|
| Mode | Capacity | Vertical | Horizontal | Stabilizer | Stock | Upgraded | Full | Expert | Aced | Stock | Full | Expert | Aced |
| Arcade | 72 | -10°/+18° | ±180° | Two-plane | 22.85 | 31.62 | 38.40 | 42.47 | 45.18 | 8.71 | 7.70 | 7.10 | 6.70 |
| Realistic | 14.28 | 16.80 | 20.40 | 22.56 | 24.00 | ||||||||
Ammunition
| Penetration statistics | |||||||
|---|---|---|---|---|---|---|---|
| Ammunition | Type of warhead |
Penetration @ 0° Angle of Attack (mm) | |||||
| 10 m | 100 m | 500 m | 1,000 m | 1,500 m | 2,000 m | ||
| M152 | HEATFS | 400 | 400 | 400 | 400 | 400 | 400 |
| M156 | HESH | 127 | 127 | 127 | 127 | 127 | 127 |
| M111 | APFSDS | 337 | 335 | 330 | 322 | 314 | 306 |
| Shell details | ||||||||||||
|---|---|---|---|---|---|---|---|---|---|---|---|---|
| Ammunition | Type of warhead |
Velocity (m/s) |
Projectile mass (kg) |
Fuse delay (m) |
Fuse sensitivity (mm) |
Explosive mass (TNT equivalent) (kg) |
Ricochet | |||||
| 0% | 50% | 100% | ||||||||||
| M152 | HEATFS | 1,174 | 10.5 | 0.05 | 0.1 | 1.27 | 65° | 72° | 77° | |||
| M156 | HESH | 731 | 11.4 | 0.1 | 4 | 3.17 | 73° | 77° | 80° | |||
| M111 | APFSDS | 1,455 | 4.2 | - | - | - | 78° | 80° | 81° | |||
| Smoke shell characteristics | ||||||
|---|---|---|---|---|---|---|
| Ammunition | Velocity (m/s) |
Projectile mass (kg) |
Screen radius (m) |
Screen deploy time (s) |
Screen hold time (s) |
Explosive mass (TNT equivalent) (g) |
| M416 | 732 | 11.6 | 20 | 5 | 25 | 50 |
Your main round for most of the situations is the M111 "Hetz" APFSDS. It can penetrate 195mm RHAe at 60 degrees at point blank range and 177mm RHAe at 60 degrees at 2,000 m, and comes with a muzzle velocity of 1,455 m/s, making the M111 one of the strongest penetrating kinetic rounds at 8.3 BR against sloped surfaces. You'll use this round 9/10 times in your engagements. It'll chew up Leopards, T-54s, T-55s, OF-40, Centauros, IS-3s, AMX-30s, STBs and Type 74s at all ranges.
This round will struggle to penetrate T-10M, IS-4M, IS-7 and Maus if facing from an "awkward angle". In such a scenario, disable the gun barrel and reposition yourself to take a side shot if the situation permits or disengage from combat.
The default round, the M152 HEATFS round, is a very good round overall, penetrating 400 m at 0 degrees and 200 mm at 60 degrees at any range. However, its usefulness is mitigated by the fact that it has low muzzle velocity than the APFSDS and can be detonated by fences and walls in its path. Carry a few of them to deal with T-10M, IS-4M and Maus at long ranges. Don't try to use the M152 against IS-7 as it has a very complex array of spaced armour behind its main armour.
The M156 is a typical British 105 mm HESH round found on all tanks using the L7 guns and its derivatives. Like any HESH round, use it against tanks with surfaces directly in contact with crew and modules(i.e no spaced armour or side skirts). M156 works best against surfaces 100-150 mm in thickness and sloped at 30-60 degrees. This creates the maximum amount of spalling and results in catastrophic damage to crew and modules.
For example, if you're facing an AMX-30 or T-54/55 from front, hitting the left side of the lower front plate is an easy temptation for initiating an ammo rack explosion, however, players keep forgetting that the ammunition rack is surrounded in front by a fuel tank, which will absorb shaped charges and HESH spalling, making HEAT and HESH rounds not worth the attempt (APFSDS and higher calibre APDS rounds, like the ones from Conqueror, Conway, Chieftains and Challenger Mk.2 will, however, punch through and blow up the ammo rack anyway). You can, however, fire the HESH on the sloped but thin turret, which will surely kill at least two crew members in the turret and disable the gun breech.
Remember, as with HEAT rounds, it can be triggered by obstacles in its path and spaced armour will nullify its effectiveness.
Use the M156 primarily to destroy enemy IFVs and SPAAAs at close to medium ranges.
The final round is the M416 smoke round, an often neglected but very useful round. Be creative with this round and use it to harass enemy snipers or cover friendly axis of advances.
All in all, the Sho't by virtue of the M111 and a quick firing Sharir cannon, has one of the most brutal firepowers at long range at its BR.
Ammo racks
.png)
| Full ammo |
1st rack empty |
2nd rack empty |
3rd rack empty |
4th rack empty |
5th rack empty |
6th rack empty |
7th rack empty |
Visual discrepancy |
|---|---|---|---|---|---|---|---|---|
| 72 | 68 (+4) | 63 (+9) | 33 (+39) | 25 (+47) | 12 (+60) | 5 (+67) | 1 (+71) | No |
Notes:
- Racks 6 and 7 are first stage ammo racks. They total 11 shells and get filled first when loading up the tank.
- These racks are also emptied early: the rack depletion order at full capacity is: 6 - 7 - 1 - 2 - 3 - 4 - 5
- To go into battle with the frontal ammo rack empty, pack 33 (+39) shells.
Machine guns
The Sho't comes with 2 coaxial machine guns and 2 roof-mounted machine guns, providing an extremely concentrated stream of small arms and heavy machine-gun fire to target harassing aircraft and helicopters. Although not as effective as the 20 mm autocannons on some other tanks, it's still quite useful.
| 12.7 mm M2HB | ||||
|---|---|---|---|---|
| Mount | Capacity (Belt) | Fire rate | Vertical | Horizontal |
| Coaxial | 1,000 (200) | 577 | N/A | N/A |
| 7.62 mm FN MAG 60-40 | ||||
|---|---|---|---|---|
| Mount | Capacity (Belt) | Fire rate | Vertical | Horizontal |
| Coaxial | 1,200 (200) | 600 | N/A | N/A |
| Pintle (loader) | 1,800 (200) | 600 | -10°/+5° | -120°/+80° |
| Pintle (commander) | 1,800 (200) | 600 | -10°/+50° | -80°/+120° |
Usage in battles
The Sho't Kal Dalet should be played in a reserved role, taking advantage of its reliable long-ranged Sharir cannon and exceptional protection against shaped charges. Its frontal armour is suited to withstand most HEAT warheads commonly found around its BR.
The Sho't Kal Dalet's main armament is perfectly capable of disposing of all threats it encounters thanks to its M111 APFSDS round. Well placed centre of mass attacks will take out even the mighty IS-7 from the front. At long ranges, up to 2,200 m, the Sho't Kal Dalet's rangefinder provides accurate target information (with rangefinding crew skills) to engage even the heaviest targets accurately.

Its armour, while good, is not reliable and only provides protection from ATGMS or HEAT attacks.
Paired with its good gun depression Sho't Kal Dalet's strengths clearly lie in long-ranged engagements preferably in hull-down positions.
That does not mean Sho't Kal Dalet is not capable of close-range fast-paced engagements.
The Sho't Kal Dalet is a true MBT as it is versatile in its playstyles and not just a long-ranged fighter,
it has decent mobility and a fully stabilized L7 at its disposal which makes it a decent close combat platform as well, but a reserved careful approach is still needed to not find itself at a disadvantage to faster opponents.
Otherwise, the slow turret and hull traverse can leave its vulnerable side exposed very quickly. Thanks to its generous arsenal of smoke dispensers and reverse speed it is possible to disengage if needed fairly well.
But the Sho't Kal Dalet does not have the mobility to evade faster opponents like the Leopard family.
Pros and cons
Pros:
- Great fully stabilized 105 mm L7 cannon
- E.R.A. grants improved protection against HEAT warheads
- Four machine guns in total; good for warding off pesky low-flying planes and helicopters
- Decent mobility compared to other British MBTs at the same BR
Cons:
- Somewhat slow in comparison to other medium tanks at its rank
History
In the late 1950s, Israel struck a deal with Great Britain to purchase a number of Centurion Mk.5 tanks as a response to Egypt's own rearmament efforts at the time. Deliveries continued well into the 1960s, with Israel fielding more than 300 Centurion tanks prior to the Six-Day War in 1967.
Although the Centurion, or Sho't as it was called by the Israelis, was the most modern tank in service with the IDF at the time, it wasn't very liked among Israeli tank crews due to its low reliability in desert conditions. Therefore, the decision was made to modernize the vehicles in May 1967 by replacing the petrol engine with a more powerful and reliable Continental diesel engine. Further upgrades included the fitting of a new transmission, larger fuel tanks and other minor improvements.
In the following Middle Eastern conflicts of the late '60s and early '70s, the Sho't had proven its effectiveness in combat. However, after the devastating tank losses of the Yom Kippur War, Israeli engineers realized the importance of crew protection and work on an indigenous tank design, that would become the Merkava, began.
In the meantime, the vehicles that were already in service had to be modernized in order to prevent a repeat of the high losses of the Yom Kippur War in potential future conflicts. This modernization effort primarily focused on the addition of the Blazer ERA package to the Sho't Kal and Magach tanks, which would reduce the effectiveness of chemical munitions fired at the vehicles.
The upgraded Sho't Kal Dalet, as it was known, proved the effectiveness of the upgrade during the Israeli invasion of Lebanon in 1982, where it fared well against ATGMs and RPGs.
The Sho't Kal Dalet was the last mass-produced modification of the Israeli Centurion before it was replaced by the more modern Merkava tank models. In total, Israel had purchased and used over 1,100 Centurion tanks, with some still being in limited service today as APCs, ARVs or CEVs.
- From Devblog
Media
- Skins
- Videos
See also
- Vehicles equipped with the same chassis
- Other vehicles of similar configuration and role
External links
- [Devblog] Sho't Kal Dalet: Conquering the Desert
- [Wikipedia] Sho't Kal Dalet
- [Tanks Encyclopedia] Sho't MBT
| Israeli Ordnance Corps (חיל החימוש) | |
|---|---|
| Medium Tanks | M-51 · M-51 (W) |
| MBTs | |
| Magach | Magach 1 · Magach 2 · Magach 3 · Magach 3 (ERA) · ▃Magach 3 (ERA) · Magach 5 |
| Magach 6 · Magach 6A · Magach 6B · Magach 6C · Magach 6R · Magach 6M · Gal Batash | |
| Sho't | Sho't · Sho't Kal Alef · Sho't Kal Gimel · Sho't Kal Dalet · ▄Sho't Kal Dalet |
| Tiran | Tiran 4 · Tiran 4S |
| Merkava | ▃Merkava Mk.1 · Merkava Mk.1B · Merkava Mk.2B · ▃Merkava Mk.2B · Merkava Mk.2D |
| Merkava Mk.3B · Merkava Mk.3C · ▃Merkava Mk.3D · Merkava Mk.4B · Merkava Mk.4M | |
| Tank destroyers | Zachlam Tager |
| See Also | Chrysler Defense · Department of Tank Design · Morozov Design Bureau |
| Britain medium tanks | |
|---|---|
| Valentine | Valentine I · Valentine IX · Valentine XI |
| Cromwell | Cromwell I · Cromwell V · Cromwell V (RP-3) |
| Cromwell derivatives | Challenger · Avenger · Comet I · Comet I "Iron Duke IV" · Charioteer Mk VII |
| Centurion | Centurion Mk 1 · Centurion Mk.2 · Centurion Mk 3 · Centurion Mk.5 AVRE · Centurion Mk 10 · Centurion Action X · FV4202 |
| Vickers MBT | Vickers Mk.1 · Vickers Mk.3 · Vickers Mk.7 |
| Chieftain | Chieftain Mk 3 · Chieftain Mk 5 · Chieftain Mk 10 |
| Challenger 1 | Challenger Mk.2 · Challenger Mk.3 · Challenger DS |
| Challenger 2 | Challenger 2 · Challenger 2 (2F) · Challenger 2 TES · Challenger 2 OES · Challenger 2E · Challenger 2 Black Night |
| Challenger 3 | Challenger 3 TD |
| Australia | A.C.I · A.C.IV · Centurion Mk.5/1 |
| South Africa | Olifant Mk.1A · Olifant Mk.2 · TTD |
| India | Vijayanta · Bhishma TWMP |
| Israel | ▄Sho't Kal Dalet |
| Jordan | Khalid |
| Sweden | ▄Strv 81 (RB 52) |
| USA | Grant I · Sherman II · Sherman Firefly · Sherman IC "Trzyniec" |
| Britain premium ground vehicles | |
|---|---|
| Light tanks | A13 Mk I (3rd R.T.R.) · A13 Mk II 1939 · AEC Mk II · Crusader "The Saint" · Rooikat 105 |
| Medium tanks | A.C.I · Grant I · Cromwell V (RP-3) · Sherman IC "Trzyniec" · A.C.IV · Comet I "Iron Duke IV" |
| Centurion Mk.2 · ▄Strv 81 (RB 52) · Centurion Mk.5 AVRE · Centurion Mk.5/1 · ▄Sho't Kal Dalet · Centurion Action X | |
| Vijayanta · Khalid · Challenger DS · Challenger 2 OES | |
| Heavy tanks | Independent · Matilda Hedgehog · Excelsior · TOG II · Churchill Crocodile · Black Prince |
| Tank destroyers | Alecto I · Achilles (65 Rg.) · QF 3.7 Ram |
