Difference between revisions of "Wiesel 1A2"
(→Mobility) |
U120640171 (talk | contribs) (the second instance of the TOW-2B not being identified as vertical) (Tag: Visual edit) |
||
| (19 intermediate revisions by 6 users not shown) | |||
| Line 12: | Line 12: | ||
<!-- ''In the description, the first part should be about the history of the creation and combat usage of the vehicle, as well as its key features. In the second part, tell the reader about the ground vehicle in the game. Insert a screenshot of the vehicle, so that if the novice player does not remember the vehicle by name, he will immediately understand what kind of vehicle the article is talking about.'' --> | <!-- ''In the description, the first part should be about the history of the creation and combat usage of the vehicle, as well as its key features. In the second part, tell the reader about the ground vehicle in the game. Insert a screenshot of the vehicle, so that if the novice player does not remember the vehicle by name, he will immediately understand what kind of vehicle the article is talking about.'' --> | ||
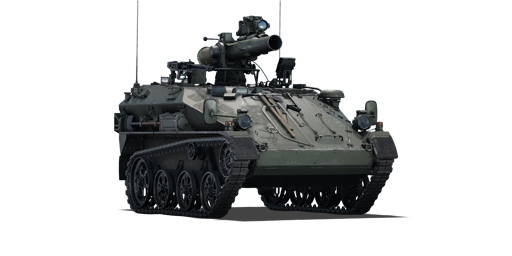
The '''{{Specs|name}}''' is a rank {{Specs|rank}} German tank destroyer {{Battle-rating}}. It was introduced in [[Update "Ground Breaking"]]. | The '''{{Specs|name}}''' is a rank {{Specs|rank}} German tank destroyer {{Battle-rating}}. It was introduced in [[Update "Ground Breaking"]]. | ||
| − | |||
| − | |||
== General info == | == General info == | ||
| Line 19: | Line 17: | ||
{{Specs-Tank-Armour}} | {{Specs-Tank-Armour}} | ||
<!-- ''Describe armour protection. Note the most well protected and key weak areas. Appreciate the layout of modules as well as the number and location of crew members. Is the level of armour protection sufficient, is the placement of modules helpful for survival in combat? If necessary use a visual template to indicate the most secure and weak zones of the armour.'' --> | <!-- ''Describe armour protection. Note the most well protected and key weak areas. Appreciate the layout of modules as well as the number and location of crew members. Is the level of armour protection sufficient, is the placement of modules helpful for survival in combat? If necessary use a visual template to indicate the most secure and weak zones of the armour.'' --> | ||
| − | + | ''Describe armour protection. Note the most well protected and key weak areas. Appreciate the layout of modules as well as the number and location of crew members. Is the level of armour protection sufficient, is the placement of modules helpful for survival in combat? If necessary use a visual template to indicate the most secure and weak zones of the armour.'' | |
| − | |||
| − | |||
'''Armour type:''' <!-- The types of armour present on the vehicle and their general locations --> | '''Armour type:''' <!-- The types of armour present on the vehicle and their general locations --> | ||
| Line 31: | Line 27: | ||
! Armour !! Front (Slope angle) !! Sides !! Rear !! Roof | ! Armour !! Front (Slope angle) !! Sides !! Rear !! Roof | ||
|- | |- | ||
| − | | Hull || | + | | Hull || ___ mm || ___ mm ''Top'' <br> ___ mm ''Bottom'' || ___ mm || ___ - ___ mm |
| + | |- | ||
| + | | Turret || ___ - ___ mm ''Turret front'' <br> ___ mm ''Gun mantlet'' || ___ - ___ mm || ___ - ___ mm || ___ - ___ mm | ||
| + | |- | ||
| + | | Cupola || ___ mm || ___ mm || ___ mm || ___ mm | ||
|- | |- | ||
|} | |} | ||
| Line 41: | Line 41: | ||
{{Specs-Tank-Mobility}} | {{Specs-Tank-Mobility}} | ||
<!-- ''Write about the mobility of the ground vehicle. Estimate the specific power and manoeuvrability, as well as the maximum speed forwards and backwards.'' --> | <!-- ''Write about the mobility of the ground vehicle. Estimate the specific power and manoeuvrability, as well as the maximum speed forwards and backwards.'' --> | ||
| − | |||
{{tankMobility|abMinHp=124|rbMinHp=77}} | {{tankMobility|abMinHp=124|rbMinHp=77}} | ||
| Line 47: | Line 46: | ||
=== Modifications and economy === | === Modifications and economy === | ||
{{Specs-Economy}} | {{Specs-Economy}} | ||
| − | |||
| − | |||
== Armaments == | == Armaments == | ||
| Line 74: | Line 71: | ||
==== Ammunition ==== | ==== Ammunition ==== | ||
| − | {{: | + | {| class="wikitable sortable" style="text-align:center" width="100%" |
| + | ! colspan="8" | Penetration statistics | ||
| + | |- | ||
| + | ! rowspan="2" data-sort-type="text" | Ammunition | ||
| + | ! rowspan="2" | Type of<br>warhead | ||
| + | ! colspan="6" | Penetration @ 0° Angle of Attack (mm) | ||
| + | |- | ||
| + | ! 10 m !! 100 m !! 500 m !! 1,000 m !! 1,500 m !! 2,000 m | ||
| + | |- | ||
| + | | TOW-2 || ATGM || 800 || 800 || 800 || 800 || 800 || 800 | ||
| + | |- | ||
| + | | TOW-2A || ATGM (tandem) || 800 || 800 || 800 || 800 || 800 || 800 | ||
| + | |- | ||
| + | | TOW-2B || ATGM (vertical) || 100 || 100 || 100 || 100 || 100 || 100 | ||
| + | |- | ||
| + | |} | ||
| + | {| class="wikitable sortable" style="text-align:center" width="100%" | ||
| + | ! colspan="11" | Shell details | ||
| + | |- | ||
| + | ! rowspan="2" data-sort-type="text" | Ammunition | ||
| + | ! rowspan="2" | Type of<br>warhead | ||
| + | ! rowspan="2" | Velocity<br>(m/s) | ||
| + | ! rowspan="2" | Range<br>(m) | ||
| + | ! rowspan="2" | Projectile<br>Mass (kg) | ||
| + | ! rowspan="2" | Fuse delay<br>(m) | ||
| + | ! rowspan="2" | Fuse sensitivity<br>(mm) | ||
| + | ! rowspan="2" | Explosive Mass<br>(TNT equivalent) (g) | ||
| + | ! colspan="3" | Ricochet | ||
| + | |- | ||
| + | ! 0% !! 50% !! 100% | ||
| + | |- | ||
| + | | TOW-2 || ATGM || 329 || 3,750 || 21.45 || 0.05 || 0.1 || 4,100 || 80° || 82° || 90° | ||
| + | |- | ||
| + | | TOW-2A || ATGM (tandem) || 329 || 3,750 || 22.63 || 0.4 || 0.1 || 4,190 || 80° || 82° || 90° | ||
| + | |- | ||
| + | | TOW-2B || ATGM (vertical) || 309 || 3,750 || 22.59 || 0.05 || 0.1 || 3,140 || 80° || 82° || 90° | ||
| + | |- | ||
| + | |} | ||
==== [[Ammo racks]] ==== | ==== [[Ammo racks]] ==== | ||
| − | [[File:Ammoracks_{{PAGENAME}}.png|right|thumb|x250px|[[Ammo racks]] of the {{PAGENAME}}]] | + | <!-- [[File:Ammoracks_{{PAGENAME}}.png|right|thumb|x250px|[[Ammo racks]] of the {{PAGENAME}}]] --> |
| − | <!-- '''Last updated: | + | <!-- '''Last updated:''' --> |
{| class="wikitable" style="text-align:center" | {| class="wikitable" style="text-align:center" | ||
|- | |- | ||
| Line 85: | Line 119: | ||
! 2nd<br>rack empty | ! 2nd<br>rack empty | ||
! 3rd<br>rack empty | ! 3rd<br>rack empty | ||
| + | ! 4th<br>rack empty | ||
| + | ! 5th<br>rack empty | ||
| + | ! 6th<br>rack empty | ||
! Visual<br>discrepancy | ! Visual<br>discrepancy | ||
|- | |- | ||
| − | | '''8''' || | + | | '''8''' || __ ''(+__)'' || __ ''(+__)'' || __ ''(+__)'' || __ ''(+__)'' || __ ''(+__)'' || __ ''(+__)'' || __ |
|- | |- | ||
|} | |} | ||
| − | |||
| − | |||
| − | |||
| − | |||
=== Machine guns === | === Machine guns === | ||
| Line 106: | Line 139: | ||
! Mount !! Capacity (Belt) !! Fire rate !! Vertical !! Horizontal | ! Mount !! Capacity (Belt) !! Fire rate !! Vertical !! Horizontal | ||
|- | |- | ||
| − | | Pintle || 1,000 ( | + | | Pintle || 1,000 (1,000) || 1,200 || -10°/+50° || -30°/+120° |
|- | |- | ||
|} | |} | ||
| Line 112: | Line 145: | ||
== Usage in battles == | == Usage in battles == | ||
<!-- ''Describe the tactics of playing in the vehicle, the features of using vehicles in the team and advice on tactics. Refrain from creating a "guide" - do not impose a single point of view but instead give the reader food for thought. Describe the most dangerous enemies and give recommendations on fighting them. If necessary, note the specifics of the game in different modes (AB, RB, SB).'' --> | <!-- ''Describe the tactics of playing in the vehicle, the features of using vehicles in the team and advice on tactics. Refrain from creating a "guide" - do not impose a single point of view but instead give the reader food for thought. Describe the most dangerous enemies and give recommendations on fighting them. If necessary, note the specifics of the game in different modes (AB, RB, SB).'' --> | ||
| − | + | ''Describe the tactics of playing in the vehicle, the features of using vehicles in the team and advice on tactics. Refrain from creating a "guide" - do not impose a single point of view but instead give the reader food for thought. Describe the most dangerous enemies and give recommendations on fighting them. If necessary, note the specifics of the game in different modes (AB, RB, SB).'' | |
=== Pros and cons === | === Pros and cons === | ||
| Line 134: | Line 167: | ||
== History == | == History == | ||
<!-- ''Describe the history of the creation and combat usage of the vehicle in more detail than in the introduction. If the historical reference turns out to be too long, take it to a separate article, taking a link to the article about the vehicle and adding a block "/History" (example: <nowiki>https://wiki.warthunder.com/(Vehicle-name)/History</nowiki>) and add a link to it here using the <code>main</code> template. Be sure to reference text and sources by using <code><nowiki><ref></ref></nowiki></code>, as well as adding them at the end of the article with <code><nowiki><references /></nowiki></code>. This section may also include the vehicle's dev blog entry (if applicable) and the in-game encyclopedia description (under <code><nowiki>=== In-game description ===</nowiki></code>, also if applicable).'' --> | <!-- ''Describe the history of the creation and combat usage of the vehicle in more detail than in the introduction. If the historical reference turns out to be too long, take it to a separate article, taking a link to the article about the vehicle and adding a block "/History" (example: <nowiki>https://wiki.warthunder.com/(Vehicle-name)/History</nowiki>) and add a link to it here using the <code>main</code> template. Be sure to reference text and sources by using <code><nowiki><ref></ref></nowiki></code>, as well as adding them at the end of the article with <code><nowiki><references /></nowiki></code>. This section may also include the vehicle's dev blog entry (if applicable) and the in-game encyclopedia description (under <code><nowiki>=== In-game description ===</nowiki></code>, also if applicable).'' --> | ||
| − | + | ''Describe the history of the creation and combat usage of the vehicle in more detail than in the introduction. If the historical reference turns out to be too long, take it to a separate article, taking a link to the article about the vehicle and adding a block "/History" (example: <nowiki>https://wiki.warthunder.com/(Vehicle-name)/History</nowiki>) and add a link to it here using the <code>main</code> template. Be sure to reference text and sources by using <code><nowiki><ref></ref></nowiki></code>, as well as adding them at the end of the article with <code><nowiki><references /></nowiki></code>. This section may also include the vehicle's dev blog entry (if applicable) and the in-game encyclopedia description (under <code><nowiki>=== In-game description ===</nowiki></code>, also if applicable).'' | |
== Media == | == Media == | ||
<!-- ''Excellent additions to the article would be video guides, screenshots from the game, and photos.'' --> | <!-- ''Excellent additions to the article would be video guides, screenshots from the game, and photos.'' --> | ||
| − | |||
| − | |||
| − | |||
;Videos | ;Videos | ||
| Line 162: | Line 192: | ||
* [[wt:en/news/7376-development-wiesel-armored-vehicles-mk20-tow-2-adwc-en|[Devblog] Wiesel armored vehicles: MK20/TOW/2 ADWC]] | * [[wt:en/news/7376-development-wiesel-armored-vehicles-mk20-tow-2-adwc-en|[Devblog] Wiesel armored vehicles: MK20/TOW/2 ADWC]] | ||
| − | |||
{{Germany tank destroyers}} | {{Germany tank destroyers}} | ||
Revision as of 16:05, 9 July 2022
| This page is about the German tank destroyer Wiesel 1A2. For other versions, see Wiesel (Family). |


Contents
Description
The Waffenträger Wiesel 1A2 TOW is a rank German tank destroyer with a battle rating of (AB), (RB), and (SB). It was introduced in Update "Ground Breaking".
General info
Survivability and armour
Describe armour protection. Note the most well protected and key weak areas. Appreciate the layout of modules as well as the number and location of crew members. Is the level of armour protection sufficient, is the placement of modules helpful for survival in combat? If necessary use a visual template to indicate the most secure and weak zones of the armour.
Armour type:
| Armour | Front (Slope angle) | Sides | Rear | Roof |
|---|---|---|---|---|
| Hull | ___ mm | ___ mm Top ___ mm Bottom |
___ mm | ___ - ___ mm |
| Turret | ___ - ___ mm Turret front ___ mm Gun mantlet |
___ - ___ mm | ___ - ___ mm | ___ - ___ mm |
| Cupola | ___ mm | ___ mm | ___ mm | ___ mm |
Notes:
Mobility
| Game Mode | Max Speed (km/h) | Weight (tons) | Engine power (horsepower) | Power-to-weight ratio (hp/ton) | |||
|---|---|---|---|---|---|---|---|
| Forward | Reverse | Stock | Upgraded | Stock | Upgraded | ||
| Arcade | Expression error: Unexpected * operator. | 124 | Expression error: Unexpected round operator. | __.__ | |||
| Realistic | 77 | Expression error: Unexpected round operator. | __.__ | ||||
Modifications and economy
Armaments
Main armament
| BGM-71 TOW missile | Turret rotation speed (°/s) | Reloading rate (seconds) | |||||||||||
|---|---|---|---|---|---|---|---|---|---|---|---|---|---|
| Mode | Capacity | Vertical | Horizontal | Stabilizer | Stock | Upgraded | Full | Expert | Aced | Stock | Full | Expert | Aced |
| Arcade | 8 | ±20° | ±45° | N/A | 26.4 | 36.5 | 44.3 | 49.0 | 52.1 | 13.00 | 11.50 | 10.60 | 10.00 |
| Realistic | 17.9 | 21.0 | 25.5 | 28.2 | 30.0 | ||||||||
Ammunition
| Penetration statistics | |||||||
|---|---|---|---|---|---|---|---|
| Ammunition | Type of warhead |
Penetration @ 0° Angle of Attack (mm) | |||||
| 10 m | 100 m | 500 m | 1,000 m | 1,500 m | 2,000 m | ||
| TOW-2 | ATGM | 800 | 800 | 800 | 800 | 800 | 800 |
| TOW-2A | ATGM (tandem) | 800 | 800 | 800 | 800 | 800 | 800 |
| TOW-2B | ATGM (vertical) | 100 | 100 | 100 | 100 | 100 | 100 |
| Shell details | ||||||||||
|---|---|---|---|---|---|---|---|---|---|---|
| Ammunition | Type of warhead |
Velocity (m/s) |
Range (m) |
Projectile Mass (kg) |
Fuse delay (m) |
Fuse sensitivity (mm) |
Explosive Mass (TNT equivalent) (g) |
Ricochet | ||
| 0% | 50% | 100% | ||||||||
| TOW-2 | ATGM | 329 | 3,750 | 21.45 | 0.05 | 0.1 | 4,100 | 80° | 82° | 90° |
| TOW-2A | ATGM (tandem) | 329 | 3,750 | 22.63 | 0.4 | 0.1 | 4,190 | 80° | 82° | 90° |
| TOW-2B | ATGM (vertical) | 309 | 3,750 | 22.59 | 0.05 | 0.1 | 3,140 | 80° | 82° | 90° |
Ammo racks
| Full ammo |
1st rack empty |
2nd rack empty |
3rd rack empty |
4th rack empty |
5th rack empty |
6th rack empty |
Visual discrepancy |
|---|---|---|---|---|---|---|---|
| 8 | __ (+__) | __ (+__) | __ (+__) | __ (+__) | __ (+__) | __ (+__) | __ |
Machine guns
| 7.62 mm MG3A1 | ||||
|---|---|---|---|---|
| Mount | Capacity (Belt) | Fire rate | Vertical | Horizontal |
| Pintle | 1,000 (1,000) | 1,200 | -10°/+50° | -30°/+120° |
Usage in battles
Describe the tactics of playing in the vehicle, the features of using vehicles in the team and advice on tactics. Refrain from creating a "guide" - do not impose a single point of view but instead give the reader food for thought. Describe the most dangerous enemies and give recommendations on fighting them. If necessary, note the specifics of the game in different modes (AB, RB, SB).
Pros and cons
Pros:
- Great ATGM, including top-down attack modification for countersniping and NERA tanks
- Good mobility
- Small silhouette, making it easy to hide
- Can properly hulldown behind short cover and has reasonable turret depression for the hills and high ground
- Can scout while being an ATGM tank - renders smoke screens and cover useless in AB, makes it easier to call for help and to get a replacement in RB
Cons:
- Almost no armour - can be broken, bullied and destroyed by using HMG or even LMG alone, will not sustain explosive damage either
- While the crew is located low enough to survive some AP shots passing through the roof, the ammo racks are placed way too high, it is necessary to spend ammunition fast to survive
- Low ATGM count, considering it can't stand up for itself in close quarters when rearming (Usually irrelevant in AB)
- TOW-2B is a tier 4 upgrade, until then 1A2 is not much better than ATGMs of lower BR
History
Describe the history of the creation and combat usage of the vehicle in more detail than in the introduction. If the historical reference turns out to be too long, take it to a separate article, taking a link to the article about the vehicle and adding a block "/History" (example: https://wiki.warthunder.com/(Vehicle-name)/History) and add a link to it here using the main template. Be sure to reference text and sources by using <ref></ref>, as well as adding them at the end of the article with <references />. This section may also include the vehicle's dev blog entry (if applicable) and the in-game encyclopedia description (under === In-game description ===, also if applicable).
Media
- Videos
See also
External links
| Germany tank destroyers | |
|---|---|
| Pz. I Derivatives | Panzerjäger I |
| Pz. II Derivatives | 15cm sIG 33 B Sfl |
| Pz. 38(t) Derivatives | Marder III · Marder III H · Jagdpanzer 38(t) |
| Pz. III Derivatives | StuG III A · StuG III F · StuG III G · StuH 42 G |
| Pz. IV Derivatives | Jagdpanzer IV · Panzer IV/70(A) · Panzer IV/70(V) · Dicker Max · Nashorn · Brummbär · VFW |
| Pz. V Derivatives | Jagdpanther G1 · Bfw. Jagdpanther G1 |
| Pz. VI Derivatives | Sturer Emil · Elefant · Ferdinand · 38 cm Sturmmörser · Jagdtiger |
| Wheeled/Half-track | 8,8 cm Flak 37 Sfl. · Sd.Kfz.251/9 · Sd.Kfz.251/10 · Sd.Kfz.251/22 · Sd.Kfz.234/3 · Sd.Kfz.234/4 · 15 cm Pz.W.42 |
| ATGM Carrier | RakJPz 2 · RakJPz 2 (HOT) · Wiesel 1A2 |
| Other | Waffenträger · M109G · JPz 4-5 · Raketenautomat · VT1-2 |
