Difference between revisions of "Fields of Poland"
(Created page with "{{DISPLAYTITLE:Fields of Poland}} center|408px {| class="catlist" align="center" |- ! ! ! Game Modes ! ! |- |<div style="w...") |
(Edits) |
||
| (4 intermediate revisions by 3 users not shown) | |||
| Line 1: | Line 1: | ||
{{DISPLAYTITLE:Fields of Poland}} | {{DISPLAYTITLE:Fields of Poland}} | ||
| + | |||
[[File:MapIcon Ground FieldsofPoland.jpg|center|408px]] | [[File:MapIcon Ground FieldsofPoland.jpg|center|408px]] | ||
| Line 7: | Line 8: | ||
! | ! | ||
! | ! | ||
| − | ! | + | ! Possible Layouts |
! | ! | ||
! | ! | ||
| Line 14: | Line 15: | ||
|<div style="width:110px; border-style:double">[[File:Icon GreenCheckmark.png|link=]] '''Domination''' </div> | |<div style="width:110px; border-style:double">[[File:Icon GreenCheckmark.png|link=]] '''Domination''' </div> | ||
|<div style="width:110px; border-style:double">[[File:Icon GreenCheckmark.png|link=]] '''Conquest''' </div> | |<div style="width:110px; border-style:double">[[File:Icon GreenCheckmark.png|link=]] '''Conquest''' </div> | ||
| − | |<div style="width:110px; border-style:double">[[File:Icon | + | |<div style="width:110px; border-style:double">[[File:Icon GreenCheckmark.png|link=]] '''Break''' </div> |
|<div style="width:110px; border-style:double">[[File:Icon RedXCross.png|link=]] '''Skirmish'''</div> | |<div style="width:110px; border-style:double">[[File:Icon RedXCross.png|link=]] '''Skirmish'''</div> | ||
| + | |- | ||
| + | |} | ||
| + | {| class="catlist" align="center" | ||
| + | |- | ||
| + | ! | ||
| + | ! | ||
| + | !Other Information | ||
| + | ! | ||
| + | ! | ||
| + | |- | ||
| + | | colspan="2" |<div style="width:210px; border-style:double">'''Full tank area size:''' 4 km x 4 km</div> | ||
| + | | | ||
| + | | colspan="2" |<div style="width:250px; border-style:double">'''Real World Location:''' [[File:CountryIcon POL.png]] Poland </div> | ||
|} | |} | ||
| Line 21: | Line 35: | ||
==Overview== | ==Overview== | ||
| − | + | <!--''Write an introduction to the article in 2-3 small paragraphs. Briefly tell about the location and also about its features.''--> | |
| − | '''Fields of Poland''' is a ground forces map, using the same map as the [[Poland]] Map. It was added in [[Update_1. | + | '''Fields of Poland''' is a ground forces map, using the same map as the [[Poland (Ground Forces)|Poland]] Map. It was added in [[Update_1.59 "Flaming_Arrows"|Update 1.59 "Flaming Arrows"]]. The difference between this map and the Poland map is that the battle area has been significantly increased; whereas on Poland the battle area is restricted to just that of the town and a small section of the surrounding area, on this map the battle area is nearly the full map (seen to the right). |
| − | + | [[File:MapLayout_Ground_Poland.jpg|right|x300px]] | |
| − | The | + | The main town and surrounding area is familiar from the Poland map. The rest of the map is made up of mostly empty fields, with hills and sections of wooded area to provide cover from long range engagements. There are also small collections of farm building dotted around the map. The map is focused around long range combat, with players able to "snipe" each other from extreme range, due to the open nature of the map. The town area still provides an opportunity for close quarters combat, but the player must cross much more open ground in order to get there. |
| − | = | + | The tank battles map is 4km x 4km (with nearly all of that playable). The air battles area is 65km x 65km. The tank battle areas are: |
| + | |||
| + | {| class="wikitable" | ||
| + | |+ Battle area Size | ||
| + | ! Game Mode | ||
| + | ! AB | ||
| + | ! RB | ||
| + | ! SB | ||
| + | |- | ||
| + | | Domination | ||
| + | | 3.34 km x 3.34 km | ||
| + | | 3.34 km x 3.34 km | ||
| + | | 3.34 km x 3.34 km | ||
| + | |- | ||
| + | | Conquest #1 | ||
| + | | 3.34 km x 3.34 km | ||
| + | | 3.34 km x 3.34 km | ||
| + | | 3.34 km x 3.34 km | ||
| + | |- | ||
| + | | Conquest #2 | ||
| + | | 3.34 km x 3.34 km | ||
| + | | 3.34 km x 3.34 km | ||
| + | | 3.34 km x 3.34 km | ||
| + | |- | ||
| + | | Conquest #3 | ||
| + | | 3.34 km x 3.34 km | ||
| + | | 3.34 km x 3.34 km | ||
| + | | 3.34 km x 3.34 km | ||
| + | |- | ||
| + | | Battle | ||
| + | | 3.34 km x 3.34 km | ||
| + | | 3.34 km x 3.34 km | ||
| + | | 3.34 km x 3.34 km | ||
| + | |} | ||
===Historical Background=== | ===Historical Background=== | ||
| + | <!--''Describe historical context of the location.''--> | ||
| + | See the main [[Poland_(Ground_Forces)|Poland]] page for Historical information. | ||
| − | + | ==Map configuration== | |
| + | <!--Under this heading is the box to change game mode--> | ||
| + | {| style="width:314; margin-left: auto; margin-right: auto; border: none;" class="wikitable" | ||
| + | ! colspan="3" | Change Maps by Game Modes | ||
| + | |- | ||
| + | ! <div class="ttx-switch-mode"><div class="ttx-switch-mode-button" id="ttx-ab-button">AB</div><div class="ttx-switch-mode-button" id="ttx-rb-button">RB</div><div class="ttx-switch-mode-button" id="ttx-sb-button" >SB</div></div> | ||
| + | |} | ||
| − | + | At present, this map has the same layouts in AB, RB and SB. | |
| − | ==Map | + | ===Domination=== |
| − | + | <!--Put map screenshot, layout sizes and basic description (where each cap point is) in table using ttx-ab, ttx-rb &ttx-sb spans appropriately. If a more detailed description is desired then insert it as a paragraph of text above the table--> | |
| − | + | {| style="width: 300px;" class="wikitable" | |
| − | + | ! Domination Mode - Map Layouts | |
| + | |- align="center" | ||
| + | | | ||
| + | <div style="float: none;" class="ttx-ab">[[File:MapLayout Domination FieldsofPoland ABRBSB.jpg|300px]]</div> | ||
| + | <div style="float: none;" class="ttx-rb">[[File:MapLayout Domination FieldsofPoland ABRBSB.jpg|300px]]</div> | ||
| + | <div style="float: none;" class="ttx-sb">[[File:MapLayout Domination FieldsofPoland ABRBSB.jpg|300px]]</div> | ||
| + | |- align="center" | ||
| + | | | ||
| + | <span class="ttx-ab">3.34 km x 3.34 km</span> | ||
| + | <span class="ttx-rb">3.34 km x 3.34 km</span> | ||
| + | <span class="ttx-sb">3.34 km x 3.34 km</span> | ||
| + | |- | ||
| + | | | ||
| + | <span class="ttx-ab">In AB point A will be in a small cluster of farm buildings in the north west of the map, B will be in a small cluster of farm buildings on the southern edge of the lake, and C is in the middle of the town (slightly to the west of the centre).</span> | ||
| + | <span class="ttx-rb">In RB point A will be in a small cluster of farm buildings in the north west of the map, B will be in a small cluster of farm buildings on the southern edge of the lake, and C is in the middle of the town (slightly to the west of the centre).</span> | ||
| + | <span class="ttx-sb">In SB point A will be in a small cluster of farm buildings in the north west of the map, B will be in a small cluster of farm buildings on the southern edge of the lake, and C is in the middle of the town (slightly to the west of the centre).</span> | ||
| + | |} | ||
| − | + | ===Conquest=== | |
| − | + | <!--Put map screenshots, layout sizes and basic descriptions (where each cap point is) in table using ttx-ab, ttx-rb &ttx-sb spans appropriately. If a more detailed description is desired then insert it as a paragraph of text above the table--> | |
| − | [[File:MapLayout Conquest1 FieldsofPoland.jpg| | + | {| style="width: 900px;" class="wikitable" |
| − | [[File:MapLayout Conquest2 FieldsofPoland.jpg| | + | ! colspan="3" | Conquest Mode - Map Layouts |
| − | [[File:MapLayout Conquest3 FieldsofPoland.jpg| | + | |- |
| + | ! Conquest #1 | ||
| + | ! Conquest #2 | ||
| + | ! Conquest #3 | ||
| + | |- align="center" | ||
| + | | | ||
| + | <div style="float: none;" class="ttx-ab">[[File:MapLayout Conquest1 FieldsofPoland ABRBSB.jpg|300px]]</div> | ||
| + | <div style="float: none;" class="ttx-rb">[[File:MapLayout Conquest1 FieldsofPoland ABRBSB.jpg|300px]]</div> | ||
| + | <div style="float: none;" class="ttx-sb">[[File:MapLayout Conquest1 FieldsofPoland ABRBSB.jpg|300px]]</div> | ||
| + | | | ||
| + | <div style="float: none;" class="ttx-ab">[[File:MapLayout Conquest2 FieldsofPoland ABRBSB.jpg|300px]]</div> | ||
| + | <div style="float: none;" class="ttx-rb">[[File:MapLayout Conquest2 FieldsofPoland ABRBSB.jpg|300px]]</div> | ||
| + | <div style="float: none;" class="ttx-sb">[[File:MapLayout Conquest2 FieldsofPoland ABRBSB.jpg|300px]]</div> | ||
| + | | | ||
| + | <div style="float: none;" class="ttx-ab">[[File:MapLayout Conquest3 FieldsofPoland ABRBSB.jpg|300px]]</div> | ||
| + | <div style="float: none;" class="ttx-rb">[[File:MapLayout Conquest3 FieldsofPoland ABRBSB.jpg|300px]]</div> | ||
| + | <div style="float: none;" class="ttx-sb">[[File:MapLayout Conquest3 FieldsofPoland ABRBSB.jpg|300px]]</div> | ||
| + | |- align="center" | ||
| + | | | ||
| + | <span class="ttx-ab">3.34 km x 3.34 km</span> | ||
| + | <span class="ttx-rb">3.34 km x 3.34 km</span> | ||
| + | <span class="ttx-sb">3.34 km x 3.34 km</span> | ||
| + | | | ||
| + | <span class="ttx-ab">3.34 km x 3.34 km</span> | ||
| + | <span class="ttx-rb">3.34 km x 3.34 km</span> | ||
| + | <span class="ttx-sb">3.34 km x 3.34 km</span> | ||
| + | | | ||
| + | <span class="ttx-ab">3.34 km x 3.34 km</span> | ||
| + | <span class="ttx-rb">3.34 km x 3.34 km</span> | ||
| + | <span class="ttx-sb">3.34 km x 3.34 km</span> | ||
| + | |- | ||
| + | | | ||
| + | <span class="ttx-ab">In AB the capture point is in a small cluster of farm buildings in the north west of the map.</span> | ||
| + | <span class="ttx-rb">In RB the capture point is in a small cluster of farm buildings in the north west of the map.</span> | ||
| + | <span class="ttx-sb">In SB the capture point is in a small cluster of farm buildings in the north west of the map.</span> | ||
| + | | | ||
| + | <span class="ttx-ab">In AB the capture point is in a small cluster of farm buildings on the southern edge of the lake.</span> | ||
| + | <span class="ttx-rb">In RB the capture point is in a small cluster of farm buildings on the southern edge of the lake.</span> | ||
| + | <span class="ttx-sb">In SB the capture point is in a small cluster of farm buildings on the southern edge of the lake.</span> | ||
| + | | | ||
| + | <span class="ttx-ab">In AB the capture point is in the middle of the town (slightly to the west of the centre).</span> | ||
| + | <span class="ttx-rb">In RB the capture point is in the middle of the town (slightly to the west of the centre).</span> | ||
| + | <span class="ttx-sb">In RB the capture point is in the middle of the town (slightly to the west of the centre).</span> | ||
| + | |} | ||
| − | + | ===Battle=== | |
| − | + | <!--Put map screenshots, layout sizes and basic descriptions (where each cap point is) in table using ttx-ab, ttx-rb &ttx-sb spans appropriately. If a more detailed description is desired then insert it as a paragraph of text above the table--> | |
| − | [[File:MapLayout Battle FieldsofPoland.jpg| | + | {| style="width: 300px;" class="wikitable" |
| + | ! Battle Mode - Map Layouts | ||
| + | |- align="center" | ||
| + | | | ||
| + | <div style="float: none;" class="ttx-ab">[[File:MapLayout Battle FieldsofPoland ABRBSB.jpg|300px]]</div> | ||
| + | <div style="float: none;" class="ttx-rb">[[File:MapLayout Battle FieldsofPoland ABRBSB.jpg|300px]]</div> | ||
| + | <div style="float: none;" class="ttx-sb">[[File:MapLayout Battle FieldsofPoland ABRBSB.jpg|300px]]</div> | ||
| + | |- align="center" | ||
| + | | | ||
| + | <span class="ttx-ab">3.34 km x 3.34 km</span> | ||
| + | <span class="ttx-rb">3.34 km x 3.34 km</span> | ||
| + | <span class="ttx-sb">3.34 km x 3.34 km</span> | ||
| + | |- | ||
| + | | | ||
| + | <span class="ttx-ab">In AB the capture points are located in a small cluster of farm buildings in the north west of the map, and a small cluster of farm buildings on the southern edge of the lake.</span> | ||
| + | <span class="ttx-rb">In RB the capture points are located in a small cluster of farm buildings in the north west of the map, and a small cluster of farm buildings on the southern edge of the lake.</span> | ||
| + | <span class="ttx-sb">In SB the capture points are located in a small cluster of farm buildings in the north west of the map, and a small cluster of farm buildings on the southern edge of the lake.</span> | ||
| + | |} | ||
==Strategy== | ==Strategy== | ||
| + | ''Describe what focus a team should have when spawning into the map'' | ||
== Media == | == Media == | ||
<!--''An excellent addition to the article will be video guides, as well as screenshots from the game and photos.''--> | <!--''An excellent addition to the article will be video guides, as well as screenshots from the game and photos.''--> | ||
| − | {{Youtube-gallery|4c04T0mSOFI|War Thunder Map Guide: Poland}} | + | ;Videos |
| + | {{Youtube-gallery|4c04T0mSOFI|War Thunder Map Guide: Poland|iNpwg4_5F3I|War Thunder - In Development: Urban Location 'Poland'}} | ||
| − | == | + | == See also == |
| − | < | + | <!--''Links to the articles on the War Thunder Wiki that you think will be useful for the reader, for example:'' |
| + | * ''reference to related locations;''--> | ||
| + | * [[Poland (Ground Forces)]] | ||
| + | |||
| + | == External links == | ||
| + | <!--''Paste links to sources and external resources, such as:'' | ||
| + | * ''topic on the official game forum;'' | ||
| + | * ''other literature.''--> | ||
| − | + | * [https://warthunder.com/en/news/759--en [Devblog<nowiki>]</nowiki> City location "Poland"] | |
| − | |||
| − | * | ||
| − | |||
| − | |||
| − | == | + | ===References=== |
| − | + | <references /> | |
| − | |||
| − | |||
[[Category:Maps_and_missions]] | [[Category:Maps_and_missions]] | ||
[[Category:Ground forces maps]] | [[Category:Ground forces maps]] | ||
Latest revision as of 10:38, 15 March 2022
| Possible Layouts | ||||
|---|---|---|---|---|
| Other Information | ||||
|---|---|---|---|---|
Full tank area size: 4 km x 4 km
|
||||
Contents
Overview
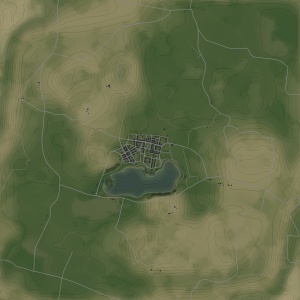
Fields of Poland is a ground forces map, using the same map as the Poland Map. It was added in Update 1.59 "Flaming Arrows". The difference between this map and the Poland map is that the battle area has been significantly increased; whereas on Poland the battle area is restricted to just that of the town and a small section of the surrounding area, on this map the battle area is nearly the full map (seen to the right).
The main town and surrounding area is familiar from the Poland map. The rest of the map is made up of mostly empty fields, with hills and sections of wooded area to provide cover from long range engagements. There are also small collections of farm building dotted around the map. The map is focused around long range combat, with players able to "snipe" each other from extreme range, due to the open nature of the map. The town area still provides an opportunity for close quarters combat, but the player must cross much more open ground in order to get there.
The tank battles map is 4km x 4km (with nearly all of that playable). The air battles area is 65km x 65km. The tank battle areas are:
| Game Mode | AB | RB | SB |
|---|---|---|---|
| Domination | 3.34 km x 3.34 km | 3.34 km x 3.34 km | 3.34 km x 3.34 km |
| Conquest #1 | 3.34 km x 3.34 km | 3.34 km x 3.34 km | 3.34 km x 3.34 km |
| Conquest #2 | 3.34 km x 3.34 km | 3.34 km x 3.34 km | 3.34 km x 3.34 km |
| Conquest #3 | 3.34 km x 3.34 km | 3.34 km x 3.34 km | 3.34 km x 3.34 km |
| Battle | 3.34 km x 3.34 km | 3.34 km x 3.34 km | 3.34 km x 3.34 km |
Historical Background
See the main Poland page for Historical information.
Map configuration
| Change Maps by Game Modes | ||
|---|---|---|
| | ||
At present, this map has the same layouts in AB, RB and SB.
Domination
| Domination Mode - Map Layouts |
|---|
|
3.34 km x 3.34 km 3.34 km x 3.34 km 3.34 km x 3.34 km |
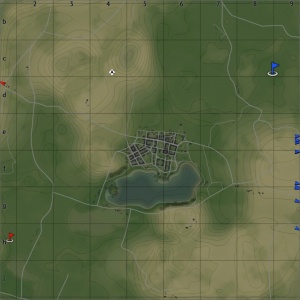
|
In AB point A will be in a small cluster of farm buildings in the north west of the map, B will be in a small cluster of farm buildings on the southern edge of the lake, and C is in the middle of the town (slightly to the west of the centre). In RB point A will be in a small cluster of farm buildings in the north west of the map, B will be in a small cluster of farm buildings on the southern edge of the lake, and C is in the middle of the town (slightly to the west of the centre). In SB point A will be in a small cluster of farm buildings in the north west of the map, B will be in a small cluster of farm buildings on the southern edge of the lake, and C is in the middle of the town (slightly to the west of the centre). |
Conquest
| Conquest Mode - Map Layouts | ||
|---|---|---|
| Conquest #1 | Conquest #2 | Conquest #3 |
|
3.34 km x 3.34 km 3.34 km x 3.34 km 3.34 km x 3.34 km |
3.34 km x 3.34 km 3.34 km x 3.34 km 3.34 km x 3.34 km |
3.34 km x 3.34 km 3.34 km x 3.34 km 3.34 km x 3.34 km |
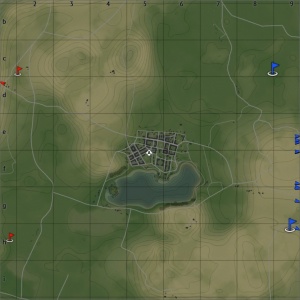
|
In AB the capture point is in a small cluster of farm buildings in the north west of the map. In RB the capture point is in a small cluster of farm buildings in the north west of the map. In SB the capture point is in a small cluster of farm buildings in the north west of the map. |
In AB the capture point is in a small cluster of farm buildings on the southern edge of the lake. In RB the capture point is in a small cluster of farm buildings on the southern edge of the lake. In SB the capture point is in a small cluster of farm buildings on the southern edge of the lake. |
In AB the capture point is in the middle of the town (slightly to the west of the centre). In RB the capture point is in the middle of the town (slightly to the west of the centre). In RB the capture point is in the middle of the town (slightly to the west of the centre). |
Battle
| Battle Mode - Map Layouts |
|---|
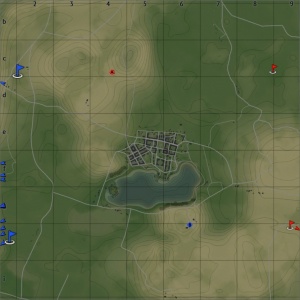
|
3.34 km x 3.34 km 3.34 km x 3.34 km 3.34 km x 3.34 km |
|
In AB the capture points are located in a small cluster of farm buildings in the north west of the map, and a small cluster of farm buildings on the southern edge of the lake. In RB the capture points are located in a small cluster of farm buildings in the north west of the map, and a small cluster of farm buildings on the southern edge of the lake. In SB the capture points are located in a small cluster of farm buildings in the north west of the map, and a small cluster of farm buildings on the southern edge of the lake. |
Strategy
Describe what focus a team should have when spawning into the map
Media
- Videos


