Difference between revisions of "Concept 3"
(Edits) |
m (→History) |
||
| (20 intermediate revisions by 10 users not shown) | |||
| Line 1: | Line 1: | ||
{{Specs-Card | {{Specs-Card | ||
|code=uk_concept3_ngac | |code=uk_concept3_ngac | ||
| − | |images={{Specs-Card-Image|GarageImage_{{PAGENAME}}.jpg | + | |images={{Specs-Card-Image|GarageImage_{{PAGENAME}}.jpg}} |
}} | }} | ||
== Description == | == Description == | ||
<!-- ''In the description, the first part should be about the history of the creation and combat usage of the vehicle, as well as its key features. In the second part, tell the reader about the ground vehicle in the game. Insert a screenshot of the vehicle, so that if the novice player does not remember the vehicle by name, he will immediately understand what kind of vehicle the article is talking about.'' --> | <!-- ''In the description, the first part should be about the history of the creation and combat usage of the vehicle, as well as its key features. In the second part, tell the reader about the ground vehicle in the game. Insert a screenshot of the vehicle, so that if the novice player does not remember the vehicle by name, he will immediately understand what kind of vehicle the article is talking about.'' --> | ||
| − | + | The '''{{Specs|name}}''' is a rank {{Specs|rank}} British light tank {{Battle-rating}}. It was introduced in [[Update "Red Skies"]]. | |
| − | |||
| − | |||
== General info == | == General info == | ||
| Line 15: | Line 13: | ||
<!-- ''Describe armour protection. Note the most well protected and key weak areas. Appreciate the layout of modules as well as the number and location of crew members. Is the level of armour protection sufficient, is the placement of modules helpful for survival in combat? If necessary use a visual template to indicate the most secure and weak zones of the armour.'' --> | <!-- ''Describe armour protection. Note the most well protected and key weak areas. Appreciate the layout of modules as well as the number and location of crew members. Is the level of armour protection sufficient, is the placement of modules helpful for survival in combat? If necessary use a visual template to indicate the most secure and weak zones of the armour.'' --> | ||
| − | Like the American [[M18 GMC|M18 Hellcat]], the Concept 3 only has 12.7 mm (0.5 in) of armour in most areas, with some areas being only 6.5 mm. As a result, anything at this BR can penetrate this vehicle's armour. Compounding issues, the Concept 3 has ammunition scattered all throughout its body. | + | Like the American [[M18 GMC|M18 Hellcat]], the Concept 3 only has 12.7 mm (0.5 in) of armour in most areas, with some areas being only 6.5 mm. As a result, anything at this BR can penetrate this vehicle's armour. Compounding issues, the Concept 3 has ammunition storage scattered all throughout its body. In other words: while incoming fire from the sides is somewhat prone to overpenetration, this cannot be depended upon. Try to avoid being shot at in the first place. |
| − | |||
| − | |||
'''Armour type:''' | '''Armour type:''' | ||
| − | |||
* Rolled homogeneous armour (hull, turret, cupola) | * Rolled homogeneous armour (hull, turret, cupola) | ||
* Wheel (tires) | * Wheel (tires) | ||
| Line 37: | Line 32: | ||
'''Notes:''' | '''Notes:''' | ||
| − | |||
* Wheels and torsion bars are 10 mm thick. | * Wheels and torsion bars are 10 mm thick. | ||
* Belly armour is 6.35 mm thick. | * Belly armour is 6.35 mm thick. | ||
| Line 44: | Line 38: | ||
{{Specs-Tank-Mobility}} | {{Specs-Tank-Mobility}} | ||
<!-- ''Write about the mobility of the ground vehicle. Estimate the specific power and manoeuvrability, as well as the maximum speed forwards and backwards.'' --> | <!-- ''Write about the mobility of the ground vehicle. Estimate the specific power and manoeuvrability, as well as the maximum speed forwards and backwards.'' --> | ||
| − | |||
| − | |||
| − | |||
| − | |||
{{tankMobility|abMinHp=324|rbMinHp=185}} | {{tankMobility|abMinHp=324|rbMinHp=185}} | ||
| Line 53: | Line 43: | ||
=== Modifications and economy === | === Modifications and economy === | ||
{{Specs-Economy}} | {{Specs-Economy}} | ||
| − | |||
| − | |||
| − | |||
| − | |||
== Armaments == | == Armaments == | ||
| Line 65: | Line 51: | ||
{{main|OQF Mk.II (77 mm)}} | {{main|OQF Mk.II (77 mm)}} | ||
| − | + | The main gun's recoil is quite strong, coupled with the bouncy suspension, leads to significantly "rocking" after firing, especially from the sides. | |
| − | |||
| − | |||
| − | |||
| − | |||
| − | |||
| − | |||
{| class="wikitable" style="text-align:center" width="100%" | {| class="wikitable" style="text-align:center" width="100%" | ||
| Line 90: | Line 70: | ||
==== Ammunition ==== | ==== Ammunition ==== | ||
| − | + | {| class="wikitable sortable" style="text-align:center" width="100%" | |
| − | + | ! colspan="8" | Penetration statistics | |
| − | { | + | |- |
| + | ! rowspan="2" data-sort-type="text" | Ammunition | ||
| + | ! rowspan="2" | Type of<br>warhead | ||
| + | ! colspan="6" | Penetration @ 0° Angle of Attack (mm) | ||
| + | |- | ||
| + | ! 10 m !! 100 m !! 500 m !! 1,000 m !! 1,500 m !! 2,000 m | ||
| + | |- | ||
| + | | Shot Mk.6 || AP || 137 || 134 || 123 || 111 || 100 || 91 | ||
| + | |- | ||
| + | | Shell Mk.1 || HE || 9 || 9 || 9 || 9 || 9 || 9 | ||
| + | |- | ||
| + | | Shot Mk.4 || APC || 137 || 134 || 123 || 111 || 100 || 91 | ||
| + | |- | ||
| + | | Shot Mk.8 || APCBC || 152 || 149 || 137 || 124 || 112 || 101 | ||
| + | |- | ||
| + | |} | ||
| + | {| class="wikitable sortable" style="text-align:center" width="100%" | ||
| + | ! colspan="10" | Shell details | ||
| + | |- | ||
| + | ! rowspan="2" data-sort-type="text" | Ammunition | ||
| + | ! rowspan="2" | Type of<br>warhead | ||
| + | ! rowspan="2" | Velocity<br>(m/s) | ||
| + | ! rowspan="2" | Projectile<br>Mass (kg) | ||
| + | ! rowspan="2" | Fuse delay<br>(m) | ||
| + | ! rowspan="2" | Fuse sensitivity<br>(mm) | ||
| + | ! rowspan="2" | Explosive Mass<br>(TNT equivalent) (g) | ||
| + | ! colspan="3" | Ricochet | ||
| + | |- | ||
| + | ! 0% !! 50% !! 100% | ||
| + | |- | ||
| + | | Shot Mk.6 || AP || 754 || 7.71 || N/A || N/A || N/A || 47° || 60° || 65° | ||
| + | |- | ||
| + | | Shell Mk.1 || HE || 754 || 6.98 || 0 || 0.1 || 580 || 79° || 80° || 81° | ||
| + | |- | ||
| + | | Shot Mk.4 || APC || 754 || 7.71 || N/A || N/A || N/A || 48° || 63° || 71° | ||
| + | |- | ||
| + | | Shot Mk.8 || APCBC || 754 || 7.71 || N/A || N/A || N/A || 48° || 63° || 71° | ||
| + | |- | ||
| + | |} | ||
==== [[Ammo racks]] ==== | ==== [[Ammo racks]] ==== | ||
[[File:Ammoracks_{{PAGENAME}}.png|right|thumb|x250px|[[Ammo racks]] of the {{PAGENAME}}]] | [[File:Ammoracks_{{PAGENAME}}.png|right|thumb|x250px|[[Ammo racks]] of the {{PAGENAME}}]] | ||
| − | <!-- '''Last updated: 2. | + | <!-- '''Last updated: 2.7.0.109''' --> |
{| class="wikitable" style="text-align:center" | {| class="wikitable" style="text-align:center" | ||
|- | |- | ||
| Line 112: | Line 130: | ||
|} | |} | ||
'''Notes''': | '''Notes''': | ||
| − | |||
* Shells are modeled individually and disappear after having been shot or loaded. | * Shells are modeled individually and disappear after having been shot or loaded. | ||
| − | * | + | * If you pack 21 ''(+39)'' shells, it will keep the turret empty of ammo. |
| − | |||
=== Machine guns === | === Machine guns === | ||
| Line 134: | Line 150: | ||
== Usage in battles == | == Usage in battles == | ||
<!-- ''Describe the tactics of playing in the vehicle, the features of using vehicles in the team and advice on tactics. Refrain from creating a "guide" - do not impose a single point of view but instead give the reader food for thought. Describe the most dangerous enemies and give recommendations on fighting them. If necessary, note the specifics of the game in different modes (AB, RB, SB).'' --> | <!-- ''Describe the tactics of playing in the vehicle, the features of using vehicles in the team and advice on tactics. Refrain from creating a "guide" - do not impose a single point of view but instead give the reader food for thought. Describe the most dangerous enemies and give recommendations on fighting them. If necessary, note the specifics of the game in different modes (AB, RB, SB).'' --> | ||
| − | + | ''Describe the tactics of playing in the vehicle, the features of using vehicles in the team and advice on tactics. Refrain from creating a "guide" - do not impose a single point of view but instead give the reader food for thought. Describe the most dangerous enemies and give recommendations on fighting them. If necessary, note the specifics of the game in different modes (AB, RB, SB).'' | |
| − | |||
| − | |||
| − | |||
| − | |||
| − | |||
| − | |||
| − | |||
| − | |||
| − | |||
| − | |||
=== Pros and cons === | === Pros and cons === | ||
| Line 159: | Line 165: | ||
* Solid shot ammunition only, accurate fire is needed to disable vehicles | * Solid shot ammunition only, accurate fire is needed to disable vehicles | ||
| − | * Suspension is quite bouncy | + | * Suspension is quite bouncy, making shots difficult |
* Turning is slow when stock | * Turning is slow when stock | ||
* Suffers in soft terrain, sometimes speed will drop massively upon the slightest obstacle | * Suffers in soft terrain, sometimes speed will drop massively upon the slightest obstacle | ||
* Negligible armour, vulnerable to artillery overpressure | * Negligible armour, vulnerable to artillery overpressure | ||
| − | * | + | * Sub-par accuracy at range when stock |
| − | |||
== History == | == History == | ||
| Line 179: | Line 184: | ||
;Skins | ;Skins | ||
| − | |||
* [https://live.warthunder.com/feed/camouflages/?vehicle=uk_concept3_ngac Skins and camouflages for the {{PAGENAME}} from live.warthunder.com.] | * [https://live.warthunder.com/feed/camouflages/?vehicle=uk_concept3_ngac Skins and camouflages for the {{PAGENAME}} from live.warthunder.com.] | ||
| Line 191: | Line 195: | ||
;Related developement | ;Related developement | ||
| − | |||
* [[Rooikat Mk.1D]] | * [[Rooikat Mk.1D]] | ||
* [[Rooikat 105]] | * [[Rooikat 105]] | ||
| Line 205: | Line 208: | ||
{{Britain light tanks}} | {{Britain light tanks}} | ||
| + | |||
[[Category:Wheeled ground vehicles]] | [[Category:Wheeled ground vehicles]] | ||
Revision as of 08:54, 3 November 2021

Contents
Description
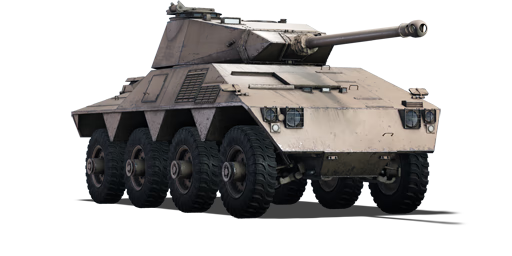
The Concept 3, New Generation Armoured Car is a rank British light tank with a battle rating of (AB), (RB), and (SB). It was introduced in Update "Red Skies".
General info
Survivability and armour
Like the American M18 Hellcat, the Concept 3 only has 12.7 mm (0.5 in) of armour in most areas, with some areas being only 6.5 mm. As a result, anything at this BR can penetrate this vehicle's armour. Compounding issues, the Concept 3 has ammunition storage scattered all throughout its body. In other words: while incoming fire from the sides is somewhat prone to overpenetration, this cannot be depended upon. Try to avoid being shot at in the first place.
Armour type:
- Rolled homogeneous armour (hull, turret, cupola)
- Wheel (tires)
| Armour | Front (Slope angle) | Sides | Rear | Roof |
|---|---|---|---|---|
| Hull | 12.7 mm (70°) Upper glacis 25.4 mm (31°) Lower glacis |
12.7 mm (25°) Top 12.7 mm Bottom |
12.7 mm Rear armour 5 mm Engine grille |
12.7 mm |
| Turret | 12.7 mm (19°) Turret front 25.4 mm (7-69°) Gun mantlet |
12.7 mm (18-19°) | 12.7 mm (21°) | 12.7 mm (10°) Front 6.35 mm Rear |
| Cupola | 25.4 mm | 25.4 mm | 25.4 mm | 12.7 mm |
Notes:
- Wheels and torsion bars are 10 mm thick.
- Belly armour is 6.35 mm thick.
Mobility
| Game Mode | Max Speed (km/h) | Weight (tons) | Engine power (horsepower) | Power-to-weight ratio (hp/ton) | |||
|---|---|---|---|---|---|---|---|
| Forward | Reverse | Stock | Upgraded | Stock | Upgraded | ||
| Arcade | Expression error: Unexpected * operator. | 324 | Expression error: Unexpected round operator. | __.__ | |||
| Realistic | 185 | Expression error: Unexpected round operator. | __.__ | ||||
Modifications and economy
Armaments
Main armament
The main gun's recoil is quite strong, coupled with the bouncy suspension, leads to significantly "rocking" after firing, especially from the sides.
| 77 mm OQF Mk.II | Turret rotation speed (°/s) | Reloading rate (seconds) | |||||||||||
|---|---|---|---|---|---|---|---|---|---|---|---|---|---|
| Mode | Capacity | Vertical | Horizontal | Stabilizer | Stock | Upgraded | Full | Expert | Aced | Stock | Full | Expert | Aced |
| Arcade | 60 | -10°/+20° | ±180° | N/A | 14.3 | 19.8 | 24.0 | 26.5 | 28.2 | 7.67 | 6.78 | 6.25 | 5.90 |
| Realistic | 8.9 | 10.5 | 12.8 | 14.1 | 15.0 | ||||||||
Ammunition
| Penetration statistics | |||||||
|---|---|---|---|---|---|---|---|
| Ammunition | Type of warhead |
Penetration @ 0° Angle of Attack (mm) | |||||
| 10 m | 100 m | 500 m | 1,000 m | 1,500 m | 2,000 m | ||
| Shot Mk.6 | AP | 137 | 134 | 123 | 111 | 100 | 91 |
| Shell Mk.1 | HE | 9 | 9 | 9 | 9 | 9 | 9 |
| Shot Mk.4 | APC | 137 | 134 | 123 | 111 | 100 | 91 |
| Shot Mk.8 | APCBC | 152 | 149 | 137 | 124 | 112 | 101 |
| Shell details | |||||||||
|---|---|---|---|---|---|---|---|---|---|
| Ammunition | Type of warhead |
Velocity (m/s) |
Projectile Mass (kg) |
Fuse delay (m) |
Fuse sensitivity (mm) |
Explosive Mass (TNT equivalent) (g) |
Ricochet | ||
| 0% | 50% | 100% | |||||||
| Shot Mk.6 | AP | 754 | 7.71 | N/A | N/A | N/A | 47° | 60° | 65° |
| Shell Mk.1 | HE | 754 | 6.98 | 0 | 0.1 | 580 | 79° | 80° | 81° |
| Shot Mk.4 | APC | 754 | 7.71 | N/A | N/A | N/A | 48° | 63° | 71° |
| Shot Mk.8 | APCBC | 754 | 7.71 | N/A | N/A | N/A | 48° | 63° | 71° |
Ammo racks

| Full ammo |
1st rack empty |
2nd rack empty |
3rd rack empty |
4th rack empty |
5th rack empty |
6th rack empty |
Visual discrepancy |
|---|---|---|---|---|---|---|---|
| 60 | 41 (+19) | 37 (+23) | 33 (+27) | 28 (+32) | 21 (+39) | 1 (+59) | No |
Notes:
- Shells are modeled individually and disappear after having been shot or loaded.
- If you pack 21 (+39) shells, it will keep the turret empty of ammo.
Machine guns
| 7.62 mm Browning MG4 | ||||
|---|---|---|---|---|
| Mount | Capacity (Belt) | Fire rate | Vertical | Horizontal |
| Coaxial | 2,500 (250) | 500 | N/A | N/A |
Usage in battles
Describe the tactics of playing in the vehicle, the features of using vehicles in the team and advice on tactics. Refrain from creating a "guide" - do not impose a single point of view but instead give the reader food for thought. Describe the most dangerous enemies and give recommendations on fighting them. If necessary, note the specifics of the game in different modes (AB, RB, SB).
Pros and cons
Pros:
- Excellent gun for its tier, good penetration and decent reload
- Fast with good acceleration when spaded
- Reverse speed is as good as forward speed, allowing for quick getaways
- Above average muzzle velocity
Cons:
- Solid shot ammunition only, accurate fire is needed to disable vehicles
- Suspension is quite bouncy, making shots difficult
- Turning is slow when stock
- Suffers in soft terrain, sometimes speed will drop massively upon the slightest obstacle
- Negligible armour, vulnerable to artillery overpressure
- Sub-par accuracy at range when stock
History
The Concept 3 was based on the British FV603 Alvis Saracen Armoured Personnel Carrier. It was designed to fulfil a new South African requirement for a "New Generation Armoured Car". The project started in 1976 and ended in 1979. 3 testbed vehicles were made, Concept 3 being one of them. The Concept 3 differed from the Alvis Saracen APCs - it had an 8-wheel configuration, giving it superior off-road characteristics and superior performance. The Concept 3 was fitted with a 77mm OQF Mk.II, identical to the one found on the A34 Comet I which, while underwhelming for the time was merely a placeholder and was later swapped for a 105 mm Royal Ordnance L7 which was a licence built version of the same gun found on the British Centurion Mk 10. The L7 variant was known as the "Bismarck". The vehicle was built by South African company Sandock-Austral (later merged into BAE Systems), the same company credited with creating and producing the Ratel family (Ratel 20 / 90) and the Eland 90 Mk.7. Several tests were conducted over the years at Potchefstroom, South Africa. The Concept 3 series was nicknamed the "Cheetah" and the vehicle was officially designated "Concept 3, Class 2B" and was built to slightly different medium specifications, raising the original weight of the vehicle from a modest 17 tonnes to a rather considerable weight of up to 23 tonnes.
When all is said and done, the Concept series deviated from the original vision of the Armoured Personnel Carrier, morphing into a light Armoured Fighting Vehicle or reconnaissance car. The original intended role of Armoured Personnel Carrier was ultimately fulfilled by the excellent Ratel family which doubled as an effective Infantry Fighting Vehicle. Therefore the South African National Defence Force ultimately cancelled the order for the Concepts, and immediate further development of the Concept programme was promptly terminated.
However, the legacy of the Concept cannot be asserted enough: the basic design of the Concept and in particular its chassis would later become that of the Rooikat family (Rooikat 105 / MTTD / Mk.1D / ZA-35) which are still used to this day. The Concept, while often forgotten, disregarded and dishonoured is perhaps one of the most - if not the most - influential military vehicle design in South African history.
Media
- Skins
- Videos
See also
- Related developement
External links
Paste links to sources and external resources, such as:
- topic on the official game forum;
- other literature.
| Britain light tanks | |
|---|---|
| A13 | A13 Mk I · A13 Mk I (3rd R.T.R.) · A13 Mk II · A13 Mk II 1939 |
| A15 | Crusader II · Crusader "The Saint" · Crusader III |
| A17 | Tetrarch I |
| IFV | Warrior · Desert Warrior (Kuwait) |
| Wheeled | Daimler Mk II · AEC Mk II · Fox · Vickers Mk.11 |
| Other | VFM5 |
| South Africa | |
| SARC | SARC MkIVa · SARC MkVI (2pdr) · SARC MkVI (6pdr) |
| Ratel | Ratel 90 · Ratel 20 |
| Rooikat | Rooikat Mk.1D · Rooikat 105 · Rooikat MTTD |
| Other | Concept 3 · Eland 90 Mk.7 |
| USA | Stuart I · Stuart III |
