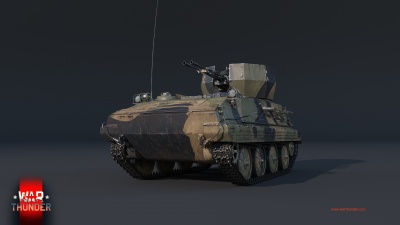
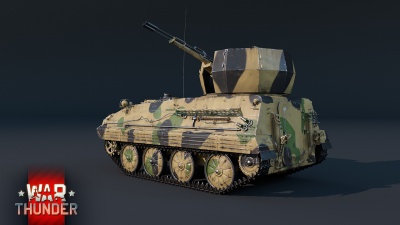
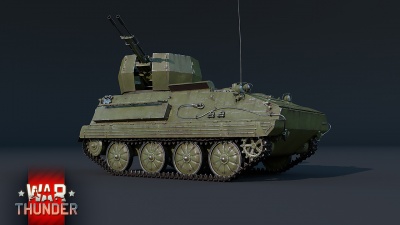
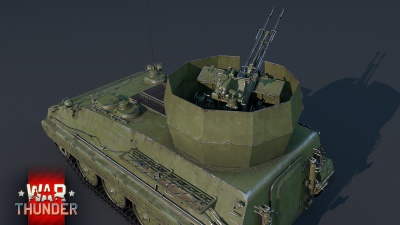
ZSD63/PG87
Contents
Description
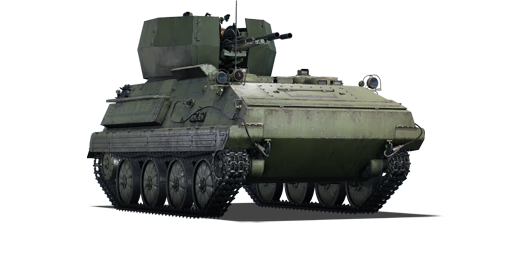
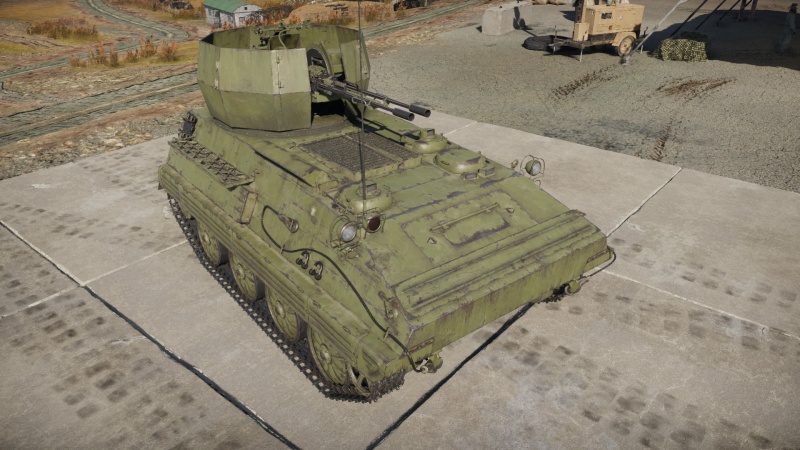
The ZSD63/PG87, Dual-Barrel AA (known in Chinese client as ZSD63式履带裝甲输送车/PG87式双管高射炮, industry code: WZ531 for the chassis) was the field modification from PLAGF to build make-shift SPAA before new SPAAGs made into commission. The concept of ZSD63 started in 1958 as a fully-enclosed tracked APC with amphibious capabilities; after the flaws in design and new upgrades introduced to the 531A prototype, the ZSD63 eventually joined PLAGF in 1970 as the first domestic APC in service and has been used during the Vietnam War by Viet Cong and Sino-Vietnamese War by both side. The SPAA variant was likely the modification built in 1990s with dozer to reduce recoil during firing; alongside with other truck-base SPAA with PG87 25 mm autocannon, they served PLAGF to at least into the 21st Century when new SPAAG eventually replaced them.
Introduced in Update "Starfighters" as the first Chinese vehicle to equip the PG87 autocannon, the ZSD63 is the third vehicle in the Chinese SPAA line and offers greatly improved anti-air capabilities to Chinese tankers. Though it looks rather like a jury-rigged technical from the Middle East, having a turret with twin autocannons grafted on an APC chassis, it packs some serious firepower for its rank. A slight brush from the ZSD63's rapid-fire cannons will tear aircraft and lightly armoured ground vehicles to shreds. Even medium tanks will be wary of the onslaught of AP rounds, which can cut through them like a buzzsaw. While it has excellent firepower, the defensive capabilities are lacking; the large size, paper-thin armour, and high profile make it an attractive target to anything on the battlefield. The pair of PG87 cannons have a 600 rpm fire rate that will empty its dual 40 round magazine (80 total) in just over 4 seconds, then to face a truly abysmal reload speed of 30 plus seconds! The vehicle also only carries enough ammo for 5 reloads which will vanish like magic. Its saving grace is the high velocity ammo that makes aiming easy; the succeeding Chinese SPAAs have a much lower rate of fire and lower velocity, thus harder to use against aerial targets until the WZ305 and its proximity-fused shells are researched. Despite these challenges, the ZSD63 can be a very fun vehicle to play and will serve well as an anti-air vehicle even beyond its low rank.
General info
Survivability and armour
| Armour | Front (Slope angle) | Sides | Rear |
|---|---|---|---|
| Hull | 12 mm | 8 mm | 8 mm |
| Turret | 8 mm | 8 mm | 8 mm |
Despite its armoured box look, one would be hard pressed to call the ZSD63 "armoured". The armour is almost entirely 8 mm thick all-around, save for the 12 mm upper glacis. The near vertical sides may as well be unprotected. Adding insult to injury is the high-mounted open-top turret with the crews' heads exposed on top like pumpkins. Even coaxial rifle-calibre machine guns stand a fair chance of penetrating this vehicle. While you might survive a few glancing bullets or have shots pass through the empty rear compartment, the best survival tactic is to avoid being seen and stay close to cover for quick retreats after firing off a few bursts.
On the other hand, the extremely thin armour will result in most shells over-penetrating, given that most fuse sensitivities are around 10 mm. An over-penetration through the empty space is likely to do little to no damage. Although you might survive, it is still a clear warning that you are exposed to lethal firepower and you should immediately relocate if possible.
Being an open topped AA with very weak armour makes it extremely susceptible to overpressure from HE and HEAT shells.
Mobility
| Game Mode | Max Speed (km/h) | Weight (tons) | Engine power (horsepower) | Power-to-weight ratio (hp/ton) | |||
|---|---|---|---|---|---|---|---|
| Forward | Reverse | Stock | Upgraded | Stock | Upgraded | ||
| Arcade | Expression error: Unexpected * operator. | 369 | Expression error: Unexpected round operator. | __.__ | |||
| Realistic | 230 | Expression error: Unexpected round operator. | __.__ | ||||
Mobility is good, though somewhat underwhelming compared to what the statistics might suggest. With 19 hp/ton, the ZSD63 accelerates to 60 km/h forward on paved roads and the suspension works quite nicely on all kinds of terrain. Off-road speed is less impressive, topping at around 30-35 km/h. The 8 km/h reverse speed leaves something to be desired but is better than most contemporary vehicles. Overall, the ZSD63 is mobile enough to follow teammates and flank, though it is not exactly lightning fast and there should be no expectation of arriving at the battlefield far ahead of everyone else.
Modifications and economy
Armaments
Main armament
The ZSD63/PG87 is arguably the most lethal autocannon system at its rank in-game. Each cannon fires a staggering 10 rounds per second (600 rpm) with extremely high velocity and precision. The excellent turret traverse speed makes tracking targets very easy. Aircraft are instant confetti under its FI-T rounds. Although the AP-T penetration at 100 m is only 60 mm, declining to 47 mm at 500 m, the high fire rate and high velocity allow multiple hits at weak points until a kill shot is made. Light tanks, tank destroyers, and other SPAAs are generally easy targets. Medium units should not be too difficult to eliminate either, and even heavy tanks can be disabled by the cannons when aimed at vulnerable locations. The weaknesses are the limited belt capacity and the extremely long reload time, so be highly conservative with your fire control. This monster will be just as effective in Rank VII as in Rank II.
The default belt is a 50/50 mix of AP-T and FI-T. This does a pretty good job for anti-air operations, and is perfectly adequate for the sort of ground targets you should be engaging - lightly armoured vehicles. The pure AP-T load is better but a needless expense. There is also a pure FI-T belt that is high effective versus aircraft but essentially useless against ground targets; it is not of much use since the default belt is almost as effective and can still deal with ground targets adequately. Using just the default belt avoids the potential for having the wrong belt loaded - it is good for all targets
Avoid trying to switch belts in the middle of combat as might be done for other SPAAs. Doing so will put the guns out of commission for potentially more than 30 seconds, which is unhelpful to say the least if there are enemies around. Spending minutes to switch belts for different targets only makes you defenceless and vulnerable.
| 25 mm PG87 (x2) | Turret rotation speed (°/s) | Reloading rate (seconds) | ||||||||||||
|---|---|---|---|---|---|---|---|---|---|---|---|---|---|---|
| Mode | Capacity (Belt) | Fire rate | Vertical | Horizontal | Stabilizer | Stock | Upgraded | Full | Expert | Aced | Stock | Full | Expert | Aced |
| Arcade | 480 (40) | 600 | -10°/+90° | ±180° | N/A | 47.6 | 65.8 | 79.9 | 88.4 | 94.0 | 16.90 | 14.95 | 13.78 | 13.00 |
| Realistic | 32.1 | 37.8 | 45.9 | 50.8 | 54.0 | |||||||||
Ammunition
- Default: AP-T · FI-T*
- Type 87 HE: FI-T*
- Type 87 AP: AP-T
| Penetration statistics | |||||||
|---|---|---|---|---|---|---|---|
| Ammunition | Penetration @ 0° Angle of Attack (mm) | ||||||
| 10 m | 100 m | 500 m | 1,000 m | 1,500 m | 2,000 m | ||
| FI-T* | 8 | 8 | 6 | 5 | 4 | 3 | |
| AP-T | 63 | 61 | 51 | 41 | 33 | 27 | |
| Shell details | ||||||||||||
|---|---|---|---|---|---|---|---|---|---|---|---|---|
| Ammunition | Velocity (m/s) |
Projectile mass (kg) |
Fuse delay (m) |
Fuse sensitivity (mm) |
Explosive mass (TNT equivalent) (g) |
Ricochet | ||||||
| 0% | 50% | 100% | ||||||||||
| FI-T* | 1,050 | 0.25 | 0.1 | 0.1 | 29.26 | 47° | 56° | 65° | ||||
| AP-T | 1,050 | 0.25 | - | - | - | 47° | 60° | 65° | ||||
Ammo racks
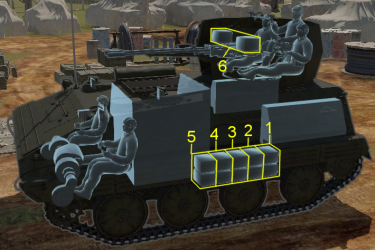
| Full ammo |
1st rack empty |
2nd rack empty |
3rd rack empty |
4th rack empty |
5th rack empty |
6th rack empty |
Visual discrepancy |
|---|---|---|---|---|---|---|---|
| 12 | 10 (+2) | 8 (+4) | 6 (+6) | 4 (+8) | 2 (+10) | 0 (+12) | No |
Notes:
- A box of ammunition contains 40 projectiles.
- A rack consists of 2 boxes.
Usage in battles
The main job for this vehicle is providing effective defence for your team against enemy aircraft. Avoid continuous firing, 1 to 2 second bursts are critical for success. The cannons have noticeable recoil and the limited ammunition capacity does not allow for much "Spray and Pray". Before any planes spawn, it is recommended to locate yourself between the points and the spawn, and find some hard cover. This way you can get close to most of your teammates and target incoming planes easier, you don't need to worry about getting shot by enemy tanks, and you can use the covers to dodge strafing planes. Then, as soon as an enemy plane spawns, slowly shoot single salvoes towards it to draw its attention. Most planes will dive in for an easy SPAA kill, knowing that all SPAA have weak armour and not-lethal-enough firepower. If it is a bomber, position your hull sideways for quick retreat from bombs. Planes diving straight towards the ZSD63 are very threatening, but at the same time they present easy no-deflection targets; use your great gunsight magnification to work out the plane's flying path, and spray a 1-sec burst of 25 mm rounds in their flight path. 1-3 hits will shred most planes apart. With this method a 40-round clip can take out 1-2 planes. Fire conservatively if the target is not flying directly towards or away from the ZSD63.
When attacking ground units, be extremely cautious and avoid exposing your weak armour. The best approach for engaging ground units is do not do so except for the lightest ones. The pure AP (AP-T) belt doubles the chance of penetrating hits but changing belts is time consuming, and you should not be engaging ground targets where the default belt isn't enough in the first place. Wide flanking manoeuvres allow you to attack the weak sides of light targets, but are likely to leave you exposed and without any support yourself - so an easy target. Going wide, you will likely encounter other weakly armoured units like the popular M24 Chaffee, which is very vulnerable to the 25 mm cannons. Know your targets and aim for weak points. The ubiquitous Shermans are generally tough customers from the front, where at most the transmission housings or perhaps ventilators can be penetrated, but the terrible hull side armour is a good target. The lower side armour behind the tracks is an especially good weak point if facing Shermans with applique side armour, and spraying a wide burst in that area can knock out the transmission, ammo, and driver. Other medium tanks like the Pz.IV F2 and Chi-Nu are vulnerable from the front at close range. T-34s are tougher targets and can only be reliably penetrated frontally in the turret cheeks (for "small turret" models like the T-34 (1940)) or the turret ring at close range. The hull sides are thicker and better sloped than other medium tanks and also have fuel tanks protecting the turret crew, so during flanking attacks, try to shoot the lower hull armour to knock out the engine and driver/machine gunner before going for the turret side. The AP round does not have explosive filler so multiple penetrating hits are needed to defeat a tank. Remember that the ZSD63 also has access to artillery, a very useful spoiler to keep your targets off balance.
For self-defence, it is important to know how to disable opponents quickly and efficiently, with minimal time and ammunition expenditure. Obviously the optimal situation is to knock out a target's crew before they can attack the ZSD63, but this will not always be possible. The twin cannons can destroy tracks and tires almost instantly, but for turreted vehicles this will not prevent the target from returning fire. If only one track is destroyed, even a casemate tank destroyer can potentially scoot around enough to fire back (though this can expose their sides). Destroying the engine is a good move when shooting from the sides or rear for this reason. Destroying gun barrels is also a good idea, but this can be difficult if said barrel is pointed directly at you, presenting a small cross section. Destroying turret rings can also be helpful, but this is not really possible outside of close quarters, and some tanks like Shermans don't even have vulnerable turret rings. Juggling these techniques takes practice, and some may end up using a lot of ammo, so it's best not to use the ZSD63 offensively against multiple well-armoured opponents. Damage targets just enough to save yourself and allow your teammates to finish them off. A target with upgraded crew skills might be able to repair their damage before the ZSD63 can reload!
Note that the default gun camera seems to be located between the guns, as a result when shooting at a target your vision will be mostly obstructed by the muzzle smoke. Some solutions include moving slightly away from the old spot to get out of the smoke, or use the "camera from gunner sight" option, although it may not be practical for other tanks.
Expect to go to allied cap zones more than most vehicles to replenish ammo and possibly another crew member.
Against the ZSD63:
Light tank/SPAA: these vehicles are not well armoured (e.g. M24) so never expose yourself to a ZSD63, or you will get destroyed within a second. If you get the chance to fire at it, do not shoot the hull directly below the turret, as there is absolutely nothing there. Your shells will either over-penetrate without detonating, or explode inside with the shrapnel hitting next to nothing. Only target two sections: frontal hull and turret. These are the areas where there are crew inside. A few more shots might be needed if the shell fuse are not set off by the thin armour. For an SPAA (e.g. M16 MGMC) it will be easier, as all you have to do is spray bullets/shells at said parts until the ZSD63 is knocked out.
Medium tank/tank destroyer: never rely on your armour even in a medium tank or tank destroyer. The ZSD's AP rounds have a maximum of 63 mm penetration which is enough to go through some weak spots of common tanks (e.g. Pz.IV F2, M4A1, StuG III F), even from the front! Since medium tanks do not have good mobility as lighter tanks and thus cannot manoeuvre around the ZSD quickly, it is crucial to ensure that it cannot fight back or cannot penetrate you. Angle your hull, target the above areas, but prioritise the turret. If you have add-on armour installed they might save your life now, for example the frontal hull armour of the Pz.IV F is 50 mm which can be penetrated by the ZSD's AP, but with an additional 20 mm tracks it becomes 70 mm, which is immune to its shells. Even a Sherman's weak side will be able to resist some fatal shells with a slight increase in its effective thickness (38 + ~20 = ~58 mm).
Heavy tank: in a well-protected heavy tank such as T14, you are safe to take some hits from a ZSD and not worry about a single shell going through, since most if not all heavy tanks' front/side armour is thicker than 63 mm. Target the same areas as said above. Note that heavy tanks are less mobile so the ZSD might manage to break your tracks and/or gun barrel. Prevent this by angling your hull and traversing it randomly, and swing your turret around randomly while you reload, this way the ZSD will waste quite some shells to follow up its target.
Aircraft: with a plane against a ZSD, your best buddy is anything with big blast radius, like bombs and rockets. With them, you do not have to perform head-ons with a ZSD63, rather you can destroy it from far away and bank off early if your bomb drops or rockets are accurately aimed. Planes such as P-47D and F6F are perfect for this role. The shrapnel can pierce through the ZSD's thin armour easily and knock out its crew members and/or modules. It is very not recommended to go head-on with a ZSD no matter how powerful your offensive weapons are. With the ZSD's great shell velocity, accuracy, trajectory, penetration and damage, the SPAA is able to put a spray of deadly 25 mm shells precisely in your flight path, and you cannot afford to take more than ~2 hits from its guns. However it has a really long reload time of around 30 seconds, so you can try strafing it if you think it fired around 40 shells.
Enemies worth noting:
- R3 T20 FA-HS: This popular Italian vehicle should be a player's priority target to hunt, if playing in an anti tank mode. It is extremely fast on road and bears a very deadly 20 mm rapid-firing autocannon. With the high fire rate and great speed, it can appear at unexpected positions and easily finish the ZSD63/PG87 with a 2-second burst. To deal with it, the full AP belt is very handy. Aim at the front half of its hull and tap to fire single salvos, and the ZSD63/PG87 can knock out all of its crews quickly.
- Wirbelwind: this is another big threat. It has two types of AP belts, and both of them can penetrate the ZSD63/PG87's armour. Plus the good rate of fire and four barrels it can be equally deadly as the R3 T20. It also has better survivability in terms of hull armour and crew number: 80 mm of frontal armour means that the ZSD63/PG87's guns cannot penetrate it in a frontal encounter, while the rather spread out crew makes it harder to knock it out in time. Aim at its turret and wipe out all the turret crew to disarm it. Of course, aim at the hull side/rear if it's not facing the ZSD63/PG87 frontally.
- Ju 87, Bf 110, etc: utmost care should be taken when facing against bomb-equipped planes since even if they are considered destroyed, they can still drop their bombs around the ZSD63/PG87 which, given its weak armour, will likely result in the vehicle getting destroyed by the bombs. Common examples include the Ju 87 and Bf 110 series as they can carry bombs of up to 1,000 kg which is a huge threat. As mentioned above, find hard cover and point the hull sideways so the ZSD63/PG87 can quickly get away from the bombs.
Pros and cons
Pros:
- Excellent firepower against planes and light & medium tanks
- Extremely high rate of fire, making it deadly against any and all aircraft
- Great -10 degrees gun depression allows engagements in hilly terrain
- High top speed allows it to get to positions in time
- Thin armour can lead to some shells over-penetrating without detonation (e.g. 122 mm)
- Huge gap behind the driving compartment and below the turret can absorb shells
- Great gun sight magnification allows easy snipes from long range
- The fast elevation speed acts like a stabilizer at very low speeds
Cons:
- A rather long reload of at least 13 seconds
- High rate of fire can empty the magazine in 4 seconds
- Low magazine capacity (2 x 40 rounds) as well as low total ammunition capacity (only 480 rounds)
- Very poor survivability due to its light armour and open-topped turret with exposed crew
- Fuel tanks are easily set on fire
- High profile makes it easier to get spotted and shot at
- AP round is not powerful enough to penetrate heavy tanks even at point blank range
History
The 装甲输送车 (Zhuangjia Shusong Che, Armoured Personnel Carrier) ZSD63 was China's first domestic armoured vehicle design. China initiated the work in 1958 with a prototype finished in 1960. It is also sometimes called the "Type 63", both a name system used to refer to Julian year of production start. The basic steel box design is simple and functional, designed for small arms protection and have all terrain operation with amphibious capabilities. Although it is a domestic Chinese design, the Soviet design influence is strongly visible. Thousands have been produced with hundreds sold to other countries making it one of the most successful military vehicles built.
This SPAA version mounts a turret on the roof armed with twin PG87 which is based on the Soviet ZU-23-2 23 mm autocannon which was modified to use domestically produced 25x183B 25 mm rounds. As the name suggests, this weapon was put in production in 1987 making for a retrofit of an approximately 23 year old chassis. This turret seems to be literally mounted on the roof, as there is no hole into the hull of the ZSD, likely an attempt to maintain is amphibious ability despite additional weight. In addition, a pair of extending feet for stabilization were added, but are not functional in-game. It is likely in real world operation the vehicle had to be stationary, feet planted, and crew externally passing the large and heavy ammo magazines to the loaders on top.
Devblog
During the 1980's, Chinese engineers finished developing a new dual 25 mm anti-aircraft turret, designated as the PG87. Intended to replace the outdated 37 mm anti-air cannons in service with the Chinese armed forces in the years prior, work on this replacement already began in the 1970s, but lacking interest and shifting priorities led to the development work being prolonged into the next decade.
Around the same time, the Chinese military was in dire need of a new mobile SPAA vehicle in order to successfully be able to carry out its air defense tasks. As no new vehicle could be developed in such short notice, the decision was made to convert existing Type 63 APC chassis into SPAAG's with the use of the newly developed PG87 anti-air turret.
The result of this undertaking was an SPAA variant of the Type 63 APC, which entered service with the Chinese military some time in the late 1980's and early 1990's. It's unknown exactly how many APC's were converted onto the SPAAG standard nor if the vehicle is still in active service today.
Media
- Skins
- Devblog Images
- Videos
See also
- Other vehicles of similar configuration and role
External links
| Norinco (China North Industries Corporation) | |
|---|---|
| Light AFV/IFV | |
| WZ501 | ZBD86¹ |
| WZ131 | ▂Type 62 · Type 62 |
| WZ211 | Type 63 · ZTS63 |
| WZ502 | ZBD04A |
| MBT | |
| WZ120 | Type 59¹ · ZTZ59A · ZTZ59D1 |
| WZ121 | Type 69 |
| WZ122 | ZTZ88B · ZTZ88A · ZTZ96 · ZTZ96A · ZTZ96A (P) |
| WZ123 | ZTZ99-II · ZTZ99-III |
| WZ1001 | WZ1001(E) LCT · ZTZ99A |
| Tank Destroyers | AFT09 · PTL02 · PTZ89 · ZLT11 |
| SPH | PLZ83 |
| SPAA | ZSD63/PG87² · PGZ09 · PGZ04A |
| Export | |
| WZ121 | Type 69-IIa · T-69 II G |
| MBT2000 | MBT-2000 · Al-Khalid-I |
| MBT3000 | VT4A1 |
| Other | WMA301 · WZ305 |
| ¹ License production / Reverse engineered · ² Field modifications | |
| China anti-aircraft vehicles | |
|---|---|
| Radar SPAAG | PGZ09 |
| Gun and Missile SPAAG | PGZ04A |
| Missile SPAA | Antelope |
| Other | ZSD63/PG87 · ZSL92 · WZ305 |
| Germany | ␗Sd.Kfz.222 |
| North Vietnam | Phòng không T-34 |
| USA | CCKW 353 (M45) · ␗M42 |
| USSR | Tor-M1 |


