Location editor
Instrument Panel and Functions
The basic instrument for work with locations is the Landscape Panel.
| The Landscape Property Panel “P” - this button opens up the landscape editing panel in the right half of the screen. | |
| Hill up/Draw mask mode “1” - this button changes the cursor to the hill up mode on the heightmap (a red sphere instead of a cursor). In the mask editing mode, this button draws a mask (a purple sphere instead of a cursor). The size of the cursor changes with the keys “[“ and “]”. | |
| Hill down/Erase mask mode “2” - this button changes the cursor to the hill down mode on the heightmap (a red sphere in place of a cursor). In the mask editing mode, this button erases the mask (a purple sphere in place of a cursor). The size of the cursor changes with the keys “[“ and “]”. | |
| Align mode/ “Finger” Mode when editing masks “3” - this button changes the cursor to the align mode in the heightmap. In the mask editing mode, it acts as “finger” instruments (they spread the current color). | |
| Smooth/Blur Mode “4” - this button changes the cursor to the landscape smoothing mode. In mask editing mode, it blurs sharp boundaries. | |
| Calculate lighting mode “5” - this button calculates shadows in places where they will be drawn with a brush. This is a handy tool, if you don’t want to recalculate the lighting for the whole level (which could take a while), but rather want to see how your changes in landscape influence the play between light and dark. | |
| Apply script mode “6” - this button applies script changes (new landclasses, changing rules of generation) in places where they will be drawn with a brush. It is not necessary to generate all masks for the whole level if you changed something in the script, because it could take a long time. Spreading the brush in areas of interest to you, you can see whether your land classes will work correctly much more quickly. | |
| Select Mode“Q” - this button selects objects without applying transformations. | |
| Move Mode “W” - this button allows you to either move selected objects, or select them and move them immediately. The “Shift” key allows you to clone objects when this mode is chosen. | |
| Move over surface mode “Alt-Ctrl-W” - this allows you to move objects along the landscape. | |
| Rotate Mode “E” - this button allows you to rotate a selected object. If several objects are selected, then the rotation will occur with respect to pivot of the first object selected. The “Shift” key allows you to clone objects when this mode is chosen. | |
| Scale Mode “R” - this button allows you to scale an object along one, two, or all three axes. If several objects are selected, each axis will scale with respect to its own center. The “Shift” key allows you to clone objects when this mode is chosen. | |
| Drop Object “Ctrl-Alt-D” - this drops a selected object onto the collision. | |
| Select objects by name “H” - this button opens the panel to select objects by their name. | |
| Show/hide an object’s properties “P” - this button shows (or hides, if it is already open) the property panel of a selected object in the right half of the screen. | |
| Hide splines “Ctrl-0” - this hides all splines on location. Note that this option does not affect export. | |
| Select points only “1” - in the selecting and editing modes, only spline points in polygons will be selected. | |
| Select splines only “2” - in the selecting and editing modes, only splines and polygons will be selected (because polygons are, in fact, only closed splines). | |
| Select entities only “3” - in the selecting and editing modes, only individual entities will be selected. (Entities placed from landclasses, splineclasses, polygons, as well as dynamic entities placed in the mission editor will not be selected). | |
| Create an entity - open the object creation panel, where you can choose the asset, which will be inserted into the level. | |
| Create a spline - open the asset selection panel for splines. In contrast to the creation of an entity, it is possible to create an empty spline, without assets in this mode. | |
| Create a polygon - open the asset selection panel for polygons. It is possible to create an empty polygon without assets, just as in the splines mode. | |
| Refine a spline - this allows you to create additional points on splines/polygons. | |
| Split a spline - divides a spline in selected point(s). If the polygon has been selected, create a smaller polygon, closed at a chosen point, and a spline, extending from this point to the next. | |
| Split a polygon - this allows you to select two arbitrary points on a polygon, between which a segment will run, thereby splitting the polygon into two new ones. Both polygons will inherit their parent properties. | |
| Reverse a spline - this deploys directed spline classes in the opposite direction. If a spline class is not symmetrical (it was placing A assets on the right side and drawing B texture on the left, for example), then it will in turn mirror the spline. (The A assets will be on the left, while the B texture on the right). | |
| Close a selected spline - this closes a selected spline (without making it a polygon). | |
| Un-close spline at a selected point-this divides a closed spline at the selected point. | |
| Use manual objects/geometry updates for splines/polygons-this switches the editor to the manual object update mode, arranging them by means of splines and polygons. These objects are drawn in real time by default. | |
| Manual spline\poly obj\geom update “F1” - when enabled, this button will update objects created with splines and polygons. | |
| Rebuild a spline’s bitmask “F2” - this button updates masks, through which splines add and remove assets. |
Now let’s have a look at the Landscape Properties Panel, which can be seen on the right:
By using the first tab “Export Parameters,” we can select the method of landscape export. In the War Thunder project, we always export our landscape as an optimized landmesh.
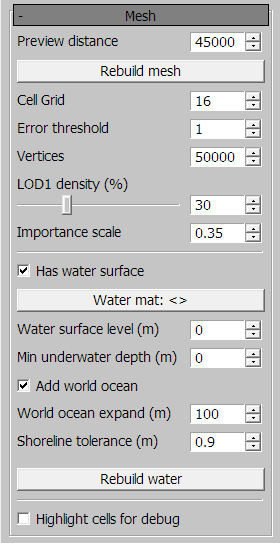
The second tab is used for the creation of landmeshes. A landmesh is a geometrical landscape composed of triangles, created by an imported or painted heightmap.
- The first row “Preview Distance” sets the distance from which the landmesh will be visible in the editor. This does not influence the export in any way and is only needed to optimize the performance of the editor.
The button “Rebuild mesh” recreates a landmesh. It is necessary to click on this if you have made any changes in the heightmap and wish to understand how exactly these changes were transferred to the landmesh.
Next come landmesh settings:
- The quantity of cells in a landmesh: The Cell Grid cannot be changed.
- Errors threshold: The smaller this number, the more uniform the mesh wireframe will be.
- Vertices: The more vertices you have in a landmesh, the more accurate it will be. The recommended maximum threshold is 200,000. Remember that a large number of points may negatively affect location performance.
- LOD1 Density (Level of Detail): This specifies the percentage of points from the original landmesh that will remain in the first LOD. (This is a simplification of the geometry from itself). It is recommended to place the lowest value as possible at which changes will not be noticeable.
- Mask Importance Scale: this tells how many times places, marked by the mask importance scale, should transmit more accurately to the heightmap.
Next comes a 3d water block.
- It begins with the water surface tab, which creates the surface of the water with material from the next button. This surface automatically expands onto the full heightmap, plus ‘world ocean expand’.
- The Water Mat specifies the material of worldwide oceans.
- Water Surface Level: This specifies the height at which the surface of the water is drawn. The landmesh divides according to this height, if the “Add World Ocean” box is checked on.
- Minimum Underwater Depth: All points, located very close to the water surface, will be lowered on the value below in order to avoid “flicker” along the shoreline.
- The “Add World Ocean” Check box: If it is active, the landscape surface will split into two parts — an underwater and an above water part (it's made for performance optimization and to get rid of water “flicker” when viewed from a great height).
- World Ocean Expand: This stretches the surface of the water at a given distance from the edge of the heightmap (so that the player, having flown to the edge of a location, doesn’t see the end of the water surface).
- Shoreline Tolerance: The maximum distance between two points on the shoreline after separating a landmesh. A smaller value creates a more accurate shoreline, but could affect performance.
- The next checkbox is “Highlight cells for debug”. This allows you to see each cell in a landmesh and does not influence the export.
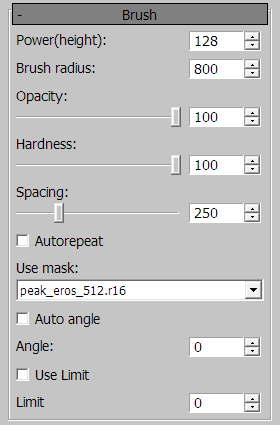
- The next box is responsible for the brush settings (and can also be called up by pressing and holding “Tab”).
- Power: Affects how strongly the terraforming brush presses on the landscape. (If you edit the mask, this influences on opacity).
- Brush Radius: This sets the brush radius.
- Opacity: This influences the brush opacity in mask mode and multiplies (as a percentage) the height in terraforming mode.
- Hardness: This indicates how sharp are the brush edges.
- Spacing: This specifies the distance between brush strokes. To create an uninterrupted line, this number should be twiceas large as the brush radius at maximum, though preferably smaller.
- Autorepeat: In the landscape editing mode, this allows you to make hills/hollow higher|lower than Pwer value.
- Use Mask: This allows you to draw not only using a round brush (the default one), but to use additional mask brushes. The additional mask files can be placed in“drive:\gamefolder\WarThunderCDK\dagor3_cdk\commondata\brushes”. File format is *.r16
- Apply Once: This allows you to use the brush once per click, regardless of whether the muse is moving or not.
- Angle: This rotates the mask at a given value in degrees.
- Use Limit: In the terraforming mode, this specifies the maximum value in meters (the limit), above which the brush will not work on the landscape.
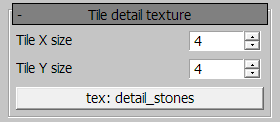
Tile detail texture: In this box, you can customize the behavior of detail texture (which is placed on top of all textures within the landscape, excluding the vertical texture to give more detail on medium to short distances.)
Tile X size, Tile Y size: This specifies the size in meters for the detail texture.
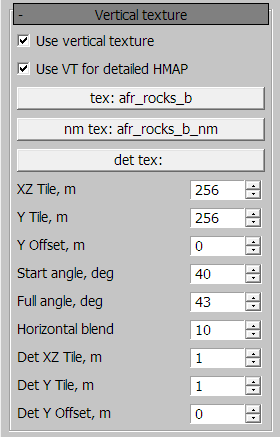
Vertical Texture Box: This is a special texture, drawn on all sufficiently steep slopes in the landscape (parameters are set within the box).
- Use Vertical Texture: This activates or deactivates the use of vertical texture at a location.
- Use VT for Detailed HMAP: This allows you to disable the use of vertical texture on detailed part of the landscape.
- Tex: Loads the texture as vertical.
- NM Tex: Used for normal map for vertical texture.
- Det Tex: This allows you to use an separate detail texture for a vertical texture. (By default one detail texture is used for the whole location).
- XZ Tile: This specifies the size of the vertical texture horizontally in meters.
- Y Tile: This specifies the size of the vertical texture vertically in meters.
- Y Offset: Specifies the texture offset in respect to zero.
- Start Angle: This is the angle in degrees from which the vertical texture will begin to appear.
- Full Angle: This is the angle in degrees at which the vertical texture will be appear in full.
- Horizontal Blend. Vertical texture is placed without unfolding the geometry, it is in fact projected along two mutually perpendicular planes. On some corners, this junction will be very noticeable. The horizontal blend parameter is responsible for the sharpness of the junction. (The closer this number is to zero, the sharper the junction).
- Det XZ Tile. M: This specifies the size of the detail texture horizontally in meters.
- Det Y Tile. M: This specifies the size of the detail texture vertically in meters.
- Y offset: This specifies the shift of the detail texture with respect to zero.
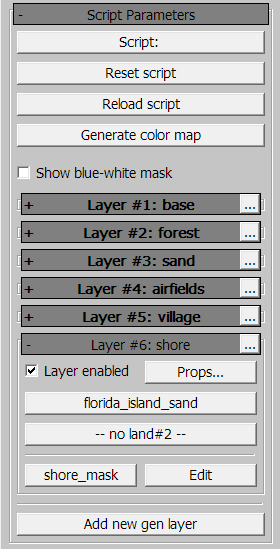
Script Parameters and the Generation of Land Classes: This is one of the most important components of the editor.
- Script: This button is for loading the script for Land Classes.
- Reset Script: This allows you to erase the script and its influence on the landscape.
- Reload Script: This reloads the script, (it is needed in case the script changes).
- Generate Color Map: This applies all script settings or layers, creating a color map for the entire level.
- Show Blue-White Mask: This check box allows you to visualize the process of drawing masks. When checked the masked portions become white and the rest of the surface becomes blue.
- Further, all layers used at a given location are shown. The layers are drawn up in order from top to bottom—the first layer is the very first shown. The “Add New Gen Layer” button adds a following layer.
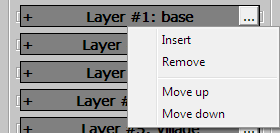
- Layer Options: This opens a drop-down menu in which you can insert a new layer above the one selected, erase the current layer, and move the current layer up or down.
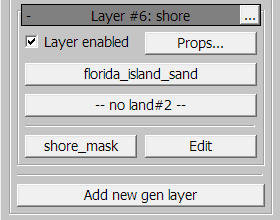
- Layer Enabled: This check box enables or disables the current layer from the total generation.
- Props: This calls up the menu for layer properties and rules.
- Two Land Class buttons allow you to use a land class in the first or second layer. Be aware that Land Class 2 is not used into the texture, and its objects are disabled on slower computers. Therefore, it is necessary not to place important gameplay elements there. Land Class 2 was created for filling a level with fine detail—bushes, stones, etc.
- The mask button allows you to change the mask layer or create a new one.
- The “Edit” button switches you to the edit mode for the current mask layer.
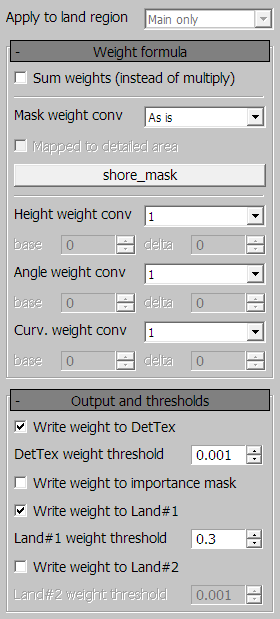
Let’s now take a look at the Props menu for a layer. The button “Apply to Land Region” indicates where a given layer will be applied — to the main landmesh (Main Only), to the detailed heightmap (Detailed Only), or to the entire location (Main and Detailed).
Next comes the Weight Formula box. Regardless of the method used for counting, a final weight of 0 indicates that in a given pixel a completely transparent and undrawn layer is found. A weight of 1 indicates a completely opaque, drawn layer.
The “Sum Weights” check box switches the weight system so that all components are summed up (values greater than 1 are discarded). By default, all components are multiplied. In practice this means thatim "Multiply" mode a value of 0 in any component makes a final weight of zero for the entire land class (nothing is drawn); in "Sum weights" mode, the addition of a 0 simply does not affect the final weight of the entire land class in this pixel.
Next come the components of the Sum Weights: Mask Weight, Height Weight, Angle Weight, and Curv. Weight. Each component can have up to four values—“0”, “1”, “As Is”, and “Smooth Step.”
You can choose either the mask will be applied to the entire landscape or just to its detailed area (Mapped to Detailed Area).
The “Smooth Step” mode is needed in cases when one land class mixes poorly with others (cities and forests, for example).
The settings are absolutely the same with the remaining components — if the “As Is” or “Smooth Step” mode is selected, you can indicate the values for the Base and the Delta. The weight of each component increases in the range from base to base+delta (if Delta is number negative than to Base-Delta). So, for a positive Delta: if a component is smaller than the Base, the weight of the component is equal to 0. If a component is larger than Base+Delta the weight of the component is equal to 1. Now, for a negative Delta: if a component is larger than the Base, the weight is equal to 0, and for all values smaller than Base+Delta, the weight is equal to 1. The heights are measured in meters, angles are in degrees, and the curvature in relative terms (from negative infinity to zero for a concave surface, and from zero to positive infinity for a convex surface. A value of 0 equates to a completely flat surface).
The next box is for Output and Thresholds.
- Write Weight to DetTex: This shows whether or not Land Class 1 will be drawn on the texture of a landscape.
- DetTex Weight Threshold: This indicates at what minimum weight value the texture will begin to be drawn.
- Write Weight to Importance Mask: This specifies whether or not it is necessary to transfer weight values to the importance mask of the heightmap. The heightmap will triangulate to the landmesh with more detail where the importance mask is drawn.
- Write Weight to Land#1: This indicates whether or not it is necessary to create objects in Land Class 1 where the weight is larger than that given.
- Land#1 Weight Threshold: This indicates at what minimum weight value objects will to be created.
- Write Weight to Land#2: This indicates whether or not it is necessary to create objects in Land Class 2 where the weight is larger than that given.
- Land#2 Weight Threshold: This indicates at what minimum weight objects will begin to be created.
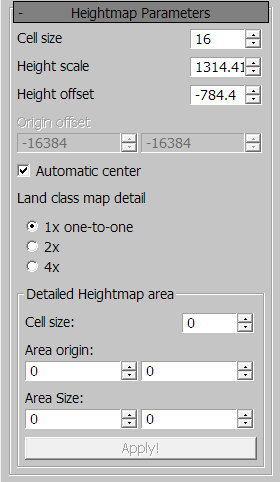
Heightmap Parameters:
- Cell Size: This specifies the size of one cell in the heightmap. This parameter directly influences the size of the location, which is equal to (The size of the cell) x (The size of the heightmap). In the example level given here, the size of the heightmap is 2048 pixels. So our location is 2048x16=32768 meters (in length measured by one side of the square). The cell size should be one of the squares of 2 (numbers in the sequence 2, 4, 8, 16, 32, etc.).
- Height Scale: This is the distance from the lowest point to the highest point on the heighmap.
- Height Offset: This is the offset of the lowest point on the heightmap in relation to the coordinate zero.
- Origin Offset: This is an option, which allows you to move the the heightmap (and the landmesh after it is counted), if necessary. By default, this option is inactive.
- The check box “Automatic Center,” if unchecked, allows you to use Origin offset (it is checked by default).
- Land Class Map Detail: These radio buttons allow you to increase accuracy of landclass' generated objects, and masks. You can increase the detail by 2 or 4 times if neccesary.
- Detailed Heightmap Area: This allows you to create an additional, highly detailed heightmap within the original. You should only use this ability for tank/aircraft locations.
- Cell Size: This specifies the cell size of a detailed heightmap. It should be taken into consideration that the cell size in a detailed heightmap affects not the size of the area, but rather the size of the heightmap file itself. Our game is supported on a large range of devices, so the size of a detailed heightmap cannot be larger than 2,048x2,048 points. For example: For a location with a size of 32,768x32,768 meters, the detailed area occupies 1/8 of its entire size—4,096x4,096 meters. The maximum size of a cell should be 2 in order to achieve a heightmap of 2,048x2,048 points.
- Area Origin: This specifies the coordinates of the lower left corner for a detailed location (if looking at the location from top to bottom).
- Area Size: This specifies the sizes of a detailed area in meters. Attention! You have to remember that detailed area must be a square and must be made up of the complete number of cells from the large heightmap. (It comes in handy to look at the cells, enabling the option “Highlight Cells” in the mesh settings tab). So, the detailed area can occupy 1, 4, 8, 16, etc. squares.
- The button “Apply” applies any changes introduced into the detailed heightmap.
- Render Menu: This menu has the service options for the render used in the editor. They do not affect level export in any way. The only parameter that can be used in this menu are the radio buttons for “Show Heightmap”: “initial” and “final.” So you can choose whether to show changes in hetightmap, coused by modifying splines and polygons or not.
- The tab “Normalmap” consists of a single button — “Calculate normalmap.” It is necessary to click this if large changes were made to the heightmap, and the normalmap ceased to correspond to it.


