Crusader Mk.II (France)
| This page is about the light tank Crusader Mk.II (France). For other versions, see Crusader (Family). |
Contents
Description
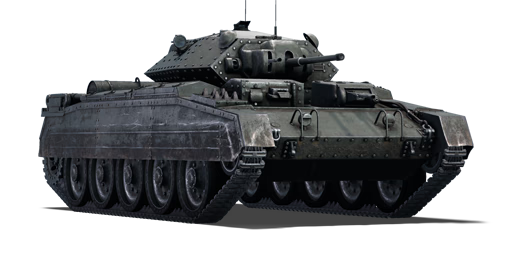
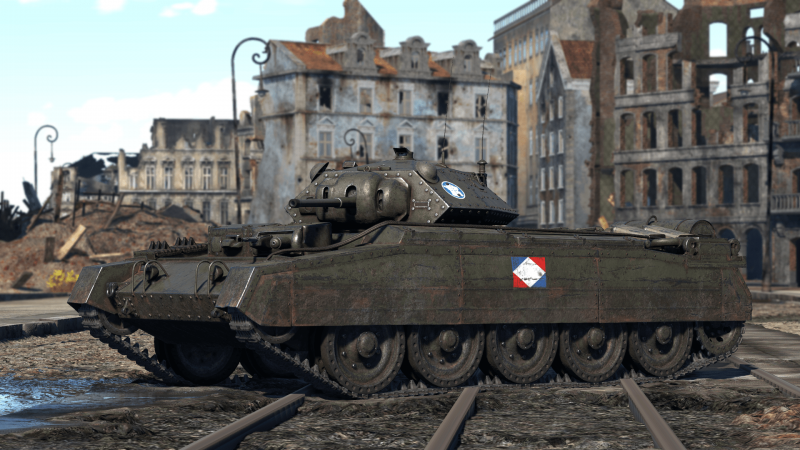
Several variants of the British Crusader cruiser tank family, notably the Crusader II and Crusader III, served with the Free French Forces. During the early stages of World War II, France was stripped of all equipment due to German occupation. The surviving forces received some of the Allies' tanks. The 1st autonomous tank company of the Free French Forces operated around 10 Crusader IIs and 18 Crusader IIIs.
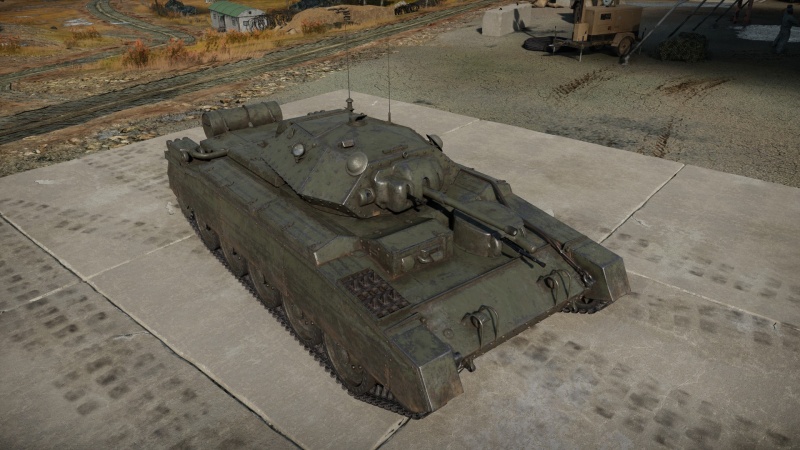
Introduced in Update 1.97 "Viking Fury", the ▄Crusader II is a capable short-range light tank. It is mounted with a fast-firing 40 mm Ordnance QF 2-pounder tank gun, which is suitable for destroying tanks with a tightly packed interior and tank crews who are close to one other. Thanks to its rapid reload, primitive vertical gun stabilizer, and excellent handling, it is a fun light tank to play with. As cross-country performance is much better and the vehicle does not slide after sudden breaking, handling is much enhanced over the A13 cruiser tanks. Driving and fighting in the open field should be avoided due to lack of armour. Players should always look for cover or the terrain that hull-down tactics, which this tank excels at, may be used. The tank also boasts excellent gun depression and a small turret.
General info
Survivability and armour
The Crusader II's armour is of a normal light tank's armour, which is very weak. The 20 mm glacis on the frontal hull is the thickest section, and it can only bounce reserve level vehicles' shells (e.g. Ha-Go), whereas anything better (e.g. Chi-Ha Kai, M5A1) can easily pierce through it. The turret front, at 30 mm, isn't much better. However, if you're lucky, the huge curved cylindrical gun mantlet may be able to bounce poorly directed shots. The turret's sharply slanted sides may also deflect some. However, normal guns at this BR will still easily penetrate the Crusader II's armour from any angle and range. The side armour (14 + 4 mm) are much weaker, allowing even heavy machine gun bullets to get through, though the sideskirts can detonate HE and HEAT rounds earlier to protect the Crusader. One positive aspect is that the MG turret on the frontal hull acts as additional spaced armour and can prevent some shells from coming out the back of it and entering the hull armour behind it, by sacrificing the machine gunner inside.
Because there is considerably large separation between the driving compartment and the turret compartment, penetrating solid rounds or small calibre shells will usually only kill 1-2 crew members. As a result, vehicles with low-calibre weaponry (such as M5A1, M22) will take a few rounds to finish the Crusader II. However, shrapnel from explosive or bigger calibre rounds will readily pass through the gap and injure any personnel around/behind them. The three turret crew members are crammed into a confined space and are vulnerable to being wiped out by a single round. As such, the Crusader II, like every other light tank, has a poor survivability rating.
Armour type:
- Rolled homogeneous armour (hull, turret, MG turret)
- Cast homogeneous armour (gun mantlet, machine gun mantlet, driver viewport)
- Structural steel (side skirts)
| Armour | Front | Sides | Rear | Roof |
|---|---|---|---|---|
| Hull | 20 mm (33°) Upper plate 18 + 22.2 mm (1°) Driver viewport frame 32 mm (cylindrical) Driver viewport 20 mm (61°) Upper glacis 20 mm (27°) Lower plate 20 mm (64°) Lower glacis |
14 mm Top 14 + 14.27 + 4 mm Bottom |
14 mm (44-51°) Top 14 mm (14°) Bottom 14 mm (51°) Lower glacis |
9 mm (5-12°) Front glacis 12 mm (9-19°) Driver hatch 7 mm Centre and Rear - Centre 7 mm (13°) Rear - Sides 7 mm (6°) Engine vents 4 mm Sides - Spaced armour compartment 7 mm Sides - Tracks |
| Turret | 31.75 + 19.05 mm (11°) Turret front 30 mm (cylindrical) Gun mantlet |
14 mm (49°)Top 14 mm (41°) Bottom |
17 + 12.7 mm (36°) Top 9 mm (66°) Bottom |
12.7 mm (8-13°) |
| MG Turret | 30 mm (1-32°) Turret front 20 mm (cylindrical) Gun mantlet |
30 mm (1-3°) | 30 mm (5-6°) | 9 mm (2-5°) |
Notes:
- Suspension wheels and tracks are 15 mm thick.
- Belly armour is 10.35 mm thick in the front half and 6.35 mm thick in the rear half.
- The armour plates on the sides of the hull are space and can defeat HEAT projectiles.
Mobility
The Crusader II overall has good manoeuvrability. It boasts a 20 power-to-weight ratio, allowing it to accelerate quite quickly on any terrain. In a rather short amount of time, it can attain speeds of around 40 km/h on hard terrain and 30 km/h on loose ones. It also has excellent hull traverse and can turn the hull without needing to go forwards or backwards first. This allows the Crusader II to move tactically as well as strategically in a swift manner, which is essential if you need to flank a well-protected adversary, such as a Valentine.
The downside mainly lies in its slow reverse speed. The reverse gear has a maximum of just -7 km/h, which is insufficient to get the Crusader out of a threatening position in time. Often, the Crusader can only withdraw by turning the hull around. This can happen often due to the fact that the Crusader is fast in the forward direction, the player might only consider being offensive but not retreating routes. When the Crusader turns on the move, it loses a lot of speed especially when at high speed. Its highest speed is also quite limited: at 43 km/h it will not be as quick as certain other light tanks, such as the BT-7, M22, and Stuarts, which can reach speeds of over 50 km/h. Though the Crusader II's speed is generally adequate, it is still not fast enough to cap a location in the middle of the map at the start of the match. It can get dangerous: either speedier allies or faster adversaries will arrive sooner.
| Game Mode | Max Speed (km/h) | Weight (tons) | Engine power (horsepower) | Power-to-weight ratio (hp/ton) | |||
|---|---|---|---|---|---|---|---|
| Forward | Reverse | Stock | Upgraded | Stock | Upgraded | ||
| Arcade | Expression error: Unexpected * operator. | 527 | Expression error: Unexpected round operator. | __.__ | |||
| Realistic | 301 | Expression error: Unexpected round operator. | __.__ | ||||
Modifications and economy
Armaments
Main armament
The Crusader II is equipped with a formidable, but beginner-friendly, 40 mm QF 2pdr gun. It reloads swiftly, at 3 seconds, like the American 37 mm and Soviet 45 mm cannons, allowing the Crusader to fire many shots at a target in just a few seconds. With a gun depression of -15 degrees, the Crusader will be able to aim its gun down over most hills, offering it excellent map adaptability regardless of it being urban or mountainous. The Crusader's turret rotates at a fast rate of roughly 25°/s, allowing it to efficiently cope with surprise strikes. This fast rotation will be more useful when engaging vehicles with slow turrets, like M22 and Sd.Kfz.234/1. Finally, once the Crusader II is travelling below 7 km/h, a shoulder stabiliser will assist speed up the aiming process, which is beneficial for short stop-and-shoot scenarios and CQC, especially against non-stabilized tanks like the Pz.IIIs. All of these characteristics contribute to the Crusader's excellent battlefield adaptability.
The only downside about the Crusader II's firepower is the lack of post-penetration damage of its shells. Most shells are solid, thus dealing damage in a narrow path. Even the explosive APHE will struggle to knock out some tanks with one hit.
| 40 mm QF 2-pounder | Turret rotation speed (°/s) | Reloading rate (seconds) | |||||||||||
|---|---|---|---|---|---|---|---|---|---|---|---|---|---|
| Mode | Capacity | Vertical | Horizontal | Stabilizer | Stock | Upgraded | Full | Expert | Aced | Stock | Full | Expert | Aced |
| Arcade | 110 | -15°/+20° | ±180° | Shoulder | 34.3 | 47.4 | 57.6 | 63.7 | 67.8 | 3.64 | 3.22 | 2.97 | 2.80 |
| Realistic | 21.4 | 25.2 | 30.6 | 33.8 | 36.0 | ||||||||
Ammunition
- Shot Mk.1 AP/T: it is just enough to penetrate most tanks the Crusader II faces, like Chi-Ha, Pz.III, M5A1, etc. Usually these common opponents can be wiped out with 1-3 rounds. Because this stock shell has mediocre penetration, it's recommended to ditch it when better researchable shells become available.
- Shell Mk.1 AP/T: this APHE, which has a 20 g explosive filler and a maximum penetration of 66 mm, is the best ammunition against lightweight opponents, for example the ones mentioned above. This shell is capable of knocking out smaller vehicles with cramped crew (such as the BT-5 and M22). However, explosives will suffer a lot when dealing with large tanks like the LVT series.
- Shot Mk.IXB APCBC/T: you will very likely encounter better-armoured opponents such as the early M4, T-80, Pz.III L, and M3 Lee. This shell will now be very useful. With a maximum penetration of 89 mm, it can pierce practically all tanks' weak points as well as the areas that the other shell types can't (e.g. M4 turret side (76 mm), KV-1 hull side (75 mm)). The Crusader II can swiftly punch many holes in the adversary with good marksmanship and its fast 3-second reload rate. Because this APCBC is a solid shell with no explosives, you must know the weak spots as well as crew placement of popular tanks.
- Shot Mk.1 APHV/T: when compared to the preceding shell types, this shell only gives a little higher velocity but no greater penetration or explosive warhead, rendering it nearly worthless if you have access to the previous shells.
| Penetration statistics | |||||||
|---|---|---|---|---|---|---|---|
| Ammunition | Type of warhead |
Penetration @ 0° Angle of Attack (mm) | |||||
| 10 m | 100 m | 500 m | 1,000 m | 1,500 m | 2,000 m | ||
| Shot Mk.1 AP/T | AP | 72 | 68 | 52 | 37 | 27 | 19 |
| Shot Mk.IXB APCBC/T | APCBC | 89 | 86 | 77 | 66 | 57 | 50 |
| Shot Mk.1 APHV/T | AP | 80 | 75 | 58 | 41 | 30 | 21 |
| Shell Mk.1 AP/T | APHE | 66 | 62 | 49 | 36 | 26 | 20 |
| Shell details | ||||||||||||
|---|---|---|---|---|---|---|---|---|---|---|---|---|
| Ammunition | Type of warhead |
Velocity (m/s) |
Projectile mass (kg) |
Fuse delay (m) |
Fuse sensitivity (mm) |
Explosive mass (TNT equivalent) (g) |
Ricochet | |||||
| 0% | 50% | 100% | ||||||||||
| Shot Mk.1 AP/T | AP | 792 | 1.08 | - | - | - | 47° | 60° | 65° | |||
| Shot Mk.IXB APCBC/T | APCBC | 792 | 1.24 | - | - | - | 48° | 63° | 71° | |||
| Shot Mk.1 APHV/T | AP | 853 | 1.08 | - | - | - | 47° | 60° | 65° | |||
| Shell Mk.1 AP/T | APHE | 792 | 1.08 | 1.2 | 9 | 20.9 | 47° | 60° | 65° | |||
Ammo racks

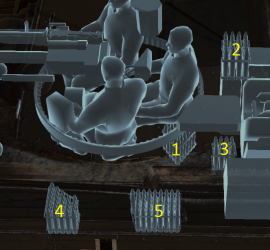
| Full ammo |
1st rack empty |
2nd rack empty |
3rd rack empty |
4th rack empty |
5th rack empty |
Visual discrepancy |
|---|---|---|---|---|---|---|
| 110 | 89 (+21) | 67 (+43) | 45 (+65) | 23 (+87) | 1 (+109) | No |
Notes:
- Racks disappear after all shells in the rack have been shot or loaded.
- Turret & center empty: 45 (+65) shells.
Machine guns
| 7.92 mm BESA | ||||
|---|---|---|---|---|
| Mount | Capacity (Belt) | Fire rate | Vertical | Horizontal |
| Hull | 4,950 (225) | 600 | ±10° | ±50° |
| Coaxial | 3,375 (225) | 600 | N/A | N/A |
The small calibre of the BESA machine guns makes them largely ineffective against all armoured vehicles but the ones with an open compartment. They still can be used to ping targets as a rangefinding help or to mow down minor obstacles blocking your line of sight.
Usage in battles
The Crusader Mk II is a quite effective low-range light tank, it is equipped with a fast firing 40 mm cannon, which is excellent at taking out tanks with a cramped interior and the crew close to each other, very fast reload, gun stabilization and its good handling makes up for shell doing not so much damage because of lack of the good explosive filler compared to other tanks in its battle rating range and even the last unlockable shell can take out enemy tanks so easily.
Since it is a light tank it does not have so much armour, driving and fighting in the open field should be avoided whatever it is possible, unless there is enough of cover or the terrain shaped in a way so it is possible to use the hull down tactics at which this tank excels, because of its very low profile, excellent good elevation and the turret shape which makes it hard to hit.
The combination of manoeuvrability, quite high speed and good acceleration makes it good at flanking and rushing the enemy positions, max speed could seem to be inferior to other light tanks and make think that it is not a good tank, but it is compensated by its acceleration, it can get to the high speed very fast and the turning ability is very good at any speed, except for moving in the same place, tank is also very stable and pleasant to drive.
Any frontal engagement with the enemy SPAAG units should be avoided, it can work only at the long distance and when flanking them. Dealing with other light tanks should not be an issue, the 40 mm cannon lacks in accuracy but the reload speed if fast and hitting the target should not be an issue at the close distance. Fighting against the medium tanks and other bigger vehicles could be a problem, against them is always required to know the crew position in the enemy tank and aim for them and since all available shells do not a lot of damage in most cases only one crew member will be falling unconscious, this means destroying the medium tank can take a lot of time and make you and your position exposed to the enemy team, long range engagements against them should be avoided.
Pros and cons
Pros:
- 5-man crew increases survivability
- Sloped/curved armour might bounce shells from certain angle
- High penetration 2-pdr cannon, great against regular opponents like M3A1, I-Go, Pz.II
- Low profile, harder to be seen and hit
- Very good acceleration with nice handling
- Additional 4 mm side skirts, useful against HE and HEAT (e.g. from Sturmpanzer II)
- Numerous smoke grenades which can be fired one at a time
Cons:
- Overall weak armour, common enemies (e.g. Pz.II, Pz.III, BT-5) can penetrate it easily
- Lower maximum speed than other light tanks like BT-5, M22
- Most shells have no explosive filler and can have trouble killing larger tanks (e.g. LVT(A)), pinpoint shots are needed
- The crew is packed together and can be knocked out easily by a single large-calibre shell, notably the early Pz.IV models
- Low -7 km/h reverse speed limits its agility and survivability
History
Development
In 1938, the General Staff of the British Army requested for a cruiser tank that was lighter and more affordable than the heavier A16 cruiser design developed by Nuffield Mechanizations & Aero. One of these designs was the designation Tank, Cruiser Mk.V based off the A13 cruiser tanks, named the "Covenanter", and Nuffield was invited to become part of its development team, but they refused due to interest in developing their own cruiser tank. Their tank was designated the Tank, Cruiser Mk.VI Crusader and fell under the General Staff specification of A15. The Crusader was a parallel design to the Covenanter, but was ready six weeks earlier than the Covenanter despite starting at a later time. The Crusader was adopted into service with the British Army in 1941 and the 5,300 units were manufactured between 1940 to 1943.
Design
The Crusader features a new design that differs from its cruiser tank predecessors. The Christie suspension system on the Crusader had five road wheels for it instead of the usual four, which improves weight distribution of the increased 20 ton weight of the Crusader compared to the 14 tons of the A13 cruisers. The engine, steering system, and cooling system on the Crusader was different as well, but the Covenanter and Crusader use the same main turret. The polygonal shape of the turret gives the crew inside more room for the turret ring diameter.
The Crusader Mk.I and Mk.II were equipped with the 2-pounder, which was aimed by the gunner inside with a padded shaft that allows them to elevate the gun by simply adjusting his own height. Later in the war where an up-gun of the tank armament was necessary and newer tanks such as the Cromwell was delayed, the Crusader was upgraded into the Crusader Mk III variant with a 6-pounder instead, which restricted turret space, requiring the turret crew to be reduced from three to two. These saw first action the Second Battle of El Alamein in October 1942.
Combat Usage
The Crusader first saw action at North Africa, right after the British had been pushed back to the Egyptian border by Axis forces. The Crusaders were part of the huge shipment in the Malta Convoys to reequip the British forces there. Enough Crusaders arrive that the entire 6th Royal Tank Regiment was refitted with them, which joined up with the 2nd Royal Tank Regiment to form the 7th Armoured Brigade "Desert Rats". The brigade's first action was in Operation Battleaxe, though it was delayed due to adapting the tanks for the desert environment. The operation, which called for the relieve of the siege of Tobruk in June, was initiated in June to which 11 Crusader tanks were lost to anti-tank guns, plus many more to mechanical faults. While more Crusader tanks came in to reinforce the cruiser tank forces, there were never enough to supply the continuously expanding armoured units as 7th Brigade was combine with the 7th Hussars, the 2nd Armoured Brigade was added to the 7th Armoured Division, and the 8th Hussars was combined with the 4th Armoured Brigade. Overall, the Crusaders proved effective in the North African Campaign, the Crusader was faster than any tanks on the opposing side and the 2-pounder was lethal to the Panzer III, but the tank suffered from its thin armour, mechanical problems in the desert, and the growing deficiency of the 2-pounder, which didn't have enough range to destroy farther tanks. The Crusader design also caused the ammo racks on the tank to easily ignite due to unprotected racks and shot traps on the turret design. Anti-tank guns continue to be the main reason the Crusader units suffer losses, rather than to enemy tanks.
By the end of 1941, only the 2nd Armoured Brigade retained the Crusaders, the rest of the other tank units were being refitted with better tanks, such as the M3 Grant medium tank from the American Lend-Lease. Crusader units were also refitted with the more powerful Crusader Mk.III with the 6-pounder, which improved the Crusader's ability to destroy the gradually stronger German tanks. After General Bernard Montgomery took command of the British Army in 1942, more British tank units were reequipped with the Grant and M4 Sherman tanks while the Crusaders were relegated from the front-lines to "light squadrons" meant to flank the enemy and attacked at its exposed sides. When the British 1st Army engaged the Axis at Tunisia, some tank regiments still use Crusaders mixed in with Valentine tanks. These units in the 26th Armoured Brigade, code named "Blade Force", worked alongside the 78th Infantry Division as an independent armoured column. During Tunisia, the 1st Army was already converting the tank regiments into Shermans, but the 8th Army continued to use the Crusaders for much longer, which would see use at the Battle of Wadi Akarit and Mareth Line.
After the North African Campaign, the Crusaders no longer saw any use in the front-lines and were used in other roles such as gun tractors with 17-pounders or anti-aircraft mounts such as the Crusader AA Mk I and Mk II Some Crusader tanks equipped the tank regiments that stayed back at the British Homelands such as the 11th Armoured Division.
Survivors
About 21 Crusaders still exist intact in various parts of the world. The most notable places with the Crusaders are South Africa with 8 known survivors, a running Crusader Mk III at Bovington Tank Museum at England, and an anti-aircraft version at Musée des Blindés in France.
French service
The 1st Free French Tank Company was equipped with 14 Crusaders in October, 1942. Each section of 3 had 2 Crusader IIs and 1 Crusader III. They would use these vehicles until May, 1943.
Media
- Skins
- Videos
See also
Links to the articles on the War Thunder Wiki that you think will be useful for the reader, for example:
- reference to the series of the vehicles;
- links to approximate analogues of other nations and research trees.
External links
- [Wikipedia] Crusader tank
- [Tanks Encyclopedia] Cruiser Mk.VI Crusader
- [Military Factory] Cruiser Tank Mk VI Crusader (A15)
| Nuffield Mechanizations and Aero Limited | |
|---|---|
| Cruiser Tanks | |
| Tank, Cruiser, Mk III (A13 Mk I) | A13 Mk I · A13 Mk I (3rd R.T.R.) |
| Tank, Cruiser, Mk IV (A13 Mk II) | A13 Mk II · A13 Mk II 1939 |
| Tank, Cruiser, Mk VI, Crusader (A15) | Crusader II · Crusader "The Saint" · Crusader III |
| Tank Destroyers | Tortoise |
| SPAAs | Crusader AA Mk I · Crusader AA Mk II |
| Export | ▄Crusader Mk.II |
| France light tanks | |
|---|---|
| AMC.34/35 | AMC.34 YR · AMC.35 (ACG.1) |
| H.35/39 | H.35 · H.39 · H.39 "Cambronne" |
| AMX-13 | AMX-13 (FL11) · AMX-13-M24 · AMX-13 · AMX-13 (SS.11) · AMX-13-90 · AMX-13 (HOT) |
| Wheeled | AML-90 · AMX-10RC · Vextra 105 |
| AMD.35 | AMD.35 · AMD.35 (SA35) |
| E.B.R. | E.B.R. (1951) · E.B.R. (1954) · E.B.R. (1963) |
| Other | FCM.36 · R.35 (SA38) · Char 25t · MARS 15 · VBCI-2 (MCT30) |
| Austria | SK-105A2 |
| Great Britain | ▄Crusader Mk.II |
| Netherlands | CV 9035NL |
| USA | LVT-4/40 · ▄M3A3 Stuart |


