Magach 2
| This page is about the Israeli medium tank Magach 2. For other versions, see Magach (Family). |
Contents
Description
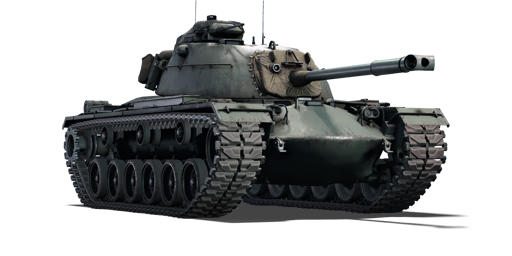
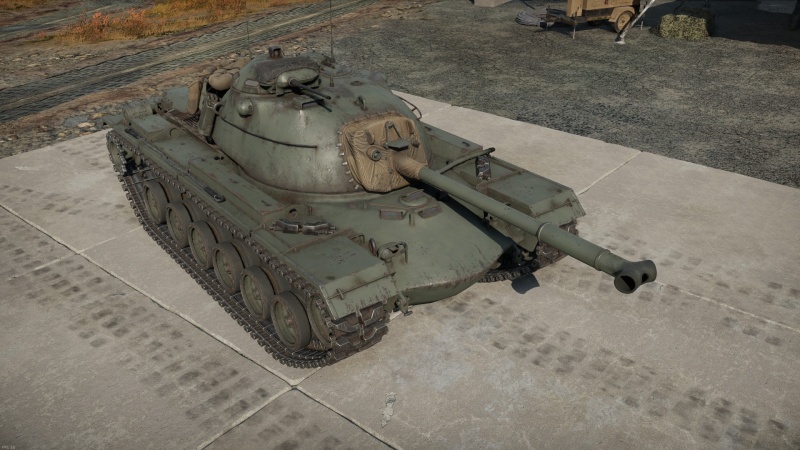
The Magach, is a family of tanks, that derivates from the M48 and M60 Patton with different upgrades to the original models. The Magach 2, is the Israeli service name for the American M48A2C. These tanks were used primarily during the Six Day War against the Egyptian and Syrian forces (which mainly operated the T-54/55). The tanks proved successful in combat, being far superior to the M-51 Super Shermans used by Israel. However, the 105mm gun from this tanks was deemed more reliable against the soviet T-62, which was a response to the American M60.
Introduced in the game during Update "Wind of Change".The Magach 2 is quite a heavy MBT, unlike designs like the Leopard 1. Because of this, the Magach 2 has a decent amount of armour, that while it may not stop any HEAT or APFSDS shell launched at the tank, prevents it from being vulnerable to APHE, APCR and HE, and projectiles shot from 20 or even 30mm autocannons around it's BR. With all it's engine modifications investigated, the Magach 2 is able to keep up with the speed of other MBTs like the soviet T-54/55. It's 90mm cannon is enough to destroy most MBTs with the HEAT shell, however this projectile lacks post penetration damage, and thus a good recommendation is to carry a small amount of APHE shells into battle and use them against light targets from the sides or the back.
General info
Survivability and armour
The armour of the Magach 2 is identical to the M48A1 and M48A2 C. The ammo rack in the turret is removed and the shape of the front hull ammo racks are improved. The front armour is able to handle almost most of the APHE shells it might face, but struggles against HEATFS and APDS rounds. The lower front plate is a big weak spot. The sides are decently armoured, but not thick enough to make angling the hull a valid tactic. Some thin vents on the top of the hull are vulnerable to strafing and bombing runs by enemy aircraft, which may cause engine fires. Overall, the Magach 2 has excellent armour protection for its tier.
Armour type:
- Cast homogeneous armour (hull, turret)
- Rolled homogeneous armour (hull rear, hull rear roof)
| Armour | Front (Slope angle) | Sides | Rear | Roof |
|---|---|---|---|---|
| Hull | 110 mm (59-74°) Upper glacis 110 mm (13-60°) Lower glacis |
76 mm (5-45°) Front 51 mm (0-44°) Rear |
25 mm Top 25 mm (32-62°) Bottom |
110 mm Front glacis (16-31°) 57 mm Crew compartment 30 mm Engine deck 12.7 mm (14°) Engine vents |
| Turret | 83.2-173 mm (0-48°) Turret front 152 + 82 mm (17-26°) Gun mantlet |
69-100 mm (12-36°) | 51-55 mm (2-71°) 25.4 mm (75-82°) Underpart of the turret |
25-69 mm |
| Cupola | 29.7 mm (cylindrical) | 29.7 mm (6-53°) | 29.7 mm (6-53°) | 29.7 mm (50-62°) |
Notes:
- Suspension wheels, tracks, and torsion bars are 20 mm thick.
Mobility
| Game Mode | Max Speed (km/h) | Weight (tons) | Engine power (horsepower) | Power-to-weight ratio (hp/ton) | |||
|---|---|---|---|---|---|---|---|
| Forward | Reverse | Stock | Upgraded | Stock | Upgraded | ||
| Arcade | Expression error: Unexpected * operator. | 1,279 | Expression error: Unexpected round operator. | __.__ | |||
| Realistic | 730 | Expression error: Unexpected round operator. | __.__ | ||||
Modifications and economy
Because the Magach 2 only available ammo at the beginning is APCR the number 1 priority of all players should be upgrading to a better shell. In this case, try to get first the HESH round and then go for the HEAT shell.
The most important upgrades are also the ones for the engine, since the Magach 2 is a bit slow when used in stock. Because of that, players should prioritize upgrading to HEAT shells but when possible, upgrade the transmission, engine and tracks of the Magach 2. The rangefinder is not that necessary because the Magach 2 is better used in frontline combat close to the enemy. But its a good upgrade if you prefer a more passive and calmed play style.
Armaments
Main armament
| 90 mm M41 | Turret rotation speed (°/s) | Reloading rate (seconds) | |||||||||||
|---|---|---|---|---|---|---|---|---|---|---|---|---|---|
| Mode | Capacity | Vertical | Horizontal | Stabilizer | Stock | Upgraded | Full | Expert | Aced | Stock | Full | Expert | Aced |
| Arcade | 64 | -9°/+19° | ±180° | N/A | 22.8 | 31.6 | 38.4 | 42.5 | 45.2 | 9.75 | 8.63 | 7.95 | 7.50 |
| Realistic | 14.3 | 16.8 | 20.4 | 22.6 | 24.0 | ||||||||
Ammunition
| Penetration statistics | |||||||
|---|---|---|---|---|---|---|---|
| Ammunition | Type of warhead |
Penetration @ 0° Angle of Attack (mm) | |||||
| 10 m | 100 m | 500 m | 1,000 m | 1,500 m | 2,000 m | ||
| M332 shot | APCR | 321 | 316 | 292 | 265 | 240 | 218 |
| T142E3 | HESH | 102 | 102 | 102 | 102 | 102 | 102 |
| M82 shot | APCBC | 185 | 182 | 169 | 155 | 142 | 130 |
| M431 shell | HEATFS | 320 | 320 | 320 | 320 | 320 | 320 |
| M71 shell | HE | 20 | 20 | 18 | 17 | 16 | 16 |
| Shell details | ||||||||||||
|---|---|---|---|---|---|---|---|---|---|---|---|---|
| Ammunition | Type of warhead |
Velocity (m/s) |
Projectile mass (kg) |
Fuse delay (m) |
Fuse sensitivity (mm) |
Explosive mass (TNT equivalent) (g) |
Ricochet | |||||
| 0% | 50% | 100% | ||||||||||
| M332 shot | APCR | 1,249 | 5.7 | - | - | - | 66° | 70° | 72° | |||
| T142E3 | HESH | 792 | 10.6 | 0.1 | 4 | 3,050 | 73° | 77° | 80° | |||
| M82 shot | APCBC | 853 | 10.91 | 1.2 | 14 | 137.2 | 48° | 63° | 71° | |||
| M431 shell | HEATFS | 1,216 | 5.8 | 0.05 | 0.1 | 712.64 | 65° | 72° | 77° | |||
| M71 shell | HE | 823 | 10.55 | 0.2 | 0.1 | 1,210 | 79° | 80° | 81° | |||
| Smoke shell characteristics | ||||||
|---|---|---|---|---|---|---|
| Ammunition | Velocity (m/s) |
Projectile mass (kg) |
Screen radius (m) |
Screen deploy time (s) |
Screen hold time (s) |
Explosive mass (TNT equivalent) (g) |
| M313 | 821 | 10.7 | 9 | 5 | 20 | 50 |
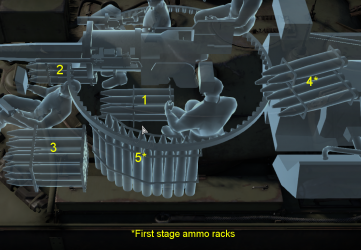
Ammo racks

| Full ammo |
1st rack empty |
2nd rack empty |
3rd rack empty |
4th rack empty |
5th rack empty |
Visual discrepancy |
|---|---|---|---|---|---|---|
| 64 | 57 (+7) | 46 (+18) | 28 (+36) | 21 (+43) | 1 (+63) | No |
Notes:
- Shells are modeled by sets of 2 and disappear from the rack after you've fired both shells in the set.
- Racks 4 and 5 are first stage ammo racks. They total 27 shells and get filled first when loading up the tank.
- These racks are also emptied early: the depletion order at full capacity is: 4 - 5 - 1 - 2 - 3.
- Full reload speed will be realized as long as shells are available in the ready racks 4 and 5. If both ready racks are empty, a penalty to reload speed will occur.
- Simply not firing when the gun is loaded will move ammo from racks 1 to 3 into rack 5 then 4. Firing will interrupt the restocking of the ready racks.
- If you pack 21 (+43) shells, it will keep the front hull and the turret bustle empty of ammo.
Machine guns
| 12.7 mm M2HB | ||||
|---|---|---|---|---|
| Mount | Capacity (Belt) | Fire rate | Vertical | Horizontal |
| Pintle | 1,400 (200) | 577 | -9°/+60° | ±180° |
| 7.62 mm M73 | ||||
|---|---|---|---|---|
| Mount | Capacity (Belt) | Fire rate | Vertical | Horizontal |
| Coaxial | 5,500 (250) | 500 | N/A | N/A |
Usage in battles
The Magach 2 is basically the same as the M48A2C sitting in the German tech tree, but as an M48 it is best used in frontline combat or support manoeuvres.
Since it starts with an APCR shell unlike the APDS used in most tanks, is best used in direct contact with the enemy when not more capable shells are available, since a small angle can make the APCR shells bounce of the target. Thus, staying close to the enemy to make more precise shots is very important. The rest of the shells in the Magach 2 are quite basic for it's BR, but it includes an APHE projectile. While this is nothing uncommon since the T-54/55 also has one, it allows the Magach to quickly destroy most enemies with a well placed shot. This is because the HEAT projectile in the Magach 2, while good in terms of penetration, lacks the damage to modules and crew members of APHE shells. Because of that a good idea is carrying both APHE and HEAT shells for different situations.
The Magach 2 has quite a decent armour, it wont stop the main shells from MBTs, like APDS or HEAT from the 100 and 105mm guns normal at it's BR. But it will certainly help survive against HE, HESH and APCR, alongside 20 and 30mm shots fired from early autocannons that lack proper APDS or APFSDS projectiles with high penetration values.
Because it's mobility is not the best compared to something like the Leopard 1 or other light tanks, positioning at the beginning of the battle is severely important. Most of the time you wont be able to capture any point but you can cover the position and prevent enemy targets from approaching. However have in mind, that the Magach 2 is a relatively big target compared to the Leopard 1 and T-54/55, and because of that hiding in ambushes is more difficult, but not impossible. One important thing about the Magach 2 is the positioning of the commander, while it's cupula severely reduces the travel speed of the 50.cal ammunition, it gives the Magach 2 access to a CIV (commanders independent view) with good zoom for long range shots, and also, the commander has access to the movement of the turret and firing of the gun. That means that when the gunner is down, the commander can still traverse the turret and shoot the main gun if necessary.
Pros and cons
Pros:
- Gets access to a rangefinder in the modifications tab
- The HESH round can be used to overpressure tanks on weak spots like the roof
- The HEAT round can penetrate just about anything at its BR
- Commander override can save you if your gunner gets knocked out
- Turret armour can save you sometimes if someone misses and hits too far left, right, or high
Cons:
- The weak hull armour can't reliably bounce shots from HEAT or APDS shells
- Stock APCR round does not perform well against sloped armour and will most of the time bounce off the target
- Ammo is in the left side of the turret and will most of the time get detonated if a shot penetrates the turret
History
Describe the history of the creation and combat usage of the vehicle in more detail than in the introduction. If the historical reference turns out to be too long, take it to a separate article, taking a link to the article about the vehicle and adding a block "/History" (example: https://wiki.warthunder.com/(Vehicle-name)/History) and add a link to it here using the main template. Be sure to reference text and sources by using <ref></ref>, as well as adding them at the end of the article with <references />. This section may also include the vehicle's dev blog entry (if applicable) and the in-game encyclopedia description (under === In-game description ===, also if applicable).
Media
- Skins
See also
- Related development
External links
Paste links to sources and external resources, such as:
- topic on the official game forum;
- other literature.
| Israeli Ordnance Corps (חיל החימוש) | |
|---|---|
| Medium Tanks | M-51 · M-51 (W) |
| MBTs | |
| Magach | Magach 1 · Magach 2 · Magach 3 · Magach 3 (ERA) · ▃Magach 3 (ERA) · Magach 5 |
| Magach 6 · Magach 6A · Magach 6B · Magach 6C · Magach 6R · Magach 6M · Gal Batash | |
| Sho't | Sho't · Sho't Kal Alef · Sho't Kal Gimel · Sho't Kal Dalet · ▄Sho't Kal Dalet |
| Tiran | Tiran 4 · Tiran 4S |
| Merkava | ▃Merkava Mk.1 · Merkava Mk.1B · Merkava Mk.2B · ▃Merkava Mk.2B · Merkava Mk.2D |
| Merkava Mk.3B · Merkava Mk.3C · ▃Merkava Mk.3D · Merkava Mk.4B · Merkava Mk.4M | |
| Tank destroyers | Zachlam Tager |
| See Also | Chrysler Defense · Department of Tank Design · Morozov Design Bureau |
| Israel medium tanks | |
|---|---|
| M-51 | M-51 · M-51 (W) |
| Magach | Magach 1 · Magach 2 · Magach 3 · Magach 3 (ERA) · Magach 5 · Magach 6 |
| Magach 6A · Magach 6B · Magach 6B Gal · Gal Batash · Magach 6C · Magach 6M · Magach 6R · Magach Hydra · Magach 7C | |
| Tiran | Tiran 4 · Tiran 4S · Tiran 6 |
| Sho't | Sho't · Sho't Kal Alef · Sho't Kal Gimel · Sho't Kal Dalet |
| Merkava | Merkava Mk.1B · Merkava Mk.2B · Merkava Mk.2D · Merkava Mk.3B · Merkava Mk.3C · Ra'am Sagol |
| Merkava Mk.4B · Merkava Mk.4M · Merkava Mk.4 LIC | |


