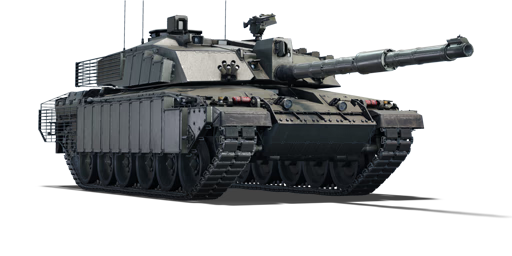
Challenger 2 (2F)
| This page is about the British medium tank Challenger 2 (2F). For other uses, see Challenger (Disambiguation). |
.jpg)
Contents
Description
The Tank, Combat, 120-mm Gun, Challenger 2 (Dorchester Level 2F) is a rank British medium tank with a battle rating of (AB), (RB), and (SB). It was introduced in Update "Starfighters".
General info
Survivability and armour
The Challenger 2 (2F) was created to give increased protection against shaped charges and as much is evident when evaluating the armour. While the internal composite armour remains the same from the previous variant, a large amount of external composite and ERA has been added to the hull front and sides as well as the turret sides. Additional slat armour has also been mounted to the sides and rear of the hull and turret.
With the only real change being the additional external armour, the same structural weakspots that exist on the Challenger 2 remain on the 2F. The large driver's port is an obvious target for enemy armour, which can penetrate it at almost any angle due to only RHA protection. Kinetic rounds aimed through the driver's port from the direct or near-direct front will often go straight through the tank, often taking several crew members, the cannon breach or the engine, occasionally resulting in a knocked out crew. Chemical rounds are less effective but fragments may set off the charges stored next to the driver, especially when fired at from above.
The gun mantlet is also a large weakspot, although kinetic rounds will be most effective, as chemical rounds will often only knock out the cannon breach or be blocked by the optics mounted at the top of the gun, which will allow the tank to pull back and repair provided it has the distance to do so. Kinetic rounds will often not fragment properly, going straight through the back of the turret, at max taking out two crew members due to the breach acting as a shield to the other side of the turret. Only when attacking from above will rounds have a significant chance of detonating ammunition due to the 2 stage system used by British tanks. Any ammunition stored in the turret will be warheads which are not able to be detonated.
As with the last variant and many other MBTs, the sides have no real kinetic protection, however the 2F has additional protection against chemical rounds. Most shots to the side of the front half of the turret have a high likelihood of taking out the cannon breach and a crew member, occasionally knocking out 2 or 3 crew. Any shots the the back half of the turret from the side will be ineffective due to the large amount of empty space. Aiming low on the tank's hull will give the best results for penetration and ammo detonation. Despite the additional ERA on the lower frontal plate, chemical rounds such as the German DM12A1 can still get through, and can get through the side mounted composite screens on a flat angle (0-25°).
| Armour | Front | Sides | Rear | Roof |
|---|---|---|---|---|
| Hull | 38-50 mm (56-83°) Upper Plate
70 mm (31-34°) Lower Glacis 60 mm (0-80°) Driver's Port |
25 mm Top (70°)
25 mm Middle (0°) 38 mm Bottom (0°) |
25 mm (32°) | 10-20 mm |
| Turret | 38 - 50 mm (56-82°) Turret Front 30 mm (3-82°) Gun Mantlet |
20-25 mm (8-10°) | 20 mm (18°) | 10-38 mm |
| Cupola | 8 mm (3-78°) | 8 mm (9-60°) | 8 mm (1-80°) | 44-60 mm |
| Composite Armour | Front | Sides | ||
| Hull | Upper Kinetic: 420-1000 mm Chemical: 700-950 mm Lower Kinetic: 100-400 mm Chemical: 350-570 mm With Dorchester 2F Modification |
Ext. Composite with NERA: Kinetic: 30 mm Chemical: 400 mm | ||
| Turret | Turret Cheeks Kinetic: 440-720 mm Chemical: 780-1000 mm |
Internal Composite Kinetic: 190-740 mm Chemical: 300-1000 mm Ext. Composite with NERA Kinetic: 30 mm Chemical: 400 mm | ||
Notes:
- Upper Frontal Plate has additional 10 mm external plate.
- Lower Frontal Plate has 25.4 mm external steel and ROMOR-A ERA. This is upgraded to a composite with NERA plate when mounting the Dorchester 2F upgrade, as detailed in the table above.
- Parts of the side and rear hull have mounted Slat Armour (50 mm Chemical Protection).
Mobility
| Game Mode | Max Speed (km/h) | Weight (tons) | Engine power (horsepower) | Power-to-weight ratio (hp/ton) | ||||
|---|---|---|---|---|---|---|---|---|
| Forward | Reverse | Stock | AoA | Stock | Upgraded | Stock | Upgraded | |
| Arcade | 62.5 | 1.1 | 1,886 | 30.18 | __.__ | |||
| Realistic | 1,076 | 17.22 | __.__ | |||||
Modifications and economy
Armaments
Main armament
| 120 mm L30A1 | Turret rotation speed (°/s) | Reloading rate (seconds) | |||||||||||
|---|---|---|---|---|---|---|---|---|---|---|---|---|---|
| Mode | Capacity | Vertical | Horizontal | Stabilizer | Stock | Upgraded | Full | Expert | Aced | Stock | Full | Expert | Aced |
| Arcade | 50 | -10°/+20° | ±180° | Two-plane | 29.5 | 40.8 | 49.6 | 54.8 | 58.4 | 6.50 | 5.75 | 5.30 | 5.00 |
| Realistic | 18.4 | 21.7 | 26.4 | 29.1 | 31.0 | ||||||||
Ammunition
| Penetration statistics | |||||||
|---|---|---|---|---|---|---|---|
| Ammunition | Type of warhead |
Penetration @ 0° Angle of Attack (mm) | |||||
| 10 m | 100 m | 500 m | 1,000 m | 1,500 m | 2,000 m | ||
| Shot L23A1 | APFSDS | 396 | 394 | 387 | 376 | 367 | 357 |
| Shell L31A7 | HESH | 152 | 152 | 152 | 152 | 152 | 152 |
| L26 | APFSDS | 493 | 491 | 487 | 481 | 474 | 468 |
| L27A1 | APFSDS | 564 | 562 | 557 | 551 | 545 | 538 |
| Shell details | |||||||||
|---|---|---|---|---|---|---|---|---|---|
| Ammunition | Type of warhead |
Velocity (m/s) |
Projectile Mass (kg) |
Fuse delay (m) |
Fuse sensitivity (mm) |
Explosive Mass (TNT equivalent) (g) |
Ricochet | ||
| 0% | 50% | 100% | |||||||
| Shot L23A1 | APFSDS | 1,535 | 3.89 | N/A | N/A | N/A | 78° | 80° | 81° |
| Shell L31A7 | HESH | 670 | 17.1 | 0.05 | 0.1 | 6,560 | 73° | 77° | 80° |
| L26 | APFSDS | 1,650 | 4.1 | N/A | N/A | N/A | 78° | 80° | 81° |
| L27A1 | APFSDS | 1,650 | 4.1 | N/A | N/A | N/A | 78° | 80° | 81° |
| Smoke shell characteristics | ||||||
|---|---|---|---|---|---|---|
| Ammunition | Velocity (m/s) |
Projectile Mass (kg) |
Screen radius (m) |
Screen deploy time (s) |
Screen hold time (s) |
Explosive Mass (TNT equivalent) (g) |
| L34 | 670 | 17.1 | 20 | 5 | 25 | 50 |
Ammo racks
| Full ammo |
1st rack empty |
2nd rack empty |
3rd rack empty |
4th rack empty |
5th rack empty |
6th rack empty |
Visual discrepancy |
|---|---|---|---|---|---|---|---|
| 50 | __ (+__) | __ (+__) | __ (+__) | __ (+__) | __ (+__) | __ (+__) | __ |
Machine guns
| 7.62 mm L37A2 | ||||
|---|---|---|---|---|
| Mount | Capacity (Belt) | Fire rate | Vertical | Horizontal |
| Pintle | 1,700 (100) | 650 | -10°/+50° | ±180° |
| 7.62 mm L94A1 | ||||
|---|---|---|---|---|
| Mount | Capacity (Belt) | Fire rate | Vertical | Horizontal |
| Coaxial | 2,300 (2,000) | 600 | N/A | N/A |
Usage in battles
In many ways, the Challenger (2F) plays the same as the precursor Challenger 2, however it differentiates itself with its increased ability to brawl. Especially with the armour package, the 2F can find itself brawling alongside its teammates, though players should be wary of the target they are facing to decide which ones they will play aggressive towards. For example, brawling with T-72As and TURMS can be viable due to their HEAT-FS and APFSDS rounds being ill equipped to penetrate many parts of the tank. Slight angling should be used to counter their rounds, and players should attempt to draw attention to their turret to try and bait shots onto the Challenger 2s impenetrable turret cheeks. One should never attempt to brawl a Leopard 2A5 or 6, and likewise any 10.3 or 7 battle-rating tanks. In urban environments, moving up, taking position, and waiting to hear approaching engines to set up ambushes is definitely a viable strategy, especially when going against Russian or American tanks, as their engines give off the characteristic rotary whine.
As expected, the tank excels at sniping, even more so than the previous Challenger 2, as it has access to its Depleted Uranium round, the L27A1, which boasts 70mm of additional penetration at 1000m. It has access the to the same smoke-generation capabilities of the Challenger 2, and therefore can support the team effectively over range and close in. Additionally, the tank can resist missiles from helicopters which one can expect to happen in open areas that lend themselves to sniping. This is possible provided the missile does not hit the roof, so if you see a missile approaching, you can attempt to block it with your gun. The slat armour on the back of the tank is very effective against chemical rounds, including missiles, which can be the difference between living and being knocked out. Once hit, however, it will fall off and therefore players should attempt to avoid exposing their rear more-so where slat armour has been destroyed.
Pros and cons
Pros:
- Effective side-ERA against air-to-ground missiles
- Fast reload, particularly for a 120 mm (5 seconds aced)
- Sights with high zoom, 2nd generation thermals and a wide FOV
- High reverse of -40 km/h
- The L30A1 120 mm gun is incredibly accurate, even at long range
- Turret cheeks are invulnerable to all HEAT-FS and APFSDS, including the dreaded DM53 shell
Cons:
- Vulnerable commander's hatch and cannon breech
- No CITV (Commander Independent Thermal Viewer)
- Dorchester 2F only marginally increases LFP armour against FIN shells and ATGMs
- Dorchester 2F adds 1,100 kg of weight to an already sluggish tank
- L27A1 has low penetration compared to other top rank NATO ammunition
- Accessible weakspots, especially the gun mantlet
History
The Challenger 2F or CR2 TES is an upgraded version of the Challenger 2, featuring the upgrade kit known as TES (Theatre Entry Standard) and nicknamed 'Megatron'. The upgrade protection kit saw several adjustments over the years until the present time.
These modifications were ordered by the MOD, as part of the numerous updates inside the Challenger 2's LEP (Life Extension Programme) to increase the operability, lethality and protection of the 1998 design until 2025, or until a new British MBT design is available. The TES aims to increase the protection levels against the operational threats of the British Army such as the IEDs, hollow charges or Tandem charges - common threats during suburban deployments.
MCS
The Challenger 2 was covered with an MCS (Mobile Camouflage System) all around the tank, reducing the heat signature and keeping the vehicle almost indistinguishable from Thermal imaging devices.
Bar armour
The slat or bar armour was added to the sides and the rear of the vehicle to increase the levels of protection against rocket-propelled grenades while not downgrading the mobility of the Challenger. The bar armour must disrupt any hollow charges from detonating; either by crushing it upon impact or damaging the warhead and the fuze through contact with the bars.
Dorchester 2F armour kit
Most previous NERA (Non-Explosive Reactive Armour) side plates have been reinforced with additional Dorchester armour plates, notably the lower frontal-glacis protection was drastically improved, with the addition of a large block of Dorchester armour; augmenting the protection in one of the most vulnerable areas for the Challenger 2. Furthermore, the sides of the turret also received external Dorchester armour packages, enhancing the protection of the crew inside the fighting compartment from possible side-attacks.
Remote controlled weapon systems (RCWS)
As an offensive upgrade, the TES received a new Remote controlled weapon systems (RCWS) over the loader's hatch ring, capable of assessing the battlefield and engaging light targets or infantry from within the vehicle. Previously, the operator had to open the hatch to fire the pintle-mounted L37A2 7.62mm GPMG machine gun.
The CR2 TES also received IED jammers near the left and right front fenders and ECM countermeasures antennas capable of detecting nearby Improvised Explosive Devices.
Media
Excellent additions to the article would be video guides, screenshots from the game, and photos.
See also
Preceded by
Similar variants
Analogues on other nations
External links
Paste links to sources and external resources, such as:
- topic on the official game forum;
- encyclopedia page on the tank;
- other literature.
| Britain medium tanks | |
|---|---|
| Valentine | Valentine I · Valentine IX · Valentine XI |
| Cromwell | Cromwell I · Cromwell V · Cromwell V (RP-3) |
| Cromwell derivatives | Challenger · Avenger · Comet I · Comet I "Iron Duke IV" · Charioteer Mk VII |
| Centurion | Centurion Mk 1 · Centurion Mk.2 · Centurion Mk 3 · Centurion Mk.5 AVRE · Centurion Mk 10 · Centurion Action X · FV4202 |
| Vickers MBT | Vickers Mk.1 · Vickers Mk.3 · Vickers Mk.7 |
| Chieftain | Chieftain Mk 3 · Chieftain Mk 5 · Chieftain Mk 10 |
| Challenger 1 | Challenger Mk.2 · Challenger Mk.3 · Challenger DS |
| Challenger 2 | Challenger 2 · Challenger 2 (2F) · Challenger 2 TES · Challenger 2 OES · Challenger 2E · Challenger 2 Black Night |
| Challenger 3 | Challenger 3 TD |
| Australia | A.C.I · A.C.IV · Centurion Mk.5/1 |
| South Africa | Olifant Mk.1A · Olifant Mk.2 · TTD |
| India | Vijayanta · Bhishma TWMP |
| Israel | ▄Sho't Kal Dalet |
| Jordan | Khalid |
| Sweden | ▄Strv 81 (RB 52) |
| USA | Grant I · Sherman II · Sherman Firefly · Sherman IC "Trzyniec" |
