Custom skins
| In the "Winds of Change" update the rendering system of custom camouflages has changed. Because of the change from "smoothness" to "inverted roughness", the rendering of camouflages has changed dramatically.
All old camouflages will gradually switch automatically to the new system. First of all, those that are already selected for the market. It can take several days! After the automatic transition to the new system, the camouflages should return to their original appearance! The SDK with the new rendering system will be available in the coming days. An updated camo creation guide is already being prepared. |
If the appearance of your favourite vehicle has started to bore you, and the in-game camouflages available for it aren’t quite what you want, the best solution is to create a unique appearance for your vehicle with a user camouflage. You can always find interesting camouflages on the War Thunder LIVE portal or create your own. User camouflage is set locally, i.e. only the player can see it. For others, your tank or aircraft will remain in the same camouflage that was selected in the “Appearance” menu as the basis for the user camouflage.
Contents
Setting user camouflage
Select the ground vehicle or aircraft you want to update the camouflage on, open the “Appearance” menu or click on the button to create an example camouflage.
After that, go to the folder where the War Thunder client is installed and do the following:
- Go to the following path: War Thunder → UserSkins → *previously obtained folder name* - for example, template_ussr_t_10m. (macOS users using the standalone launcher must right-click the launcher in Finder, select 'Show Package Contents', then enter the 'Contents' folder. Inside is the War Thunder app itself. 'Show Package Contents' there, then go to Contents → Resources → game → UserSkins → *previously obtained folder name*.)
- If you want to set a camouflage from the War Thunder LIVE portal, just delete the entire contents of the folder, then download the unique camouflage you like from live.warthunder.com and copy the contents of the archive to the folder. This will be 2-3 files in the DDS or TGA file formats and also configuration file “name_of_the_vehicle.blk”.
- If you want to create your own camouflage, then start editing the simple graphical files in the TGA format that are already in the folder. By default a texture will be created for ground vehicles which will be applied to all elements of the vehicle.
Return to the client and update the list of available camouflages by pressing the corresponding button.
If you did everything correctly, then the camouflage you loaded should be shown in the “User camouflages” list when you click it. Set the camouflage.
Camouflage creation
The creation of any camouflage begins with the creation of the example that was described above. Next, the example files are edited in any suitable graphical editor as an ordinary image. The important thing here is to preserve the initial title, since this makes it far easier for less experienced users to use the already finished camouflage. If you want to change the name of texture so don’t forget to change it in the configuration file “name_of_the_vehicle.blk”.
Principles of creation
When creating a camouflage scheme, authors are encouraged to adhere to the principles adopted in the game. Camouflages that do not comply with these rules will not be used in preparing content for the War Thunder Market.
- Selection of content for the market will not be included if the camouflage contains changes in the cockpit.
- Changing the texture of the engine flame on aircraft is not desirable and in most cases will lead to a rejection when selecting content for the market.
- Damages and chips of paint on _dmg textures should not at the borders of different sections of the DM model in the covering.
- The identification markings on aircraft of countries from the fascist/Nazi bloc should not contain prohibited symbols.
- For Italian aircraft it is recommended to use downloadable harmonised markings: (Click here to download the zip file).
- The markings indicating shot down aircraft as well as the personal emblems of the pilots should not contain prohibited symbols. It is recommended to use the uniform image standards adopted in the game.
- For German aircraft it is recommended not to use tail markings.
Aircraft camouflage
Aircraft camouflages can not be rotated or scaled that’s why in the example you will find the arrangement of the elements of the structure.
The example consists of the following files:
- vehicle_name.blk – a required file for defining the camouflage
- vehicle_name_с.tga – the camouflage itself
- vehicle_name_n.tga – camouflage normals
- vehicle-name_с_dmg.tga – damage mask for alterations after taking damage
- vehicle-name_n_dmg.tga – damage mask normals
The first two files are enough for the simplest camouflage, but then your camo will be swapped for the standard one created by the example when you take even the smallest hit. So it’s worth stocking up on patience and creating some truly impressive work.
Camouflage ground equipment
At the moment it is possible to create two types of camouflage for ground vehicles:
- Repeating camouflage - simple (monochrome, with spots, stripes) colouring, which can be scaled and rotated.
- Fixed camouflage - complex variable patterns on different parts of the vehicle in which it is also possible to add decals even without a background (camouflage) which will be on the vehicle at all times. Such camouflage can not be rotated or scaled.
Rules of fixed camouflage
- Will be used by the set_tex block in the .blk file (see the example below).
- The colour of the camouflage will be applied to the model by the mask of the alpha channel.
- Alpha channel: white - colour of the camouflage seen on the model, gray - translucent, black - colour will not be applied.
- The colour of the fixed camouflage "shades" the metallicity and changes the smoothness.
- The size of each side of the texture in pixels should correspond to the power of two (for example, 2048, 4096, 8192), the ratio between the sides should be the same as the original texture.
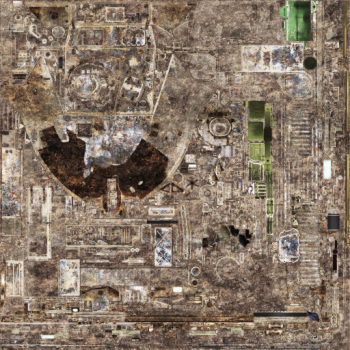
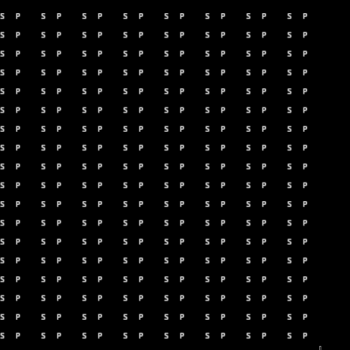
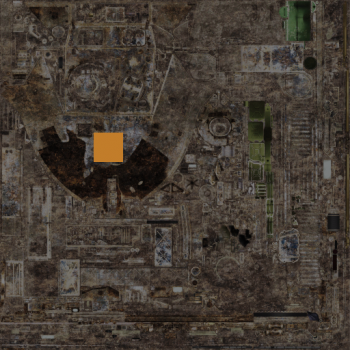
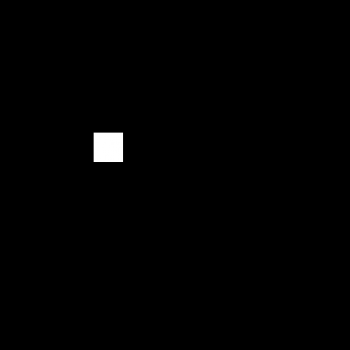
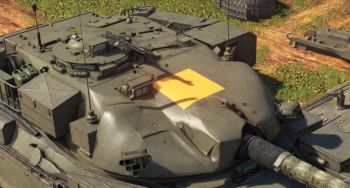
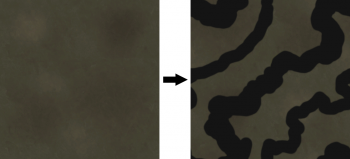
As a simple example we will create camouflage for the Chieftain Mk.10 with fixed decal in the form of an orange square. The layer will contain chieftain_mk_10_turret.tga texture. Its RGB and Alpha channels look like this:
We draw a square in the same area on all channels. In the alpha channel, the remaining area needs to be filled with black.
In the case of changes to only one texture, the blk file will look like this:
name:t="user"
 set_tex{
  from:t="chieftain_mk_10_turret_c*" //the name of the source texture
  to:t="chieftain_mk_10_turret.tga" //the name of the changed texture
 param:t="camo_skin_tex"  //technical parameter
 }
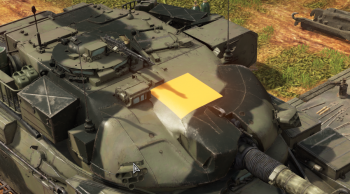
So the model will take the following form:
Note that the rest of the texture with rust on the turret is not visible. This occured because the values of the alpha channel outside the square were equal to zero. Places with a gray alpha channel will be applied as translucent. The decal will overpaint the “split colour” places, change the metallicity and smoothness of the surface. Let’s open the uk_camo_very_dark_drab.tga file and draw black bars there (in the understanding of PBR "black" - it's not darker than 30; 30; 30 in RGB). Important:
- This texture should have alpha channel, the smoothness of the coloured areas depends on it.
- The texture should be shaded.
The replacement of the repetitive camouflage file should be displayed in the blk file. For this it is required to add following block:
replace_tex{
 from:t="uk_camo_very_dark_drab*" //old camouflage
 to:t="uk_camo_very_dark_drab.tga" //new camouflage
}
As a result you will get a camouflage that can age (An aging mask will be applied) and after the destruction the model, will look correct.
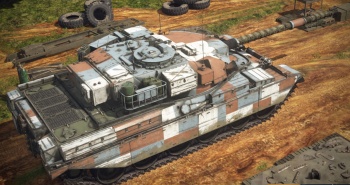
By using set_tex you can paint the vehicle almost entirely as in the example of the camouflage “Berlin Brigade” for Chieftain Mk.10.
The file .blk describes the application of fixed camouflage to the model by a consistent reference to the involved textures. If a texture is mentioned in .blk file which is not in the archive, then such a camouflage is unlikely to be considered in the selection for the market.
name:t="user"
// Scalable camouflage
replace_tex{
 from:t = "uk_camo_very_dark_drab*"
 to:t = "uk_camo_light_mud_blue_black.tga*"
}
// Fixed camouflage
set_tex{
 from:t="chieftain_mk_10_body_c*"
 to:t="chieftain_mk_10_body_c.tga"
 param:t="camo_skin_tex"
}
set_tex{
 from:t="chieftain_mk_10_gun_c*"
 to:t="chieftain_mk_10_gun_c.tga"
 param:t="camo_skin_tex"
}
set_tex{
 from:t="chieftain_mk_10_turret_c*"
 to:t="chieftain_mk_10_turret_c.tga"
 param:t="camo_skin_tex"
}
set_tex{
 from:t="chieftain_mk_10_add_c*"
 to:t="chieftain_mk_10_add.tga"
 param:t="camo_skin_tex"
}
Pay attention to the alpha channel in the hull structure (the alpha channels of the remaining elements of fixed camouflage are similar).
Due to such a complex structure, there is no "paint" on scratches and parts if chassis. The similar effect can be achieved by subtracting a metallic map from the white alpha channel. To get alpha channel masks and metallicity maps we recommend using the export function WTAssetViewer from the War Thunder CDK.
| Using the replace_tex instead of set_tex for the fixed camouflage texture will result in the inability to apply any decal to such textures in the game and such creations will be automatically rejected by selecting the content for the War Thunder Market. |
Features of the application of camouflage by using set_tex:
- Set_tex is not intended for normal maps or AO (ambient occlusion).
- Transparency or incomplete coverage are allowed - for example to fix the decals. Then a scalable colour will be used in the missed areas.
- You can apply decals from the game to the model.
- Following destruction, the model will look correct.


