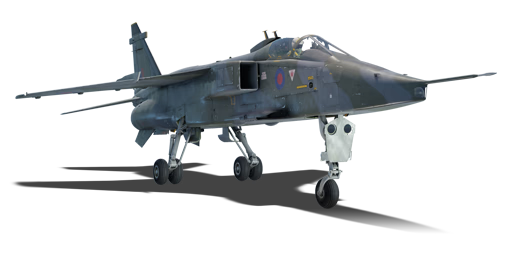
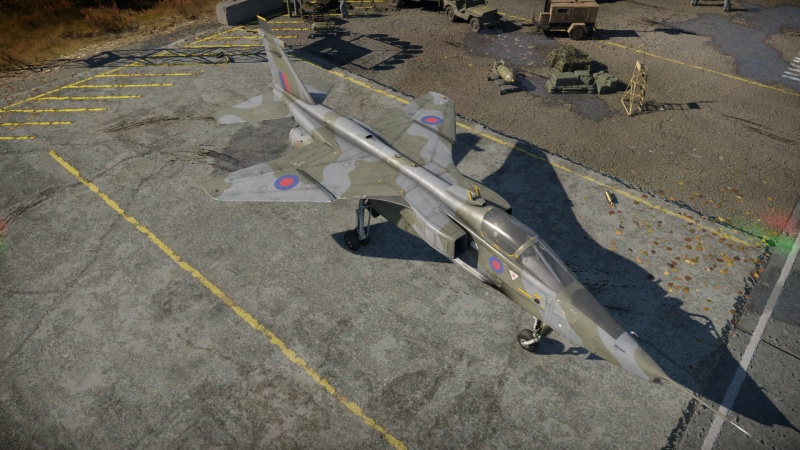
Jaguar GR.1A
| This page is about the British strike aircraft Jaguar GR.1A. For other versions, see Jaguar (Family). |
Contents
Description
The Jaguar GR.1A is a rank British strike aircraft with a battle rating of (AB), (RB), and (SB). It was introduced in Update "Ground Breaking".
General info
Flight performance
The Jaguar GR.1A handles nearly the same as the previous Jaguar GR.1. However, due to having access to Rolls-Royce Turbomeca Limited Adour Mk.104 engines, the acceleration, cruise speed, and maximum speed are significantly increased. It generally maintains similar flight performance and use, with a slightly reduced turn-time at high speeds. It has the same loadout capacity as the previous Jaguar, performing nearly exactly the same with mounted ordnance. It should be noted that it is nowhere near on being the fastest plane at its battle rating but can become a difficult opponent when being hunted down, especially if the Jaguar has a speed advantage.
When on take-off:
Taking off with the Jaguar GR.1A is pretty straightforward, no changes from the GR.1 with the exception that it reaches the minimum lift velocity faster than the GR.1. Flaps are not required for take-off even with the 8 x 1,000 lb bomb payload. However, it is recommended to be used for an easier take-off. Carrier take-off are the same but with a much shorter take-off time. Be aware of centering the aircraft correctly with the deck or else a landing gear might break.
When on landing:
Landings should be done below 500 km/h but depending on the situation, map and place where the Jaguar will land (aircraft carrier or airfield) this may vary. When landing on a carrier, maintain greater speeds than 360 km/h but less than 480 km/h, this is to ensure a safe pull up if the hook is missed. When landing on an airfield, maintain speeds greater than 300 km/h but less than 450 km/h, this is to ensure the plane has enough space to brake and slow down. Upon reaching 300 km/h while on the ground, a drag chute is deployed to assist in slowing down the aircraft. Use the airbrake in order to slow down faster.
| Characteristics | Max Speed (km/h at 10,668 m) |
Max altitude (metres) |
Turn time (seconds) |
Rate of climb (metres/secSond) |
Take-off run (metres) | |||
|---|---|---|---|---|---|---|---|---|
| AB | RB | AB | RB | AB | RB | |||
| Stock | 1,557 | 1,540 | 31.7 | 32.2 | 75.8 | 67.7 | 850 | |
| Upgraded | ___ | ___ | __._ | __._ | __._ | __._ | ||
Details
| Features | |||||
|---|---|---|---|---|---|
| Combat flaps | Take-off flaps | Landing flaps | Air brakes | Arrestor gear | Drogue chute |
| ✓ | ✓ | ✓ | ✓ | ✓ | ✓ |
| Limits | ||||||
|---|---|---|---|---|---|---|
| Wings (km/h) | Gear (km/h) | Flaps (km/h) | Max Static G | |||
| Combat | Take-off | Landing | + | - | ||
| 1,273 | 926 | 525 | 410 | ~12 | ~6 | |
| Optimal velocities (km/h) | |||
|---|---|---|---|
| Ailerons | Rudder | Elevators | Radiator |
| < 585 | < 600 | < 649 | N/A |
Engine performance
| Engine | Aircraft mass | |||||||
|---|---|---|---|---|---|---|---|---|
| Engine name | Number | Basic mass | Wing loading (full fuel) | |||||
| Rolls-Royce Turbomeca Limited Adour Mk.104 | 2 | 7,656 kg | 455 kg/m2 | |||||
| Engine characteristics | Mass with fuel (no weapons load) | Max Takeoff Weight | ||||||
| Weight (each) | Type | 15m fuel | 20m fuel | 30m fuel | 45m fuel | 51m fuel | ||
| 709 kg | Afterburning low-bypass turbofan | 8,632 kg | 8,916 kg | 9,546 kg | 10,491 kg | 10,909 kg | 13,500 kg | |
| Maximum engine thrust @ 0 m (RB/SB) | Thrust to weight ratio @ 0 m (WEP) | |||||||
| Condition | 100% | WEP | 15m fuel | 20m fuel | 30m fuel | 45m fuel | 51m fuel | MTOW |
| Stationary | 2,061 kgf | 3,354 kgf | 0.78 | 0.75 | 0.70 | 0.64 | 0.61 | 0.50 |
| Optimal | 2,313 kgf (200 km/h) |
3,585 kgf (200 km/h) |
0.83 | 0.80 | 0.75 | 0.68 | 0.66 | 0.53 |
Survivability and armour
The aircraft gets no extra armoured protection, therefore it's extra weak against autocannons. The fuel tanks are self-sealing. This will help you a lot when getting shot at by enemy autocannons, but not air-to-air missiles, which are very common at this battle rating. As seen in the previous Jaguar, damage done to the engines will most likely result in making a non-recoverable manoeuvre and they are prompt to catch fire easily. Keep this in mind when fighting other aircraft and SPAA. The Jaguar has access to a Radar Warning Receiver, which can be useful to alert the pilot of incoming aircraft with radar-guided missiles, or ground based radar anti-air.
The use of chaff and flares significantly improves the survivability of the aircraft in all game modes. Flares are a very useful tool to combat both IR-guided air-to-air missiles and ground vehicles such as the Ozelot, Type 93, and SIDAM 25 (Mistral). However, chaff still remains useless against SPAA radars. The best countermeasure against them is to stay out of sight by flying too high or too low.
Modifications and economy
Armaments
| Ballistic Computer | |||
|---|---|---|---|
| CCIP (Guns) | CCIP (Rockets) | CCIP (Bombs) | CCRP (Bombs) |
| |
|
|
|
Offensive armament
The Jaguar GR.1A is armed with:
- A choice between two presets:
- 2 x 30 mm ADEN Mk.4 cannons, belly-mounted (150 rpg = 300 total)
- 60 x countermeasures + 2 x 30 mm ADEN Mk.4 cannons (150 rpg = 300 total)
Suspended armament
The Jaguar GR.1A can be outfitted with the following ordnance:
- Without load
- 2 x AIM-9G Sidewinder missiles
- 76 x CRV7 M247 rockets
- 72 x SNEB type 23 rockets
- 8 x 540 lb Mk.M1 bombs (4,320 lb total)
- 8 x 1,000 lb G.P. Mk.I bombs (8,000 lb total)
- 2 x AIM-9G Sidewinder missiles + 8 x 1,000 lb G.P. Mk.I bombs (8,000 lb total)
- 2 x AIM-9G Sidewinder missiles + 8 x 540 lb Mk.M1 bombs (4,320 lb total)
- 2 x AIM-9G Sidewinder missiles + 72 x SNEB type 23 rockets
- 2 x AIM-9G Sidewinder missiles + 76 x CRV7 M247 rockets
- 2 x AIM-9G Sidewinder missiles + 36 x SNEB type 23 rockets + 6 x 1,000 lb G.P. Mk.I bombs (6,000 lb total)
- 2 x AIM-9G Sidewinder missiles + 36 x SNEB type 23 rockets + 6 x 540 lb Mk.M1 bombs (3,240 lb total)
- 2 x AIM-9G Sidewinder missiles + 38 x CRV7 M247 rockets + 6 x 1,000 lb G.P. Mk.I bombs (6,000 lb total)
- 2 x AIM-9G Sidewinder missiles + 38 x CRV7 M247 rockets + 6 x 540 lb Mk.M1 bombs (3,240 lb total)
- 2 x AIM-9G Sidewinder missiles
- 76 x CRV7 M247 rockets
- 72 x SNEB type 23 rockets
- 6 x 540 lb Mk.M1 bombs (3,240 lb total)
- 6 x 1,000 lb G.P. Mk.I bombs (6,000 lb total)
- 2 x AIM-9G Sidewinder missiles + 6 x 1,000 lb G.P. Mk.I bombs (6,000 lb total)
- 2 x AIM-9G Sidewinder missiles + 6 x 540 lb Mk.M1 bombs (3,240 lb total)
- 2 x AIM-9G Sidewinder missiles + 72 x SNEB type 23 rockets
- 2 x AIM-9G Sidewinder missiles + 76 x CRV7 M247 rockets
- 2 x AIM-9G Sidewinder missiles + 36 x SNEB type 23 rockets + 4 x 1,000 lb G.P. Mk.I bombs (4,000 lb total)
- 2 x AIM-9G Sidewinder missiles + 36 x SNEB type 23 rockets + 4 x 540 lb Mk.M1 bombs (2,160 lb total)
- 2 x AIM-9G Sidewinder missiles + 38 x CRV7 M247 rockets + 4 x 1,000 lb G.P. Mk.I bombs (4,000 lb total)
- 2 x AIM-9G Sidewinder missiles + 38 x CRV7 M247 rockets + 4 x 540 lb Mk.M1 bombs (2,160 lb total)
- 2 x 546 kg Mk.13 bombs (1,092 kg total)
- 2 x 546 kg Mk.13 bombs + 2 x 540 lb Mk.M1 bombs (2,172 lb total)
- 2 x 546 kg Mk.13 bombs + 2 x 1,000 lb G.P. Mk.I bombs (3,092 lb total)
- 2 x 546 kg Mk.13 bombs + 2 x AIM-9G Sidewinder missiles (1,092 kg total)
- 2 x 546 kg Mk.13 bombs + 2 x AIM-9G Sidewinder missiles + 2 x 540 lb Mk.M1 bombs (2,172 lb total)
- 2 x 546 kg Mk.13 bombs + 2 x AIM-9G Sidewinder missiles + 2 x 1,000 lb G.P. Mk.I bombs (3,092 lb total)
Usage in battles
The Jaguar is mostly an air-to-ground plane with defensive capabilities against aircraft. The role of the Jaguar is pretty straightforward when it comes to air battles: base bombing or ground/naval units bombing. It is recommended to utilize the different bomb payloads combined with flares or with the AIM-9G if desired. Rockets are not recommended to be taken as they are inaccurate and useless against lightly armoured vehicles, even with the ballistic computer. GBUs are the main weapon against any vessel. They are recommended to be used against destroyers, cruisers, battleships, and even enemy carriers. A well-placed Mk.13 is enough to sink a carrier.
The Jaguar has a wide variety of payloads for all types of players: for those who want to be fast and engage bases or ground targets as quickly as possible, and for those who want to carry out as much destruction as possible. The main advantage of the GR.1A over other strike aircraft is its ability to carry AIM-9G as well as significant ground ordnance due to the over-wing pylons. The recommended payload for a fair trade in speed, firepower and defensive capabilities is the "2 x AIM-9G + 6 x 1,000 lb G.P. Mk.I bombs" payload, which provides more than enough bombs to take 2 bases in maps where there are only 3 bases and airfield, or 1 of the 4 respawning bases which take double the payload. If the player wants to play a more aggressive full bomb payload, then the "8 x 1,000 lb G.P. Mk.I bombs" payload can be carried.
Using Mk.13 GBU and TIALD
The Jaguar GR.1A brings completely new systems to Great Britain's aircraft tech-tree. While similar to the French Jaguar A, it does has its changes, pros and cons. The guided munitions features have been seen in other aircraft in-game such as the MiG-27M, MiG-23, A-7D and the like. However, the Jaguar GR.1A is the only top tier aircraft to not have access to guided missiles, only bombs.
TIALD
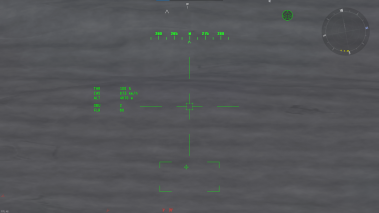
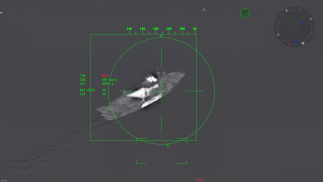
The TIALD (Thermal Imaging Airborne Laser Designator) is a new targeting pod added to the Jaguar GR.1A which, unlike the French Jaguar, has access to thermal vision, making target acquisition a much easier task. While in use, it acts very similar to helicopter gunner sights for modern helicopters, utilizing almost the exact same functions. Range is not displayed in the HUD as seen in helicopters. However, this is not a crucial aspect of accurate bombing as the range is fully dependent on the aircraft's attitude (altitude, speed, angle of attack, etc). If the user is familiar with helicopter HUD, you will be familiar with the indicators to the left of the reticle.
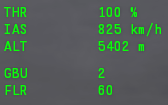
These indicators signal the following: THR (throttle), IAS (indicated air speed), ALT (altitude). These indicators will stay fixed to the sight regardless of the loadout. The lower indicators will vary according to the loadout carried at the time, in this case: GBU (Mk.13 guided bombs) and FLR (chaff and flares according to the loadout). The TIALD has a double functionality, not only working as the laser designator for GBUs but can work as an additional scouting tool for better situational awareness, both for air-to-ground and air-to-air. Functionalities of the TIALD will be explained further below.
Something to keep in mind is that while the TIALD pod can look backwards it cannot look directly downwards, this means that if you have the pod locked to a target and you fly directly over the target the pod can lose its lock on the target when it hits the downwards limit. If you allow this to happen, it is likely the bomb will miss the target before you are able to get the targeting pod pointed at it again. In order to avoid this, you can fly slightly off the side side of your target (rather than passing straight over it) so that the pod can keep pointed at the target by swivelling sideways, rather than straight down like it would have to if you few directly over it.
Mk.13 GBU
The Mk.13 GBU are capable laser-guided bombs able to destroy any ground unit with a single hit and cause significant damage to any vessel in-game, including aircraft carriers. Unlike other unguided bombs, the GBU have extended range even if no lock is made. This is due to having surface controls that keep the bomb level during flight when there is no guidance. In order to successfully perform precision airstrikes, some basic keybind controls have to be done first for this to work properly. First, the "Sight Stabilization" keybind under the Controls > Aircraft > Weaponry must be set, to lock on to a target.
In order to properly make a laser lock, a target that can be locked onto must be found, which is easily achieved by using the thermal imagery on the TIALD targeting pod. If a target is successfully acquired, a fully enclosed square will be displayed around the target. A non-locked target will show the box as a striped square. With a successful lock, GBU can be released in multiple ways. However, there are some things to keep in mind before dropping the GBU. If we have a locked-on target, hitting the "Sight Stabilization" key again will pop up a circle over the box. The circle gives free camera motion while staying slaved to the movement of the target. This is particularly useful to compensate for speed when hitting moving targets, or to simply adjust the desired point of contact. Once the guidance position is satisfactory, the bomb can be released. The GBU tends to maintain a horizontal flight path if it does not have a laser lock, for this same reason the GBU must be dropped at an angle. This is particularly easy as the CCIP ballistic computer shows the general area of the impact zone. As long as bomb is released inside the circle of the CCIP marking, the bomb will hit the marked location precisely.
As soon as the bombs are released, they will instantly start to guide themselves towards the target as long as the laser lock is active. Keep in mind the bombs are dependent on gravity and are not self-propelled, so when attacking a moving target, make sure to compensate for the target's movement for a successful hit. There is a slight delay between the bomb's release and it beginning to guide itself in to the target.
A single GBU is needed per ground target, not only because the bomb has the equivalent to 288 kg of TNT, but the pinpoint accuracy will, most of the time, hit the enemy vehicle's roof, destroying it 99% of the time. Assault fuze is advised here, no need for a time fuze for multiple reasons: There is no risk of explosion self-damage as bombing can be easily done at stand-off distance, assault fuze will ensure the bomb explodes when it hits on target which, in case the target is not hit directly, reduces the escape window for the target.
Pros and cons
Pros:
- Good speed
- Excellent roll rate
- Decent turning circle
- Sufficient quantity of flares & chaff
- Good nose-mounted autocannon
- Wide variety of ordnance
- Effective air-to-air missiles
- Access to laser-guided bombs
- Air-to-air missiles are mounted on over wing pylons so you do not have to sacrifice any air-to-ground ordnance to carry them (unlike on the Jaguar GR.1 and Jaguar A)
- TIALD targeting pod has thermal imaging, unlike the ATLIS II targeting pod on the Jaguar A
Cons:
- Underwhelming stock performance
- Limited air-to-air ordnance
- Rather lacking ammunition for the 30 mm cannons
- Poor energy retention means that you bleed speed very quickly in turns
- Very high fuel consumption when using afterburner (more so than on other aircraft)
History
Describe the history of the creation and combat usage of the aircraft in more detail than in the introduction. If the historical reference turns out to be too long, take it to a separate article, taking a link to the article about the vehicle and adding a block "/History" (example: https://wiki.warthunder.com/(Vehicle-name)/History) and add a link to it here using the main template. Be sure to reference text and sources by using <ref></ref>, as well as adding them at the end of the article with <references />. This section may also include the vehicle's dev blog entry (if applicable) and the in-game encyclopedia description (under === In-game description ===, also if applicable).
Media
- Skins
- Videos
See also
External links
| SEPECAT | |
|---|---|
| Jet fighters | Jaguar A · Jaguar E · Jaguar GR.1 · Jaguar GR.1A · Jaguar IS* |
| SEPECAT was a joint venture between BAC (later BAe) and Bréguet (later merged with Dassault). Production were split between the two manufacturers. *Built by BAe and Hindustan Aeronautics Limited (HAL). | |
| Britain jet aircraft | |
|---|---|
| Blackburn | Buccaneer S.1 · Buccaneer S.2 · Buccaneer S.2B |
| British Aerospace | Harrier GR.7 · Sea Harrier FRS.1 (e) · Sea Harrier FRS.1 · Sea Harrier FA 2 |
| British Aircraft Corporation | Strikemaster Mk.88 |
| English Electric | Canberra B Mk 2 · Canberra B (I) Mk 6 · Lightning F.6 · Lightning F.53 |
| Gloster | Meteor F Mk 3 · Sea Meteor F Mk 3 · Meteor F Mk 4 G.41F · Meteor F Mk 4 G.41G · Meteor F Mk 8 G.41K · Meteor F Mk.8 Reaper |
| Javelin F.(A.W.) Mk.9 | |
| de Havilland | Vampire F.B.5 · Venom FB.4 · Sea Venom FAW 20 · Sea Vixen F.A.W. Mk.2 |
| Hawker | Sea Hawk FGA.6 · Hunter F.1 · Hunter F.6 · Hunter FGA.9 · Harrier GR.1 · Harrier GR.3 |
| Panavia | Tornado GR.1 · Tornado GR.4 · Tornado F.3 · Tornado F.3 Late |
| SEPECAT | Jaguar GR.1 · Jaguar GR.1A · Jaguar IS |
| Supermarine | Attacker FB 1 · Attacker FB.2 · Scimitar F Mk.1 · Swift F.1 · Swift F.7 |
| Foreign | Phantom FG.1 (USA) · Phantom FGR.2 (USA) · F-4J(UK) Phantom II (USA) |
| Australia | F-111C |
| India | ▄MiG-21 Bison |
| South Africa | ▄JAS39C |


