Difference between revisions of "T-70"
(→Description) |
U103352677 (talk | contribs) (→Pros and cons) (Tag: Visual edit) |
||
| Line 130: | Line 130: | ||
'''Pros:''' | '''Pros:''' | ||
| − | * Good frontal armour | + | * Good sloped frontal armour |
* Relatively good gun with high penetration | * Relatively good gun with high penetration | ||
* Good machine gun | * Good machine gun | ||
| Line 173: | Line 173: | ||
;Skins | ;Skins | ||
| + | |||
* [https://live.warthunder.com/feed/camouflages/?vehicle=ussr_t_70_1942 Skins and camouflages for the {{PAGENAME}} from live.warthunder.com.] | * [https://live.warthunder.com/feed/camouflages/?vehicle=ussr_t_70_1942 Skins and camouflages for the {{PAGENAME}} from live.warthunder.com.] | ||
Latest revision as of 14:31, 20 October 2024
Contents
Description
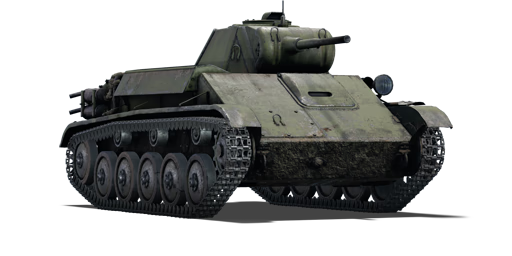
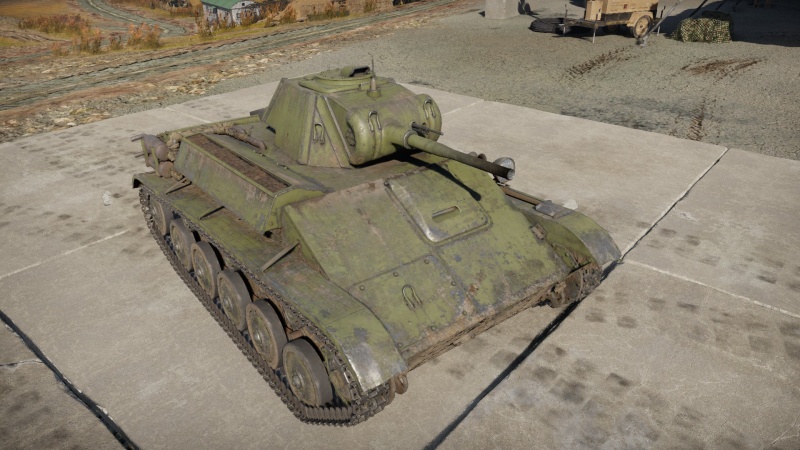
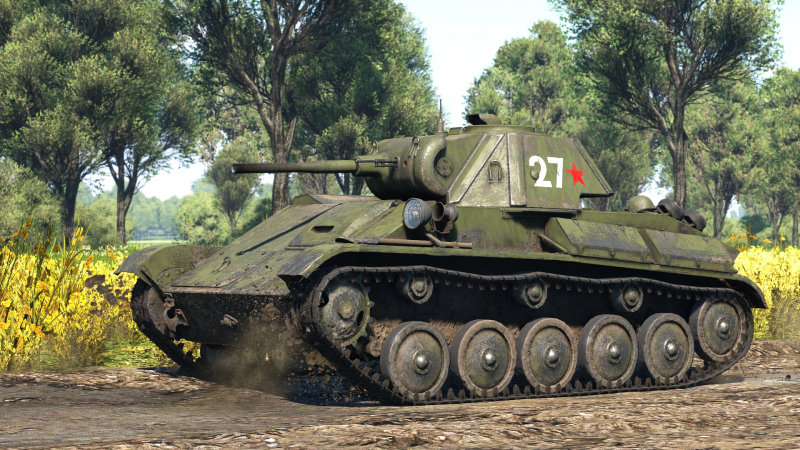
The T-70 was a Soviet tank developed from the preceding T-60 light tank. The T-70 replaced the T-60 in the role of reconnaissance tank as well as replacing the T-50 in the role of infantry support. The hull armour of the T-70 stayed the same as the T-60s, however a new turret featuring the 45 mm 20-K gun was installed with 50 mm thick armour at the front and 35 mm on the sides and back of the turret. The T-70 was designed by N. Astrov, the designer of the previous T-60 light tank at Factory No.38 in Kirov. The T-70 was powered by two automobile GAZ-202 engines which were placed on each side of hull, this proved problematic and after a few dozens were made, the engines were moved in-line on the right side of the hull. The conical turret was also replaced by a welded one allowing for easier production and moved to the left side of the hull. On 6th July 1943, Lieutenant B.V. Pavlovich destroyed four german tanks, three medium tanks and one Panther near the village of Pokrovka. On 26th March 1944, Sergeant Alexander Pegov ambushed a column of approximately 18 German tanks singlehandedly and took out one Panther, and immobilized another. The T-70 retreated and Pegov was promoted to a lieutenant and received the Hero of the Soviet Union award, the highest Soviet Military award at that time. The T-70s remained in service until 1948 and served as a basis for the SU-76 tank destroyer and ZSU-37 self-propelled anti-aircraft gun.
The T-70 was introduced during the Closed Beta Test for Ground Forces before Update 1.41. The T-70 is an upgunned T-60 tank, it shares the same two crew layout, meaning any penetrating hit will be fatal. The armour itself offers good protection due to its sloping, although HEAT-equipped cannons like those found on the German Pz.IV F1 or high velocity guns such as the PaK 36(r) found on the Marder tank destroyer have no issue penetrating the armour and destroying the T-70 in single hit. The T-70 is capable of penetrating nearly all its opponents with few exceptions such as the Matilda III. Flanking should still be the primary playstyle of the T-70, as it excels in ambushing due to its small size and low silhouette.
General info
Survivability and armour
With sloped 50 mm and 35 mm on the turret and hull, the turret can take quite a beating and have sustained no lasting damage other than scratches on the glorious green paint. However, note that you only have 2 crew members in an extremely cramped crew compartment and, especially if your enemy has a tank of higher BR, you're unlikely to survive more than one penetrating hit. As like most tanks, the weak spots are the side and back, and even .50 cal bullets will easily go through the thin side. That's why you must present the sloped front armour of the vehicle to the enemy, increasing the likelihood of bounces and non-penetration.
Armour type:
- Rolled homogeneous armour
- Cast homogeneous armour (Gun mantlet)
| Armour | Front | Sides | Rear | Roof |
|---|---|---|---|---|
| Hull | 35 mm (62°) Front glacis 35 mm (33-71°) Driver's port 45 mm (31°) Lower glacis |
15 mm | 10 mm (70°) Top 25 mm (43°) Bottom |
35 mm (28°) Front glacis 10 mm Fighting compartment 10 mm (19-25°) Rear |
| Turret | 35 mm (25°) Turret front 50 mm (cylindrical) Gun mantlet |
35 mm (22-25°) Sides 35+15 mm (22-25°) Joint areas |
35 mm (28-30°) | 15 mm |
Notes:
- Suspension wheels are 10 mm thick while tracks are 15 mm thick.
Mobility
| Game Mode | Max Speed (km/h) | Weight (tons) | Engine power (horsepower) | Power-to-weight ratio (hp/ton) | |||
|---|---|---|---|---|---|---|---|
| Forward | Reverse | Stock | Upgraded | Stock | Upgraded | ||
| Arcade | Expression error: Unexpected * operator. | 217 | Expression error: Unexpected round operator. | __.__ | |||
| Realistic | 124 | Expression error: Unexpected round operator. | __.__ | ||||
The T-70's forward speed is good but nothing impressive compared to the BT series. It does help you get out of sticky situations and it makes enemies harder to aim at your weak points. Though not the fastest, the T-70 can get to places within an acceptable time frame. Speed and acceleration are slightly lower on soft/uneven ground. Reverse speed is very poor and will not quickly get the tank out of danger, but fortunately the T-70's frontal protection increases its survivability while it slowly reverses.
With two car engines crammed together, this small tank is less than 10 tons with 254 HP - a quite decent HP/ton ratio. The suspension is very smooth, providing some ability to fire on the move, but also making it more difficult to quickly engage an enemy after stopping, as the vehicle will keep rocking back-and-forth until the suspension settles.
Modifications and economy
Armaments
Main armament
The T-70 has a decent cannon for its BR. Although it's the same gun as on the BT-5, it is still sufficient to penetrate common enemies. Stock round has a maximum penetration of 70 mm. Combined with the 29 g TNT, it is almost certain that the T-70 will frontally knock out every tank with a single shot. Even at more than 500 m away from the target, it still has 40-50 mm of penetration which is still enough to go through a lot of tanks' frontal armour. The tank has 6 degrees of gun depression which is only enough for some terrain, so it should be avoided to get into a hilly terrain. The 5 second reload (stock) isn't the best for its calibre which encourages the player to aim carefully at weak spots and disable the opponent in one shot. When facing heavily armoured tanks like the B1 and Matilda, the researchable APCR becomes pretty handy, but remember to only shoot at flat armour up close since APCR rounds lose penetration over distance or when hitting angled armour.
While the hull's shape is similar to late and post-war Soviet vehicles (T-54 1947, T-44, etc.), it is shorter and not angled as much. Still, this armour configuration is efficient and makes the most out of this little amount of steel, meaning the tank can bounce some shots if angled properly. The lower frontal plate, while thicker, is not angled as much, but transmission prevents most shots from injuring the crew when penetrating. The frontal armour of the turret is a semi-circular 50 mm thick steel plate, which provides decent protection at long ranges (very bouncy). Thanks to its small profile, this tank's turret are nearly invincible when hulled-down at ranges since no gun is accurate enough at this BR to efficiently take down the light tank. Beware the thin side armour, however: most HMGs can penetrate it, and the ammo rack located on the left side makes the tank even more vulnerable, so make sure it's protected.
| 45 mm 20-K | Turret rotation speed (°/s) | Reloading rate (seconds) | |||||||||||
|---|---|---|---|---|---|---|---|---|---|---|---|---|---|
| Mode | Capacity | Vertical | Horizontal | Stabilizer | Stock | Upgraded | Full | Expert | Aced | Stock | Full | Expert | Aced |
| Arcade | 90 | -6°/+20° | ±180° | N/A | 5.71 | 7.91 | 9.60 | 10.62 | 11.29 | 5.20 | 4.60 | 4.24 | 4.00 |
| Realistic | 3.57 | 4.20 | 5.10 | 5.64 | 6.00 | ||||||||
Ammunition
| Penetration statistics | |||||||
|---|---|---|---|---|---|---|---|
| Ammunition | Type of warhead |
Penetration @ 0° Angle of Attack (mm) | |||||
| 10 m | 100 m | 500 m | 1,000 m | 1,500 m | 2,000 m | ||
| BR-240 | APHEBC | 70 | 67 | 58 | 47 | 39 | 32 |
| BR-240SP | APBC | 73 | 70 | 60 | 50 | 41 | 34 |
| BR-240P | APCR | 94 | 87 | 64 | 43 | 29 | 20 |
| Shell details | ||||||||||||
|---|---|---|---|---|---|---|---|---|---|---|---|---|
| Ammunition | Type of warhead |
Velocity (m/s) |
Projectile mass (kg) |
Fuse delay (m) |
Fuse sensitivity (mm) |
Explosive mass (TNT equivalent) (g) |
Ricochet | |||||
| 0% | 50% | 100% | ||||||||||
| BR-240 | APHEBC | 760 | 1.43 | 1.2 | 9 | 29.26 | 48° | 63° | 71° | |||
| BR-240SP | APBC | 757 | 1.43 | - | - | - | 47° | 60° | 65° | |||
| BR-240P | APCR | 985 | 0.85 | - | - | - | 66° | 70° | 72° | |||
Ammo racks

| Full ammo |
1st rack empty |
2nd rack empty |
3rd rack empty |
4th rack empty |
5th rack empty |
Visual discrepancy |
|---|---|---|---|---|---|---|
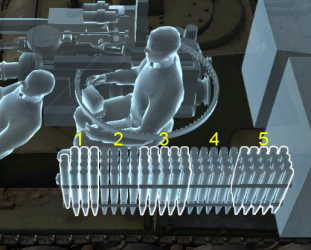
| 90 | 77 (+13) | 61 (+29) | 41 (+49) | 21 (+69) | 1 (+89) | No |
Notes:
- Racks disappear after you've fired all shells in the rack.
- To go into battle with the flank almost empty of ammo, pack 21 (+69) (racks 1 to 4 empty).
Machine guns
| 7.62 mm DT | ||||
|---|---|---|---|---|
| Mount | Capacity (Belt) | Fire rate | Vertical | Horizontal |
| Coaxial | 945 (63) | 600 | N/A | N/A |
The small calibre of the DT machine gun makes it largely ineffective against all armoured vehicles but the ones with an open compartment. It still can be used to ping targets as a rangefinding help. The clip capacity of the machine gun is quite poor, as it relies on a magazine of 63 bullets instead of a belt like similar machine guns from other nations.
Usage in battles
Unlike later tanks, the T-70 presents a strange configuration: motor and turret are side by side, meaning that exposing the tank's back will not immobilize it. With its turret definitively leaning to the left, a smart player will prefer going around corners with the obstacle on the right side of the tank. This tactic has two effects: it decreases the size of the target for the enemy and protects the crew with the engine block, at the expense of being immobilized if shot from the right side. Try to avoid being shot to the left side since there is a big ammo rack on the whole left side of the vehicle. The rocky suspension puts T-70 at a disadvantage in sudden one-on-one encounters, so rushing for the nearest piece of cover instead of stopping to take aim may be a better option, unless the enemy is unaware of the light tank. Any player familiar with low-rank tanks will be comfortable with the 45 mm 20-K cannon. Some peculiarities to the T-70 is its good gun depression of -6° and slow turret traverse.
Enemies worth noting:
- Pz.III J1: the Pz.IIIs equipped with long-barreled 50 mm cannons are threatening due to their high penetration. Even the T-70's sloped 35 mm UFP will not stop their rounds. The T-70 will get destroyed easily upon being penetrated due to the cramped interior with only 2 crews. Luckily the Pz.IIIs are also poorly protected against T-70's 45 mm gun. The turret is especially weak so it is generally a good idea to disable their turret crews. Note that when angling, the Pz.IIIs' hull armour can become stronger than they appear thus harder to penetrate.
- B1 bis/ter: the B1 heavy tanks are the true tough nuts to crack. It is generally a good idea to engage them as close as you can get, the ideal distance being point blank. This way you can utilise your superior manoeuvrability and maximise your penetration. Both B1s cannot reliably penetrate the T-70's frontal armour, so you can confidently take some hits. Aim at their turret ring, or if that is bushed up, their commander's cupola to disable the 47 mm cannon's gunner. The shrapnel may also destroy the turret ring. You can also break its tracks to pin it down. Do not waste your shells at anywhere else other than these 3 spots when the B1 faces you frontally. When the B1 is immobile, quickly flank it. If it is a B1 bis (flat hull side and exposed tracks), flank to its side and hit its flat hull side without any angling. If it is a ter model (slightly sloped hull side with larger mudguards above the tracks), manoeuvre to its rear and destroy its engine as your shells will most likely bounce off its thickened side. Fire at its turret and knock out the turret gunner again and again until it has no crew left to replenish said position, giving you the kill.
- Pz.IV C & Pz.IV E: the HEAT shells of the short-barreled 75 mm KwK37 cannon can frontally penetrate the T-70. With the disadvantage of only having 2 crew, it is easily knocked out by a single shot.
Pros and cons
Pros:
- Good sloped frontal armour
- Relatively good gun with high penetration
- Good machine gun
- Compact size makes it a small target
- Thick gun mantlet
Cons:
- Only two crew members
- Slow reloading
- Very vulnerable from sides
- Very slow turret traverse (hand cranked)
History
Development
In 1942, advances in armoured warfare caused light tanks in Soviet service to be considered inadequate in terms of protection, firepower, and mobility in comparison to the all-around T-34 medium tank. The only advantage the light tanks present was that small factories could produce these, unable to handle the machining process of the medium and heavy tanks in Soviet service. The two light tanks in service however, the T-50 and the T-60 were inadequate in terms of Soviet doctrine. The T-50 was complicated and expensive to produce, and the T-60 had poor cross-country mobility and a weak 20 mm autocannon.
The T-70 light tank was designed to solve this issue, though it started with a glaring mechanical issue of having two engines, one for each track. The T-70M, a redesigned version that is still called the "T-70", fixes this with one engine on the right side of the hull and normal transmission layout. The turret was also changed in the "M" designation to be easily welded and moved to the left of the hull to compensate for the engine on the right. In the end, it was a 9-ton tank with a 45 mm gun and only had two crew members.
However, at this point of the war, it is increasingly clear that the light tank and the role of an infantry tank were obsolete. The T-70 was also insufficient of coordinating an armoured unit due to the two crew members, forcing the commander in the turret to be a gunner, loader, and radio operator as well. An attempt to remedy this was the T-80 light tank design, which was a stronger T-70 with a two-man turret, but was deemed unnecessary and all light tank production ceased in October 1943, with the remaining ones issued to artillery units or other rear-echelon duties.
Combat usage
Despite its inferiority, the T-70 had a few moments to shine. On July 6, 1943, Lt B.V. Pavlovich of the 49th Guards tank brigade engaged and destroyed four German medium tanks near Pokrovka village. On March 26, 1944, Sgt Alexander Pegov of the Third Guards tank army in a T-70 tank ambushed a Panther tank in a range of 150 to 200 m with APCR rounds, setting it on fire. He immobilized another a moment later. The Panthers blocked a vital road as they were immobilized, and Pegov was decorated as a Hero of the Soviet Union.
The T-70 was also used as the platform for the SU-76 Soviet tank destroyer, featuring a wider and longer chassis. The main production variant for this tank destroyer was the SU-76M. The T-70 was also used as a basis for an anti-aircraft platform called the T-90 SPAAG. This was cancelled in 1943 in favour of the ZSU-37 however, which is a repurposed SU-76M chassis.
The T-70 served all the way to 1948 in Soviet inventory. Despite its inferior status, it was a valuable war commodity as it helped fill in roles when the T-34 couldn't be spared to do so. About 8,226 of this vehicle was produced during its production life of 1942 to 1943.
| Archive of the in-game description | |
|---|---|
|
This tank was adopted by the Red Army in 1942 as a replacement for the T-60 and put into mass production in three factories at once. In comparison to the T-60, it had stronger armour, more powerful weaponry and a powertrain consisting of two sequentially paired six-cylinder petrol engines. The transmission and driving wheels were placed in the front of the tank. The hull was welded together from rolled armour plates, and the welds were strengthened with rivets. The frontal and rear hull plates were set at a sloping angle. The vehicle was equipped with a 45 mm Mod. 1938 tank cannon and a DT coaxial machine gun. It was not equipped with a radio set. T-70 light tanks served jointly with T-34 tanks in tank brigades and mixed regiments. They underwent their trial by fire in June-July 1942, suffering significant losses. Their first battles revealed the weaknesses of the new light tanks in combat. Their weaponry was not powerful enough to go toe to toe with German medium tanks, and their armour was insufficient for the tanks to be used for direct infantry support. In addition, there were only two tankers in the crew, one of which was overloaded with numerous responsibilities, and the vehicles had no means of communication. All of this significantly weakened their value in the units they operated in and led to increased losses. According to some tank commanders, the T-70 was ideally suited for chasing retreating enemies, a characteristic which became important in 1943. The T-70's powertrain and running gear were more reliable than those of the T-34. This allowed them to make long treks. The T-70 was a quiet vehicle, in stark contrast to the roaring engine and rumbling tracks of the T-34, which could be heard from up to 1.5 km away at night. | |
Media
- Skins
- Videos
See also
- Related development
External links
| Gorky Automobile Plant (Го́рьковский автомоби́льный заво́д) | |
|---|---|
| SPAA | GAZ-AAA (4M) · GAZ-AAA (DShK) · GAZ-MM (72-K) |
| ZUT-37 · ZSU-37 | |
| Light Tank | T-60 · T-70 · T-80 |
| Tank Destoyer | SU-76M · SU-76M (5th Gv.Kav.Corps) · SU-85A |
| ZiS-30 | |
| Rocket | BM-8-24 |
| USSR light tanks | |
|---|---|
| T-26 | T-26 · T-26 (1st Gv.T.Br.) · T-26-4 · T-26E |
| BT | BT-5 · RBT-5 · BT-7 · BT-7 TD · BT-7M · BT-7A (F-32) |
| T-50 | T-126 · T-50 |
| T-70 | T-70 · T-80 |
| PT-76 | PT-76B · PT-76-57 · Object 906 |
| BMP | BMP-1 · BMP-2 · BMP-2M · BMP-3 |
| BMD | BMD-4 |
| 2S25 | 2S25 · 2S25M |
| Wheeled | BA-11 · BTR-80A |
| Other | T-60 · Object 685 · 2S38 |
| China | ▂Type 62 |


