Difference between revisions of "Shipboard reconnaissance aircraft"
m (→Comparison: F1M2 Added (Also - When Are Spaded Stats Gonna Be Known)) |
m (→Comparison) |
||
| Line 66: | Line 66: | ||
|- | |- | ||
| [[File:Kingdom_Italy_flag.png|30px|link=]] || [[Ro.43]] || 412 <br> ''at 4,000 m'' || 17 || 2 x [[Breda-SAFAT (7.7 mm)|7.7 mm Breda-SAFAT]]|| 900 || 1 x [[Breda-SAFAT (7.7 mm)|7.7 mm Breda-SAFAT]] || 900 || colspan=2 | - | | [[File:Kingdom_Italy_flag.png|30px|link=]] || [[Ro.43]] || 412 <br> ''at 4,000 m'' || 17 || 2 x [[Breda-SAFAT (7.7 mm)|7.7 mm Breda-SAFAT]]|| 900 || 1 x [[Breda-SAFAT (7.7 mm)|7.7 mm Breda-SAFAT]] || 900 || colspan=2 | - | ||
| + | |- | ||
| + | | [[File:France_flag.png|30px|link=]] || [[GL.832HY]] || 289 <br> ''at 2,500 m'' || 22.6 || colspan=2 | - || 1 x [[Lewis (7.7 mm)|7.7 mm Lewis]] || 550 || colspan=2 | - | ||
|- | |- | ||
|} | |} | ||
Revision as of 17:27, 15 June 2023
Shipboard reconnaissance aircraft were introduced into War Thunder in Update "Winged Lions" as an additional vehicle available for naval units.
Contents
Description
While hydroplanes were present in War Thunder prior to Update "Winged Lions", all were standalone aircraft present in the tech tree that could be piloted in air battles by the player. Shipboard reconnaissance aircraft allow large bluewater ships to utilize their plane catapults to send scout planes to perform reconnaissance of an area, land on capture zones, and pester enemy ships with their onboard weaponry.
| Ship-launched reconnaissance aircraft | |
|---|---|
| USA | O3U-1 · OS2U-1* · SOC-1 |
| Germany | Ar 196 A-3* |
| USSR | KOR-1 |
| Britain | Osprey Mk IV · Walrus Mk.I |
| Japan | E7K2 · E8N2 · E13A1 · F1M2* |
| Italy | Ro.43 |
| France | GL.832HY · Loire 130С |
| *Available standalone in tech tree | |
Uses
Spotting
This is the first thing you will notice after launching the plane. Enemy ships across most of the map will be visible from the air, allowing you much greater situational awareness. This does not affect spotting capabilities of the ship itself.
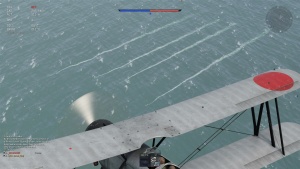
Other than spotting ships, one can also spot torpedoes - these leave a very visible trail in the water, and can be spotted from kilometres away at altitude, allowing the captain to easily avoid them without affecting aim.
Capturing point
One of the primary use cases for the shipborne hydroplane is taking the cap points. It's particularly useful on large maps in high ranks, where it can take minutes for even the quickest bluewater ships to arrive at the cap point. Also later, throughout the game, if there's an enemy cap point without hostile ships in proximity, it's worth attempting capping with the plane as well.
For a successful capping, approach the cap at maximum speed, then reduce the throttle to zero and quickly bleed velocity through sharp turns and/or using the rudder (default Q/E on PC) down to IAS of 200 km/h or less, while being careful to avoid a stall, and gently land. If you would like to keep a constant speed on the water in order to avoid getting hit, set your throttle to about 55% and adjust from there on.
Smoke screen
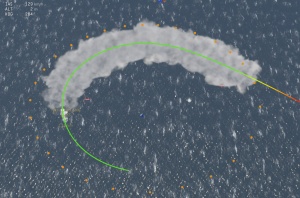
One of the most common uses of the hydroplane is to deploy a smoke screen. Unlike the Smokescreen modification on ships, shipboard reconnaissance aircraft can deploy the screen directly between you and the enemy, allowing for a more efficient cover and more time to escape. While escaping from a particularly persistent enemy, a hydroplane can deploy a wall of smoke during the time that the smoke on the ship is still reloading, allowing for constant cover, switching back and forth between smoke from the ship and smoke from the aircraft.
Finally, the hydroplane itself can benefit from the smoke screen. Approach the cap point towards its edge and begin dropping smoke as you're about to start capturing, then make a turn towards the center of the cap, hiding yourself behind the smoke.
Offense and Defence
Hydroplanes equipped with bombs can directly engage enemy ships to defend your bluewater ship. While this is a very risky strategy, likely a suicidal attempt that usually ends without success, it can pay off with some luck and manoeuvring. Hydroplanes suffer from being extremely fragile - often a single hit from a 20 mm can be enough to take them down. But even two small bombs dropped on an ammo rack of an enemy destroyer can turn the tide. Using mountains, icebergs, or other hard cover is highly recommended, as within 500 metres it becomes tricky to survive without a hit even for the most skilled pilots.
Alternatively, and often more successfully, hydroplanes can be used to stop enemy hydroplanes, bombers, or even fighters. The Ar 196 A-3 is a particularly good fit for that, as its 20 mm cannons can deal damage quickly and efficiently. Lower calibre guns require more time to inflict critical damage, making it riskier when the enemy has any defensive armament. Rear-facing defensive armament is extremely unreliable against hostile aircraft, but it can still be used against unsuspecting enemy hydroplanes, in particular when aimed manually.
Reloading
In Realistic battles, aircraft will not reload their bombs or guns in-flight like they do in Arcade. There is no way of landing back on the ship or at the airfield either. This leaves only two options for reloading: either landing on a naval landing strip, or by landing on a capture point, which will reload ammunition much like it does for tanks in the ground battles.
Comparison
| Aircraft | Max speed (km/h) | Turn time (s) | Offensive armament | Defensive armament | Suspended armament | ||||
|---|---|---|---|---|---|---|---|---|---|
| Type | Fire rate | Type | Fire rate | Type | TNT equiv. (kg) | ||||
| |
OS2U-1 | 296 at 1,700 m |
33 | 1 x 7.62 mm Browning | 1,000 | 1 x 7.62 mm Browning | 1,000 | 2 x AN-M30A1 (100 lb) | 24.5 |
| |
SOC-1 | 296 at 1,700 m |
33 | 1 x 7.62 mm Browning | 1,000 | 1 x 7.62 mm Browning | 1,000 | 2 x AN-M30A1 (100 lb) | 24.5 |
| |
Ar 196 A-3 | 320 at 2,000 m |
21 | 2 x 20 mm MG FF 1 x 7.92 mm MG 17 |
520 1,200 |
1 x 7.92 mm MG 15 | 1,000 | 2 x SC50JA (50 kg) | 25 |
| |
KOR-1 | 412 at 4,000 m |
17 | 2 x 7.62 mm ShKAS | 1,800 | 1 x 7.62 mm ShKAS | 1,800 | 2 x FAB-100sv (100 kg) | 36.02 |
| |
Osprey Mk IV | 412 at 4,000 m |
17 | 1 x 7.7 mm Vickers E | 900 | 1 x 7.7 mm Lewis | 551 | - | |
| |
Walrus Mk.I | 412 at 4,000 m |
17 | - | 2 x 7.7 mm Lewis | 551 | 4 x G.P. Mk.IV (250 lb) | 30.7 | |
| |
E7K2 | 412 at 4,000 m |
17 | - | 2 x 7.7 mm Type 92 | 600 | 4 x Navy Type 97 Number 6 (60 kg) | 25.3 | |
| |
E8N2 | 412 at 4,000 m |
17 | 1 x 7.7 mm Type 97 | 900 | 1 x 7.7 mm Type 92 | 600 | 2 x Navy Type 97 Number 6 (60 kg) | 25.3 |
| |
E13A1 | 412 at 4,000 m |
17 | - | 1 x 7.7 mm Type 97 | 900 | 4 x Navy Type 97 Number 6 (60 kg) | 25.3 | |
| |
F1M2 | 412 at 4,000 m |
17 | 2 x 7.7 mm Type 97 | 900 | 1 x 7.7 mm Type 97 | 900 | 2 x Navy Type 97 Number 6 (60 kg) | 25.3 |
| |
Ro.43 | 412 at 4,000 m |
17 | 2 x 7.7 mm Breda-SAFAT | 900 | 1 x 7.7 mm Breda-SAFAT | 900 | - | |
| |
GL.832HY | 289 at 2,500 m |
22.6 | - | 1 x 7.7 mm Lewis | 550 | - | ||
See also
- Category:Hydroplanes
- Drones - Another class of aircraft launched from a different vehicle.


