Difference between revisions of "T-34-85 (S-53) (China)"
(→Usage in battles) (Tag: Visual edit) |
(→Usage in battles) (Tag: Visual edit) |
||
| Line 180: | Line 180: | ||
[[Tiger H1]] / E: | [[Tiger H1]] / E: | ||
| − | The Tiger's weak spots are the opposite with the Panthers. Their hull are unsloped and rather thin, while the gun mantlet is weirdly shaped and can absorb quite some shells. The best engaging range remains the same, within 500m. If the Tiger is angling, aim at the turret ring to disable the gunner, if not destroying it. Or aim at the hull side below the side skirt, which is only 60mm. If it is not angling, aim between the driver's vision port and the MG for an instant kill. Avoid shooting at these two parts as they tend to bounce / absorb shells. | + | The Tiger's weak spots are the opposite with the Panthers. Their hull are unsloped and rather thin, while the gun mantlet is weirdly shaped and can absorb quite some shells. The best engaging range remains the same, within 500m. If the Tiger is angling, aim at the turret ring to disable the gunner, if not destroying it. Or aim at the hull side below the side skirt, which is only 60mm. If it is not angling, aim between the driver's vision port and the MG for an instant kill. Avoid shooting at these two parts as they tend to bounce / absorb shells. For the Tiger E, don't shoot at the lower glacis as there will be add-on tracks installed there, making it harder to penetrate. |
[[Ho-Ri Production|Ho-Ri]]: | [[Ho-Ri Production|Ho-Ri]]: | ||
Revision as of 07:58, 8 June 2020
Contents
Description
The ␗Т-34-85 (S-53) is a rank Chinese medium tank
with a battle rating of (AB), (RB), and (SB). It was introduced in Update 1.91 "Night Vision".
General info
Survivability and armour
Armour type:
- Rolled homogeneous armour (Hull, Turret roof)
- Cast homogeneous armour (Turret, Cupola, Driver's hatch, Machine gun port)
| Armour | Front (Slope angle) | Sides | Rear | Roof |
|---|---|---|---|---|
| Hull | 45 mm (60°) Front glacis 45 mm (60°) Lower glacis 75 mm (60°) Driver's hatch 65 mm (30°) Machine gun port |
45 mm (39-40°) Top 45 mm Bottom |
45 mm (47-49°) Top 45 mm (46°) Bottom |
20 mm |
| Turret | 90 mm (1-69°) Turret front 90 + 40 mm (8-61°) Gun mantlet |
75 mm (19-22°) Front 2/3rd 52 mm (13-19°) Rear 1/3rd |
52 mm (9°) | 20 mm |
| Armour | Sides | Roof | ||
| Cupola | 90 mm | 20 mm |
Notes:
- The gun mantlet has 90 mm in front with additional small and thin 40 mm plates on the sides of the gun. See here.
- Suspensions wheels are 20 mm thick and tracks are 18 mm thick
The armor layout of the T-34-85 (S-53) is virtually identical to the T-34-85. The hull armor, while well angled, is very thin for its rank and can be penetrated by nearly any tank cannon. Creative use of angling can still lead to the occasional bounce. The 90 mm thick turret is also thin for its rank, but the good sloping on the sides can also lead to bounces with some luck.
The T-34-85 has very poor survivability due to the fact that all 5 crew members are packed close to each other. A hull penetration will likely knock out all of them. However, inexperienced players that face this tank will often shoot the lower hull part of the driver hatch, which is infamous for being surprisingly resilient.
Mobility
| Game Mode | Max Speed (km/h) | Weight (tons) | Engine power (horsepower) | Power-to-weight ratio (hp/ton) | ||||
|---|---|---|---|---|---|---|---|---|
| Forward | Reverse | Stock | AoA | Stock | Upgraded | Stock | Upgraded | |
| Arcade | -0.2 | 0.2 | 775 | -3875 | __.__ | |||
| Realistic | 442 | -2210 | __.__ | |||||
The T-34-85 (S-53) has excellent mobility for a medium tank, as expected of a T-34. It can reach high speeds both on and off road thanks to its wide tracks. The reverse speed is not exactly great, but it is significantly better than those of comparable Shermans, Panthers, and early T-34s (76 mm, 57 mm variants).
Armaments
Main armament
The T-34/85(S-53) is equipped with the fantastic ZiS-S-53 cannon, with penetrates about 145mm on close range with the stock BR465K round. This might not be enough to fight Tiger IIs frontaly, but it works perfectly with other tanks, which are less armored or you can engage them from the side.
The gun depression is like on many other soviet(based) vehicles quite poor, with only 5° there are no hulldown manouvers possible.
To the ammunition:
The stock round is the BR365K which has 148mm of penetration on close range. The APHE round has a very good oneshot-potential with 48g of A-IX-2(73,92g of TNT equivalent).
The second round, the BR365A ,,only" has about 135mm penetration on point blank. But instead of having 48g it has 164g TNT of explosives inside the shell. This increases the post-penetration effect dramaticly.
APCR is also aviable, but keep in mind that it hates sloped armor and it has very poor post-penetretion damage.
This BR365-P penetrates about 195mm of RHA on close range.
The HE-shell is called O-365K. With 660g of TNT inside it performs pretty good against trucks&halftrucks.
Ammunition
| Penetration statistics | |||||||
|---|---|---|---|---|---|---|---|
| Ammunition | Type of warhead |
Penetration @ 0° Angle of Attack (mm) | |||||
| 10 m | 100 m | 500 m | 1,000 m | 1,500 m | 2,000 m | ||
| BR-365A | APHEBC | 135 | 133 | 125 | 115 | 106 | 97 |
| BR-365K | APHE | 147 | 143 | 126 | 107 | 90 | 77 |
| BR-365P | APCR | 193 | 187 | 154 | 120 | 94 | 74 |
| O-365K | HE | 10 | 10 | 10 | 10 | 10 | 10 |
| Shell details | ||||||||||
|---|---|---|---|---|---|---|---|---|---|---|
| Ammunition | Type of warhead |
Velocity (m/s) |
Projectile Mass (kg) |
Fuse delay (m) |
Fuse sensitivity (mm) |
Explosive Mass (TNT equivalent) (g) |
Normalisation at 30° from horizontal |
Ricochet | ||
| 0% | 50% | 100% | ||||||||
| BR-365A | APHEBC | 792 | 9.2 | 1.2 | 14.0 | 164 | +4.0° | 48° | 63° | 71° |
| BR-365K | APHE | 792 | 9.2 | 1.2 | 14.0 | 73.9 | -1.0° | 47° | 60° | 65° |
| BR-365P | APCR | 1,050 | 4.99 | N/A | N/A | N/A | +1.5° | 66° | 70° | 72° |
| O-365K | HE | 793 | 9.54 | 0.1 | 0.3 | 660 | +0.0° | 79° | 80° | 81° |
Ammo racks

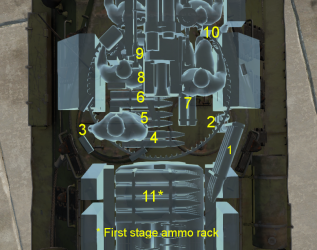
| Full ammo |
1st rack empty |
2nd rack empty |
3rd rack empty |
4th rack empty |
5th rack empty |
6th rack empty |
Visual discrepancy |
|---|---|---|---|---|---|---|---|
| 60 | 51 (+9) | 41 (+19) | 31 (+29) | 21 (+39) | 11 (+49) | 1 (+59) | no |
Turret empty: 24 (+12)
Machine guns
| 7.62 mm DT | ||||||
|---|---|---|---|---|---|---|
| Coaxial mount | ||||||
| Capacity (Belt capacity) | Fire rate (shots/minute) |
Vertical guidance |
Horizontal guidance | |||
| 1,890 (63) | 600 | N/A | N/A | |||
Usage in battles
While the T-34-85 Gai is a fairly well-rounded tank, its poor armor and high speed mean that one should play it more like a light tank than a medium. The gun is very lethal but the penetration is not particularly good, so it is better to flank and go for side shots, which can instantly knock out all but the largest and most spacious opponents. During frontal engagements, Tiger Is should be shot in the flat portions of the hull (avoiding the driver's port), Panthers should be shot in the turret (in the less curved portion of the mantlet) or possibly in the lower glacis, and non-Jumbo Shermans can generally be shot anywhere. The Tiger II (P) is only vulnerable in a small portion of the turret cheeks and the Tiger II (H) is essentially frontally immune, so for these kinds of targets, circle around to get a good look at the hull sides and let the slope modifiers take care of the rest. Watch out for American tanks like the M4A3 (76) W and T25, as they have vertical stabilizers and can often shoot first if they are aware of you.
In AB, you should play this tank like any other T-34. Push because you have a pretty well-rounded tank and will generally be able to adapt to whatever situation that develops. The AB meta generally favors more heavily armed and armored tanks due to the presence of markers making flanking and ambushes more difficult, so play carefully and take advantage of your high mobility.
In RB, play this tank offensively yet carefully. Use your speed and keep up with your teammates, or alternatively play it like a light tank and go on long flanks. In RB, one will often encounter enemy flankers like the infamous M18 Hellcat or R3 T20 FA-HS; while the main gun is adequate for dispatching these soft targets, the heavy machine gun can also rip through them in a pinch, particularly from the sides. The machine gun can be especially helpful if one's tank is otherwise disabled due to a jammed turret ring, destroyed gun breech, etc. Diving aircraft expecting to strafe an innocuous T-34 can also be given a nasty surprise, though the DShK's small belt capacity makes this more difficult.
In SB, play this tank very cautiously because the optics aren't that good and most of the time you will face tanks from pretty far distances. Panthers generally have better optics than you so try to avoid encounters with Panthers or Tigers.
Enemies worth noting:
Panther A / D, Tiger II P:
The Panthers are one of the most common tanks around 5.7, and they post a great threat with their deadly long 75mm cannon, thick frontal armor and adequate speed. You want to avoid engaging them at long range as the T-34 has only x3.5 scope magnification, making long range shooting super hard. Engage the Panthers within 500m and avoid shooting their frontal hull. Their number 1 weak spot is the gun mantlet, which is only 100mm and has a flat part in the middle. That is where you want to aim at, the T-34's APHE has sufficient damage to instantly destroy the Panther even form its turret. The second weak spot is of course the side, guaranteeing an instant kill. Generally APHE is enough to deal with the Panthers, and no APCR is needed.
For the Tiger II P, also aim at the vertical area of the frontal turret which is also 100mm. The best tactic is still flanking.
Tiger H1 / E:
The Tiger's weak spots are the opposite with the Panthers. Their hull are unsloped and rather thin, while the gun mantlet is weirdly shaped and can absorb quite some shells. The best engaging range remains the same, within 500m. If the Tiger is angling, aim at the turret ring to disable the gunner, if not destroying it. Or aim at the hull side below the side skirt, which is only 60mm. If it is not angling, aim between the driver's vision port and the MG for an instant kill. Avoid shooting at these two parts as they tend to bounce / absorb shells. For the Tiger E, don't shoot at the lower glacis as there will be add-on tracks installed there, making it harder to penetrate.
In a frontal engagement, APCR is required as the APHEs don't have enough penetration. With APCR loaded, aim at the further sides of the fighting compartment, away from the gun, because the further from the gun, the thinner the armor gets, with the thinnest part being around 160mm unsloped. Penetrating there will knock out its loader, gunner or commander, or detonating the ammo. Of course, the best way is still side-shooting with APHE.
Panzer IV/70, Jagdpanzer 38(t):
These small tank destroyers with their well angled frontal armor can be quite a problem from a distance. With APHE, you can disable their transmission by shooting at their lower glacis. Now if you can, flank them. The 85mm APHE does a great job at penetrating sloped, thin armor, so you don't have to get to their absolute sides. For the Pz IV/70, you can also aim at the downward part of the gun mantlet since the shell might ricochet downwards into the hull, knocking out every crew. The Jgpz 38t doesn't have this problem, so side-shooting is required to destroy it effectively.
This is another common enemy. It is recommended to use the BR-365A, the one with less pen but more explosives. The reason is that it is better at penetrating sloped armor, which the Jumbo has. With that shell you can easily destroy a M4A3E2 who's not angling. If it is, aim at the hull side just above the tracks, or load APCR and shoot straight at its gun mantlet. Against a 75mm M4A3E2 you can relax a bit as it will struggle to penetrate your armor, but your cupola is a rather large weak spot and a shot through there can knock out the T-34. Be more careful with the M4A3E2 76 W, as they can easily pierce through your armor.
Modules
| Tier | Mobility | Protection | Firepower | ||
|---|---|---|---|---|---|
| I | Tracks | Parts | Horizontal Drive | BR-365A | |
| II | Suspension | Brake System | FPE | Adjustment of Fire | |
| III | Filters | Crew Replenishment | Elevation Mechanism | BR-365P | |
| IV | Transmission | Engine | Artillery Support | ||
Pros and cons
Pros:
- Excellent gun with adequate penetration, destructive damage and good reload rate
- 56 km/h top speed and great manoeuvrability allows it to reposition easily
- 5-man crew increases survivalility
- Access to BR-365P APCR to effectively penetrate tough tanks up cloes (M4A3E2s, Tigers & Panthers)
- Has two types of AP for players to choose: BR-365K with higher pen but less TNT, and BR-365A with less pen but plenty of TNT
- Similar playstyle with the previous T-34s which is beginner-friendly
- Fast turret traverse to easily deal with targets from multiple directions
- Sloped hull and round frontal turret might bounce small caliber shells
Cons:
- Armour is extremely thin, providing very limited protection against common guns (American 76mm, British 17pdr, German 75mm & 88mm, etc)
- Crews are closely packed, a well-aimed shot tend to kill them all
- 5 degrees gun depression is below average
- Large turret profile makes it easier to get spotted & shot
History
Describe the history of the creation and combat usage of the vehicle in more detail than in the introduction. If the historical reference turns out to be too long, take it to a separate article, taking a link to the article about the vehicle and adding a block "/History" (example: https://wiki.warthunder.com/(Vehicle-name)/History) and add a link to it here using the main template. Be sure to reference text and sources by using <ref></ref>, as well as adding them at the end of the article with <references />. This section may also include the vehicle's dev blog entry (if applicable) and the in-game encyclopedia description (under === In-game description ===, also if applicable).
Media
See also
Paste links to sources and external resources, such as:
- topic on the official game forum;
- encyclopedia page on the tank;
- other literature.
| China medium tanks | |
|---|---|
| ZTZ59 | Type 59 · ZTZ59A · ZTZ59D1 |
| ZTZ69 | Type 69 · Type 69-IIa |
| ZTZ88/96 | ZTZ88A · ZTZ88B |
| ZTZ96 · ZTZ96A · ZTZ96A (P) | |
| ZTZ99 | ZTZ99-II · ZTZ99-III |
| ZTZ99A | ZTZ99A · WZ1001(E) LCT |
| Export series | MBT-2000 · VT4A1 |
| ROC | CM11 |
| Other | Т-34-85 Gai · Object 122MT "MC" |
| Bangladesh | T-69 II G |
| Japan | ␗Chi-Ha · ␗Chi-Ha Kai |
| Pakistan | Al-Khalid-I |
| USA | ␗M4A4 · ␗M4A4 (1st PTG) · ␗M4A1 (75) W · ␗M48A1 · ␗M60A3 TTS |
| USSR | ␗T-34 (1943) · ␗Т-34-85 (S-53) · T-34-85 No.215 · Т-62 №545 |


