Difference between revisions of "SARC MkVI (6pdr)"
(Added About template) |
U109009388 (talk | contribs) (→Mobility) (Tag: Visual edit) |
||
| (15 intermediate revisions by 7 users not shown) | |||
| Line 1: | Line 1: | ||
| − | |||
| − | |||
| − | |||
| − | |||
| − | |||
{{Specs-Card | {{Specs-Card | ||
|code=uk_marmon_herrington_mk_6_6pdr | |code=uk_marmon_herrington_mk_6_6pdr | ||
| − | |images={{Specs-Card-Image|GarageImage_{{PAGENAME}}.jpg | + | |images={{Specs-Card-Image|GarageImage_{{PAGENAME}}.jpg}} |
}} | }} | ||
| Line 21: | Line 16: | ||
== General info == | == General info == | ||
=== Survivability and armour === | === Survivability and armour === | ||
| − | + | Being a light tank, one probably won't expect much from the SARC in terms of armour and overall survivability, and rightfully so- | |
| − | |||
| − | + | while it can survive some MG fire from the front, HMGs will pen the sides, quickly destroying the SARC , autocannoms are even more dangerous, they will shred through it, tearing the SARC to pieces. Shots fired from non-automatic weaponry will sometimes just pass through the vehicle knocking out only a crewmember or two, don't rely on that though. The SARC is not a vehicle to be shot at in. | |
'''Armour type:'''<!-- The types of armour present on the vehicle and their general locations --> | '''Armour type:'''<!-- The types of armour present on the vehicle and their general locations --> | ||
| Line 46: | Line 40: | ||
=== Mobility === | === Mobility === | ||
| − | {{Specs-Tank-Mobility}} | + | Having a good power to weight ratio of 17 hp/ton, allowing it to reach a respectable top speed of over 60kph fairly quickly- on roads, that is, |
| + | |||
| + | off road, however being wheeled, light and lacking an impressively powerfull engine the SARC will struggle progressing through mud, snow | ||
| + | |||
| + | or over hills, furthermore as to its lightweight the SARC can get slowed down considerably or even stopped by minor obstacles (walls, trees, though fences...) which contemporary Medium Tanks would just run through, with next to no loss of speed. Thanks to its good acceleration that speed can be regained fairly quickly. Of course wheels don't turn on the spot, so that maneuvering in confined spaces can be difficult and time consuming. {{Specs-Tank-Mobility}} | ||
<!-- ''Write about the mobility of the ground vehicle. Estimate the specific power and manoeuvrability, as well as the maximum speed forwards and backwards.'' --> | <!-- ''Write about the mobility of the ground vehicle. Estimate the specific power and manoeuvrability, as well as the maximum speed forwards and backwards.'' --> | ||
{{tankMobility|abMinHp=294|rbMinHp=168}} | {{tankMobility|abMinHp=294|rbMinHp=168}} | ||
| − | |||
| − | |||
=== Modifications and economy === | === Modifications and economy === | ||
| Line 61: | Line 57: | ||
{{Specs-Tank-Weapon|1}} | {{Specs-Tank-Weapon|1}} | ||
<!-- ''Give the reader information about the characteristics of the main gun. Assess its effectiveness in a battle based on the reloading speed, ballistics and the power of shells. Do not forget about the flexibility of the fire, that is how quickly the cannon can be aimed at the target, open fire on it and aim at another enemy. Add a link to the main article on the gun: <code><nowiki>{{main|Name of the weapon}}</nowiki></code>. Describe in general terms the ammunition available for the main gun. Give advice on how to use them and how to fill the ammunition storage.'' --> | <!-- ''Give the reader information about the characteristics of the main gun. Assess its effectiveness in a battle based on the reloading speed, ballistics and the power of shells. Do not forget about the flexibility of the fire, that is how quickly the cannon can be aimed at the target, open fire on it and aim at another enemy. Add a link to the main article on the gun: <code><nowiki>{{main|Name of the weapon}}</nowiki></code>. Describe in general terms the ammunition available for the main gun. Give advice on how to use them and how to fill the ammunition storage.'' --> | ||
| − | + | {{main|6pdr OQF Mk.III (57 mm)}} | |
{| class="wikitable" style="text-align:center" width="100%" | {| class="wikitable" style="text-align:center" width="100%" | ||
| Line 80: | Line 76: | ||
==== Ammunition ==== | ==== Ammunition ==== | ||
| − | { | + | {| class="wikitable sortable" style="text-align:center" width="100%" |
| + | ! colspan="8" | Penetration statistics | ||
| + | |- | ||
| + | ! rowspan="2" data-sort-type="text" | Ammunition | ||
| + | ! rowspan="2" | Type of<br>warhead | ||
| + | ! colspan="6" | Penetration @ 0° Angle of Attack (mm) | ||
| + | |- | ||
| + | ! 10 m !! 100 m !! 500 m !! 1,000 m !! 1,500 m !! 2,000 m | ||
| + | |- | ||
| + | | Shot Mk.5 || AP || 101 || 97 || 82 || 66 || 53 || 43 | ||
| + | |- | ||
| + | | Shell Mk.10 || HE || 9 || 9 || 9 || 9 || 9 || 9 | ||
| + | |- | ||
| + | | Shot Mk.5 HV || AP || 108 || 104 || 87 || 70 || 57 || 46 | ||
| + | |- | ||
| + | | Shot Mk.8 || APC || 110 || 106 || 89 || 72 || 59 || 48 | ||
| + | |- | ||
| + | | Shot Mk.9 || APCBC || 122 || 118 || 101 || 84 || 70 || 58 | ||
| + | |- | ||
| + | |} | ||
| + | {| class="wikitable sortable" style="text-align:center" width="100%" | ||
| + | ! colspan="10" | Shell details | ||
| + | |- | ||
| + | ! rowspan="2" data-sort-type="text" | Ammunition | ||
| + | ! rowspan="2" | Type of<br>warhead | ||
| + | ! rowspan="2" | Velocity<br>(m/s) | ||
| + | ! rowspan="2" | Projectile<br>Mass (kg) | ||
| + | ! rowspan="2" | Fuse delay<br>(m) | ||
| + | ! rowspan="2" | Fuse sensitivity<br>(mm) | ||
| + | ! rowspan="2" | Explosive Mass<br>(TNT equivalent) (g) | ||
| + | ! colspan="3" | Ricochet | ||
| + | |- | ||
| + | ! 0% !! 50% !! 100% | ||
| + | |- | ||
| + | | Shot Mk.5 || AP || 815 || 2.8 || N/A || N/A || N/A || 47° || 60° || 65° | ||
| + | |- | ||
| + | | Shell Mk.10 || HE || 655 || 2.72 || 0 || 0.1 || 590 || 79° || 80° || 81° | ||
| + | |- | ||
| + | | Shot Mk.5 HV || AP || 853 || 2.8 || N/A || N/A || N/A || 47° || 60° || 65° | ||
| + | |- | ||
| + | | Shot Mk.8 || APC || 853 || 2.87 || N/A || N/A || N/A || 48° || 63° || 71° | ||
| + | |- | ||
| + | | Shot Mk.9 || APCBC || 801 || 3.23 || N/A || N/A || N/A || 48° || 63° || 71° | ||
| + | |- | ||
| + | |} | ||
==== [[Ammo racks]] ==== | ==== [[Ammo racks]] ==== | ||
| − | [[File:Ammoracks_{{PAGENAME}}.png|right|thumb|x250px|[[Ammo racks]] of the {{PAGENAME}}]] | + | <!-- [[File:Ammoracks_{{PAGENAME}}.png|right|thumb|x250px|[[Ammo racks]] of the {{PAGENAME}}]] --> |
| − | <!-- '''Last updated: | + | <!-- '''Last updated:''' --> |
{| class="wikitable" style="text-align:center" | {| class="wikitable" style="text-align:center" | ||
|- | |- | ||
| Line 94: | Line 134: | ||
! 5th<br>rack empty | ! 5th<br>rack empty | ||
! 6th<br>rack empty | ! 6th<br>rack empty | ||
| − | |||
! Visual<br>discrepancy | ! Visual<br>discrepancy | ||
|- | |- | ||
| − | | '''60''' || | + | | '''60''' || __ ''(+__)'' || __ ''(+__)'' || __ ''(+__)'' || __ ''(+__)'' || __ ''(+__)'' || __ ''(+__)'' || __ |
|- | |- | ||
|} | |} | ||
| − | |||
| − | |||
| − | |||
| − | |||
| − | |||
| − | |||
| − | |||
| − | |||
=== Machine guns === | === Machine guns === | ||
| Line 113: | Line 144: | ||
{{Specs-Tank-Weapon|3}} | {{Specs-Tank-Weapon|3}} | ||
<!-- ''Offensive and anti-aircraft machine guns not only allow you to fight some aircraft but also are effective against lightly armoured vehicles. Evaluate machine guns and give recommendations on its use.'' --> | <!-- ''Offensive and anti-aircraft machine guns not only allow you to fight some aircraft but also are effective against lightly armoured vehicles. Evaluate machine guns and give recommendations on its use.'' --> | ||
| − | + | {{main|M2HB (12.7 mm)|BESA (7.92 mm)}} | |
{| class="wikitable" style="text-align:center" width="50%" | {| class="wikitable" style="text-align:center" width="50%" | ||
| Line 121: | Line 152: | ||
! Mount !! Capacity (Belt) !! Fire rate !! Vertical !! Horizontal | ! Mount !! Capacity (Belt) !! Fire rate !! Vertical !! Horizontal | ||
|- | |- | ||
| − | | Pintle || | + | | Pintle || 500 (200) || 577 || -5°/+40° || ±180° |
|- | |- | ||
|} | |} | ||
| Line 130: | Line 161: | ||
! Mount !! Capacity (Belt) !! Fire rate !! Vertical !! Horizontal | ! Mount !! Capacity (Belt) !! Fire rate !! Vertical !! Horizontal | ||
|- | |- | ||
| − | | Coaxial || 2, | + | | Coaxial || 2,000 (225) || 600 || N/A || N/A |
|- | |- | ||
|} | |} | ||
| Line 136: | Line 167: | ||
== Usage in battles == | == Usage in battles == | ||
<!-- ''Describe the tactics of playing in the vehicle, the features of using vehicles in the team and advice on tactics. Refrain from creating a "guide" - do not impose a single point of view but instead give the reader food for thought. Describe the most dangerous enemies and give recommendations on fighting them. If necessary, note the specifics of the game in different modes (AB, RB, SB).'' --> | <!-- ''Describe the tactics of playing in the vehicle, the features of using vehicles in the team and advice on tactics. Refrain from creating a "guide" - do not impose a single point of view but instead give the reader food for thought. Describe the most dangerous enemies and give recommendations on fighting them. If necessary, note the specifics of the game in different modes (AB, RB, SB).'' --> | ||
| − | + | ''Describe the tactics of playing in the vehicle, the features of using vehicles in the team and advice on tactics. Refrain from creating a "guide" - do not impose a single point of view but instead give the reader food for thought. Describe the most dangerous enemies and give recommendations on fighting them. If necessary, note the specifics of the game in different modes (AB, RB, SB).'' | |
| − | |||
=== Pros and cons === | === Pros and cons === | ||
| Line 144: | Line 174: | ||
'''Pros:''' | '''Pros:''' | ||
| − | * Effective firepower with the 6-pdr gun and 12.7 mm | + | * Effective firepower with the 6-pdr gun and 12.7 mm HMG |
| − | * | + | * Fast SARC chassis upon optimal terrains (roads, fields, slopes and cities) |
| − | * Frontal turret armour can withstand heavy machine gun | + | * Frontal turret armour can withstand heavy machine gun with some distance |
| − | * Useful amount of smoke grenades (26) | + | * Useful amount of smoke grenades (26) |
| − | * | + | * Advantageous rate of fire of the 57 mm gun, amongst the best at the rank |
'''Cons:''' | '''Cons:''' | ||
| − | * | + | * Unreliable armour on the sides and open-top |
| − | + | * Just 3 crew members; the vehicle can be easily taken out | |
| − | * Tall profile | + | * Tall profile + pintle heavy machine gun can give away tank's location |
| − | * Limited off-road mobility on snow, mud | + | * Limited off-road mobility on snow, mud and sand; typical of most wheeled cars |
| − | * Recoil of the | + | * Recoil of the 57 mm gun can hinder target acquisition; more notable when firing from the sides |
| − | |||
== History == | == History == | ||
<!-- ''Describe the history of the creation and combat usage of the vehicle in more detail than in the introduction. If the historical reference turns out to be too long, take it to a separate article, taking a link to the article about the vehicle and adding a block "/History" (example: <nowiki>https://wiki.warthunder.com/(Vehicle-name)/History</nowiki>) and add a link to it here using the <code>main</code> template. Be sure to reference text and sources by using <code><nowiki><ref></ref></nowiki></code>, as well as adding them at the end of the article with <code><nowiki><references /></nowiki></code>. This section may also include the vehicle's dev blog entry (if applicable) and the in-game encyclopedia description (under <code><nowiki>=== In-game description ===</nowiki></code>, also if applicable).'' --> | <!-- ''Describe the history of the creation and combat usage of the vehicle in more detail than in the introduction. If the historical reference turns out to be too long, take it to a separate article, taking a link to the article about the vehicle and adding a block "/History" (example: <nowiki>https://wiki.warthunder.com/(Vehicle-name)/History</nowiki>) and add a link to it here using the <code>main</code> template. Be sure to reference text and sources by using <code><nowiki><ref></ref></nowiki></code>, as well as adding them at the end of the article with <code><nowiki><references /></nowiki></code>. This section may also include the vehicle's dev blog entry (if applicable) and the in-game encyclopedia description (under <code><nowiki>=== In-game description ===</nowiki></code>, also if applicable).'' --> | ||
| − | '' | + | ''Describe the history of the creation and combat usage of the vehicle in more detail than in the introduction. If the historical reference turns out to be too long, take it to a separate article, taking a link to the article about the vehicle and adding a block "/History" (example: <nowiki>https://wiki.warthunder.com/(Vehicle-name)/History</nowiki>) and add a link to it here using the <code>main</code> template. Be sure to reference text and sources by using <code><nowiki><ref></ref></nowiki></code>, as well as adding them at the end of the article with <code><nowiki><references /></nowiki></code>. This section may also include the vehicle's dev blog entry (if applicable) and the in-game encyclopedia description (under <code><nowiki>=== In-game description ===</nowiki></code>, also if applicable).'' |
| − | |||
| − | |||
| − | |||
| − | |||
| − | |||
| − | |||
| − | |||
| − | |||
| − | |||
| − | ' | ||
| − | |||
| − | |||
| − | |||
| − | === | ||
| − | |||
| − | |||
| − | |||
| − | |||
| − | |||
| − | |||
| − | |||
== Media == | == Media == | ||
<!-- ''Excellent additions to the article would be video guides, screenshots from the game, and photos.'' --> | <!-- ''Excellent additions to the article would be video guides, screenshots from the game, and photos.'' --> | ||
| − | + | ''Excellent additions to the article would be video guides, screenshots from the game, and photos.'' | |
| − | |||
| − | |||
| − | |||
| − | |||
| − | |||
| − | |||
| − | |||
| − | |||
| − | |||
| − | |||
| − | |||
| − | |||
| − | |||
== See also == | == See also == | ||
| Line 209: | Line 204: | ||
* [[SARC MkVI (2pdr)]] | * [[SARC MkVI (2pdr)]] | ||
| + | |||
| + | ;Tanks equipped with the same gun | ||
| + | |||
| + | * [[Cromwell I]] | ||
| + | * [[Crusader III]] | ||
| + | * [[M4A5]] | ||
| + | * [[Valentine IX]] | ||
== External links == | == External links == | ||
| Line 214: | Line 216: | ||
* ''topic on the official game forum;'' | * ''topic on the official game forum;'' | ||
* ''other literature.'' --> | * ''other literature.'' --> | ||
| + | ''Paste links to sources and external resources, such as:'' | ||
| − | * | + | * ''topic on the official game forum;'' |
| − | + | * ''other literature.'' | |
| − | |||
| − | |||
| − | |||
{{Britain light tanks}} | {{Britain light tanks}} | ||
[[Category:Wheeled ground vehicles]] | [[Category:Wheeled ground vehicles]] | ||
Revision as of 13:18, 24 March 2021
.jpg)
Contents
Description
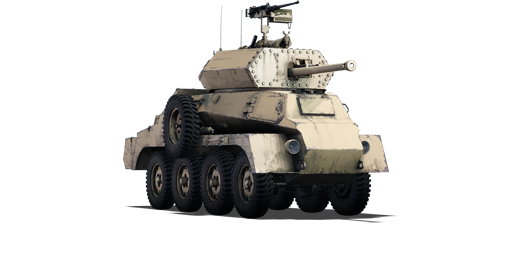
The SARC MkVI (6pdr) is a rank British light tank with a battle rating of (AB), (RB), and (SB). It was introduced in Update "Ixwa Strike".
With an improvement in firepower and yet very fast, this latter SARC variant covers most of the cons of the earlier 2-pounder version, almost without new disadvantages; perfect for admirers of fast or scouting vehicles such as the Cromwell I and Crusader III.
While externally the SARC MkVI 6-pounder might not seem intimidating to some players, the potential of these light tanks should not be undervalued under any circumstances. The well-known 57 mm QF gun is capable of precisely and quickly dispatching even the heaviest of the tanks at the battle rating, such as the mighty KV-1 series.
The less advantageous aspect remains the sacrifices in the armour of the SARC chassis and the reduced crew inside the fighting compartment. This shortage of armour sends the tank straight to flanking and ambushing tactics, away from prolonged frontal engagements. It only takes a well-aimed shot to the turret to be back on the garage.
General info
Survivability and armour
Being a light tank, one probably won't expect much from the SARC in terms of armour and overall survivability, and rightfully so-
while it can survive some MG fire from the front, HMGs will pen the sides, quickly destroying the SARC , autocannoms are even more dangerous, they will shred through it, tearing the SARC to pieces. Shots fired from non-automatic weaponry will sometimes just pass through the vehicle knocking out only a crewmember or two, don't rely on that though. The SARC is not a vehicle to be shot at in.
Armour type:
| Armour | Front (Slope angle) | Sides | Rear | Roof |
|---|---|---|---|---|
| Hull | ___ mm | ___ mm Top ___ mm Bottom |
___ mm | ___ - ___ mm |
| Turret | ___ - ___ mm Turret front ___ mm Gun mantlet |
___ - ___ mm | ___ - ___ mm | ___ - ___ mm |
| Cupola | ___ mm | ___ mm | ___ mm | ___ mm |
Notes:
Mobility
Having a good power to weight ratio of 17 hp/ton, allowing it to reach a respectable top speed of over 60kph fairly quickly- on roads, that is,
off road, however being wheeled, light and lacking an impressively powerfull engine the SARC will struggle progressing through mud, snow
or over hills, furthermore as to its lightweight the SARC can get slowed down considerably or even stopped by minor obstacles (walls, trees, though fences...) which contemporary Medium Tanks would just run through, with next to no loss of speed. Thanks to its good acceleration that speed can be regained fairly quickly. Of course wheels don't turn on the spot, so that maneuvering in confined spaces can be difficult and time consuming.
| Game Mode | Max Speed (km/h) | Weight (tons) | Engine power (horsepower) | Power-to-weight ratio (hp/ton) | |||
|---|---|---|---|---|---|---|---|
| Forward | Reverse | Stock | Upgraded | Stock | Upgraded | ||
| Arcade | Expression error: Unexpected * operator. | 294 | Expression error: Unexpected round operator. | __.__ | |||
| Realistic | 168 | Expression error: Unexpected round operator. | __.__ | ||||
Modifications and economy
Armaments
Main armament
| 57 mm 6pdr OQF Mk.III | Turret rotation speed (°/s) | Reloading rate (seconds) | |||||||||||
|---|---|---|---|---|---|---|---|---|---|---|---|---|---|
| Mode | Capacity | Vertical | Horizontal | Stabilizer | Stock | Upgraded | Full | Expert | Aced | Stock | Full | Expert | Aced |
| Arcade | 60 | -10°/+20° | ±180° | Shoulder | 34.3 | 47.4 | 57.6 | 63.7 | 67.8 | 5.20 | 4.60 | 4.24 | 4.00 |
| Realistic | 21.4 | 25.2 | 30.6 | 33.8 | 36.0 | ||||||||
Ammunition
| Penetration statistics | |||||||
|---|---|---|---|---|---|---|---|
| Ammunition | Type of warhead |
Penetration @ 0° Angle of Attack (mm) | |||||
| 10 m | 100 m | 500 m | 1,000 m | 1,500 m | 2,000 m | ||
| Shot Mk.5 | AP | 101 | 97 | 82 | 66 | 53 | 43 |
| Shell Mk.10 | HE | 9 | 9 | 9 | 9 | 9 | 9 |
| Shot Mk.5 HV | AP | 108 | 104 | 87 | 70 | 57 | 46 |
| Shot Mk.8 | APC | 110 | 106 | 89 | 72 | 59 | 48 |
| Shot Mk.9 | APCBC | 122 | 118 | 101 | 84 | 70 | 58 |
| Shell details | |||||||||
|---|---|---|---|---|---|---|---|---|---|
| Ammunition | Type of warhead |
Velocity (m/s) |
Projectile Mass (kg) |
Fuse delay (m) |
Fuse sensitivity (mm) |
Explosive Mass (TNT equivalent) (g) |
Ricochet | ||
| 0% | 50% | 100% | |||||||
| Shot Mk.5 | AP | 815 | 2.8 | N/A | N/A | N/A | 47° | 60° | 65° |
| Shell Mk.10 | HE | 655 | 2.72 | 0 | 0.1 | 590 | 79° | 80° | 81° |
| Shot Mk.5 HV | AP | 853 | 2.8 | N/A | N/A | N/A | 47° | 60° | 65° |
| Shot Mk.8 | APC | 853 | 2.87 | N/A | N/A | N/A | 48° | 63° | 71° |
| Shot Mk.9 | APCBC | 801 | 3.23 | N/A | N/A | N/A | 48° | 63° | 71° |
Ammo racks
| Full ammo |
1st rack empty |
2nd rack empty |
3rd rack empty |
4th rack empty |
5th rack empty |
6th rack empty |
Visual discrepancy |
|---|---|---|---|---|---|---|---|
| 60 | __ (+__) | __ (+__) | __ (+__) | __ (+__) | __ (+__) | __ (+__) | __ |
Machine guns
| 12.7 mm M2HB | ||||
|---|---|---|---|---|
| Mount | Capacity (Belt) | Fire rate | Vertical | Horizontal |
| Pintle | 500 (200) | 577 | -5°/+40° | ±180° |
| 7.92 mm BESA | ||||
|---|---|---|---|---|
| Mount | Capacity (Belt) | Fire rate | Vertical | Horizontal |
| Coaxial | 2,000 (225) | 600 | N/A | N/A |
Usage in battles
Describe the tactics of playing in the vehicle, the features of using vehicles in the team and advice on tactics. Refrain from creating a "guide" - do not impose a single point of view but instead give the reader food for thought. Describe the most dangerous enemies and give recommendations on fighting them. If necessary, note the specifics of the game in different modes (AB, RB, SB).
Pros and cons
Pros:
- Effective firepower with the 6-pdr gun and 12.7 mm HMG
- Fast SARC chassis upon optimal terrains (roads, fields, slopes and cities)
- Frontal turret armour can withstand heavy machine gun with some distance
- Useful amount of smoke grenades (26)
- Advantageous rate of fire of the 57 mm gun, amongst the best at the rank
Cons:
- Unreliable armour on the sides and open-top
- Just 3 crew members; the vehicle can be easily taken out
- Tall profile + pintle heavy machine gun can give away tank's location
- Limited off-road mobility on snow, mud and sand; typical of most wheeled cars
- Recoil of the 57 mm gun can hinder target acquisition; more notable when firing from the sides
History
Describe the history of the creation and combat usage of the vehicle in more detail than in the introduction. If the historical reference turns out to be too long, take it to a separate article, taking a link to the article about the vehicle and adding a block "/History" (example: https://wiki.warthunder.com/(Vehicle-name)/History) and add a link to it here using the main template. Be sure to reference text and sources by using <ref></ref>, as well as adding them at the end of the article with <references />. This section may also include the vehicle's dev blog entry (if applicable) and the in-game encyclopedia description (under === In-game description ===, also if applicable).
Media
Excellent additions to the article would be video guides, screenshots from the game, and photos.
See also
- Related development
- Tanks equipped with the same gun
External links
Paste links to sources and external resources, such as:
- topic on the official game forum;
- other literature.
| Britain light tanks | |
|---|---|
| A13 | A13 Mk I · A13 Mk I (3rd R.T.R.) · A13 Mk II · A13 Mk II 1939 |
| A15 | Crusader II · Crusader "The Saint" · Crusader III |
| A17 | Tetrarch I |
| IFV | Warrior · Desert Warrior (Kuwait) |
| Wheeled | Daimler Mk II · AEC Mk II · Fox · Vickers Mk.11 |
| Other | VFM5 |
| South Africa | |
| SARC | SARC MkIVa · SARC MkVI (2pdr) · SARC MkVI (6pdr) |
| Ratel | Ratel 90 · Ratel 20 |
| Rooikat | Rooikat Mk.1D · Rooikat 105 · Rooikat MTTD |
| Other | Concept 3 · Eland 90 Mk.7 |
| USA | Stuart I · Stuart III |
