Difference between revisions of "M3A3 Bradley"
(Edits) |
(→Usage in battles: Copied M3 Bradley on Usage in Battle) (Tag: Visual edit) |
||
| Line 66: | Line 66: | ||
==== Ammunition ==== | ==== Ammunition ==== | ||
| + | |||
* '''Default:''' {{Annotation|APDS|Armour-piercing discarding sabot}}{{-}}{{Annotation|HEI-T*|High-explosive incendiary tracer (self-destroying)}} | * '''Default:''' {{Annotation|APDS|Armour-piercing discarding sabot}}{{-}}{{Annotation|HEI-T*|High-explosive incendiary tracer (self-destroying)}} | ||
* '''M791:''' {{Annotation|APDS|Armour-piercing discarding sabot}}{{-}}{{Annotation|APDS|Armour-piercing discarding sabot}}{{-}}{{Annotation|APDS|Armour-piercing discarding sabot}}{{-}}{{Annotation|HEI-T*|High-explosive incendiary tracer (self-destroying)}} | * '''M791:''' {{Annotation|APDS|Armour-piercing discarding sabot}}{{-}}{{Annotation|APDS|Armour-piercing discarding sabot}}{{-}}{{Annotation|APDS|Armour-piercing discarding sabot}}{{-}}{{Annotation|HEI-T*|High-explosive incendiary tracer (self-destroying)}} | ||
| Line 209: | Line 210: | ||
== Usage in battles == | == Usage in battles == | ||
<!-- ''Describe the tactics of playing in the vehicle, the features of using vehicles in the team and advice on tactics. Refrain from creating a "guide" - do not impose a single point of view but instead give the reader food for thought. Describe the most dangerous enemies and give recommendations on fighting them. If necessary, note the specifics of the game in different modes (AB, RB, SB).'' --> | <!-- ''Describe the tactics of playing in the vehicle, the features of using vehicles in the team and advice on tactics. Refrain from creating a "guide" - do not impose a single point of view but instead give the reader food for thought. Describe the most dangerous enemies and give recommendations on fighting them. If necessary, note the specifics of the game in different modes (AB, RB, SB).'' --> | ||
| − | '' | + | ''One way the Bradley can be played is as an ambush vehicle. Find a good location where you have sufficient protective cover to secure your position, but where you can see at least one lane of attack that the enemy is likely to use. Since you will be sitting still, your TOW launcher will be deployed, and you can fire TOW missiles whenever you need to. The best way to use the TOW missiles is to hit the enemy in the side. Two TOW missiles to the side should almost always kill a tank if well aimed.'' |
| + | |||
| + | ''Another way to use the Bradley is to get hull down, at long range and use the TOW launcher to deadly effect. Since you do not have to calculate for drop for ATGMs, you should be able to reliably hit your target and do major damage. Because you are firing at such long-range, it is likely the enemy will not spot you in time to shoot at you, or they will miss at least their first shot.'' | ||
| + | |||
| + | ''The Bradley can also be used effectively in urban combat. If you pick a side street to set up, when the enemy goes past, hopefully without seeing you, you will be able to hit them in the side with the TOW launcher.'' | ||
| + | |||
| + | ''In arcade mode, the Bradley can be used very effectively as an anti-aircraft vehicle. Since in arcade you get a lead indicator, you should be able to accurately hit planes and helicopters. When using the HEI-T* ammunition one to two hits is usually fatal for an aircraft. TOW missiles can be used to great effect against helicopters as well, but it is probably smarter to save the ATGMs for ground targets. Also, it can be hard to hit a moving helicopter with an ATGM for someone who's inexperienced with ATGMs.'' | ||
| + | |||
| + | ''One last note: the TOW missiles should be your primary weapon, not your autocannon. Firing the autocannon will likely give away your position instantly, so unless you have already been seen, or if you know you can kill the target quickly, do not use the autocannon. The autocannon can not effectively destroy tanks but is mostly just effective against SPAA's and light tanks. Those targets can also kill you very easily though, so it is almost always better to use the TOW missiles, in order to destroy the enemy tank quickly and efficiently. On the other hand, if an enemy tank is at close range, and has spotted you, you can often use the autocannon to damage or destroy their gun barrel with multiple, well-aimed, shots, to buy yourself more time.'' | ||
| + | |||
| + | [M3 Bradley Article Copy] | ||
=== Pros and cons === | === Pros and cons === | ||
Revision as of 13:38, 21 March 2021

Contents
Description
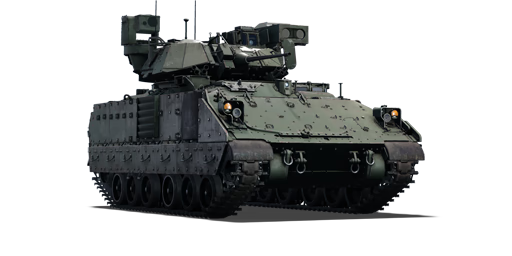
The Fighting Vehicle, Cavalry, M3A3 is a rank American light tank with a battle rating of (AB), (RB), and (SB). It was introduced in Update "Ixwa Strike".
General info
Survivability and armour
Describe armour protection. Note the most well protected and key weak areas. Appreciate the layout of modules as well as the number and location of crew members. Is the level of armour protection sufficient, is the placement of modules helpful for survival in combat? If necessary use a visual template to indicate the most secure and weak zones of the armour.
Armour type:
| Armour | Front (Slope angle) | Sides | Rear | Roof |
|---|---|---|---|---|
| Hull | ___ mm | ___ mm Top ___ mm Bottom |
___ mm | ___ - ___ mm |
| Turret | ___ - ___ mm Turret front ___ mm Gun mantlet |
___ - ___ mm | ___ - ___ mm | ___ - ___ mm |
| Cupola | ___ mm | ___ mm | ___ mm | ___ mm |
Notes:
Mobility
| Game Mode | Max Speed (km/h) | Weight (tons) | Engine power (horsepower) | Power-to-weight ratio (hp/ton) | |||
|---|---|---|---|---|---|---|---|
| Forward | Reverse | Stock | Upgraded | Stock | Upgraded | ||
| Arcade | Expression error: Unexpected * operator. | 942 | Expression error: Unexpected round operator. | __.__ | |||
| Realistic | 538 | Expression error: Unexpected round operator. | __.__ | ||||
Modifications and economy
Armaments
Main armament
| 25 mm M242 | Turret rotation speed (°/s) | Reloading rate (seconds) | ||||||||||||
|---|---|---|---|---|---|---|---|---|---|---|---|---|---|---|
| Mode | Capacity (Belt) | Fire rate | Vertical | Horizontal | Stabilizer | Stock | Upgraded | Full | Expert | Aced | Stock | Full | Expert | Aced |
| Arcade | 1,500 (300) | 201 | -9°/+59° | ±180° | Two-plane | 57.1 | 79.1 | 96.0 | 106.2 | 112.9 | 0.26 | 0.23 | 0.21 | 0.20 |
| Realistic | 35.7 | 42.0 | 51.0 | 56.4 | 60.0 | |||||||||
Ammunition
- Default: APDS · HEI-T*
- M791: APDS · APDS · APDS · HEI-T*
- M919: APFSDS
| Penetration statistics | ||||||
|---|---|---|---|---|---|---|
| Belt | Penetration @ 0° Angle of Attack (mm) | |||||
| 10 m | 100 m | 500 m | 1,000 m | 1,500 m | 2,000 m | |
| Default | 81 | 80 | 76 | 70 | 66 | 61 |
| M791 | 81 | 80 | 76 | 70 | 66 | 61 |
| M919 | 101 | 100 | 97 | 93 | 89 | 85 |
| Belt details | |||||||||
|---|---|---|---|---|---|---|---|---|---|
| Belt | Type of warhead |
Velocity (m/s) |
Projectile Mass (kg) |
Fuse delay (m) |
Fuse sensitivity (mm) |
Explosive Mass (TNT equivalent) (g) |
Ricochet | ||
| 0% | 50% | 100% | |||||||
| M919 | APFSDS | 1,385 | 0.1 | N/A | N/A | N/A | 78° | 80° | 81° |
Ammo racks
| Full ammo |
1st rack empty |
2nd rack empty |
3rd rack empty |
4th rack empty |
5th rack empty |
6th rack empty |
Visual discrepancy |
|---|---|---|---|---|---|---|---|
| 5 | __ (+__) | __ (+__) | __ (+__) | __ (+__) | __ (+__) | __ (+__) | __ |
Additional armament
Some tanks are armed with several guns in one or more turrets. Evaluate the additional weaponry and give advice on its use. Describe the ammunition available for additional weaponry. Give advice on about how to use them and how to fill the ammunition storage. If there is no additional weaponry remove this subsection.
| BGM-71 TOW missile | Reloading rate (seconds) | ||||||
|---|---|---|---|---|---|---|---|
| Capacity (Belt) | Vertical | Horizontal | Stabilizer | Stock | Full | Expert | Aced |
| 12 (2) | -19°/+29° | N/A | N/A | _.__ | _.__ | _.__ | _.__ |
Ammunition
| Penetration statistics | |||||||
|---|---|---|---|---|---|---|---|
| Ammunition | Type of warhead |
Penetration @ 0° Angle of Attack (mm) | |||||
| 10 m | 100 m | 500 m | 1,000 m | 1,500 m | 2,000 m | ||
| TOW-2 | ATGM | 800 | 800 | 800 | 800 | 800 | 800 |
| TOW-2B | ATGM | 430 | 430 | 430 | 430 | 430 | 430 |
| Shell details | |||||||||
|---|---|---|---|---|---|---|---|---|---|
| Ammunition | Type of warhead |
Velocity (m/s) |
Projectile Mass (kg) |
Fuse delay (m) |
Fuse sensitivity (mm) |
Explosive Mass (TNT equivalent) (g) |
Ricochet | ||
| 0% | 50% | 100% | |||||||
| TOW-2 | ATGM | 329 | 21.4 | 0 | 0.01 | 3,130 | 80° | 82° | 90° |
| TOW-2B | ATGM | 309 | 22.6 | 0 | 0.01 | 4,100 | 80° | 82° | 90° |
Ammo racks
| Full ammo |
1st rack empty |
2nd rack empty |
3rd rack empty |
4th rack empty |
5th rack empty |
6th rack empty |
Visual discrepancy |
|---|---|---|---|---|---|---|---|
| 6 | __ (+__) | __ (+__) | __ (+__) | __ (+__) | __ (+__) | __ (+__) | __ |
Machine guns
| 7.62 mm M240 | ||||
|---|---|---|---|---|
| Mount | Capacity (Belt) | Fire rate | Vertical | Horizontal |
| Coaxial | 4,400 (200) | 941 | N/A | N/A |
Usage in battles
One way the Bradley can be played is as an ambush vehicle. Find a good location where you have sufficient protective cover to secure your position, but where you can see at least one lane of attack that the enemy is likely to use. Since you will be sitting still, your TOW launcher will be deployed, and you can fire TOW missiles whenever you need to. The best way to use the TOW missiles is to hit the enemy in the side. Two TOW missiles to the side should almost always kill a tank if well aimed.
Another way to use the Bradley is to get hull down, at long range and use the TOW launcher to deadly effect. Since you do not have to calculate for drop for ATGMs, you should be able to reliably hit your target and do major damage. Because you are firing at such long-range, it is likely the enemy will not spot you in time to shoot at you, or they will miss at least their first shot.
The Bradley can also be used effectively in urban combat. If you pick a side street to set up, when the enemy goes past, hopefully without seeing you, you will be able to hit them in the side with the TOW launcher.
In arcade mode, the Bradley can be used very effectively as an anti-aircraft vehicle. Since in arcade you get a lead indicator, you should be able to accurately hit planes and helicopters. When using the HEI-T* ammunition one to two hits is usually fatal for an aircraft. TOW missiles can be used to great effect against helicopters as well, but it is probably smarter to save the ATGMs for ground targets. Also, it can be hard to hit a moving helicopter with an ATGM for someone who's inexperienced with ATGMs.
One last note: the TOW missiles should be your primary weapon, not your autocannon. Firing the autocannon will likely give away your position instantly, so unless you have already been seen, or if you know you can kill the target quickly, do not use the autocannon. The autocannon can not effectively destroy tanks but is mostly just effective against SPAA's and light tanks. Those targets can also kill you very easily though, so it is almost always better to use the TOW missiles, in order to destroy the enemy tank quickly and efficiently. On the other hand, if an enemy tank is at close range, and has spotted you, you can often use the autocannon to damage or destroy their gun barrel with multiple, well-aimed, shots, to buy yourself more time.
[M3 Bradley Article Copy]
Pros and cons
Summarise and briefly evaluate the vehicle in terms of its characteristics and combat effectiveness. Mark its pros and cons in a bulleted list. Try not to use more than 6 points for each of the characteristics. Avoid using categorical definitions such as "bad", "good" and the like - use substitutions with softer forms such as "inadequate" and "effective".
Pros:
Cons:
History
Devblog
Following the Gulf War of the early 1990's, US engineers developed a new modification of the widely used M3 Bradley in order to incorporate improvements derived from the operational experience gained during the conflict. As such, the Bradley received numerous upgrades to its electronic systems, including a new fire control system, a laser rangefinder and thermal imaging for the commander along with other improvements to the vehicle's protection and firepower.
The M3A3 modification of the Bradley started being shipped to the first U.S. Army units in 1998 with the first vehicles officially entering service in 2000. By late 2010, well over 3,300 Bradleys were converted to the A3 standard and the vehicle continues serving as one of the cornerstones of the U.S. armored units today.
Media


See also
Links to the articles on the War Thunder Wiki that you think will be useful for the reader, for example:
- reference to the series of the vehicles;
- links to approximate analogues of other nations and research trees.
External links
Paste links to sources and external resources, such as:
- topic on the official game forum;
- other literature.
| USA light tanks | |
|---|---|
| LVT | LVT(A)(1) · ○LVT(A)(1) · LVT(A)(4) |
| M2 | M2A2 · M2A4 · M2A4 (1st Arm.Div.) |
| M3/M5 Stuart | M3 Stuart · M3A1 Stuart · M3A1 (USMC) · M5A1 · M5A1 TD · ▃Stuart VI (5th CAD) |
| M22 Locust | M22 |
| M24 Chaffee | M24 · M24 (TL) |
| M18 Hellcat | M18 GMC · M18 "Black Cat" · Super Hellcat |
| M41 Walker Bulldog | M41A1 |
| M551 Sheridan | M551 · M551(76) |
| M3 Bradley | M3 Bradley · M3A3 Bradley |
| Wheeled | M8 LAC · T18E2 · M1128 · M1128 Wolfpack |
| Other | M8A1 GMC · T92 · T114 · HSTV-L · CCVL · XM8 · XM800T · AGS |
