Difference between revisions of "M42 (Italy)"
m (→Pros and cons: Deleted the line about having to use your whole belt, as now you can reload partial belts on points. Which honestly makes the massive belt a good thing because you keep reloading constantly.) (Tag: Visual edit) |
(Added a general statement on survivability and armor, as well as improving the usage on combat areas. Added one more con, with less cannon shells per gun.) (Tag: Visual edit) |
||
| (46 intermediate revisions by 16 users not shown) | |||
| Line 1: | Line 1: | ||
| + | {{Specs-Card|code=it_m15_42_contraereo}} | ||
{{About | {{About | ||
| − | | about = Italian SPAA '''{{ | + | | about = Italian SPAA '''{{Specs|pseudonym}}''' |
| − | | usage = other | + | | usage = other usages |
| link = M42 (Disambiguation) | | link = M42 (Disambiguation) | ||
| − | |||
| − | |||
| − | |||
| − | |||
}} | }} | ||
== Description == | == Description == | ||
| − | <!-- ''In the description, the first part | + | <!--''In the description, the first part needs to be about the history of the creation and combat usage of the vehicle, as well as its key features. In the second part, tell the reader about the ground vehicle in the game. Insert the screenshot of the vehicle. If the novice player does not remember the vehicle by name, they will immediately understand what kind of vehicle it is talking about.''--> |
| − | The ''' | + | [[File:GarageImage_{{PAGENAME}}.jpg|420px|thumb|left]] |
| − | + | {{break}} | |
| − | + | The '''{{Specs|name}}''' (shortened as just '''{{Specs|pseudonym}}''', also nicknamed "Quadruplo"), is a Rank {{Specs|rank}} Italian self-propelled anti-aircraft gun {{Battle-rating}}. It was introduced in [[Update 1.85 "Supersonic"]]. | |
== General info == | == General info == | ||
=== Survivability and armour === | === Survivability and armour === | ||
| − | + | The M42 Contraereo is based off the M15/42 hull with an opened top turret, surrounding the crew members. The gunner does have an exposed spot in the front, and if shown correctly to the enemy, can be machined gunned easily without them to have to fire their main cannon. The turret may protect you from small rifle caliber bullets, but 50. caliber and up, especially on the M4 Sherman will be able to penetrate your turret from anywhere, as it is generally weak against them. The hull armor is decent, still keeping the armor from the M15/42 hull, but don't expect to tank a lot of shots, as most of your enemies you will face at 3.3 will have better caliber weapons, with mostly encountering 75mm and Russian 76.2mm cannons. You may be able to bounce some smaller caliber shells like the 37mm cannons but don't rely on your hull armor as your turret will most likely be targeted by the enemy. You have a small crew count of 3 members, and with two in the turret, and having okay armor, you'll usually die in one hit. | |
| − | |||
| − | |||
| − | |||
| − | |||
| − | |||
| − | |||
| − | |||
| − | |||
| − | |||
| − | |||
| − | |||
| − | |||
| − | |||
| − | |||
| − | |||
| − | |||
| − | |||
| − | |||
| − | |||
| − | |||
| − | |||
| − | |||
| − | |||
| − | |||
| − | |||
| − | |||
=== Mobility === | === Mobility === | ||
| − | |||
<!-- ''Write about the mobility of the ground vehicle. Estimate the specific power and manoeuvrability, as well as the maximum speed forwards and backwards.'' --> | <!-- ''Write about the mobility of the ground vehicle. Estimate the specific power and manoeuvrability, as well as the maximum speed forwards and backwards.'' --> | ||
| − | {{tankMobility|abMinHp=263|rbMinHp=164 | + | {{tankMobility|abMinHp= 263|rbMinHp= 164}} |
| − | |||
| − | |||
| − | |||
== Armaments == | == Armaments == | ||
| − | |||
=== Main armament === | === Main armament === | ||
| − | + | <!--''Give the reader information about the characteristics of the main gun. Assess its effectiveness in a battle based on the reloading speed, ballistics and the power of shells. Do not forget about the flexibility of the fire, that is how quickly the cannon can be aimed at the target, open fire on it and aim at another enemy. Add a link to the main article on the gun: <code><nowiki>{{main|Name of the weapon}}</nowiki></code>. Describe in general terms the ammunition available for the main gun. Give advice on how to use them and how to fill the ammunition storage.''--> | |
| − | <!-- ''Give the reader information about the characteristics of the main gun. Assess its effectiveness in a battle based on the reloading speed, ballistics and the power of shells. Do not forget about the flexibility of the fire, that is how quickly the cannon can be aimed at the target, open fire on it and aim at another enemy. Add a link to the main article on the gun: <code><nowiki>{{main|Name of the weapon}}</nowiki></code>. Describe in general terms the ammunition available for the main gun. Give advice on how to use them and how to fill the ammunition storage.'' --> | ||
{{main|Scotti-IF 20/70 mod.41 (20 mm)}} | {{main|Scotti-IF 20/70 mod.41 (20 mm)}} | ||
| − | {| class="wikitable" style="text-align:center" width=" | + | {| class="wikitable" style="text-align:center" |
| + | |- | ||
| + | ! colspan="6" | [[Scotti-IF 20/70 mod.41 (20 mm)|20 mm Scotti-IF 20/70 mod.41]] (x4) | ||
| + | |- | ||
| + | ! colspan="2" rowspan="1" style="width:5em" |Capacity (Belt capacity each) | ||
| + | ! rowspan="1" | Fire rate <br> (shots/minute) | ||
| + | ! rowspan="1" | Vertical <br> guidance | ||
| + | ! rowspan="1" | Horizontal <br> guidance | ||
| + | ! rowspan="1" | Stabilizer | ||
|- | |- | ||
| − | + | | colspan="2" | 3,200 (12) || 600 || -5°/+90° || ±180° || N/A | |
|- | |- | ||
| − | ! | + | ! colspan="6" | Turret rotation speed (°/s) |
| − | |||
| − | |||
|- | |- | ||
| − | ! | + | ! style="width:4em" |Mode |
| − | + | ! style="width:4em" |Stock | |
| + | ! style="width:4em" |Upgraded | ||
| + | ! style="width:4em" |Prior + Full crew | ||
| + | ! style="width:4em" |Prior + Expert qualif. | ||
| + | ! style="width:4em" |Prior + Ace qualif. | ||
|- | |- | ||
| − | + | | ''Arcade'' || 52.8 || __.__ || __.__ || __.__ || __.__ | |
| − | | 35.7 || | + | |- |
| + | | ''Realistic'' || 35.7 || __.__ || __.__ || __.__ || __.__ | ||
| + | |- | ||
| + | ! colspan="4" | Reloading rate (seconds) | ||
| + | |- | ||
| + | ! colspan="1" style="width:4em" |Stock | ||
| + | ! colspan="1" style="width:4em" |Prior + Full crew | ||
| + | ! colspan="1" style="width:4em" |Prior + Expert qualif. | ||
| + | ! colspan="1" style="width:4em" |Prior + Ace qualif. | ||
| + | |- | ||
| + | | 5.2 || __.__ || __.__ || 4.0 | ||
|- | |- | ||
|} | |} | ||
| − | ==== Ammunition ==== | + | ===== Ammunition ===== |
| − | + | {| class="wikitable sortable" style="text-align:center" width="100%" | |
| − | + | ! colspan="8" | Penetration statistics | |
| − | + | |- | |
| − | + | ! rowspan="2" data-sort-type="text" | Ammunition | |
| − | + | ! rowspan="2" class="unsortable" | Type of <br /> warhead | |
| − | + | ! colspan="6" | '''Penetration''' '''''in mm''''' '''@ 90°''' | |
| − | + | |- | |
| + | ! 10m | ||
| + | ! 100m | ||
| + | ! 500m | ||
| + | ! 1000m | ||
| + | ! 1500m | ||
| + | ! 2000m | ||
| + | |- | ||
| + | | Granata mod.35 || HEFI-T || 2 || 2 || 2 || 2 || 2 || 2 | ||
| + | |- | ||
| + | | Perforante mod.35 || API-T || 40 || 38 || 29 || 20 || 14 || 10 | ||
| + | |- | ||
| + | | PzGr 40 || HVAP-T || 64 || 63 || 29 || 20 || 14 || 10 | ||
| + | |- | ||
| + | |} | ||
| + | {| class="wikitable sortable" style="text-align:center" width="100%" | ||
| + | ! colspan="11" | Shell details | ||
| + | |- | ||
| + | ! rowspan="2" data-sort-type="text" | Ammunition | ||
| + | ! rowspan="2" class="unsortable" | Type of <br /> warhead | ||
| + | ! rowspan="2" |Velocity <br /> in m/s | ||
| + | ! rowspan="2" |Projectile<br />Mass in kg | ||
| + | ! rowspan="2" | ''Fuse delay'' | ||
| + | ''in m:'' | ||
| + | ! rowspan="2" | ''Fuse sensitivity'' | ||
| + | ''in mm:'' | ||
| + | ! rowspan="2" | ''Explosive Mass in g<br /> (TNT equivalent):'' | ||
| + | ! rowspan="2" | ''Normalization At 30° <br> from horizontal:'' | ||
| + | ! colspan="3" | ''Ricochet:'' | ||
| + | |- | ||
| + | ! 0% | ||
| + | ! 50% | ||
| + | ! 100% | ||
| + | |- | ||
| + | | Granata mod.35 || HEFI-T || 830 || 0.14 || 0.3 || 0.1 || 3 || ° || 79° || 80° || 81° | ||
| + | |- | ||
| + | | Perforante mod.35 || API-T || 832 || 0.14 || 1.3 || 15 || 1 || ° || 47° || 60° || 65° | ||
| + | |- | ||
| + | | PzGr 40 || HVAP-T ||1,050||0.1||N/A||N/A||N/A||+1.5°||66°||70°||72° | ||
| + | |- | ||
| + | |} | ||
| − | ==== [[Ammo racks]] ==== | + | ===== [[Ammo racks|Ammo racks]] ===== |
| − | + | {| class="wikitable sortable" style="text-align:center" | |
| − | |||
| − | {| class="wikitable" style="text-align:center" | ||
|- | |- | ||
| − | ! Full<br>ammo | + | ! class="wikitable unsortable" |Full<br /> ammo |
| − | ! 1st<br>rack empty | + | ! class="wikitable unsortable" |1st<br /> rack empty |
| − | ! Visual<br>discrepancy | + | ! class="wikitable unsortable" |2nd<br /> rack empty |
| + | ! class="wikitable unsortable" |3rd<br /> rack empty | ||
| + | ! class="wikitable unsortable" |4th<br /> rack empty | ||
| + | ! class="wikitable unsortable" |5th<br /> rack empty | ||
| + | ! class="wikitable unsortable" |Visual<br /> discrepancy | ||
|- | |- | ||
| − | | ''' | + | || 268 || 253 ''(+15)'' || ''9 (+259)'' || 6 ''(+262)'' || 3 ''(+265)'' || 0 ''(+268)'' || style="text-align:left" | No |
|- | |- | ||
|} | |} | ||
| − | |||
| − | |||
| − | |||
| − | |||
| − | |||
== Usage in battles == | == Usage in battles == | ||
| − | <!-- ''Describe the tactics of playing in the vehicle, the features of using vehicles in the team and advice on tactics. Refrain from creating a "guide" - do not impose a single point of view but | + | <!--''Describe the tactics of playing in the vehicle, the features of using vehicles in the team and advice on tactics. Refrain from creating a "guide" - do not impose a single point of view but give the reader food for thought. Describe the most dangerous enemies and give recommendations on fighting them. If necessary, note the specifics of the game in different modes (AB, RB, SB).''--> |
| − | In Realistic battles, the Quadruplo is best used in the support role when tank hunting, sticking with teammates, assisting them and potentially distracting the enemy. Your best bet of killing any tank, usually a Sherman, Cromwell or T-34 | + | In Realistic battles, the Quadruplo is best used in the support role when tank hunting, sticking with teammates, assisting them and potentially distracting the enemy .Your best bet of killing any tank, usually a Sherman, Cromwell or T-34 is from the side as the APCR will pierce through their side armor, killing the tank. Light tanks such as M24s, Stuarts and Crusaders are able to be penetrated by the front, but usually this is only in close range engagements. T-50 and other slightly armored light tanks will be tougher to kill, but you're still able to flank them. You can kill basically any SPAA you see, as you'll usually encounter trucks or armored cars. Ambush and surprise tactics are good options to kill tanks effectively, as the enemy will stroll pass you, usually showing their side armor. Aggressive play styles are suggested to get the most out of the Quadruplo, similar when playing a Wirbelwind when tank hunting. Try not to expose yourself too much and move from cover to cover, as one hit from a tank shell, usually APHE will knock you out in one shot, or the machine guns pierce your turret armor and kill both your gunner and commander. When it comes to shooting down planes in the Quadruplo, it is best to get their attention so they try to strafe you, or surprise them as they come closer to you, when you have a good shot as they won't have enough reaction time to evade your shots if they connect. Be mindful that you are opened topped, and you'll less likely ti survive a strafe run. Despite the guns having a high fire rate, and being close together, the Quadruplo has a lower ammo count per gun with 12 with each gun, having a 48 in total loaded (essentially a discount Wirbelwind). It is easy to burn through it, so make sure you have a good shot on the aircraft you are trying to shoot down as you'll only have about 3-4 seconds of continuous fire before needing to reload. |
=== Pros and cons === | === Pros and cons === | ||
| − | <!-- '' | + | <!--''Summarize and briefly evaluate the vehicle in terms of its characteristics and combat effectiveness. Mark its pros and cons in a bulleted list. Try not to use more than 6 points for each of the characteristics. Avoid using categorical definitions such as "bad", "good" and the like - they have a substitution in the form of softer "inadequate", "effective".''--> |
| − | |||
'''Pros:''' | '''Pros:''' | ||
| Line 117: | Line 138: | ||
* Great armour for a SPAA | * Great armour for a SPAA | ||
* Guns have a very high rate of fire | * Guns have a very high rate of fire | ||
| − | |||
* Guns are placed very close together | * Guns are placed very close together | ||
'''Cons:''' | '''Cons:''' | ||
| − | * | + | * PzGr 40 is tier IV modification |
| − | |||
* Performance is inadequate when stock | * Performance is inadequate when stock | ||
* Gap in the gunner's position of the turret armour | * Gap in the gunner's position of the turret armour | ||
| − | * Turret can be penetrated by .50 | + | * Turret can be penetrated by .50 cals heavy machine guns |
| − | * | + | * High rate of fire makes it more difficult to adjust fire against planes |
| − | |||
| − | |||
| − | + | * 3 crew members, all in turret | |
| − | |||
| − | |||
| − | + | * Low magazine count for the guns (12 ammo per cannon) | |
| − | + | == History == | |
| − | + | <!--Describe the history of the creation and combat usage of the ground vehicle in more detail than in the introduction. If the historical reference turns out to be too big, take it to a separate article, taking a link to the article about the vehicle and adding a block "/ History" (example: <nowiki>https://wiki.warthunder.com/(Vehicle-name)/History</nowiki>) and add a link to it here using the <code>main</code> template. Be sure to reference text and sources by using <code><nowiki><ref></nowiki></code>, as well as adding them at the end of the article. This section may also include the vehicle's dev blog entry (if applicable) and the in-game encyclopedia description (under <code><nowiki>=== Encyclopedia Info ===</nowiki></code>, also if applicable).--> | |
| − | |||
| − | + | A prototype AA tank based on the M15/42 medium tank. The single prototype was captured by Germany upon Italy's surrender in September, 1943. Some sources have claimed it served as inspiration for the German Wirbelwind AA tank, which first saw service in mid-1944. | |
== Media == | == Media == | ||
| − | + | ''An excellent addition to the article will be video guides, as well as screenshots from the game and photos.'' | |
| − | + | == See also == | |
| + | ''Links to the articles on the War Thunder Wiki that you think will be useful for the reader, for example:'' | ||
| − | |||
| − | |||
| − | |||
| − | |||
| − | |||
| − | |||
| − | |||
* ''reference to the series of the vehicles;'' | * ''reference to the series of the vehicles;'' | ||
| − | * ''links to approximate analogues of other nations and research trees.'' | + | * ''links to approximate analogues of other nations and research trees.'' |
| − | + | == External links == | |
| − | + | ''Paste links to sources and external resources, such as:'' | |
| − | |||
| − | |||
| − | |||
| − | |||
| − | |||
| − | |||
| − | |||
| − | |||
| − | |||
* ''topic on the official game forum;'' | * ''topic on the official game forum;'' | ||
| − | * ''other literature.'' | + | * ''encyclopedia page on tank;'' |
| − | + | * ''other literature.'' | |
| − | |||
| − | |||
{{Italy anti-aircraft vehicles}} | {{Italy anti-aircraft vehicles}} | ||
Revision as of 21:38, 2 June 2020
Contents
| This page is about the Italian SPAA M42 Contraereo. For other usages, see M42 (Disambiguation). |
Description
.jpg)
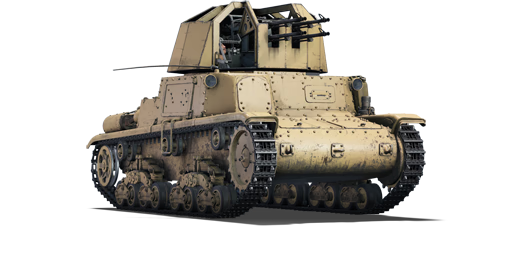
The Semovente M42 Contraereo (shortened as just M42 Contraereo, also nicknamed "Quadruplo"), is a Rank Italian self-propelled anti-aircraft gun
with a battle rating of (AB), (RB), and (SB). It was introduced in Update 1.85 "Supersonic".
General info
Survivability and armour
The M42 Contraereo is based off the M15/42 hull with an opened top turret, surrounding the crew members. The gunner does have an exposed spot in the front, and if shown correctly to the enemy, can be machined gunned easily without them to have to fire their main cannon. The turret may protect you from small rifle caliber bullets, but 50. caliber and up, especially on the M4 Sherman will be able to penetrate your turret from anywhere, as it is generally weak against them. The hull armor is decent, still keeping the armor from the M15/42 hull, but don't expect to tank a lot of shots, as most of your enemies you will face at 3.3 will have better caliber weapons, with mostly encountering 75mm and Russian 76.2mm cannons. You may be able to bounce some smaller caliber shells like the 37mm cannons but don't rely on your hull armor as your turret will most likely be targeted by the enemy. You have a small crew count of 3 members, and with two in the turret, and having okay armor, you'll usually die in one hit.
Mobility
| Game Mode | Max Speed (km/h) | Weight (tons) | Engine power (horsepower) | Power-to-weight ratio (hp/ton) | |||
|---|---|---|---|---|---|---|---|
| Forward | Reverse | Stock | Upgraded | Stock | Upgraded | ||
| Arcade | Expression error: Unexpected * operator. | 263 | Expression error: Unexpected round operator. | __.__ | |||
| Realistic | 164 | Expression error: Unexpected round operator. | __.__ | ||||
Armaments
Main armament
| 20 mm Scotti-IF 20/70 mod.41 (x4) | |||||
|---|---|---|---|---|---|
| Capacity (Belt capacity each) | Fire rate (shots/minute) |
Vertical guidance |
Horizontal guidance |
Stabilizer | |
| 3,200 (12) | 600 | -5°/+90° | ±180° | N/A | |
| Turret rotation speed (°/s) | |||||
| Mode | Stock | Upgraded | Prior + Full crew | Prior + Expert qualif. | Prior + Ace qualif. |
| Arcade | 52.8 | __.__ | __.__ | __.__ | __.__ |
| Realistic | 35.7 | __.__ | __.__ | __.__ | __.__ |
| Reloading rate (seconds) | |||||
| Stock | Prior + Full crew | Prior + Expert qualif. | Prior + Ace qualif. | ||
| 5.2 | __.__ | __.__ | 4.0 | ||
Ammunition
| Penetration statistics | |||||||
|---|---|---|---|---|---|---|---|
| Ammunition | Type of warhead |
Penetration in mm @ 90° | |||||
| 10m | 100m | 500m | 1000m | 1500m | 2000m | ||
| Granata mod.35 | HEFI-T | 2 | 2 | 2 | 2 | 2 | 2 |
| Perforante mod.35 | API-T | 40 | 38 | 29 | 20 | 14 | 10 |
| PzGr 40 | HVAP-T | 64 | 63 | 29 | 20 | 14 | 10 |
| Shell details | ||||||||||
|---|---|---|---|---|---|---|---|---|---|---|
| Ammunition | Type of warhead |
Velocity in m/s |
Projectile Mass in kg |
Fuse delay
in m: |
Fuse sensitivity
in mm: |
Explosive Mass in g (TNT equivalent): |
Normalization At 30° from horizontal: |
Ricochet: | ||
| 0% | 50% | 100% | ||||||||
| Granata mod.35 | HEFI-T | 830 | 0.14 | 0.3 | 0.1 | 3 | ° | 79° | 80° | 81° |
| Perforante mod.35 | API-T | 832 | 0.14 | 1.3 | 15 | 1 | ° | 47° | 60° | 65° |
| PzGr 40 | HVAP-T | 1,050 | 0.1 | N/A | N/A | N/A | +1.5° | 66° | 70° | 72° |
Ammo racks
| Full ammo |
1st rack empty |
2nd rack empty |
3rd rack empty |
4th rack empty |
5th rack empty |
Visual discrepancy |
|---|---|---|---|---|---|---|
| 268 | 253 (+15) | 9 (+259) | 6 (+262) | 3 (+265) | 0 (+268) | No |
Usage in battles
In Realistic battles, the Quadruplo is best used in the support role when tank hunting, sticking with teammates, assisting them and potentially distracting the enemy .Your best bet of killing any tank, usually a Sherman, Cromwell or T-34 is from the side as the APCR will pierce through their side armor, killing the tank. Light tanks such as M24s, Stuarts and Crusaders are able to be penetrated by the front, but usually this is only in close range engagements. T-50 and other slightly armored light tanks will be tougher to kill, but you're still able to flank them. You can kill basically any SPAA you see, as you'll usually encounter trucks or armored cars. Ambush and surprise tactics are good options to kill tanks effectively, as the enemy will stroll pass you, usually showing their side armor. Aggressive play styles are suggested to get the most out of the Quadruplo, similar when playing a Wirbelwind when tank hunting. Try not to expose yourself too much and move from cover to cover, as one hit from a tank shell, usually APHE will knock you out in one shot, or the machine guns pierce your turret armor and kill both your gunner and commander. When it comes to shooting down planes in the Quadruplo, it is best to get their attention so they try to strafe you, or surprise them as they come closer to you, when you have a good shot as they won't have enough reaction time to evade your shots if they connect. Be mindful that you are opened topped, and you'll less likely ti survive a strafe run. Despite the guns having a high fire rate, and being close together, the Quadruplo has a lower ammo count per gun with 12 with each gun, having a 48 in total loaded (essentially a discount Wirbelwind). It is easy to burn through it, so make sure you have a good shot on the aircraft you are trying to shoot down as you'll only have about 3-4 seconds of continuous fire before needing to reload.
Pros and cons
Pros:
- PzGr 40 shells are great at penetrating tanks from the sides and knocking out modules
- High mobility when spaded
- Great armour for a SPAA
- Guns have a very high rate of fire
- Guns are placed very close together
Cons:
- PzGr 40 is tier IV modification
- Performance is inadequate when stock
- Gap in the gunner's position of the turret armour
- Turret can be penetrated by .50 cals heavy machine guns
- High rate of fire makes it more difficult to adjust fire against planes
- 3 crew members, all in turret
- Low magazine count for the guns (12 ammo per cannon)
History
A prototype AA tank based on the M15/42 medium tank. The single prototype was captured by Germany upon Italy's surrender in September, 1943. Some sources have claimed it served as inspiration for the German Wirbelwind AA tank, which first saw service in mid-1944.
Media
An excellent addition to the article will be video guides, as well as screenshots from the game and photos.
See also
Links to the articles on the War Thunder Wiki that you think will be useful for the reader, for example:
- reference to the series of the vehicles;
- links to approximate analogues of other nations and research trees.
External links
Paste links to sources and external resources, such as:
- topic on the official game forum;
- encyclopedia page on tank;
- other literature.
| Italy anti-aircraft vehicles | |
|---|---|
| R3 Capraia | R3 T20 FA-HS |
| SIDAM 25 | SIDAM 25 · SIDAM 25 (Mistral) |
| Wheeled | AS 42 · CM52 |
| Tracked | M42 Contraereo · Leopard 40/70 · OTOMATIC |
| Hungary | ◔ZSU-57-2 · ◔ZSU-23-4 |
