Difference between pages "Cromwell V (RP-3)" and "Cromwell I"
(Updated w/ Specs, Battle-rating, Disambig notice) |
(→Description) |
||
| Line 1: | Line 1: | ||
| − | {{ | + | {{About |
| − | + | |about= British medium tank '''{{PAGENAME}}''' | |
| + | |usage= other versions | ||
| + | |link= Cromwell (Family) | ||
| + | }} | ||
| + | {{Specs-Card | ||
| + | |code=uk_a27m_cromwell_1 | ||
| + | |images={{Specs-Card-Image|GarageImage_{{PAGENAME}}.jpg|ArtImage_{{PAGENAME}}.png}} | ||
| + | }} | ||
== Description == | == Description == | ||
| − | <!--''In the description, the first part | + | <!-- ''In the description, the first part should be about the history of the creation and combat usage of the vehicle, as well as its key features. In the second part, tell the reader about the ground vehicle in the game. Insert a screenshot of the vehicle, so that if the novice player does not remember the vehicle by name, he will immediately understand what kind of vehicle the article is talking about.'' --> |
| − | + | The '''{{Specs|name}}''' (or just '''{{Specs|pseudonym}}''') was a British WWII-era medium tank named after 17th century military leader Oliver Cromwell. The tank was heavily influenced by the previous Crusader tank and the demand for a medium velocity dual-purpose gun by the Ministry of Defence. Initially, three different prototypes were named Cromwell. The initial A24 Cromwell I prototype made by Nuffield later crystallized into the A24 "Cavalier" cruiser tank, of which about 500 were made, but the performance proved unsatisfactory. The second prototype was the A27L Cromwell II made by English Electric and later Leyland. Out of this prototype, the "Centaur" was developed. Centaur was equipped with vintage WWI Liberty engine and Merrit-Brown gearbox taken over from Churchill infantry tank. The last prototype bearing the name Cromwell was the A27M Cromwell III, which then became the only tank bearing the name into serial production. The A27M used the Rolls-Royce Meteor engine but was otherwise similar to the Centaur, although due to the engine it had no issues with cooling and reliability. All the Centaur hulls were reengined and taken into service as Cromwells. The tank first saw action after the Normandy landings in June 1944. The usage of higher calibre guns then led to development of the [[Comet I|Comet]], [[Charioteer Mk VII|Charioteer]], and [[Challenger]] cruiser tanks, based on the Cromwell. After the war, Cromwell was also used by many other countries such as Czechoslovakia, Israel, and Greece. The British army also used Cromwells in the Korean War, where a few were captured by the North Korean forces. | |
| − | |||
| − | The '''{{Specs|name}}''' (or just '''{{Specs|pseudonym}}''') | ||
| − | The Cromwell | + | The Cromwell was introduced along with the initial British ground tree in [[Update 1.55 "Royal Armour"]]. The Cromwell Mk I uses the 6-pdr, which provides higher penetration than the 75 mm on the [[Cromwell V|Mk V]]. It is also slightly faster and more manoeuvrable, thanks to the addition of an engine governor on the Mk V that lowered its maximum output. However, these advantages are offset by the higher BR which means the Cromwell will be facing some tanks that are well-matched in terms of speed, like the [[T-34 (Family)|T-34]], and some tanks that are largely invulnerable, like the [[KV-1E]]. The Cromwell has adequate armour for a medium tank and a reasonably powerful gun. |
== General info == | == General info == | ||
=== Survivability and armour === | === Survivability and armour === | ||
| − | <!--''Describe armour protection. Note the most well protected and key weak areas. Appreciate the layout of modules as well as the number and location of crew members. Is the level of armour protection sufficient, is the placement of modules | + | {{Specs-Tank-Armour}} |
| + | <!-- ''Describe armour protection. Note the most well protected and key weak areas. Appreciate the layout of modules as well as the number and location of crew members. Is the level of armour protection sufficient, is the placement of modules helpful for survival in combat? If necessary use a visual template to indicate the most secure and weak zones of the armour.'' --> | ||
| + | '''Armour type:''' | ||
| + | |||
| + | * Rolled homogeneous armour | ||
| + | * Cast homogeneous armour (Gun mantlet, Driver's port, Side armour, Compartment hull roof) | ||
| − | |||
| − | |||
| − | |||
{| class="wikitable" | {| class="wikitable" | ||
|- | |- | ||
! Armour !! Front !! Sides !! Rear !! Roof | ! Armour !! Front !! Sides !! Rear !! Roof | ||
|- | |- | ||
| − | | Hull || 63.5 mm ''Front plate'' <br> 25.4 mm ( | + | | Hull || 63.5 mm ''Front plate'' <br> 25.4 mm (74°) ''Front glacis'' <br> 57 mm (13°) ''Joint plate'' <br> 25.4 mm (68°) ''Lower glacis'' ||44 mm ''Top front'' <br> 32 + 14 mm ''Bottom front'' <br> 38 (0°) + 32 mm (34°) ''Top rear'' <br> 25.4 + 14 mm ''Bottom rear'' || 32 mm (0-7°) ''Top'' <br> 20 mm (47°) ''Bottom'' || 20 mm ''Compartment'' <br> 14 mm ''Engine'' |
|- | |- | ||
| − | | Turret || | + | | Turret || 64 mm + 12.7 mm ''Turret front'' <br> 88.9 mm ''Gun mantlet'' || 51 mm + 12.7 mm || 44 mm + 12.7 mm || 20 mm |
|- | |- | ||
|} | |} | ||
'''Notes:''' | '''Notes:''' | ||
| − | * Suspension wheels and tracks are 20 mm thick. | + | |
| − | * | + | * Suspension wheels and tracks are 20 mm thick. |
| + | * 12.7mm Armour basket behind Turret front, sides and rear. | ||
| + | * The vehicle has 5mm structural steel compartment separators inside | ||
=== Mobility === | === Mobility === | ||
| − | <!--''Write about the mobility of the ground vehicle. Estimate the specific power and | + | {{Specs-Tank-Mobility}} |
| − | {| | + | <!-- ''Write about the mobility of the ground vehicle. Estimate the specific power and manoeuvrability, as well as the maximum speed forwards and backwards.'' --> |
| − | | | + | |
| − | + | {{tankMobility|abMinHp= 930|rbMinHp= 531}} | |
| − | + | ||
| − | + | === Modifications and economy === | |
| − | + | {{Specs-Economy}} | |
| − | |||
| − | |||
| − | |||
| − | |||
| − | |||
| − | |||
| − | |||
| − | |||
| − | |||
| − | |||
| − | |||
| − | |||
| − | |||
| − | |||
| − | |||
| − | |||
| − | |||
| − | |||
| − | |||
| − | |||
| − | |||
| − | |||
| − | |||
| − | |||
| − | |||
| − | |||
| − | |||
| − | |||
| − | |||
| − | |||
| − | |||
| − | |||
| − | |||
| − | |||
| − | |||
== Armaments == | == Armaments == | ||
| + | {{Specs-Tank-Armaments}} | ||
=== Main armament === | === Main armament === | ||
| − | <!--''Give the reader information about the characteristics of the main gun. Assess its effectiveness in a battle based on the reloading speed, ballistics and the power of shells. Do not forget about the | + | {{Specs-Tank-Weapon|1}} |
| − | {{main| | + | <!-- ''Give the reader information about the characteristics of the main gun. Assess its effectiveness in a battle based on the reloading speed, ballistics and the power of shells. Do not forget about the flexibility of the fire, that is how quickly the cannon can be aimed at the target, open fire on it and aim at another enemy. Add a link to the main article on the gun: <code><nowiki>{{main|Name of the weapon}}</nowiki></code>. Describe in general terms the ammunition available for the main gun. Give advice on how to use them and how to fill the ammunition storage.'' --> |
| + | {{main|6pdr OQF Mk.III (57 mm)}} | ||
| − | {| class="wikitable | + | {| class="wikitable" style="text-align:center" width="100%" |
| − | |||
| − | |||
| − | |||
| − | |||
| − | |||
| − | |||
| − | |||
| − | |||
| − | |||
| − | |||
| − | |||
| − | |||
| − | |||
| − | |||
| − | |||
| − | |||
| − | |||
| − | |||
| − | |||
| − | |||
| − | |||
| − | |||
| − | |||
| − | |||
| − | |||
| − | |||
| − | |||
| − | |||
| − | |||
| − | |||
| − | |||
| − | |||
| − | |||
| − | |||
| − | |||
| − | |||
| − | |||
| − | |||
| − | |||
| − | |||
| − | |||
| − | |||
| − | |||
| − | |||
| − | |||
| − | |||
| − | |||
| − | |||
| − | |||
| − | |||
|- | |- | ||
| − | | | + | ! colspan="5" | [[6pdr OQF Mk.III (57 mm)|57 mm 6pdr OQF Mk.III]] || colspan="5" | Turret rotation speed (°/s) || colspan="4" | Reloading rate (seconds) |
|- | |- | ||
| − | + | ! Mode !! Capacity !! Vertical !! Horizontal !! Stabilizer | |
| + | ! Stock !! Upgraded !! Full !! Expert !! Aced | ||
| + | ! Stock !! Full !! Expert !! Aced | ||
|- | |- | ||
| − | + | ! ''Arcade'' | |
| − | + | | rowspan="2" | 75 || rowspan="2" | -12°/+20° || rowspan="2" | ±180° || rowspan="2" | Vertical || 23.8 || 32.9 || 40.0 || 44.2 || 47.1 || rowspan="2" | 5.20 || rowspan="2" | 4.60 || rowspan="2" | 4.24 || rowspan="2" | 4.00 | |
| − | |||
|- | |- | ||
| − | ! | + | ! ''Realistic'' |
| − | + | | 14.9 || 17.5 || 21.3 || 23.5 || 25.0 | |
| − | |||
| − | |||
| − | |||
| − | |||
| − | |||
| − | |||
| − | |||
| − | |||
| − | |||
| − | |||
| − | |||
| − | |||
| − | |||
| − | |||
| − | | | ||
| − | |||
| − | |||
| − | |||
| − | |||
|- | |- | ||
|} | |} | ||
| − | ==== | + | ==== Ammunition ==== |
| − | + | {{:6pdr OQF Mk.III (57 mm)/Ammunition|Shot Mk.5, Shot Mk.5 HV, Shot Mk.8, Shot Mk.9, Shell Mk.10}} | |
| − | |||
| − | |||
| − | |||
| − | |||
| − | |||
| − | |||
| − | |||
| − | |||
| − | |||
| − | |||
| − | |||
| − | |||
| − | |||
| − | |||
| − | |||
| − | |||
| − | === | + | ==== [[Ammo racks]] ==== |
| − | <!--'' | + | [[File:Ammoracks_{{PAGENAME}}.png|right|thumb|x250px|[[Ammo racks]] of the {{PAGENAME}}.]] |
| + | <!-- '''Last updated: 2.27.2.40''' --> | ||
{| class="wikitable" style="text-align:center" | {| class="wikitable" style="text-align:center" | ||
|- | |- | ||
| − | ! | + | ! Full<br>ammo |
| + | ! 1st<br>rack empty | ||
| + | ! 2nd<br>rack empty | ||
| + | ! 3rd<br>rack empty | ||
| + | ! 4th<br>rack empty | ||
| + | ! 5th<br>rack empty | ||
| + | ! 6th<br>rack empty | ||
| + | ! 7th<br>rack empty | ||
| + | ! 8th<br>rack empty | ||
| + | ! Visual<br>discrepancy | ||
|- | |- | ||
| − | + | | '''75''' || 66 ''(+9)'' || 56 ''(+19)'' || 46 ''(+29)'' || 37 ''(+38)'' || 28 ''(+47)'' || 19 ''(+56)'' || 10 ''(+65)'' || 1 ''(+74)'' || Yes | |
| − | |||
| − | |||
| − | |||
| − | | | ||
| − | | | ||
|- | |- | ||
|} | |} | ||
| + | '''Notes''': | ||
| − | ==== | + | * Racks disappear after you've fired all shells in the rack. |
| − | {| class="wikitable | + | * The visual discrepancy concerns the total number of shells as well as the number of shells per rack: |
| − | ! colspan=" | + | ** 86 shells are visually modelled but you can only pack 75 shells. |
| + | ** For each rack, the number of shells modelled does not correspond to the number of shells available to be fired. | ||
| + | |||
| + | ==== Optics ==== | ||
| + | {| class="wikitable" style="text-align:center" width="50%" | ||
| + | ! colspan="3" | {{PAGENAME}} [[Optics]] | ||
|- | |- | ||
| − | ! | + | ! Which ones |
| − | ! | + | ! Default magnification |
| − | ! | + | ! Maximum magnification |
|- | |- | ||
| − | ! | + | ! Main Gun optics |
| − | + | | x1.8 || x3.5 | |
| − | |||
| − | |||
| − | |||
| − | |||
|- | |- | ||
| − | + | ! Comparable optics | |
| − | + | | colspan="2" | [[M10 GMC]] | |
| − | |||
| − | |||
| − | |||
| − | |||
| − | |||
| − | |||
| − | |||
| − | |||
| − | |||
| − | |||
| − | |||
| − | |||
| − | |||
| − | |||
| − | |||
| − | |||
| − | |||
| − | |||
| − | |||
| − | |||
|- | |- | ||
|} | |} | ||
=== Machine guns === | === Machine guns === | ||
| − | <!--''Offensive and anti-aircraft machine guns not only allow you to fight some aircraft | + | {{Specs-Tank-Weapon|2}} |
| + | <!-- ''Offensive and anti-aircraft machine guns not only allow you to fight some aircraft but also are effective against lightly armoured vehicles. Evaluate machine guns and give recommendations on its use.'' --> | ||
{{main|BESA (7.92 mm)}} | {{main|BESA (7.92 mm)}} | ||
| − | {| class="wikitable" style="text-align:center" | + | {| class="wikitable" style="text-align:center" width="50%" |
|- | |- | ||
| − | ! colspan=" | + | ! colspan="5" | [[BESA (7.92 mm)|7.92 mm BESA]] |
|- | |- | ||
| − | ! | + | ! Mount !! Capacity (Belt) !! Fire rate !! Vertical !! Horizontal |
|- | |- | ||
| − | + | | Coaxial || 4,950 (225) || 600 || N/A || N/A | |
| − | |||
| − | |||
| − | |||
| − | |||
| − | |||
|- | |- | ||
|} | |} | ||
| − | == Usage in | + | == Usage in battles == |
| − | <!--''Describe the tactics of playing in the vehicle, the features of using vehicles in the team and advice on tactics. Refrain from creating a "guide" - do not impose a single point of view but give the reader food for thought. Describe the most dangerous enemies and give recommendations on fighting them. If necessary, note the specifics of the game in different modes (AB, RB, SB).''--> | + | <!-- ''Describe the tactics of playing in the vehicle, the features of using vehicles in the team and advice on tactics. Refrain from creating a "guide" - do not impose a single point of view but instead give the reader food for thought. Describe the most dangerous enemies and give recommendations on fighting them. If necessary, note the specifics of the game in different modes (AB, RB, SB).'' --> |
| − | |||
| − | + | '''Overview:''' | |
| − | + | The Cromwell I is a fast tank with a good cannon and acceptable armour protection. Commanders should play it like a light tank, but be careful of the extremely slow reverse gear. It excels in close quarters combat due to the excellent gun and hull handling characteristics, as well as the fast reload rate. Commanders should avoid long range fights due to the slow reverse gear. This lack of a reverse gear makes it difficult to return to cover after exposing your tank to fire on the enemy. The best strategy in the Cromwell I is to hug the map corners and try to flank, outmaneuvering enemy forces. The tank is very rewarding to players who have experience with the map that is being played, are adept at flanking, and are able to predict enemy movements. It is a true Cruiser tank, able to exploit gaps in the enemy defenses by disrupting the enemy back line. Despite its admirable characteristics, the Cromwell is an ''unconventional'' medium tank, and may be difficult to use in the hands of a traditional medium tank player. | |
| − | The | + | '''Firepower:''' |
| + | |||
| + | The best shell to use is the Shot Mk.9 APCBC due to its penetration characteristics. Generally this is a great round due to the fast reload and shell velocity. However this round struggles against angled armour, most notably against Soviet T-34 tanks. Against this enemy Cromwell gunners will have to aim for the turret or machine gun port, as the upper front plate will bounce the Shot Mk.9 easily. The 6pdr also has a high velocity loss modifier, resulting in poor penetration over long distances. | ||
| + | |||
| + | '''Staying alive:''' | ||
| + | |||
| + | In terms of armour, the Cromwell I is in a better situation than many players would assume. While the front armour is not particularly impressive, the design is very square and the side armour is acceptable. This means that the Cromwell I is an excellent tank to angle your hull and turret armour in. When the enemy fires, a quick turn using the impressive handling and acceleration can cause a bounce. The Cromwell's turret face has an interior 12mm plate behind the main armour, meaning that in a downtier, some vehicles may have issue penetrating you when hull down. There is also an overlap with the 88.9mm mantlet and 64mm turret face, resulting in a small area with up to 160mm of effective armour. Generally, Cromwell I commanders should seek to move unpredictably when under fire and create angles that are difficult to penetrate. They should also seek to engage targets from the flanks whenever possible, and plan potential escape routes if the engagement is not in your favor. | ||
| + | |||
| + | One somewhat unconventional tool that the Cromwell has access to is an abundance of smoke grenades. Commanders can use these grenades to shut down enemy firing angles and protect themselves from being shot in the side, or on the retreat. However, be careful not to spam these too much as they may get in the way of your teammates as well. | ||
=== Pros and cons === | === Pros and cons === | ||
| − | <!--'' | + | <!-- ''Summarise and briefly evaluate the vehicle in terms of its characteristics and combat effectiveness. Mark its pros and cons in a bulleted list. Try not to use more than 6 points for each of the characteristics. Avoid using categorical definitions such as "bad", "good" and the like - use substitutions with softer forms such as "inadequate" and "effective".'' --> |
| + | |||
'''Pros:''' | '''Pros:''' | ||
| − | * Very fast for a medium tank | + | |
| − | * | + | * Very fast for a medium tank, excellent for capturing zones and catching enemy light tanks off-guard |
| − | * | + | * 57 mm performs well against most armoured targets |
| − | * | + | * Great gun handling thanks to high turret traverse, good gun depression and vertical stabilizer |
| − | * | + | * Can easily hide behind obstacles and surprise passing enemies with a flanking manoeuvre |
| − | * | + | * Remains competitive even in an uptier |
| − | + | * Respectable minimum frontal armour means that in a downtier some vehicles may struggle to penetrate you | |
| − | * | + | * Reasonably fast neutral turning capablity |
| − | * | + | * Above average survivability thanks to 5 crew members and interior structural steel |
| − | + | ||
'''Cons:''' | '''Cons:''' | ||
| − | * | + | |
| − | + | * Terrible reverse speed, makes overextending difficult | |
| − | * | + | * Neutral turning performs poorly on sloped terrain |
| − | * Boxy, vertical armour on hull and turret makes angling | + | * Boxy, vertical armour on hull and turret makes angling essential |
| − | * | + | * Gunner can frequently be knocked out from frontal shots |
| − | * | + | * 57 mm struggles to penetrate sloped or angled armour. T-34s and KV-1s are an issue at this rank as they are very difficult to penetrate at long ranges |
| − | + | * 57mm ammunition can sometimes fail to injure enemy crew sufficiently | |
| − | |||
| − | * | ||
| − | |||
== History == | == History == | ||
| − | <!--''Describe the history of the creation and combat usage of the | + | <!-- ''Describe the history of the creation and combat usage of the vehicle in more detail than in the introduction. If the historical reference turns out to be too long, take it to a separate article, taking a link to the article about the vehicle and adding a block "/History" (example: <nowiki>https://wiki.warthunder.com/(Vehicle-name)/History</nowiki>) and add a link to it here using the <code>main</code> template. Be sure to reference text and sources by using <code><nowiki><ref></ref></nowiki></code>, as well as adding them at the end of the article with <code><nowiki><references /></nowiki></code>. This section may also include the vehicle's dev blog entry (if applicable) and the in-game encyclopedia description (under <code><nowiki>=== In-game description ===</nowiki></code>, also if applicable).'' --> |
===Development=== | ===Development=== | ||
| − | Development for the tank started back in 1940, just around the time the [[Crusader Mk II|Crusader cruiser tank]] was being put into service in the British Army. The development of a stronger cruiser tank was initiated due to the belief that that the Crusader would become obsolete in the face of more advanced German tanks as the time pass. The initial plans was for the tank to mount the OQF 6-pounder gun and was to be completed in 1942. The project was taken up by three companies who submitted their designs. Vauxhall developed the | + | Development for the tank started back in 1940, just around the time the [[Crusader Mk II|Crusader cruiser tank]] was being put into service in the British Army. The development of a stronger cruiser tank was initiated due to the belief that that the Crusader would become obsolete in the face of more advanced German tanks as the time pass. The initial plans was for the tank to mount the OQF 6-pounder gun and was to be completed in 1942. The project was taken up by three companies who submitted their designs. Vauxhall developed the A23, a scaled down [[Churchill Mk III|Churchill tank]] with 75 mm of armour and a 12-cylinder Bedford engine. Nuffield developed the A24 based off the Crusader that was powered by the Liberty engine and had an advantage of being put into production quickly. Leyland and Birmingham Railway Carriage & Wagon developed a design that was similar to Nuffield's, but with different suspension and track designs. All these designs were examined in January 1941 and it was decided that Nuffield's A24 would become the vehicle of choice for the project. Six prototypes of the vehicle, now called Cromwell I were ordered for delivery in the Spring of 1942, but arrived four months late, with current events making the tank designs outdated. Despite that, the tank was put into production and experienced an unsatisfactory performance history as being an under-powered tank. The lack of available tanks led to the demands for more 6-pounders on the battlefield, which were used to be mounted on the older tank designs. |
| − | When Britain entered the war, Rolls-Royce stopped producing cars and set up a team to find ways to use their production lines. The team was made under Roy Robotham at Clan Foundry near the city of Belper. Meeting with Henry Spurrier of Leyland, they talked tank designs and a project began of fitting a Rolls-Royce Merlin engine onto a tank. A Leyland-built Crusader was used for the test, removing the supercharger from the engine before installing it in the tank. The result was an absurdly fast tank, able to reach a speed of 80 km/h, estimated since timing the speed runs was difficult. The impressive performance had Leyland organize a production for 1,000 units of the engine, renamed as the | + | When Britain entered the war, Rolls-Royce stopped producing cars and set up a team to find ways to use their production lines. The team was made under Roy Robotham at Clan Foundry near the city of Belper. Meeting with Henry Spurrier of Leyland, they talked tank designs and a project began of fitting a Rolls-Royce Merlin engine onto a tank. A Leyland-built Crusader was used for the test, removing the supercharger from the engine before installing it in the tank. The result was an absurdly fast tank, able to reach a speed of 80 km/h, estimated since timing the speed runs was difficult. The impressive performance had Leyland organize a production for 1,000 units of the engine, renamed as the Meteor. This plan was changed after concerns of the engine's cooling was raised, Leyland decides to produce their own version of Meteor which was weaker (350 hp) compared to the Rolls design (500 hp). Thus, the Tank Board decided to just order the engine straight from Rolls-Royce for the Meteor engine. The A24 tank design with the Meteor engine was redesignated as the A27. During the development, Leyland suggested that the tank should be made to fit both the Meteor and the American-designed Liberty engine, thus the designation expanded to A27M (Meteor) and the A27L (Liberty) and were called Cromwell III and Cromwell II respectively. Leyland's attempt at building their own engine was abandoned. The A27M tank was made into a prototype and delivered on January 1942, it proved extremely mobile with its 600 hp engine and orders were placed for both engine versions. This proved difficult due to production difficulties with the Meteor and soon Leyland took over production of both versions. Production lines for the Meteor engine continued to be strained until late 1942, where Ernest Hives of Rolls met with Spencer Wilks of the company Rover made a deal in January 1943 to exchange factories, with Rolls establishing a Meteor engine factory at Barnoldswick, Lancashire. |
| − | Production of the tank began in November 1942 with new names given out | + | Production of the tank began in November 1942 with new names given out the tanks. The original A24 Cromwell I from Nuffield was renamed the Cavalier, the Liberty powered Cromwell II became the Centaur, and the Meteor powered Cromwell III retained the name as the '''Cromwell'''. The actual Cromwell tank production was delayed until January 1943 due to low supply of Meteor engines until the Rover factory began producing it. With more Meteor engines being produced, the Centaur tanks were often converted to use the Meteor engine, turning them into Cromwells. Field tests with the tanks took place in August to September in 1943 alongside the [[M4A2|M4A2]] and M4A4 Shermans. The tests proved the Shermans to be more reliable than the Cromwell and Centaurs, needing only about 0.03 hours of mechanical attention every mile compared to the Cromwell's 0.07 hours per mile and the Centaur's 0.08 hours per mile. The two tanks were thus given time to iron out these deficiencies, the Cromwell suffered from oil leaks along with brake and clutch failures. While the tank suffered from these defects, the crews expressed their satisfaction with the designs for their speed and handling, but the Centaur was not given the same attention as the Cromwell. The second test in November had the Cromwell perform with improved results while the Centaur was still experiencing the same problems. The production model was finalized on February 2, 1944, after a specifications for a "Battle Cromwell" came in from Leyland, which included some design changes, an increase of 6 mm on the bottom of the tank, seam welding the joints, and the standard usage of the Meteor engine and the Merritt Brown transmission. The Centaur was relegated to training roles or modified for specialist roles such as anti-aircraft guns or engineering vehicles. Total production for the A27 tank series is 4,016 tanks, of which 950 are Centaurs and 3,066 are Cromwells. |
===Design=== | ===Design=== | ||
| − | The Cromwell's frame used a riveted construction in its initial production models, but this later changed to welding. The frame was strengthened with bolted armour plates. Companies involved in the A27 production were LMS Railway, Morris Motors, Metro-Cammell, Birmingham Railway Carriage & Wagon Company, and English Electric. Some of these models were not consistent in construction, such as some variants built with 360 mm wide tracks and some with 393 mm tracks. | + | The Cromwell's frame used a riveted construction in its initial production models, but this later changed to welding. The frame was strengthened with bolted armour plates. Companies involved in the A27 production were LMS Railway, Morris Motors, Metro-Cammell, Birmingham Railway Carriage & Wagon Company, and English Electric. Some of these models were not consistent in construction, such as some variants built with 360 mm wide tracks and some with 393 mm tracks. The suspension was a Christie suspension derived from the earlier cruiser tank designs. Four of the tanks' road wheels have shock absorbers, and no return rollers are available, the tracks are supported on the top of the large road wheels. The gearbox has five forward and one reverse gear, with the first forward gear made for confined areas and sharp turns. While the Meteor engine is capable of going faster, it is restricted to 540 hp output with a governor to avoid straining the engine and suspension. The Cromwell's armaments changed over a few times, its initial model mounted the 6-pounder gun, but the later models [[Cromwell V|mounted the 75 mm gun]]. The adaption was easy due to the 75 mm gun being a 6-pounder bored for the larger calibre. A 7.92 mm BESA machine gun was available for coaxial firing on the turret. The armour on the Cromwell started as a 76 mm plate, which increased gradually to 83 mm and 100 mm overtime for additional protection. |
| − | The '''A27M Cromwell | + | The '''A27M Cromwell I''' was exactly the same as Centaur I, with the biggest difference being that it was powered with a Meteor engine. It featured a 6-pounder as its main armament, but only a few were produced before the Cromwell changed armament to the [[Ordnance QF Mk.V (75 mm)|75 mm gun]] |
===Combat usage=== | ===Combat usage=== | ||
| − | ' | + | The British, at the time of Operation Overlord, primarily service the [[M4|M4 Sherman]] as the main tank of their armoured units, only the armoured brigades of the 7th Armoured Division were equipped with the Cromwell tanks. Although the Cromwell also saw use as armoured reconnaissance regiments in other British divisions such as the Guards Armoured Division and the 11th Armoured Division. Compared to the Sherman, the Cromwell was much faster, so fast that it earned the title as the fastest British tank in World War II. The Cromwell also presented a smaller profile, making it a lower target, and has a thicker frontal armour plate. However, the Cromwell's armour was not sloping, was not as reliable in comparison to the Sherman, and a slightly smaller crew space inside the tank. Nevertheless, the Cromwell proved very mobile and effective on the battlefield alongside the Sherman, often outflanking German armour with their superior speed to hit the tanks on their sides or rear. Since the Cromwells are not able to mount the larger and more powerful 17-pounder and a derivative, the [[Challenger|A30 Challenger]], met with production issues, Cromwell units were equipped with [[Sherman Firefly|Sherman Fireflies]] in order to supplement the firepower of the 17-pounder. Later in the war, these units began to be succeeded by the [[Comet I|Comet tank]] which had more armour and a more powerful 77 mm gun derived from the 17-pounder. |
| + | |||
| + | During the war, the Cromwell chassis was used in various specialized roles on the battlefield. The A30 Challenger is a tank design that attempted to mount the 17-pounder on a lengthened Cromwell chassis, the [[Avenger|A30 SP Avenger]] was another attempt to equip the 17-pounder, but used a lighter turret instead. Some were made into observation posts or command tanks. The Centaur saw a wider conversion with some becoming engineering vehicles, armoured recovery vehicles, and armoured personnel carriers. After the war, the British attempted to up-gun the Cromwell into the [[Charioteer Mk VII|Charioteer]], which was designed in the 1950s to supplement tank units before the [[Centurion Mk 3|Centurion]] was mass-issued. | ||
| + | |||
| + | The Cromwells were also given out to Allied units such as the 1st Polish Armoured Division and the 1st Czechoslovak Armoured Brigade. These units served in Northern Europe with the Allies as they breakthrough deeper into Europe. After World War II, some Cromwell stayed in service and saw service in the Korean War with the 7th Royal Tank Regiment and the 8th King's Royal Irish Hussars. The Cromwells also were given to Greece, where it had the distinction of being the first tank put into service by the Greek Army. 52 Centaurs were given to Greece in 1946 to fight in the Greek Civil War, but these were stored due to lack of crews with adequate training. Formal training began in Greece began in 1947 with the return of trained officers from Britain. The Centaur saw limited service in the Greek Armoured Corps, fighting in the Greek mountains. These units kept the Centaurs up until 1963 where it was replaced by the American [[M47|M47 Pattons]]. | ||
== Media == | == Media == | ||
| − | '' | + | <!-- ''Excellent additions to the article would be video guides, screenshots from the game, and photos.'' --> |
| + | |||
| + | ;Skins | ||
| + | |||
| + | * [https://live.warthunder.com/feed/camouflages/?vehicle=uk_a27m_cromwell_1 Skins and camouflages for the {{PAGENAME}} from live.warthunder.com.] | ||
| + | |||
| + | ;Images | ||
| + | <gallery mode="packed-hover" heights="200"> | ||
| + | File:Cromwell I desert charge.jpg|<small>Cromwell I in the desert.</small> | ||
| + | </gallery> | ||
| + | |||
| + | ;Videos | ||
| + | {{Youtube-gallery|CHvo6EIIlKk|'''Pages of History: A27 Cromwell''' - ''War Thunder Official Channel''}} | ||
| + | |||
| + | == See also == | ||
| + | <!-- ''Links to the articles on the War Thunder Wiki that you think will be useful for the reader, for example:'' | ||
| + | * ''reference to the series of the vehicles;'' | ||
| + | * ''links to approximate analogues of other nations and research trees.'' --> | ||
| − | + | * [[Cromwell V]] | |
| − | * [ | + | * [[Cromwell V (RP-3)]] |
| − | == | + | == External links == |
| − | ''Paste links to sources and external resources, such as:'' | + | <!-- ''Paste links to sources and external resources, such as:'' |
* ''topic on the official game forum;'' | * ''topic on the official game forum;'' | ||
| − | * ''other literature.'' | + | * ''other literature.'' --> |
| + | |||
| + | * [[wt:en/devblog/current/846/|[Devblog] Cromwell I]] | ||
| + | * [[wt:en/news/3549-profile-cromwell-mk-i-en|[Vehicle Profile] Cromwell Mk I]] | ||
{{Britain medium tanks}} | {{Britain medium tanks}} | ||
| − | |||
Latest revision as of 09:13, 18 May 2024
| This page is about the British medium tank Cromwell I. For other versions, see Cromwell (Family). |


Contents
Description
The Tank, Cruiser, Mk VIII, Cromwell I (A27M) (or just Cromwell I) was a British WWII-era medium tank named after 17th century military leader Oliver Cromwell. The tank was heavily influenced by the previous Crusader tank and the demand for a medium velocity dual-purpose gun by the Ministry of Defence. Initially, three different prototypes were named Cromwell. The initial A24 Cromwell I prototype made by Nuffield later crystallized into the A24 "Cavalier" cruiser tank, of which about 500 were made, but the performance proved unsatisfactory. The second prototype was the A27L Cromwell II made by English Electric and later Leyland. Out of this prototype, the "Centaur" was developed. Centaur was equipped with vintage WWI Liberty engine and Merrit-Brown gearbox taken over from Churchill infantry tank. The last prototype bearing the name Cromwell was the A27M Cromwell III, which then became the only tank bearing the name into serial production. The A27M used the Rolls-Royce Meteor engine but was otherwise similar to the Centaur, although due to the engine it had no issues with cooling and reliability. All the Centaur hulls were reengined and taken into service as Cromwells. The tank first saw action after the Normandy landings in June 1944. The usage of higher calibre guns then led to development of the Comet, Charioteer, and Challenger cruiser tanks, based on the Cromwell. After the war, Cromwell was also used by many other countries such as Czechoslovakia, Israel, and Greece. The British army also used Cromwells in the Korean War, where a few were captured by the North Korean forces.
The Cromwell was introduced along with the initial British ground tree in Update 1.55 "Royal Armour". The Cromwell Mk I uses the 6-pdr, which provides higher penetration than the 75 mm on the Mk V. It is also slightly faster and more manoeuvrable, thanks to the addition of an engine governor on the Mk V that lowered its maximum output. However, these advantages are offset by the higher BR which means the Cromwell will be facing some tanks that are well-matched in terms of speed, like the T-34, and some tanks that are largely invulnerable, like the KV-1E. The Cromwell has adequate armour for a medium tank and a reasonably powerful gun.
General info
Survivability and armour
Armour type:
- Rolled homogeneous armour
- Cast homogeneous armour (Gun mantlet, Driver's port, Side armour, Compartment hull roof)
| Armour | Front | Sides | Rear | Roof |
|---|---|---|---|---|
| Hull | 63.5 mm Front plate 25.4 mm (74°) Front glacis 57 mm (13°) Joint plate 25.4 mm (68°) Lower glacis |
44 mm Top front 32 + 14 mm Bottom front 38 (0°) + 32 mm (34°) Top rear 25.4 + 14 mm Bottom rear |
32 mm (0-7°) Top 20 mm (47°) Bottom |
20 mm Compartment 14 mm Engine |
| Turret | 64 mm + 12.7 mm Turret front 88.9 mm Gun mantlet |
51 mm + 12.7 mm | 44 mm + 12.7 mm | 20 mm |
Notes:
- Suspension wheels and tracks are 20 mm thick.
- 12.7mm Armour basket behind Turret front, sides and rear.
- The vehicle has 5mm structural steel compartment separators inside
Mobility
| Game Mode | Max Speed (km/h) | Weight (tons) | Engine power (horsepower) | Power-to-weight ratio (hp/ton) | |||
|---|---|---|---|---|---|---|---|
| Forward | Reverse | Stock | Upgraded | Stock | Upgraded | ||
| Arcade | Expression error: Unexpected * operator. | 930 | Expression error: Unexpected round operator. | __.__ | |||
| Realistic | 531 | Expression error: Unexpected round operator. | __.__ | ||||
Modifications and economy
Armaments
Main armament
| 57 mm 6pdr OQF Mk.III | Turret rotation speed (°/s) | Reloading rate (seconds) | |||||||||||
|---|---|---|---|---|---|---|---|---|---|---|---|---|---|
| Mode | Capacity | Vertical | Horizontal | Stabilizer | Stock | Upgraded | Full | Expert | Aced | Stock | Full | Expert | Aced |
| Arcade | 75 | -12°/+20° | ±180° | Vertical | 23.8 | 32.9 | 40.0 | 44.2 | 47.1 | 5.20 | 4.60 | 4.24 | 4.00 |
| Realistic | 14.9 | 17.5 | 21.3 | 23.5 | 25.0 | ||||||||
Ammunition
| Penetration statistics | |||||||
|---|---|---|---|---|---|---|---|
| Ammunition | Type of warhead |
Penetration @ 0° Angle of Attack (mm) | |||||
| 10 m | 100 m | 500 m | 1,000 m | 1,500 m | 2,000 m | ||
| Shot Mk.5 | AP | 101 | 97 | 82 | 66 | 53 | 43 |
| Shot Mk.5 HV | AP | 108 | 104 | 87 | 70 | 57 | 46 |
| Shot Mk.8 | APC | 110 | 106 | 89 | 72 | 59 | 48 |
| Shot Mk.9 | APCBC | 122 | 118 | 101 | 84 | 70 | 58 |
| Shell Mk.10 | HE | 9 | 9 | 9 | 9 | 9 | 9 |
| Shell details | ||||||||||||
|---|---|---|---|---|---|---|---|---|---|---|---|---|
| Ammunition | Type of warhead |
Velocity (m/s) |
Projectile mass (kg) |
Fuse delay | Fuse sensitivity (mm) |
Explosive mass (TNT equivalent) (g) |
Ricochet | |||||
| 0% | 50% | 100% | ||||||||||
| Shot Mk.5 | AP | 815 | 2.8 | - | - | - | 47° | 60° | 65° | |||
| Shot Mk.5 HV | AP | 853 | 2.8 | - | - | - | 47° | 60° | 65° | |||
| Shot Mk.8 | APC | 853 | 2.87 | - | - | - | 48° | 63° | 71° | |||
| Shot Mk.9 | APCBC | 801 | 3.23 | - | - | - | 48° | 63° | 71° | |||
| Shell Mk.10 | HE | 655 | 2.72 | 0 | 0.1 | 590 | 79° | 80° | 81° | |||
Ammo racks

| Full ammo |
1st rack empty |
2nd rack empty |
3rd rack empty |
4th rack empty |
5th rack empty |
6th rack empty |
7th rack empty |
8th rack empty |
Visual discrepancy |
|---|---|---|---|---|---|---|---|---|---|
| 75 | 66 (+9) | 56 (+19) | 46 (+29) | 37 (+38) | 28 (+47) | 19 (+56) | 10 (+65) | 1 (+74) | Yes |
Notes:
- Racks disappear after you've fired all shells in the rack.
- The visual discrepancy concerns the total number of shells as well as the number of shells per rack:
- 86 shells are visually modelled but you can only pack 75 shells.
- For each rack, the number of shells modelled does not correspond to the number of shells available to be fired.
Optics
| Cromwell I Optics | ||
|---|---|---|
| Which ones | Default magnification | Maximum magnification |
| Main Gun optics | x1.8 | x3.5 |
| Comparable optics | M10 GMC | |
Machine guns
| 7.92 mm BESA | ||||
|---|---|---|---|---|
| Mount | Capacity (Belt) | Fire rate | Vertical | Horizontal |
| Coaxial | 4,950 (225) | 600 | N/A | N/A |
Usage in battles
Overview:
The Cromwell I is a fast tank with a good cannon and acceptable armour protection. Commanders should play it like a light tank, but be careful of the extremely slow reverse gear. It excels in close quarters combat due to the excellent gun and hull handling characteristics, as well as the fast reload rate. Commanders should avoid long range fights due to the slow reverse gear. This lack of a reverse gear makes it difficult to return to cover after exposing your tank to fire on the enemy. The best strategy in the Cromwell I is to hug the map corners and try to flank, outmaneuvering enemy forces. The tank is very rewarding to players who have experience with the map that is being played, are adept at flanking, and are able to predict enemy movements. It is a true Cruiser tank, able to exploit gaps in the enemy defenses by disrupting the enemy back line. Despite its admirable characteristics, the Cromwell is an unconventional medium tank, and may be difficult to use in the hands of a traditional medium tank player.
Firepower:
The best shell to use is the Shot Mk.9 APCBC due to its penetration characteristics. Generally this is a great round due to the fast reload and shell velocity. However this round struggles against angled armour, most notably against Soviet T-34 tanks. Against this enemy Cromwell gunners will have to aim for the turret or machine gun port, as the upper front plate will bounce the Shot Mk.9 easily. The 6pdr also has a high velocity loss modifier, resulting in poor penetration over long distances.
Staying alive:
In terms of armour, the Cromwell I is in a better situation than many players would assume. While the front armour is not particularly impressive, the design is very square and the side armour is acceptable. This means that the Cromwell I is an excellent tank to angle your hull and turret armour in. When the enemy fires, a quick turn using the impressive handling and acceleration can cause a bounce. The Cromwell's turret face has an interior 12mm plate behind the main armour, meaning that in a downtier, some vehicles may have issue penetrating you when hull down. There is also an overlap with the 88.9mm mantlet and 64mm turret face, resulting in a small area with up to 160mm of effective armour. Generally, Cromwell I commanders should seek to move unpredictably when under fire and create angles that are difficult to penetrate. They should also seek to engage targets from the flanks whenever possible, and plan potential escape routes if the engagement is not in your favor.
One somewhat unconventional tool that the Cromwell has access to is an abundance of smoke grenades. Commanders can use these grenades to shut down enemy firing angles and protect themselves from being shot in the side, or on the retreat. However, be careful not to spam these too much as they may get in the way of your teammates as well.
Pros and cons
Pros:
- Very fast for a medium tank, excellent for capturing zones and catching enemy light tanks off-guard
- 57 mm performs well against most armoured targets
- Great gun handling thanks to high turret traverse, good gun depression and vertical stabilizer
- Can easily hide behind obstacles and surprise passing enemies with a flanking manoeuvre
- Remains competitive even in an uptier
- Respectable minimum frontal armour means that in a downtier some vehicles may struggle to penetrate you
- Reasonably fast neutral turning capablity
- Above average survivability thanks to 5 crew members and interior structural steel
Cons:
- Terrible reverse speed, makes overextending difficult
- Neutral turning performs poorly on sloped terrain
- Boxy, vertical armour on hull and turret makes angling essential
- Gunner can frequently be knocked out from frontal shots
- 57 mm struggles to penetrate sloped or angled armour. T-34s and KV-1s are an issue at this rank as they are very difficult to penetrate at long ranges
- 57mm ammunition can sometimes fail to injure enemy crew sufficiently
History
Development
Development for the tank started back in 1940, just around the time the Crusader cruiser tank was being put into service in the British Army. The development of a stronger cruiser tank was initiated due to the belief that that the Crusader would become obsolete in the face of more advanced German tanks as the time pass. The initial plans was for the tank to mount the OQF 6-pounder gun and was to be completed in 1942. The project was taken up by three companies who submitted their designs. Vauxhall developed the A23, a scaled down Churchill tank with 75 mm of armour and a 12-cylinder Bedford engine. Nuffield developed the A24 based off the Crusader that was powered by the Liberty engine and had an advantage of being put into production quickly. Leyland and Birmingham Railway Carriage & Wagon developed a design that was similar to Nuffield's, but with different suspension and track designs. All these designs were examined in January 1941 and it was decided that Nuffield's A24 would become the vehicle of choice for the project. Six prototypes of the vehicle, now called Cromwell I were ordered for delivery in the Spring of 1942, but arrived four months late, with current events making the tank designs outdated. Despite that, the tank was put into production and experienced an unsatisfactory performance history as being an under-powered tank. The lack of available tanks led to the demands for more 6-pounders on the battlefield, which were used to be mounted on the older tank designs.
When Britain entered the war, Rolls-Royce stopped producing cars and set up a team to find ways to use their production lines. The team was made under Roy Robotham at Clan Foundry near the city of Belper. Meeting with Henry Spurrier of Leyland, they talked tank designs and a project began of fitting a Rolls-Royce Merlin engine onto a tank. A Leyland-built Crusader was used for the test, removing the supercharger from the engine before installing it in the tank. The result was an absurdly fast tank, able to reach a speed of 80 km/h, estimated since timing the speed runs was difficult. The impressive performance had Leyland organize a production for 1,000 units of the engine, renamed as the Meteor. This plan was changed after concerns of the engine's cooling was raised, Leyland decides to produce their own version of Meteor which was weaker (350 hp) compared to the Rolls design (500 hp). Thus, the Tank Board decided to just order the engine straight from Rolls-Royce for the Meteor engine. The A24 tank design with the Meteor engine was redesignated as the A27. During the development, Leyland suggested that the tank should be made to fit both the Meteor and the American-designed Liberty engine, thus the designation expanded to A27M (Meteor) and the A27L (Liberty) and were called Cromwell III and Cromwell II respectively. Leyland's attempt at building their own engine was abandoned. The A27M tank was made into a prototype and delivered on January 1942, it proved extremely mobile with its 600 hp engine and orders were placed for both engine versions. This proved difficult due to production difficulties with the Meteor and soon Leyland took over production of both versions. Production lines for the Meteor engine continued to be strained until late 1942, where Ernest Hives of Rolls met with Spencer Wilks of the company Rover made a deal in January 1943 to exchange factories, with Rolls establishing a Meteor engine factory at Barnoldswick, Lancashire.
Production of the tank began in November 1942 with new names given out the tanks. The original A24 Cromwell I from Nuffield was renamed the Cavalier, the Liberty powered Cromwell II became the Centaur, and the Meteor powered Cromwell III retained the name as the Cromwell. The actual Cromwell tank production was delayed until January 1943 due to low supply of Meteor engines until the Rover factory began producing it. With more Meteor engines being produced, the Centaur tanks were often converted to use the Meteor engine, turning them into Cromwells. Field tests with the tanks took place in August to September in 1943 alongside the M4A2 and M4A4 Shermans. The tests proved the Shermans to be more reliable than the Cromwell and Centaurs, needing only about 0.03 hours of mechanical attention every mile compared to the Cromwell's 0.07 hours per mile and the Centaur's 0.08 hours per mile. The two tanks were thus given time to iron out these deficiencies, the Cromwell suffered from oil leaks along with brake and clutch failures. While the tank suffered from these defects, the crews expressed their satisfaction with the designs for their speed and handling, but the Centaur was not given the same attention as the Cromwell. The second test in November had the Cromwell perform with improved results while the Centaur was still experiencing the same problems. The production model was finalized on February 2, 1944, after a specifications for a "Battle Cromwell" came in from Leyland, which included some design changes, an increase of 6 mm on the bottom of the tank, seam welding the joints, and the standard usage of the Meteor engine and the Merritt Brown transmission. The Centaur was relegated to training roles or modified for specialist roles such as anti-aircraft guns or engineering vehicles. Total production for the A27 tank series is 4,016 tanks, of which 950 are Centaurs and 3,066 are Cromwells.
Design
The Cromwell's frame used a riveted construction in its initial production models, but this later changed to welding. The frame was strengthened with bolted armour plates. Companies involved in the A27 production were LMS Railway, Morris Motors, Metro-Cammell, Birmingham Railway Carriage & Wagon Company, and English Electric. Some of these models were not consistent in construction, such as some variants built with 360 mm wide tracks and some with 393 mm tracks. The suspension was a Christie suspension derived from the earlier cruiser tank designs. Four of the tanks' road wheels have shock absorbers, and no return rollers are available, the tracks are supported on the top of the large road wheels. The gearbox has five forward and one reverse gear, with the first forward gear made for confined areas and sharp turns. While the Meteor engine is capable of going faster, it is restricted to 540 hp output with a governor to avoid straining the engine and suspension. The Cromwell's armaments changed over a few times, its initial model mounted the 6-pounder gun, but the later models mounted the 75 mm gun. The adaption was easy due to the 75 mm gun being a 6-pounder bored for the larger calibre. A 7.92 mm BESA machine gun was available for coaxial firing on the turret. The armour on the Cromwell started as a 76 mm plate, which increased gradually to 83 mm and 100 mm overtime for additional protection.
The A27M Cromwell I was exactly the same as Centaur I, with the biggest difference being that it was powered with a Meteor engine. It featured a 6-pounder as its main armament, but only a few were produced before the Cromwell changed armament to the 75 mm gun
Combat usage
The British, at the time of Operation Overlord, primarily service the M4 Sherman as the main tank of their armoured units, only the armoured brigades of the 7th Armoured Division were equipped with the Cromwell tanks. Although the Cromwell also saw use as armoured reconnaissance regiments in other British divisions such as the Guards Armoured Division and the 11th Armoured Division. Compared to the Sherman, the Cromwell was much faster, so fast that it earned the title as the fastest British tank in World War II. The Cromwell also presented a smaller profile, making it a lower target, and has a thicker frontal armour plate. However, the Cromwell's armour was not sloping, was not as reliable in comparison to the Sherman, and a slightly smaller crew space inside the tank. Nevertheless, the Cromwell proved very mobile and effective on the battlefield alongside the Sherman, often outflanking German armour with their superior speed to hit the tanks on their sides or rear. Since the Cromwells are not able to mount the larger and more powerful 17-pounder and a derivative, the A30 Challenger, met with production issues, Cromwell units were equipped with Sherman Fireflies in order to supplement the firepower of the 17-pounder. Later in the war, these units began to be succeeded by the Comet tank which had more armour and a more powerful 77 mm gun derived from the 17-pounder.
During the war, the Cromwell chassis was used in various specialized roles on the battlefield. The A30 Challenger is a tank design that attempted to mount the 17-pounder on a lengthened Cromwell chassis, the A30 SP Avenger was another attempt to equip the 17-pounder, but used a lighter turret instead. Some were made into observation posts or command tanks. The Centaur saw a wider conversion with some becoming engineering vehicles, armoured recovery vehicles, and armoured personnel carriers. After the war, the British attempted to up-gun the Cromwell into the Charioteer, which was designed in the 1950s to supplement tank units before the Centurion was mass-issued.
The Cromwells were also given out to Allied units such as the 1st Polish Armoured Division and the 1st Czechoslovak Armoured Brigade. These units served in Northern Europe with the Allies as they breakthrough deeper into Europe. After World War II, some Cromwell stayed in service and saw service in the Korean War with the 7th Royal Tank Regiment and the 8th King's Royal Irish Hussars. The Cromwells also were given to Greece, where it had the distinction of being the first tank put into service by the Greek Army. 52 Centaurs were given to Greece in 1946 to fight in the Greek Civil War, but these were stored due to lack of crews with adequate training. Formal training began in Greece began in 1947 with the return of trained officers from Britain. The Centaur saw limited service in the Greek Armoured Corps, fighting in the Greek mountains. These units kept the Centaurs up until 1963 where it was replaced by the American M47 Pattons.
Media
- Skins
- Images
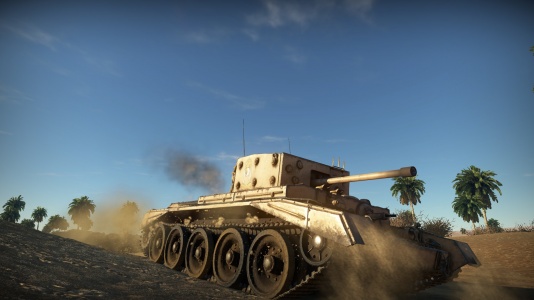
Cromwell I in the desert.

- Videos
See also
External links
| Britain medium tanks | |
|---|---|
| Valentine | Valentine I · Valentine IX · Valentine XI |
| Cromwell | Cromwell I · Cromwell V · Cromwell V (RP-3) |
| Cromwell derivatives | Challenger · Avenger · Comet I · Comet I "Iron Duke IV" · Charioteer Mk VII |
| Centurion | Centurion Mk 1 · Centurion Mk.2 · Centurion Mk 3 · Centurion Mk.5 AVRE · Centurion Mk 10 · Centurion Action X · FV4202 |
| Vickers MBT | Vickers Mk.1 · Vickers Mk.3 · Vickers Mk.7 |
| Chieftain | Chieftain Mk 3 · Chieftain Mk 5 · Chieftain Mk 10 |
| Challenger 1 | Challenger Mk.2 · Challenger Mk.3 · Challenger DS |
| Challenger 2 | Challenger 2 · Challenger 2 (2F) · Challenger 2 TES · Challenger 2 OES · Challenger 2E · Challenger 2 Black Night |
| Challenger 3 | Challenger 3 TD |
| Australia | A.C.I · A.C.IV · Centurion Mk.5/1 |
| South Africa | Olifant Mk.1A · Olifant Mk.2 · TTD |
| India | Vijayanta · Bhishma TWMP |
| Israel | ▄Sho't Kal Dalet |
| Jordan | Khalid |
| Sweden | ▄Strv 81 (RB 52) |
| USA | Grant I · Sherman II · Sherman Firefly · Sherman IC "Trzyniec" |
