Difference between pages "Dardo" and "CM25"
(→Ammunition: Updated) |
(Edits) |
||
| Line 1: | Line 1: | ||
{{Specs-Card | {{Specs-Card | ||
| − | |code= | + | |code=cn_cm_25 |
|images={{Specs-Card-Image|GarageImage_{{PAGENAME}}.jpg}} | |images={{Specs-Card-Image|GarageImage_{{PAGENAME}}.jpg}} | ||
}} | }} | ||
| Line 6: | Line 6: | ||
== Description == | == Description == | ||
<!-- ''In the description, the first part should be about the history of the creation and combat usage of the vehicle, as well as its key features. In the second part, tell the reader about the ground vehicle in the game. Insert a screenshot of the vehicle, so that if the novice player does not remember the vehicle by name, he will immediately understand what kind of vehicle the article is talking about.'' --> | <!-- ''In the description, the first part should be about the history of the creation and combat usage of the vehicle, as well as its key features. In the second part, tell the reader about the ground vehicle in the game. Insert a screenshot of the vehicle, so that if the novice player does not remember the vehicle by name, he will immediately understand what kind of vehicle the article is talking about.'' --> | ||
| − | The '''{{Specs|name}}''' is a | + | The '''{{Specs|name}}''', officially known as CM25拖式飛彈車 (lit. TOW Missile Vehicle) in ROCMC's description plate during open day, is the missile carrier of ROCMC. The CM25 has to trace back to its hull - CM21; after the Nationalist Government signed contracts to repair US Army's M113 APC in Taiwan Island due to the heavy loss during the Vietnam War, the experiences gained during rebuilding these hulls and previous attempts to built the Project Wancheng (萬乘; lit. 10 thousand vehicles/chariots) prototype vehicles were then used to reverse-engineer a domestic APC using parts from M113. There are variants such as its base model APC, mortar carrier, commander vehicle and the TOW launcher vehicle; although there were plans to built an IFV with GIAT's autocannon, the project was ditched. |
| + | |||
| + | Introduced in [[Update "Raining Fire"]] as one of the ROCA's tank destroyer, CM25 shared many similarities including its hull design and powertrains, but ROCA decided to weld additional armor plates and polyurethane (PU) chemicals for extra protection; while CM25 replaced the layer with polystyrene (PS) for extra buoyancy as required by ROCMC. The vehicle is rather unprotected due to its aluminum chassis and the extra weight from the additional armor makes it even slower than M113A1 to some extent, utilizing terrain or hiding behind wreckages of vehicles can also make it a useful missile vehicle to take down oncoming enemy vehicles with conventional I-TOW or TOW-2B with overhead attack capabilities. | ||
== General info == | == General info == | ||
| Line 12: | Line 14: | ||
{{Specs-Tank-Armour}} | {{Specs-Tank-Armour}} | ||
<!-- ''Describe armour protection. Note the most well protected and key weak areas. Appreciate the layout of modules as well as the number and location of crew members. Is the level of armour protection sufficient, is the placement of modules helpful for survival in combat? If necessary use a visual template to indicate the most secure and weak zones of the armour.'' --> | <!-- ''Describe armour protection. Note the most well protected and key weak areas. Appreciate the layout of modules as well as the number and location of crew members. Is the level of armour protection sufficient, is the placement of modules helpful for survival in combat? If necessary use a visual template to indicate the most secure and weak zones of the armour.'' --> | ||
| − | |||
| − | + | The vehicle profile is a basic rectangle with a slightly sloped front which increases protection from machine gun fire. The front has a hatch, which works as a HESH screen. The main areas of the vehicle to target when attacking is the missile launcher and machine gun to disable its attack capability, or the main vehicle shot to disable it completely. | |
| − | The | + | The CM25 is meant to be a stand-off vehicle due to its role on the battlefield and is not built to be on the front line. Even with the add-on armour, compared to the previous [[M113A1 (TOW) (China)|M113A1]], the aluminium alloy armour will not stand up to much and will barely stop 12.7 mm machine gun fire when angled or far away. Anything of higher calibre is almost guaranteed to penetrate. |
| − | + | Try to hide as best as you can, or not only the gunner will suffer consequences, but the entirety of the crew as well. | |
| − | * Rolled homogeneous armour | + | The gunner is exposed outside of the vehicle when directing the launcher and can be hit. Be aware, as the launcher's base, and sometimes even the rangefinder located next to the launcher, can trigger APHE fuse and cause it to explode in front of the gunner's face, the shrapnel then flying back and shredding the virtually nonexistent roof armour, taking out everyone in the middle of the vehicle. Also, since the gunner stands within the opened roof hatch, if a chemical warhead hits the rangefinder, then the payload can enter the vehicle through it and take out the loader as well. |
| − | + | ||
| − | * | + | Since the vehicle's armour is very thin, it sometimes does not detonate shells so armour-piercing shells cause less than fatal damage. However, only very high calibre shells with fuses of about 20-22 mm won't detonate, which are very rare at the battle rating, as most shells use 15 mm fuses at this point. The main key here is to avoid being hit at all as if your tank is angled during an attack, the fuses would detonate anyway. The shield on the front can stop HESH from doing any damage at all, but it's not very reliable. |
| − | + | ||
| + | All in all, it's best to just get out of the way of other tanks and sneak around; this is a vehicle of strategy, not brute force. | ||
| + | |||
| + | '''Armour type:''' <!-- The types of armour present on the vehicle and their general locations --> | ||
| + | <!-- Example: * Rolled homogeneous armour (Front, Side, Rear, Hull roof) | ||
| + | * Cast homogeneous armour (Turret, Transmission area) --> | ||
{| class="wikitable" | {| class="wikitable" | ||
| Line 29: | Line 35: | ||
! Armour !! Front (Slope angle) !! Sides !! Rear !! Roof | ! Armour !! Front (Slope angle) !! Sides !! Rear !! Roof | ||
|- | |- | ||
| − | | Hull || | + | | Hull || ___ mm || ___ mm ''Top'' <br> ___ mm ''Bottom'' || ___ mm || ___ - ___ mm |
|- | |- | ||
| − | | Turret || | + | | Turret || ___ - ___ mm ''Turret front'' <br> ___ mm ''Gun mantlet'' || ___ - ___ mm || ___ - ___ mm || ___ - ___ mm |
|- | |- | ||
| − | | Cupola || | + | | Cupola || ___ mm || ___ mm || ___ mm || ___ mm |
|- | |- | ||
|} | |} | ||
| − | '''Notes:''' | + | '''Notes:''' <!-- Any additional notes which the user needs to be aware of --> |
| − | + | <!-- Example: * Suspension wheels are 20 mm thick, tracks are 30 mm thick, and torsion bars are 60 mm thick. --> | |
| − | * | ||
| − | |||
=== Mobility === | === Mobility === | ||
{{Specs-Tank-Mobility}} | {{Specs-Tank-Mobility}} | ||
<!-- ''Write about the mobility of the ground vehicle. Estimate the specific power and manoeuvrability, as well as the maximum speed forwards and backwards.'' --> | <!-- ''Write about the mobility of the ground vehicle. Estimate the specific power and manoeuvrability, as well as the maximum speed forwards and backwards.'' --> | ||
| − | |||
| − | {{tankMobility|abMinHp= | + | {{tankMobility|abMinHp=305|rbMinHp=190}} |
=== Modifications and economy === | === Modifications and economy === | ||
| Line 55: | Line 58: | ||
{{Specs-Tank-Armaments}} | {{Specs-Tank-Armaments}} | ||
=== Main armament === | === Main armament === | ||
| − | {{Specs-Tank-Weapon| | + | {{Specs-Tank-Weapon|1}} |
<!-- ''Give the reader information about the characteristics of the main gun. Assess its effectiveness in a battle based on the reloading speed, ballistics and the power of shells. Do not forget about the flexibility of the fire, that is how quickly the cannon can be aimed at the target, open fire on it and aim at another enemy. Add a link to the main article on the gun: <code><nowiki>{{main|Name of the weapon}}</nowiki></code>. Describe in general terms the ammunition available for the main gun. Give advice on how to use them and how to fill the ammunition storage.'' --> | <!-- ''Give the reader information about the characteristics of the main gun. Assess its effectiveness in a battle based on the reloading speed, ballistics and the power of shells. Do not forget about the flexibility of the fire, that is how quickly the cannon can be aimed at the target, open fire on it and aim at another enemy. Add a link to the main article on the gun: <code><nowiki>{{main|Name of the weapon}}</nowiki></code>. Describe in general terms the ammunition available for the main gun. Give advice on how to use them and how to fill the ammunition storage.'' --> | ||
| − | {{main| | + | {{main|BGM-71 TOW}} |
| − | |||
| − | |||
| − | + | The placement of the weapon is high enough to fire over cover, however, advantages also at times spawn disadvantages and in this case, with the vehicle gunner standing tall outside of the vehicle, he has no protection and can easily be hit, despite the rest of vehicle being concealed. | |
| − | The | + | The launcher has a rather limited arc of fire - 45 degrees in either direction, which isn't compensated by missile's characteristics like in the case of [[Swingfire]] or armour like in the case of [[IT-1]]. If you want to fire over cover, the best bet is to stay far away from the enemy and cover, or right in front of the cover, however, this still probably won't protect the gunner. The gun depression, at 20 degrees, excels almost every other tank and allows the player to use many surprising positions to attack. Note that the depression is far less when the launch tube is positioned above the machine gun. |
{| class="wikitable" style="text-align:center" width="100%" | {| class="wikitable" style="text-align:center" width="100%" | ||
|- | |- | ||
| − | ! colspan=" | + | ! colspan="5" | [[BGM-71 TOW]] ATGM || colspan="5" | Turret rotation speed (°/s) || colspan="4" | Reloading rate (seconds) |
|- | |- | ||
| − | ! Mode !! Capacity | + | ! Mode !! Capacity !! Vertical !! Horizontal !! Stabilizer |
! Stock !! Upgraded !! Full !! Expert !! Aced | ! Stock !! Upgraded !! Full !! Expert !! Aced | ||
! Stock !! Full !! Expert !! Aced | ! Stock !! Full !! Expert !! Aced | ||
|- | |- | ||
! ''Arcade'' | ! ''Arcade'' | ||
| − | | rowspan="2" | | + | | rowspan="2" | 10 || rowspan="2" | -20°/+25° || rowspan="2" | ±45° || rowspan="2" | N/A || 26.4 || 36.6 || 44.3 || 49.0 || 52.1 || rowspan="2" | 13.00 || rowspan="2" | 11.50 || rowspan="2" | 10.60 || rowspan="2" | 10.00 |
|- | |- | ||
! ''Realistic'' | ! ''Realistic'' | ||
| − | | | + | | 17.9 || 21.0 || 25.5 || 28.2 || 30.0 |
|- | |- | ||
|} | |} | ||
==== Ammunition ==== | ==== Ammunition ==== | ||
| − | + | {{:BGM-71 TOW/Ammunition|I-TOW, TOW-2B}} | |
| − | |||
| − | |||
| − | |||
| − | |||
| − | |||
| − | |||
| − | |||
| − | |||
| − | |||
| − | |||
| − | |||
| − | |||
| − | |||
| − | |||
| − | |||
| − | |||
| − | |||
| − | |||
| − | |||
| − | |||
| − | |||
| − | |||
| − | |||
| − | |||
| − | |||
| − | |||
| − | |||
| − | |||
| − | |||
| − | |||
| − | |||
| − | |||
| − | |||
| − | |||
| − | |||
| − | |||
| − | |||
| − | |||
==== [[Ammo racks]] ==== | ==== [[Ammo racks]] ==== | ||
| − | [[File:Ammoracks_{{PAGENAME}}.png|right|thumb|x250px|Ammo | + | [[File:Ammoracks_{{PAGENAME}}.png|right|thumb|x250px|[[Ammo racks]] of the {{PAGENAME}}]] |
| − | <!-- '''Last updated: 2. | + | <!-- '''Last updated: 2.3.0.101''' --> |
{| class="wikitable" style="text-align:center" | {| class="wikitable" style="text-align:center" | ||
|- | |- | ||
| Line 131: | Line 94: | ||
! 2nd<br>rack empty | ! 2nd<br>rack empty | ||
! 3rd<br>rack empty | ! 3rd<br>rack empty | ||
| − | ! | + | ! 4th<br>rack empty |
| + | ! 5th<br>rack empty | ||
|- | |- | ||
| − | | ''' | + | | '''10''' || 9 ''(+1)'' || 8 ''(+2)'' || 7 ''(+3)'' || 6 ''(+4)'' || 5 ''(+5)'' |
|- | |- | ||
| − | + | ! 6th<br>rack empty | |
| − | + | ! 7th<br>rack empty | |
| − | + | ! 8th<br>rack empty | |
| − | + | ! 9th<br>rack empty | |
| − | < | + | ! 10th<br>rack empty |
| − | + | ! Visual<br>discrepancy | |
| − | |||
| − | |||
| − | |||
| − | |||
| − | |||
| − | |||
| − | |||
| − | |||
| − | |||
| − | ! | ||
| − | |||
| − | ! | ||
| − | ! | ||
| − | |||
| − | |||
| − | |||
| − | |||
| − | |||
| − | |||
| − | |||
| − | ! | ||
| − | |||
| − | |||
| − | ! | ||
| − | |||
| − | |||
| − | |||
| − | |||
| − | |||
|- | |- | ||
| − | | | + | | 4 ''(+6)'' || 3 ''(+7)'' || 2 ''(+8)'' || 1 ''(+9)'' || 0 ''(+10)'' || No |
| − | |||
| − | |||
| − | |||
| − | |||
| − | |||
| − | |||
| − | |||
| − | |||
| − | |||
| − | |||
| − | |||
| − | |||
| − | |||
| − | |||
| − | |||
| − | |||
| − | |||
| − | |||
| − | |||
| − | |||
|- | |- | ||
|} | |} | ||
| + | '''Notes''': | ||
| − | + | * The CM25 is only required to have at least 2 missiles to go into battle, unlike the standard 4 ammunition for other vehicles. | |
| − | + | * The vehicle has no ready rack. | |
| − | + | * It is advised to bring full ammo due to how little ammo the CM25 can carry. | |
| − | |||
| − | |||
| − | |||
| − | |||
| − | |||
| − | |||
| − | |||
| − | |||
| − | |||
| − | |||
| − | |||
=== Machine guns === | === Machine guns === | ||
| − | {{Specs-Tank-Weapon| | + | {{Specs-Tank-Weapon|2}} |
<!-- ''Offensive and anti-aircraft machine guns not only allow you to fight some aircraft but also are effective against lightly armoured vehicles. Evaluate machine guns and give recommendations on its use.'' --> | <!-- ''Offensive and anti-aircraft machine guns not only allow you to fight some aircraft but also are effective against lightly armoured vehicles. Evaluate machine guns and give recommendations on its use.'' --> | ||
| − | {{main| | + | {{main|M2HB (12.7 mm)}} |
| + | |||
| + | The single 12.7 mm machine gun can be effective when fighting against open-topped or lightly armoured vehicles (eg [[AUBL/74]], [[Gepard]]) or to cause some confusion/distraction to the enemy vehicles as the CM25 reloads. | ||
| + | |||
| + | At this battle rating, this vehicle is limited to keeping helicopters from getting too comfy, since they too have thin to no armour, other aircraft should be left to the designated anti-air vehicles. As a last resort, the ATGM can be used. | ||
{| class="wikitable" style="text-align:center" width="50%" | {| class="wikitable" style="text-align:center" width="50%" | ||
|- | |- | ||
| − | ! colspan="5" | [[ | + | ! colspan="5" | [[M2HB (12.7 mm)|12.7 mm M2HB]] |
|- | |- | ||
! Mount !! Capacity (Belt) !! Fire rate !! Vertical !! Horizontal | ! Mount !! Capacity (Belt) !! Fire rate !! Vertical !! Horizontal | ||
|- | |- | ||
| − | | | + | | Pintle || 1,000 (200) || 577 || -10°/+50° || ±120° |
|- | |- | ||
|} | |} | ||
| Line 228: | Line 137: | ||
<!-- ''Describe the tactics of playing in the vehicle, the features of using vehicles in the team and advice on tactics. Refrain from creating a "guide" - do not impose a single point of view but instead give the reader food for thought. Describe the most dangerous enemies and give recommendations on fighting them. If necessary, note the specifics of the game in different modes (AB, RB, SB).'' --> | <!-- ''Describe the tactics of playing in the vehicle, the features of using vehicles in the team and advice on tactics. Refrain from creating a "guide" - do not impose a single point of view but instead give the reader food for thought. Describe the most dangerous enemies and give recommendations on fighting them. If necessary, note the specifics of the game in different modes (AB, RB, SB).'' --> | ||
| − | + | The best way one should use this vehicle would be to stay away from the active combat areas, hide, and use the exposed gunner and TOW launcher to your advantage. The exposed launcher allows the vehicle to hide behind solid cover while still being able to fire from over it, giving the enemy a much harder time in spotting and shooting you. Staying away from the combat zones maximises your survivability, in addition to taking advantage of the TOW missiles' extremely long-range, allowing you to pick off targets from beyond the range of conventional rounds. | |
| − | + | It is also worth noting the -20 degrees launcher depression as, even though it may not be as impressive as the -30 degrees launcher depression of the [[M901]], it is still very capable of adapting to uneven terrain and firing from behind hills. However, note that the depression angles are severely limited when the launcher is facing the pintle-mounted machine gun, to roughly only -3 degrees. Therefore, you should try to always have the front of the hull facing the direction of the battlefield, to avoid the launcher suddenly jerking up when the machine gun gets into the way, which will also guide the missile upwards (if launched), and therefore miss the target. Horizontal guidance is also limited, and the launcher will stop rotating at ±45 degrees. The best way to counter this drawback will be to play it like other turret-less tank destroyers, like the [[ISU-122 (China)|ISU-122]] and the [[ISU-152 (China)|ISU-152]], which must rotate the hull to assist with aiming at extreme angles. | |
| − | + | Even though the CM25 is mounted with a heavy machine gun, attempting to combat helicopters and planes is not recommended unless the situation is desperate, as doing so will only grab unwanted attention from both the air and ground. Aircraft at this rank are often equipped with HE rockets, only one of which is necessary to destroy your vehicle thanks to the overpressure mechanic, and if not, the vast majority of aircraft-mounted guns will be able to penetrate from any angle. | |
| − | + | If you find yourself in a close-quarters situation, the best method of survival will be to use the machine gun to cause some levels of distraction, while attempting to retreat to the nearest cover. Do note that your machine gun does have a relatively impressive penetration of 31 mm at close range, which can allow you to take out lightly armoured targets like the [[M3 Bradley]] (in the turret with some luck), [[AUBL/74]], [[Falcon]] etc., yet should still be avoided if possible due to these vehicles possessing much better close-quarters capabilities and will have no problem in shredding the CM25. | |
| − | + | '''Enemies worth noting:''' | |
| + | |||
| + | * [[Helicopters]] e.g. AH-1, UH-1, etc: helicopters are always a great threat to you. Although at the start of the match they cannot equip ATGMs, they are still able to carry lots of deadly rockets, posing a great threat to the CM25's weak hull. When an enemy helicopter is roaming nearby and showering the ground with rockets, the safest option is to stay in cover or be stationary, to make it harder for the helicopter to see you. Your only effective defensive weapon against them is the 12.7 mm MG (unless you are very skilled and can manually guide the ATGM to hit them). Only open fire when the helicopter is extremely near, for example within 400 m. Your MG can only damage light helicopters like the UH-1 but not armoured ones. Continuously spray bullets at it until it starts to turn towards you, and quickly retreat back into cover as any helicopter can easily destroy you with a few rockets. | ||
| + | * [[M60A1 RISE (P)]], [[M60A3 TTS]]: these tanks are covered with ERA which is designed to counter chemical warheads like your TOW missiles. When the CM25's TOW missile hits them, their ERA always detonates, leaving the tanks themselves unharmed, so it is not recommended to shoot them when their ERA is still present. If they are quite far away, you can choose to break their gun barrels or tracks to make them defenceless or immobile. If they are close enough, you can use your 12.7 mm MG to destroy their ERA first. Do not spray, fire in quick bursts and focus on a few blocks of ERA, as the bullets seem to spread out a lot in a continuous fire which will decrease the damage to the ERA you want to destroy. The MG is rather effective at destroying these modules. Once the ERA is gone, use the TOW to hit the uncovered areas. The most straightforward method is to just fire a missile at them, destroying a bunch of ERA and fire another one at the uncovered area. However, this method will give them more than 10 seconds of reaction time so make sure that you are well concealed and will not get spotted before the next missile is loaded. | ||
| + | * [[M901]]: this is a similar vehicle based on the M113 hull, with an interesting and unique TOW launcher. The launcher has 360 degrees horizontal rotation and 30 degrees gun depression meaning it adapts to terrains better than the CM25. Furthermore, its gunner is not exposed which increases its fighting capacity, so you must deal with the M901 carefully. In a battle, your CM25 and the M901 might be at similar spots which are kind of a sniper vs sniper scenario. Do not get hit by it, as your gunner/launcher will detonate its missile and the shrapnel will splash down, knocking out all the crew or causing a hull break. Try to fire first or hide until his attention shifts. | ||
=== Pros and cons === | === Pros and cons === | ||
| Line 243: | Line 156: | ||
'''Pros:''' | '''Pros:''' | ||
| − | * | + | * Can research TOW-2B a whole BR earlier than other ATGM tanks. The missile grants the tank a top-attack ability, which is an incredible advantage when hunting opponents behind obstacles or counter-sniping |
| − | * | + | * Stock I-TOW missile has decent penetration |
| − | * | + | * Amazing 20 degrees depression allows easy adaption to rough terrain |
| − | * | + | * Decent mobility (64 km/h top speed) allows it to get to positions in time, not much slower than common MBTs like the [[T-55A]] and [[M48A1]] |
| + | * Heavy machine gun can take out lightly armoured vehicles and low-flying planes/helicopters | ||
| + | * A extended gunner and launcher allows the vehicle to fire with its whole hull in cover | ||
'''Cons:''' | '''Cons:''' | ||
| − | * | + | * Fully exposed gunner is very vulnerable to everything |
| − | * | + | * Thin armour makes it especially vulnerable to autocannons that can shred through the crew and ammo |
| − | * | + | * While not slow, it can still easily be outrun by fast tanks like the [[Leopard I]] and [[Centauro]] |
| + | * Is a big and soft target for aircraft, even those only armed with MGs | ||
| + | * Cannot fire ATGM on the move, which can be fatal in a close quarter sudden encounter | ||
| + | * Turns rather slowly | ||
| + | * Area of the MG blocks gun depression | ||
== History == | == History == | ||
<!-- ''Describe the history of the creation and combat usage of the vehicle in more detail than in the introduction. If the historical reference turns out to be too long, take it to a separate article, taking a link to the article about the vehicle and adding a block "/History" (example: <nowiki>https://wiki.warthunder.com/(Vehicle-name)/History</nowiki>) and add a link to it here using the <code>main</code> template. Be sure to reference text and sources by using <code><nowiki><ref></ref></nowiki></code>, as well as adding them at the end of the article with <code><nowiki><references /></nowiki></code>. This section may also include the vehicle's dev blog entry (if applicable) and the in-game encyclopedia description (under <code><nowiki>=== In-game description ===</nowiki></code>, also if applicable).'' --> | <!-- ''Describe the history of the creation and combat usage of the vehicle in more detail than in the introduction. If the historical reference turns out to be too long, take it to a separate article, taking a link to the article about the vehicle and adding a block "/History" (example: <nowiki>https://wiki.warthunder.com/(Vehicle-name)/History</nowiki>) and add a link to it here using the <code>main</code> template. Be sure to reference text and sources by using <code><nowiki><ref></ref></nowiki></code>, as well as adding them at the end of the article with <code><nowiki><references /></nowiki></code>. This section may also include the vehicle's dev blog entry (if applicable) and the in-game encyclopedia description (under <code><nowiki>=== In-game description ===</nowiki></code>, also if applicable).'' --> | ||
| − | During the | + | During the heat of the Vietnam War, Taiwan was one of the major bases for US operations against the North Vietnamese forces; while the M113 APC was an iconic vehicle in the war, it also suffered from heavy losses to the Viet Cong. As such, the US signed an agreement with the Taiwanese government in 1967 to refurbish and repair M113s that were recovered by US forces under the "Third-Nation Overhaul Program" (第三國翻修計劃). |
| − | |||
| − | |||
| − | + | At the time, the Nationalist forces had never built any form of armoured vehicles from scratch, only a few vehicles that were rebuilt from existing parts of US aid vehicles, so the overhaul program was a good chance for the Nationalist forces to learn the flow of APC manufacture and methods to repair M113s. In 1975, after the war was ended with the victory of the Northern forces, the Combined Service Forces (聯合勤務總司令部 or 聯勤 for short) started "Project Wancheng" (萬乘計劃, 萬乘 lit. 10 thousand vehicles) for domestic versions of M113, coded Wancheng 1 to 3; from mortar vehicles to MLRS and even projected to install spare [[M24 (China)|M24 Chaffee]] turrets onto the chassis of M113. These vehicles, built and assembled by Taiwan Aluminum Corporation (台鋁公司, now China Steel Aluminum Corporation 中鋼鋁業), became the basis of what would be CM21 APC for the Republic of China Army. | |
| − | + | The major difference of the later versions CM21 APC to the original M113A1 is additional armour plates on around the hull, which are filled with polyurethane chemicals to absorb bullet up to 5.56 mm NATO rounds; while it might be a little more protected than M113A1, this also cost some of its mobility due to the weight added from such armour plates. | |
| + | |||
| + | CM25 is one of the five major variants of the CM21 APC, armed with US-made [[BGM-71 TOW]] missiles, the polyurethane forms were also replaced by polystyrene for the amphibious needs of the ROCMC; these around 30 vehicles became heavy weaponry exclusively for the Marine Corps anti-tank companies, serving as their mobile AT platform along with its American cousin [[M113A1 (TOW) (China)|M113A1 (TOW)]] in view of possible Mainland China landing operations. | ||
| + | |||
| + | === [[wt:en/news/6843-development-cm25-armor-reaper-en|Devblog]] === | ||
| + | Since the 1960's, the armed forces in Taiwan have operated with a large fleet of American-made M113 APCs spanning several variants. Thoroughly pleased with the vehicle's performance and reliability, Taiwan decided to develop its own APC, inspired by the proven M113's design. | ||
| + | |||
| + | In 1979, the first prototype of what would become the CM21 series of APCs was built and subsequently underwent testing. Once some improvements were made, the CM21 series went into mass production and officially entered service in 1982. By the time the production ceased in 1999, some 1,200 units of the CM21 series of APCs were built. | ||
| + | |||
| + | In 1987, the basic CM21 design was modified to allow the vehicle to conduct anti-tank duties, similar to the M113A1 TOW already in service at the time. In a similar manner as the M113, the vehicle was fitted with a single TOW launcher and received the new designation CM25. | ||
| + | |||
| + | By 2019, all M113A1 APCs among the ranks of the Taiwanese armed forces were replaced by newer vehicles. However, the CM21 series of APCs, including the CM25, continue serving in the present. | ||
== Media == | == Media == | ||
| Line 269: | Line 197: | ||
;Skins | ;Skins | ||
| − | * [https://live.warthunder.com/feed/camouflages/?vehicle= | + | * [https://live.warthunder.com/feed/camouflages/?vehicle=cn_cm_25 Skins and camouflages for the {{PAGENAME}} from live.warthunder.com.] |
;Images | ;Images | ||
| − | + | <gallery mode="packed" caption="CM25 Devblog Images" heights="150"> | |
| − | + | File:CM25 WTWallpaper 001.jpg| | |
| − | + | File:CM25 WTWallpaper 002.jpg| | |
| − | + | File:CM25 WTWallpaper 003.jpg| | |
| + | File:CM25 WTWallpaper 004.jpg| | ||
| + | </gallery> | ||
== See also == | == See also == | ||
| Line 282: | Line 212: | ||
* ''links to approximate analogues of other nations and research trees.'' --> | * ''links to approximate analogues of other nations and research trees.'' --> | ||
| − | * [[ | + | ;Related development |
| + | * [[M113 (Family)]] | ||
== External links == | == External links == | ||
| Line 289: | Line 220: | ||
* ''other literature.'' --> | * ''other literature.'' --> | ||
| − | * [[wt:en/news/ | + | * [[wt:en/news/6843-development-cm25-armor-reaper-en|[Devblog] CM25: Armor Reaper]] |
| − | {{ | + | {{TankManufacturer Ordnance Research Development Center}} |
| − | + | {{China tank destroyers}} | |
Latest revision as of 13:08, 1 October 2023

Contents
Description
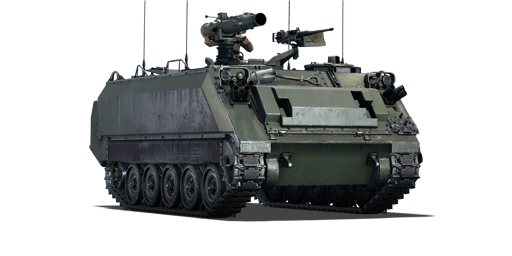
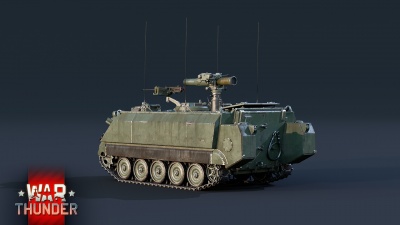
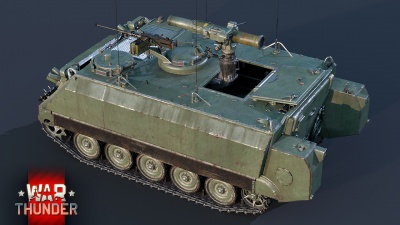
The CM25, officially known as CM25拖式飛彈車 (lit. TOW Missile Vehicle) in ROCMC's description plate during open day, is the missile carrier of ROCMC. The CM25 has to trace back to its hull - CM21; after the Nationalist Government signed contracts to repair US Army's M113 APC in Taiwan Island due to the heavy loss during the Vietnam War, the experiences gained during rebuilding these hulls and previous attempts to built the Project Wancheng (萬乘; lit. 10 thousand vehicles/chariots) prototype vehicles were then used to reverse-engineer a domestic APC using parts from M113. There are variants such as its base model APC, mortar carrier, commander vehicle and the TOW launcher vehicle; although there were plans to built an IFV with GIAT's autocannon, the project was ditched.
Introduced in Update "Raining Fire" as one of the ROCA's tank destroyer, CM25 shared many similarities including its hull design and powertrains, but ROCA decided to weld additional armor plates and polyurethane (PU) chemicals for extra protection; while CM25 replaced the layer with polystyrene (PS) for extra buoyancy as required by ROCMC. The vehicle is rather unprotected due to its aluminum chassis and the extra weight from the additional armor makes it even slower than M113A1 to some extent, utilizing terrain or hiding behind wreckages of vehicles can also make it a useful missile vehicle to take down oncoming enemy vehicles with conventional I-TOW or TOW-2B with overhead attack capabilities.
General info
Survivability and armour
The vehicle profile is a basic rectangle with a slightly sloped front which increases protection from machine gun fire. The front has a hatch, which works as a HESH screen. The main areas of the vehicle to target when attacking is the missile launcher and machine gun to disable its attack capability, or the main vehicle shot to disable it completely.
The CM25 is meant to be a stand-off vehicle due to its role on the battlefield and is not built to be on the front line. Even with the add-on armour, compared to the previous M113A1, the aluminium alloy armour will not stand up to much and will barely stop 12.7 mm machine gun fire when angled or far away. Anything of higher calibre is almost guaranteed to penetrate.
Try to hide as best as you can, or not only the gunner will suffer consequences, but the entirety of the crew as well.
The gunner is exposed outside of the vehicle when directing the launcher and can be hit. Be aware, as the launcher's base, and sometimes even the rangefinder located next to the launcher, can trigger APHE fuse and cause it to explode in front of the gunner's face, the shrapnel then flying back and shredding the virtually nonexistent roof armour, taking out everyone in the middle of the vehicle. Also, since the gunner stands within the opened roof hatch, if a chemical warhead hits the rangefinder, then the payload can enter the vehicle through it and take out the loader as well.
Since the vehicle's armour is very thin, it sometimes does not detonate shells so armour-piercing shells cause less than fatal damage. However, only very high calibre shells with fuses of about 20-22 mm won't detonate, which are very rare at the battle rating, as most shells use 15 mm fuses at this point. The main key here is to avoid being hit at all as if your tank is angled during an attack, the fuses would detonate anyway. The shield on the front can stop HESH from doing any damage at all, but it's not very reliable.
All in all, it's best to just get out of the way of other tanks and sneak around; this is a vehicle of strategy, not brute force.
Armour type:
| Armour | Front (Slope angle) | Sides | Rear | Roof |
|---|---|---|---|---|
| Hull | ___ mm | ___ mm Top ___ mm Bottom |
___ mm | ___ - ___ mm |
| Turret | ___ - ___ mm Turret front ___ mm Gun mantlet |
___ - ___ mm | ___ - ___ mm | ___ - ___ mm |
| Cupola | ___ mm | ___ mm | ___ mm | ___ mm |
Notes:
Mobility
| Game Mode | Max Speed (km/h) | Weight (tons) | Engine power (horsepower) | Power-to-weight ratio (hp/ton) | |||
|---|---|---|---|---|---|---|---|
| Forward | Reverse | Stock | Upgraded | Stock | Upgraded | ||
| Arcade | Expression error: Unexpected * operator. | 305 | Expression error: Unexpected round operator. | __.__ | |||
| Realistic | 190 | Expression error: Unexpected round operator. | __.__ | ||||
Modifications and economy
Armaments
Main armament
The placement of the weapon is high enough to fire over cover, however, advantages also at times spawn disadvantages and in this case, with the vehicle gunner standing tall outside of the vehicle, he has no protection and can easily be hit, despite the rest of vehicle being concealed.
The launcher has a rather limited arc of fire - 45 degrees in either direction, which isn't compensated by missile's characteristics like in the case of Swingfire or armour like in the case of IT-1. If you want to fire over cover, the best bet is to stay far away from the enemy and cover, or right in front of the cover, however, this still probably won't protect the gunner. The gun depression, at 20 degrees, excels almost every other tank and allows the player to use many surprising positions to attack. Note that the depression is far less when the launch tube is positioned above the machine gun.
| BGM-71 TOW ATGM | Turret rotation speed (°/s) | Reloading rate (seconds) | |||||||||||
|---|---|---|---|---|---|---|---|---|---|---|---|---|---|
| Mode | Capacity | Vertical | Horizontal | Stabilizer | Stock | Upgraded | Full | Expert | Aced | Stock | Full | Expert | Aced |
| Arcade | 10 | -20°/+25° | ±45° | N/A | 26.4 | 36.6 | 44.3 | 49.0 | 52.1 | 13.00 | 11.50 | 10.60 | 10.00 |
| Realistic | 17.9 | 21.0 | 25.5 | 28.2 | 30.0 | ||||||||
Ammunition
| Penetration statistics | |||||||
|---|---|---|---|---|---|---|---|
| Ammunition | Type of warhead |
Penetration @ 0° Angle of Attack (mm) | |||||
| 10 m | 100 m | 500 m | 1,000 m | 1,500 m | 2,000 m | ||
| I-TOW | ATGM | 630 | 630 | 630 | 630 | 630 | 630 |
| TOW-2B | ATGM (OTA) | 100 | 100 | 100 | 100 | 100 | 100 |
| Missile details | ||||||||||||
|---|---|---|---|---|---|---|---|---|---|---|---|---|
| Ammunition | Type of warhead |
Velocity (m/s) |
Range (m) |
Projectile mass (kg) |
Fuse delay (m) |
Fuse sensitivity (mm) |
Explosive mass (TNT equivalent) (kg) |
Ricochet | ||||
| 0% | 50% | 100% | ||||||||||
| I-TOW | ATGM | 296 | 3,750 | 19.05 | 0.05 | 0.1 | 2.88 | 80° | 82° | 90° | ||
| Missile details | ||||||||||||
|---|---|---|---|---|---|---|---|---|---|---|---|---|
| Ammunition | Type of warhead |
Velocity (m/s) |
Range (m) |
Projectile mass (kg) |
Fuse delay (m) |
Fuse sensitivity (mm) |
Arming distance (m) |
Trigger radius (m) |
Explosive mass (TNT equivalent) (kg) |
Ricochet | ||
| 0% | 50% | 100% | ||||||||||
| TOW-2B | ATGM (OTA) | 309 | 3,750 | 22.59 | 0.05 | 0.1 | 30 | 3 | 3.38 | 80° | 82° | 90° |
Ammo racks

| Full ammo |
1st rack empty |
2nd rack empty |
3rd rack empty |
4th rack empty |
5th rack empty |
|---|---|---|---|---|---|
| 10 | 9 (+1) | 8 (+2) | 7 (+3) | 6 (+4) | 5 (+5) |
| 6th rack empty |
7th rack empty |
8th rack empty |
9th rack empty |
10th rack empty |
Visual discrepancy |
| 4 (+6) | 3 (+7) | 2 (+8) | 1 (+9) | 0 (+10) | No |
Notes:
- The CM25 is only required to have at least 2 missiles to go into battle, unlike the standard 4 ammunition for other vehicles.
- The vehicle has no ready rack.
- It is advised to bring full ammo due to how little ammo the CM25 can carry.
Machine guns
The single 12.7 mm machine gun can be effective when fighting against open-topped or lightly armoured vehicles (eg AUBL/74, Gepard) or to cause some confusion/distraction to the enemy vehicles as the CM25 reloads.
At this battle rating, this vehicle is limited to keeping helicopters from getting too comfy, since they too have thin to no armour, other aircraft should be left to the designated anti-air vehicles. As a last resort, the ATGM can be used.
| 12.7 mm M2HB | ||||
|---|---|---|---|---|
| Mount | Capacity (Belt) | Fire rate | Vertical | Horizontal |
| Pintle | 1,000 (200) | 577 | -10°/+50° | ±120° |
Usage in battles
The best way one should use this vehicle would be to stay away from the active combat areas, hide, and use the exposed gunner and TOW launcher to your advantage. The exposed launcher allows the vehicle to hide behind solid cover while still being able to fire from over it, giving the enemy a much harder time in spotting and shooting you. Staying away from the combat zones maximises your survivability, in addition to taking advantage of the TOW missiles' extremely long-range, allowing you to pick off targets from beyond the range of conventional rounds.
It is also worth noting the -20 degrees launcher depression as, even though it may not be as impressive as the -30 degrees launcher depression of the M901, it is still very capable of adapting to uneven terrain and firing from behind hills. However, note that the depression angles are severely limited when the launcher is facing the pintle-mounted machine gun, to roughly only -3 degrees. Therefore, you should try to always have the front of the hull facing the direction of the battlefield, to avoid the launcher suddenly jerking up when the machine gun gets into the way, which will also guide the missile upwards (if launched), and therefore miss the target. Horizontal guidance is also limited, and the launcher will stop rotating at ±45 degrees. The best way to counter this drawback will be to play it like other turret-less tank destroyers, like the ISU-122 and the ISU-152, which must rotate the hull to assist with aiming at extreme angles.
Even though the CM25 is mounted with a heavy machine gun, attempting to combat helicopters and planes is not recommended unless the situation is desperate, as doing so will only grab unwanted attention from both the air and ground. Aircraft at this rank are often equipped with HE rockets, only one of which is necessary to destroy your vehicle thanks to the overpressure mechanic, and if not, the vast majority of aircraft-mounted guns will be able to penetrate from any angle.
If you find yourself in a close-quarters situation, the best method of survival will be to use the machine gun to cause some levels of distraction, while attempting to retreat to the nearest cover. Do note that your machine gun does have a relatively impressive penetration of 31 mm at close range, which can allow you to take out lightly armoured targets like the M3 Bradley (in the turret with some luck), AUBL/74, Falcon etc., yet should still be avoided if possible due to these vehicles possessing much better close-quarters capabilities and will have no problem in shredding the CM25.
Enemies worth noting:
- Helicopters e.g. AH-1, UH-1, etc: helicopters are always a great threat to you. Although at the start of the match they cannot equip ATGMs, they are still able to carry lots of deadly rockets, posing a great threat to the CM25's weak hull. When an enemy helicopter is roaming nearby and showering the ground with rockets, the safest option is to stay in cover or be stationary, to make it harder for the helicopter to see you. Your only effective defensive weapon against them is the 12.7 mm MG (unless you are very skilled and can manually guide the ATGM to hit them). Only open fire when the helicopter is extremely near, for example within 400 m. Your MG can only damage light helicopters like the UH-1 but not armoured ones. Continuously spray bullets at it until it starts to turn towards you, and quickly retreat back into cover as any helicopter can easily destroy you with a few rockets.
- M60A1 RISE (P), M60A3 TTS: these tanks are covered with ERA which is designed to counter chemical warheads like your TOW missiles. When the CM25's TOW missile hits them, their ERA always detonates, leaving the tanks themselves unharmed, so it is not recommended to shoot them when their ERA is still present. If they are quite far away, you can choose to break their gun barrels or tracks to make them defenceless or immobile. If they are close enough, you can use your 12.7 mm MG to destroy their ERA first. Do not spray, fire in quick bursts and focus on a few blocks of ERA, as the bullets seem to spread out a lot in a continuous fire which will decrease the damage to the ERA you want to destroy. The MG is rather effective at destroying these modules. Once the ERA is gone, use the TOW to hit the uncovered areas. The most straightforward method is to just fire a missile at them, destroying a bunch of ERA and fire another one at the uncovered area. However, this method will give them more than 10 seconds of reaction time so make sure that you are well concealed and will not get spotted before the next missile is loaded.
- M901: this is a similar vehicle based on the M113 hull, with an interesting and unique TOW launcher. The launcher has 360 degrees horizontal rotation and 30 degrees gun depression meaning it adapts to terrains better than the CM25. Furthermore, its gunner is not exposed which increases its fighting capacity, so you must deal with the M901 carefully. In a battle, your CM25 and the M901 might be at similar spots which are kind of a sniper vs sniper scenario. Do not get hit by it, as your gunner/launcher will detonate its missile and the shrapnel will splash down, knocking out all the crew or causing a hull break. Try to fire first or hide until his attention shifts.
Pros and cons
Pros:
- Can research TOW-2B a whole BR earlier than other ATGM tanks. The missile grants the tank a top-attack ability, which is an incredible advantage when hunting opponents behind obstacles or counter-sniping
- Stock I-TOW missile has decent penetration
- Amazing 20 degrees depression allows easy adaption to rough terrain
- Decent mobility (64 km/h top speed) allows it to get to positions in time, not much slower than common MBTs like the T-55A and M48A1
- Heavy machine gun can take out lightly armoured vehicles and low-flying planes/helicopters
- A extended gunner and launcher allows the vehicle to fire with its whole hull in cover
Cons:
- Fully exposed gunner is very vulnerable to everything
- Thin armour makes it especially vulnerable to autocannons that can shred through the crew and ammo
- While not slow, it can still easily be outrun by fast tanks like the Leopard I and Centauro
- Is a big and soft target for aircraft, even those only armed with MGs
- Cannot fire ATGM on the move, which can be fatal in a close quarter sudden encounter
- Turns rather slowly
- Area of the MG blocks gun depression
History
During the heat of the Vietnam War, Taiwan was one of the major bases for US operations against the North Vietnamese forces; while the M113 APC was an iconic vehicle in the war, it also suffered from heavy losses to the Viet Cong. As such, the US signed an agreement with the Taiwanese government in 1967 to refurbish and repair M113s that were recovered by US forces under the "Third-Nation Overhaul Program" (第三國翻修計劃).
At the time, the Nationalist forces had never built any form of armoured vehicles from scratch, only a few vehicles that were rebuilt from existing parts of US aid vehicles, so the overhaul program was a good chance for the Nationalist forces to learn the flow of APC manufacture and methods to repair M113s. In 1975, after the war was ended with the victory of the Northern forces, the Combined Service Forces (聯合勤務總司令部 or 聯勤 for short) started "Project Wancheng" (萬乘計劃, 萬乘 lit. 10 thousand vehicles) for domestic versions of M113, coded Wancheng 1 to 3; from mortar vehicles to MLRS and even projected to install spare M24 Chaffee turrets onto the chassis of M113. These vehicles, built and assembled by Taiwan Aluminum Corporation (台鋁公司, now China Steel Aluminum Corporation 中鋼鋁業), became the basis of what would be CM21 APC for the Republic of China Army.
The major difference of the later versions CM21 APC to the original M113A1 is additional armour plates on around the hull, which are filled with polyurethane chemicals to absorb bullet up to 5.56 mm NATO rounds; while it might be a little more protected than M113A1, this also cost some of its mobility due to the weight added from such armour plates.
CM25 is one of the five major variants of the CM21 APC, armed with US-made BGM-71 TOW missiles, the polyurethane forms were also replaced by polystyrene for the amphibious needs of the ROCMC; these around 30 vehicles became heavy weaponry exclusively for the Marine Corps anti-tank companies, serving as their mobile AT platform along with its American cousin M113A1 (TOW) in view of possible Mainland China landing operations.
Devblog
Since the 1960's, the armed forces in Taiwan have operated with a large fleet of American-made M113 APCs spanning several variants. Thoroughly pleased with the vehicle's performance and reliability, Taiwan decided to develop its own APC, inspired by the proven M113's design.
In 1979, the first prototype of what would become the CM21 series of APCs was built and subsequently underwent testing. Once some improvements were made, the CM21 series went into mass production and officially entered service in 1982. By the time the production ceased in 1999, some 1,200 units of the CM21 series of APCs were built.
In 1987, the basic CM21 design was modified to allow the vehicle to conduct anti-tank duties, similar to the M113A1 TOW already in service at the time. In a similar manner as the M113, the vehicle was fitted with a single TOW launcher and received the new designation CM25.
By 2019, all M113A1 APCs among the ranks of the Taiwanese armed forces were replaced by newer vehicles. However, the CM21 series of APCs, including the CM25, continue serving in the present.
Media
- Skins
- Images
- CM25 Devblog Images


See also
- Related development
External links
| Ordnance Research Development Center, ROCA (陸軍兵工整備發展中心) | |
|---|---|
| Light tanks | M41D · M64 |
| Medium tanks | CM11 |
| Tank destroyers | CM25 |
| China tank destroyers | |
|---|---|
| PLA | |
| Gun vehicles | PLZ83 · PLZ83-130 · PLZ05 · PTZ89 |
| Missile vehicles | AFT09 |
| ROC | |
| Missile vehicles | CM25 |
| USA | |
| Gun vehicles | ␗M8 HMC · LVT(A)(4) (ZiS-2) · ␗M10 GMC · ␗M36 GMC |
| Missile vehicles | ␗M113A1 (TOW) |
| USSR | |
| Gun vehicles | ␗SU-76M · ␗ISU-152 · ␗ISU-122 · ␗SU-100 |
