Difference between revisions of "SUB-I-II"
m (→Survivability and armour) (Tag: Visual edit) |
(Added data) |
||
| Line 14: | Line 14: | ||
{{Specs-Tank-Armour}} | {{Specs-Tank-Armour}} | ||
<!-- ''Describe armour protection. Note the most well protected and key weak areas. Appreciate the layout of modules as well as the number and location of crew members. Is the level of armour protection sufficient, is the placement of modules helpful for survival in combat? If necessary use a visual template to indicate the most secure and weak zones of the armour.'' --> | <!-- ''Describe armour protection. Note the most well protected and key weak areas. Appreciate the layout of modules as well as the number and location of crew members. Is the level of armour protection sufficient, is the placement of modules helpful for survival in combat? If necessary use a visual template to indicate the most secure and weak zones of the armour.'' --> | ||
| − | The SUB-I-II has no notable armour. It is dangerous to stand in the open without cover, as the SPAA can be penetrated by any tank or plane. The survivability of this SPAA is very low if any enemy has a direct line of sight on it. | + | The SUB-I-II has no notable armour. It is dangerous to stand in the open without cover, as the SPAA can be penetrated by any tank or plane. The survivability of this SPAA is very low if any enemy has a direct line of sight on it. |
'''Armour type:''' | '''Armour type:''' | ||
| Line 30: | Line 30: | ||
! | ! | ||
|- | |- | ||
| − | | Cupola || 10 mm (spherical) ''Base'' <br> 15 mm (spherical) ''Dome'' || 10 mm (spherical) ''Base'' <br> 15 mm (spherical) ''Dome'' || 10 mm (spherical) ''Base'' <br> 15 mm (spherical) ''Dome'' || 15 mm | + | | Cupola || 10 mm (spherical) ''Base'' <br> 15 mm (spherical) ''Dome'' || 10 mm (spherical) ''Base'' <br> 15 mm (spherical) ''Dome'' || 10 mm (spherical) ''Base'' <br> 15 mm (spherical) ''Dome'' || 15 mm |
|- | |- | ||
|} | |} | ||
| Line 43: | Line 43: | ||
The SUB-I-II has a modest top reverse speed in RB of -12 km/h so bear that in mind when choosing a good spot to shoot from. | The SUB-I-II has a modest top reverse speed in RB of -12 km/h so bear that in mind when choosing a good spot to shoot from. | ||
| − | {{tankMobility|abMinHp= | + | {{tankMobility|abMinHp=497|rbMinHp=310}} |
=== Modifications and economy === | === Modifications and economy === | ||
| Line 54: | Line 54: | ||
<!-- ''Give the reader information about the characteristics of the main gun. Assess its effectiveness in a battle based on the reloading speed, ballistics and the power of shells. Do not forget about the flexibility of the fire, that is how quickly the cannon can be aimed at the target, open fire on it and aim at another enemy. Add a link to the main article on the gun: <code><nowiki>{{main|Name of the weapon}}</nowiki></code>. Describe in general terms the ammunition available for the main gun. Give advice on how to use them and how to fill the ammunition storage.'' --> | <!-- ''Give the reader information about the characteristics of the main gun. Assess its effectiveness in a battle based on the reloading speed, ballistics and the power of shells. Do not forget about the flexibility of the fire, that is how quickly the cannon can be aimed at the target, open fire on it and aim at another enemy. Add a link to the main article on the gun: <code><nowiki>{{main|Name of the weapon}}</nowiki></code>. Describe in general terms the ammunition available for the main gun. Give advice on how to use them and how to fill the ammunition storage.'' --> | ||
{{main|Rh202 (20 mm)}} | {{main|Rh202 (20 mm)}} | ||
| − | |||
| − | |||
{| class="wikitable" style="text-align:center" width="100%" | {| class="wikitable" style="text-align:center" width="100%" | ||
| Line 66: | Line 64: | ||
|- | |- | ||
! ''Arcade'' | ! ''Arcade'' | ||
| − | | rowspan="2" | 800 (100) || rowspan="2" | 800 || rowspan="2" | -10°/+80° || rowspan="2" | ±180° || rowspan="2" | | + | | rowspan="2" | 800 (100) || rowspan="2" | 800 || rowspan="2" | -10°/+80° || rowspan="2" | ±180° || rowspan="2" | - || 52.8 || 73.1 || 88.8 || 98.2 || 104.5 || rowspan="2" | 10.40 || rowspan="2" | 9.20 || rowspan="2" | 8.48 || rowspan="2" | 8.00 |
|- | |- | ||
! ''Realistic'' | ! ''Realistic'' | ||
| − | | | + | | 35.7 || 42.0 || 51.0 || 56.4 || 60.0 |
|- | |- | ||
|} | |} | ||
==== Ammunition ==== | ==== Ammunition ==== | ||
| − | |||
* '''Default:''' {{Annotation|HVAP-T|High-velocity armour-piercing tracer}}{{-}}{{Annotation|HEFI-T|High-explosive fragmentation incendiary tracer}} | * '''Default:''' {{Annotation|HVAP-T|High-velocity armour-piercing tracer}}{{-}}{{Annotation|HEFI-T|High-explosive fragmentation incendiary tracer}} | ||
* '''DM51A1:''' {{Annotation|HEFI-T|High-explosive fragmentation incendiary tracer}}{{-}}{{Annotation|HEFI-T|High-explosive fragmentation incendiary tracer}}{{-}}{{Annotation|HEFI-T|High-explosive fragmentation incendiary tracer}}{{-}}{{Annotation|HVAP-T|High-velocity armour-piercing tracer}} | * '''DM51A1:''' {{Annotation|HEFI-T|High-explosive fragmentation incendiary tracer}}{{-}}{{Annotation|HEFI-T|High-explosive fragmentation incendiary tracer}}{{-}}{{Annotation|HEFI-T|High-explosive fragmentation incendiary tracer}}{{-}}{{Annotation|HVAP-T|High-velocity armour-piercing tracer}} | ||
| Line 104: | Line 101: | ||
<!-- ''Offensive and anti-aircraft machine guns not only allow you to fight some aircraft but also are effective against lightly armoured vehicles. Evaluate machine guns and give recommendations on its use.'' --> | <!-- ''Offensive and anti-aircraft machine guns not only allow you to fight some aircraft but also are effective against lightly armoured vehicles. Evaluate machine guns and give recommendations on its use.'' --> | ||
{{main|M1919A4 (7.62 mm)}} | {{main|M1919A4 (7.62 mm)}} | ||
| − | |||
| − | |||
{| class="wikitable" style="text-align:center" width="50%" | {| class="wikitable" style="text-align:center" width="50%" | ||
| Line 113: | Line 108: | ||
! Mount !! Capacity (Belt) !! Fire rate !! Vertical !! Horizontal | ! Mount !! Capacity (Belt) !! Fire rate !! Vertical !! Horizontal | ||
|- | |- | ||
| − | | || | + | | Hull || 1,000 (250) || 500 || ±10° || ±10° |
|- | |- | ||
|} | |} | ||
| Line 119: | Line 114: | ||
== Usage in battles == | == Usage in battles == | ||
<!-- ''Describe the tactics of playing in the vehicle, the features of using vehicles in the team and advice on tactics. Refrain from creating a "guide" - do not impose a single point of view but instead give the reader food for thought. Describe the most dangerous enemies and give recommendations on fighting them. If necessary, note the specifics of the game in different modes (AB, RB, SB).'' --> | <!-- ''Describe the tactics of playing in the vehicle, the features of using vehicles in the team and advice on tactics. Refrain from creating a "guide" - do not impose a single point of view but instead give the reader food for thought. Describe the most dangerous enemies and give recommendations on fighting them. If necessary, note the specifics of the game in different modes (AB, RB, SB).'' --> | ||
| − | When hunting for planes, the SUB-I-II should always have some sort of cover to hide behind in case a plane retaliates. When shooting, you should also be mindful of the gun overheating and use all of the rounds in the belt as the SUB-I-II has only 800 rounds at most. If possible, try to remain near a friendly capture point to restock on ammo belts when they run out because the main | + | When hunting for planes, the SUB-I-II should always have some sort of cover to hide behind in case a plane retaliates. When shooting, you should also be mindful of the gun overheating and use all of the rounds in the belt as the SUB-I-II has only 800 rounds at most. If possible, try to remain near a friendly capture point to restock on ammo belts when they run out because the main cannon can shoot at 800 rpm. |
=== Pros and cons === | === Pros and cons === | ||
| Line 130: | Line 125: | ||
* Can penetrate some medium tanks from the side | * Can penetrate some medium tanks from the side | ||
| − | '''Cons:''' | + | '''Cons:''' |
* Low survivability | * Low survivability | ||
Revision as of 22:01, 8 August 2023


Contents
Description
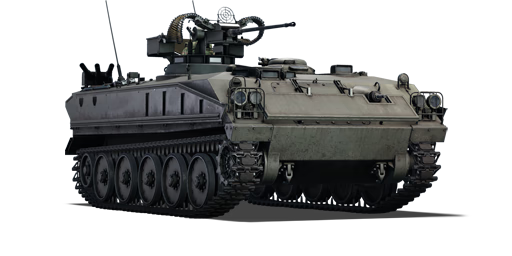
The Mitsubishi SUB-I-II was a prototype for the Type 73 APC meant to replace the smaller Type 60 APC. Going through multiple prototypes, this particular version was tested with a Rh202 (20 mm) as a self-defense and anti-air cannon, though this armament would not see use in the final version.
It was introduced in Update "Apex Predators". The SUB-I-II provides an excellent fire rate with the possibility of an APDS belt in an amphibious yet squishy APC hull only offering up to 20 mm of armour. As such, if positioned correctly against a suitable target, the SUB-I-II can utilize the APDS autocannon to shred their opponent apart.
General info
Survivability and armour
The SUB-I-II has no notable armour. It is dangerous to stand in the open without cover, as the SPAA can be penetrated by any tank or plane. The survivability of this SPAA is very low if any enemy has a direct line of sight on it.
Armour type:
- Aluminium alloy 5083 (hull, gun mount)
- Cast homogeneous armour (cupola)
| Armour | Front (Slope angle) | Sides | Rear | Roof |
|---|---|---|---|---|
| Hull | 20 mm (52°) Upper glacis 20 mm (24-60°) Lower glacis |
12.7+5 mm Top 12.7 mm Bottom |
20 mm (7°) | 10 mm 5 mm Engine vents |
| Turret | 20 mm (conical) | 20 mm (conical) | 20 mm | |
| Cupola | 10 mm (spherical) Base 15 mm (spherical) Dome |
10 mm (spherical) Base 15 mm (spherical) Dome |
10 mm (spherical) Base 15 mm (spherical) Dome |
15 mm |
Notes:
- Suspension wheels and torsion bars are 10 mm thick, while tracks are 15 mm thick.
- Belly armour is 10 mm thick.
Mobility
The SUB-I-II has a modest top reverse speed in RB of -12 km/h so bear that in mind when choosing a good spot to shoot from.
| Game Mode | Max Speed (km/h) | Weight (tons) | Engine power (horsepower) | Power-to-weight ratio (hp/ton) | |||
|---|---|---|---|---|---|---|---|
| Forward | Reverse | Stock | Upgraded | Stock | Upgraded | ||
| Arcade | Expression error: Unexpected * operator. | 497 | Expression error: Unexpected round operator. | __.__ | |||
| Realistic | 310 | Expression error: Unexpected round operator. | __.__ | ||||
Modifications and economy
Armaments
Main armament
| 20 mm Rh202 | Turret rotation speed (°/s) | Reloading rate (seconds) | ||||||||||||
|---|---|---|---|---|---|---|---|---|---|---|---|---|---|---|
| Mode | Capacity (Belt) | Fire rate | Vertical | Horizontal | Stabilizer | Stock | Upgraded | Full | Expert | Aced | Stock | Full | Expert | Aced |
| Arcade | 800 (100) | 800 | -10°/+80° | ±180° | - | 52.8 | 73.1 | 88.8 | 98.2 | 104.5 | 10.40 | 9.20 | 8.48 | 8.00 |
| Realistic | 35.7 | 42.0 | 51.0 | 56.4 | 60.0 | |||||||||
Ammunition
- Default: HVAP-T · HEFI-T
- DM51A1: HEFI-T · HEFI-T · HEFI-T · HVAP-T
- DM43: HVAP-T · HVAP-T · HVAP-T · HEFI-T
- DM63: APDS · APDS · APDS · HEFI-T
| Penetration statistics | |||||||
|---|---|---|---|---|---|---|---|
| Ammunition | Penetration @ 0° Angle of Attack (mm) | ||||||
| 10 m | 100 m | 500 m | 1,000 m | 1,500 m | 2,000 m | ||
| HVAP-T | 57 | 52 | 37 | 24 | 15 | 10 | |
| HEFI-T | 7 | 6 | 5 | 3 | 2 | 2 | |
| APDS | 66 | 61 | 45 | 31 | 21 | 14 | |
| Shell details | ||||||||||||
|---|---|---|---|---|---|---|---|---|---|---|---|---|
| Ammunition | Velocity (m/s) |
Projectile mass (kg) |
Fuse delay (m) |
Fuse sensitivity (mm) |
Explosive mass (TNT equivalent) (g) |
Ricochet | ||||||
| 0% | 50% | 100% | ||||||||||
| HVAP-T | 1,100 | 0.11 | - | - | - | 66° | 70° | 72° | ||||
| HEFI-T | 1,100 | 0.13 | 0.1 | 0.1 | 11.05 | 79° | 80° | 81° | ||||
| APDS | 1,150 | 0.13 | - | - | - | 75° | 78° | 80° | ||||
Ammo racks
| Full ammo |
1st rack empty |
2nd rack empty |
3rd rack empty |
4th rack empty |
5th rack empty |
6th rack empty |
Visual discrepancy |
|---|---|---|---|---|---|---|---|
| 8 | __ (+__) | __ (+__) | __ (+__) | __ (+__) | __ (+__) | __ (+__) | __ |
Machine guns
| 7.62 mm M1919A4 | ||||
|---|---|---|---|---|
| Mount | Capacity (Belt) | Fire rate | Vertical | Horizontal |
| Hull | 1,000 (250) | 500 | ±10° | ±10° |
Usage in battles
When hunting for planes, the SUB-I-II should always have some sort of cover to hide behind in case a plane retaliates. When shooting, you should also be mindful of the gun overheating and use all of the rounds in the belt as the SUB-I-II has only 800 rounds at most. If possible, try to remain near a friendly capture point to restock on ammo belts when they run out because the main cannon can shoot at 800 rpm.
Pros and cons
Pros:
- High rate of fire
- Amphibious
- Can penetrate some medium tanks from the side
Cons:
- Low survivability
- Slow speed in water
- Low ammo count
History
Development of the Type 73 APC started in 1967 as a replacement for the Type 60 APC (chassis of the Type 60 ATM). Four prototypes were made during the development, two from Mitsubishi (SUB-I-I and SUB-I-II) and two from Komatsu (SUB-II-I and SUB-II-II). The 20 mm Rh202 version got rejected at last.
Media
- Skins
See also
Links to the articles on the War Thunder Wiki that you think will be useful for the reader, for example:
- reference to the series of the vehicles;
- links to approximate analogues of other nations and research trees.
External links
| Japan anti-aircraft vehicles | |
|---|---|
| Ke-Ni Derivatives | Ta-Se · So-Ki |
| Wheeled | Type 94 |
| Tracked | SUB-I-II |
| Radar SPAAG | Type 87 |
| Missile SPAA | Type 93 · Type 81 (C) |
| USA | ▅M16 MGMC · ▅M19A1 · ▅M42 |
