Difference between pages "He 112 B-0" and "D3A1"
(Perceived inaccuracies should be taken up through official bug-reporting channels) |
m (→Description: Edits) |
||
| Line 1: | Line 1: | ||
| − | {{Specs-Card|code= | + | {{Specs-Card |
| − | {{ | + | |code=d3a1 |
| − | | | + | |images={{Specs-Card-Image|GarageImage_{{PAGENAME}}.jpg|ArtImage_{{PAGENAME}}.png}} |
| − | | | ||
| − | |||
| − | |||
| − | |||
| − | |||
}} | }} | ||
== Description == | == Description == | ||
<!-- ''In the description, the first part should be about the history of and the creation and combat usage of the aircraft, as well as its key features. In the second part, tell the reader about the aircraft in the game. Insert a screenshot of the vehicle, so that if the novice player does not remember the vehicle by name, he will immediately understand what kind of vehicle the article is talking about.'' --> | <!-- ''In the description, the first part should be about the history of and the creation and combat usage of the aircraft, as well as its key features. In the second part, tell the reader about the aircraft in the game. Insert a screenshot of the vehicle, so that if the novice player does not remember the vehicle by name, he will immediately understand what kind of vehicle the article is talking about.'' --> | ||
| − | + | The '''{{Specs|name}}''', designated as '''Type 99 Carrier Dive Bomber ({{Annotation|九九式艦上爆撃機|Kyū Kyū Shiki Kanjō Bakugekiki}})''' was a carrier-based dive bomber that served in the Imperial Japanese Navy during World War II. It was the first Japanese plane to strike American targets, starting with the Pearl Harbor attack in December 1941. It also took part in almost all major Japanese carrier operations in the first year of the war, such as the Indian Ocean Raid, the Battle of the Coral Sea, and the Battle of Midway. The Aichi D3A replaced the older D1A biplane and was influenced by the German Heinkel He 70. The Aichi D3A1 was accurate and reliable. It sank more Allied ships than any other Axis plane, but faced heavy losses as the war went on and newer Allied fighters surpassed it. | |
| − | |||
| − | The '''{{Specs|name}}''' | ||
| − | The | + | The D3A1 has been in the game since the start of the Open Beta Test prior to Update 1.27. It has a sturdy airframe, a fixed landing gear, and a Mitsubishi Kinsei radial engine that allows it to reach 240 knots (440 km/h). It can carry one 250 kg bomb under the fuselage and two 60 kg bombs under the wings. It also has two machine guns in the front and one in the back for self-defense. The D3A1 is not very fast or agile compared to other Japanese planes, but it is very precise when diving on a target, especially with the airbrake that helps it adjust its speed and angle. |
| − | + | ;Nicknames | |
| + | * IJN Pilot nickname: ''Kanbaku'' <small>(艦爆, Abbriviation of {{Annotation|'''艦'''上'''爆'''撃機 ('''Kan'''jō '''Baku'''gekiki)|Dive Bomber}})</small>. | ||
| + | * Allied reporting name: ''Val''. | ||
== General info == | == General info == | ||
=== Flight performance === | === Flight performance === | ||
| − | ''Describe how the aircraft behaves in the air. Speed, manoeuvrability, acceleration and allowable loads - these are the most important characteristics of the vehicle.'' | + | {{Specs-Avia-Flight}} |
| + | <!-- ''Describe how the aircraft behaves in the air. Speed, manoeuvrability, acceleration and allowable loads - these are the most important characteristics of the vehicle.'' --> | ||
| + | The D3A1 is one of the fastest and most manoeuvrable of any early war dive bomber, allowing the D3A1 to hit hard and fast, while making it back to base in quick succession. This does come at the cost of only offering a limited payload of 1 x 250 kg and 2 x 60 kg bombs. | ||
| − | {| class="wikitable" style="text-align:center" | + | {| class="wikitable" style="text-align:center" width="70%" |
| − | + | ! rowspan="2" | Characteristics | |
| − | + | ! colspan="2" | Max Speed<br>(km/h at 3,900 m) | |
| − | + | ! rowspan="2" | Max altitude<br>(metres) | |
| − | ! | ||
| − | |||
| − | ! colspan="2" | Max Speed<br>(km/h at | ||
| − | ! rowspan="2" | Max altitude<br>( | ||
! colspan="2" | Turn time<br>(seconds) | ! colspan="2" | Turn time<br>(seconds) | ||
| − | ! colspan="2" | Rate of climb<br>( | + | ! colspan="2" | Rate of climb<br>(metres/second) |
| − | ! rowspan="2" | Take-off run<br>( | + | ! rowspan="2" | Take-off run<br>(metres) |
|- | |- | ||
| − | ! AB | + | ! AB !! RB !! AB !! RB !! AB !! RB |
| − | ! RB | ||
| − | ! AB | ||
| − | ! RB | ||
| − | ! AB | ||
| − | ! RB | ||
|- | |- | ||
| − | | | + | ! Stock |
| + | | 417 || 408 || rowspan="2" | {{Specs|ceiling}} || 30.0 || 30.6 || 6.4 || 6.4 || rowspan="2" | 232 | ||
|- | |- | ||
| − | ! | + | ! Upgraded |
| − | + | | 443 || 430 || 28.5 || 29.2 || 11.1 || 8.6 | |
| − | |||
| − | |||
| − | |||
| − | |||
| − | |||
| − | | | ||
| − | |||
| − | |||
| − | |||
| − | |||
| − | |||
| − | |||
| − | |||
| − | |||
|- | |- | ||
|} | |} | ||
==== Details ==== | ==== Details ==== | ||
| − | {| class="wikitable" style="text-align:center" | + | {| class="wikitable" style="text-align:center" width="50%" |
|- | |- | ||
! colspan="5" | Features | ! colspan="5" | Features | ||
|- | |- | ||
| − | ! Combat flaps | + | ! Combat flaps !! Take-off flaps !! Landing flaps !! Air brakes !! Arrestor gear |
| − | ! Take-off flaps | ||
| − | ! Landing flaps | ||
| − | ! Air brakes | ||
| − | ! Arrestor gear | ||
|- | |- | ||
| − | | ✓ || ✓ || ✓ || | + | | ✓ || ✓ || ✓ || ✓ || ✓ <!-- ✓ --> |
|- | |- | ||
|} | |} | ||
| − | {| class="wikitable" style="text-align:center" | + | {| class="wikitable" style="text-align:center" width="50%" |
|- | |- | ||
| − | ! colspan=" | + | ! colspan="7" | Limits |
|- | |- | ||
| − | ! rowspan="2" | | + | ! rowspan="2" | Wings (km/h) |
| − | ! rowspan="2" | Gear | + | ! rowspan="2" | Gear (km/h) |
| − | ! | + | ! colspan="3" | Flaps (km/h) |
! colspan="2" | Max Static G | ! colspan="2" | Max Static G | ||
|- | |- | ||
| − | ! + | + | ! Combat !! Take-off !! Landing !! + !! - |
| − | ! - | ||
|- | |- | ||
| − | | {{Specs|destruction| | + | | {{Specs|destruction|body}} || {{Specs|destruction|gear}} || 458 || 429 || 280 || ~12 || ~4 |
|- | |- | ||
|} | |} | ||
| Line 96: | Line 66: | ||
{| class="wikitable" style="text-align:center" | {| class="wikitable" style="text-align:center" | ||
|- | |- | ||
| − | ! colspan="4" | Optimal velocities | + | ! colspan="4" | Optimal velocities (km/h) |
|- | |- | ||
| − | ! Ailerons | + | ! Ailerons !! Rudder !! Elevators !! Radiator |
| − | ! Rudder | ||
| − | ! Elevators | ||
| − | ! Radiator | ||
|- | |- | ||
| − | | < | + | | < 330 || < 360 || < 380 || > 315 |
|- | |- | ||
|} | |} | ||
| − | + | === Survivability and armour === | |
| − | + | {{Specs-Avia-Armour}} | |
| − | + | <!-- ''Examine the survivability of the aircraft. Note how vulnerable the structure is and how secure the pilot is, whether the fuel tanks are armoured, etc. Describe the armour, if there is any, and also mention the vulnerability of other critical aircraft systems.'' --> | |
| − | + | The D3A1 lacks any armour protection, but its three fuel tanks are self-sealing. One is located beneath the pilot, and the other two are in the wings, one in each wing. The gunner is exposed (his head sticks out of the aircraft). | |
| − | ! | + | |
| − | + | === Modifications and economy === | |
| − | + | {{Specs-Economy}} | |
| − | |||
| − | |||
| − | |||
| − | |||
| − | |||
| − | |||
| − | |||
| − | |||
| − | |||
| − | |||
| − | |||
| − | |||
| − | |||
| − | |||
| − | + | When upgrading the D3A1, it's preferred to focus on improving the performance as the bomb load is already unlocked. The armaments should be focused on last as performance is the key trait of the D3A1. | |
| − | ' | ||
== Armaments == | == Armaments == | ||
| + | {{Specs-Avia-Armaments}} | ||
=== Offensive armament === | === Offensive armament === | ||
| + | {{Specs-Avia-Offensive}} | ||
<!-- ''Describe the offensive armament of the aircraft, if any. Describe how effective the cannons and machine guns are in a battle, and also what belts or drums are better to use. If there is no offensive weaponry, delete this subsection.'' --> | <!-- ''Describe the offensive armament of the aircraft, if any. Describe how effective the cannons and machine guns are in a battle, and also what belts or drums are better to use. If there is no offensive weaponry, delete this subsection.'' --> | ||
| − | {{main| | + | {{main|Type 97 navy (7.7 mm)}} |
The '''''{{PAGENAME}}''''' is armed with: | The '''''{{PAGENAME}}''''' is armed with: | ||
| − | + | * 2 x 7.7 mm Type 97 navy machine guns, nose-mounted (900 rpg = 1,800 total) | |
| − | * 2 x 7. | ||
| − | The | + | While only armed with 2 x nose-mounted 7.7 mm Type 97 machine guns, they can still pose a threat to underestimating foes; while only rifle-calibre, they can still knock out open-topped tanks and trucks, and with superb manoeuvrability for a dive bomber, the D3A1 can keep up in a dogfight. |
| + | |||
| + | === Suspended armament === | ||
| + | {{Specs-Avia-Suspended}} | ||
| + | <!-- ''Describe the aircraft's suspended armament: additional cannons under the wings, bombs, rockets and torpedoes. This section is especially important for bombers and attackers. If there is no suspended weaponry remove this subsection.'' --> | ||
| + | {{main|Navy Type 97 Number 6 (60 kg)|Navy Type Number 25 Model 2 (250 kg)}} | ||
| + | |||
| + | The '''''{{PAGENAME}}''''' can be outfitted with the following ordnance: | ||
| + | |||
| + | * Without load | ||
| + | * 1 x 250 kg Navy Type Number 25 Model 2 bomb + 2 x 60 kg Navy Type 97 Number 6 bombs (370 kg total) | ||
| + | |||
| + | While it only comes with a single preset of 1 x 250 kg + 2 x 60 kg, it is still more than a threat for any target it will be dropped upon, be it a tank or ship, the 250 kg will make short work of it, with the 60 kg allowing more novice pilots to precise bomb for ground targets or smaller vessels. | ||
| + | |||
| + | === Defensive armament === | ||
| + | {{Specs-Avia-Defensive}} | ||
| + | <!-- ''Defensive armament with turret machine guns or cannons, crewed by gunners. Examine the number of gunners and what belts or drums are better to use. If defensive weaponry is not available, remove this subsection.'' --> | ||
| + | {{main|Type 92 (7.7 mm)}} | ||
| + | |||
| + | The '''''{{PAGENAME}}''''' is defended by: | ||
| + | |||
| + | * 1 x 7.7 mm Type 92 machine gun, dorsal turret (1,000 rpg) | ||
| + | |||
| + | The D3A1 is defended by a single Type 92 MG in the tail gunner position. While offering not much punch, the dorsal MG will still fend off any attackers staying directly behind the tail of the D3A1. | ||
== Usage in battles == | == Usage in battles == | ||
| − | <!-- ''Describe the tactics of playing in | + | <!-- ''Describe the tactics of playing in the aircraft, the features of using aircraft in a team and advice on tactics. Refrain from creating a "guide" - do not impose a single point of view, but instead, give the reader food for thought. Examine the most dangerous enemies and give recommendations on fighting them. If necessary, note the specifics of the game in different modes (AB, RB, SB).'' --> |
| − | The | + | The D3A1 is Japan's early dive bomber, a highly manoeuvrable aircraft that is able to outturn a lot of enemies and avoid bursts of fire. Having a small turn radius gives the D3A1 a chance to defend itself by getting on the tail of enemy, but if the enemy is smart enough and doesn't try to turn with the D3A1, they can run away from the D3A1 after it has lost a bit of speed in turning around to get on the tail. But the D3A1 can still get in a couple of hits. |
| − | + | D3A1 is capable of carrying a modest bomb load which is similar to early versions of [[Ju 87 (Family)|Ju 87]]. But it's also similar in terms of firepower as well with 2 x 7.7 mm [[Type 97 navy (7.7 mm)|Type 97 navy]] machine guns which can be used to defend itself from enemies, but also strafe light targets like AA/howitzer postions and light armoured vehicles like trucks and SPAA. D3A1 also has a defensive [[Type 92 (7.7 mm)|Type 92]] machine gun mounted on the back, the gunner has an impressive area of cover which eliminates most dead zones that other dive bombers and some bombers have. | |
| − | + | Main use of the D3A1 is dive bombing, that is where its strength lies, knocking out ground targets in ground battles or the AI targets in air battles, being able to dive near ground using the air brakes for accurate drop of bombs. After dropping bombs the D3A1 can be used as a fighter, but keep in mind that it has a relatively unprotected pilot and gunner, which makes it easy for enemy fighters and vehicles on the ground with AA-mounted machine guns to knock these out. The plane does not react well to being hit as well but it can still function relatively well even when damaged and can still put up a fight. Aircraft and vehicles equipped with 12.7 mm and above will make a quick work of the D3A1 either by getting the pilots or vital parts of the plane but also to set it on fire. 7.92 mm and below can also pose a threat if there is more than 1 mainly. | |
| − | + | '''Enemies to be aware of:''' | |
| + | |||
| + | * [[P-40E-1]], [[P-400]], [[He 100 D-1]], [[Bf 109 E-1]], [[P-66]], [[H-81A-2]] - These enemy fighters possess sufficient firepower and speed over the D3A1 to easily outclimb, outrun, and outgun the D3A1. They will Boom-n-Zoom the D3A1 and run away fast to prepare for the next attack, giving the D3A1 no chance to defend itself with its offensive machine guns. | ||
| + | |||
| + | * [[I-153 M-62]] - The I-153 can outturn the D3A1 with ease and therefore will have no problem tailing the bomber in evasive manoeuvres. | ||
| + | |||
| + | ;Tip for taking off in simulator battles: | ||
| + | |||
| + | Hands-off carrier take-off (Auto engine control, no secondary weapons): | ||
| + | |||
| + | * Start engine | ||
| + | * Flaps: raised | ||
| + | * Elevator trim: 8% up | ||
| + | * Aileron trim: 0% | ||
| + | * Rudder trim: 21% right | ||
| + | * WEP throttle | ||
| + | * Hands off controls until your plane lifts off the carrier | ||
=== Manual Engine Control === | === Manual Engine Control === | ||
| Line 165: | Line 157: | ||
! rowspan="2" | Turbocharger | ! rowspan="2" | Turbocharger | ||
|- | |- | ||
| − | ! Oil | + | ! Oil !! Water !! Type |
| − | ! Water | ||
| − | ! Type | ||
|- | |- | ||
| − | | | + | | Not controllable || Controllable<br>Not auto controlled || Not controllable<br>Not auto controlled || Controllable<br>Not auto controlled || Combined || Not controllable<br>1 gear || Not controllable |
| − | |||
| − | |||
| − | |||
| − | |||
| − | |||
| − | |||
| − | |||
| − | |||
| − | |||
| − | |||
| − | |||
| − | |||
| − | |||
| − | |||
| − | |||
| − | |||
| − | |||
| − | |||
| − | |||
| − | |||
| − | |||
| − | |||
| − | |||
| − | |||
| − | |||
| − | |||
| − | |||
| − | |||
| − | |||
| − | |||
| − | |||
| − | |||
| − | |||
|- | |- | ||
|} | |} | ||
| Line 211: | Line 168: | ||
'''Pros:''' | '''Pros:''' | ||
| − | * | + | * '''D'''3A for Carrier-based dive bomber: |
| − | * | + | ** 250 kg + 2 x 60 kg |
| − | * | + | ** Bomber airspawn |
| − | * | + | ** Airbrakes |
| − | * | + | * Common Navy plane construction: |
| − | * | + | ** Nose-mounted armament |
| − | * | + | ** Excellent manoeuvrability |
| − | * | + | * the D3A1 has self-sealing fuel tanks |
'''Cons:''' | '''Cons:''' | ||
| − | * | + | * '''D'''3A for Carrier-based dive bomber: |
| − | * | + | ** Has bomb cradle, significant delay in fuselage bomb drop |
| − | * MG | + | ** Not good for bombing bases |
| − | * | + | * Common Navy plane construction: |
| − | * | + | ** Poor offensive armament: [[Type 97 navy (7.7 mm)|7.7 mm Type 97 MG]] |
| − | * | + | ** Poor defensive armament: [[Type 92 (7.7 mm)|7.7 mm Type 92 MG]] |
| − | * | + | ** Fragile, little armour |
| − | * | + | ** Exposed tail gunner |
| + | * '''{{PAGENAME}}''' Specific: | ||
| + | ** Payload is rather weak | ||
== History == | == History == | ||
| − | <!-- ''Describe the history of the creation and combat usage of the aircraft in more detail than in the introduction. If the historical reference turns out to be too long, take it to a separate article, taking a link to the article about the vehicle and adding a block "/ History" (example: <nowiki>https://wiki.warthunder.com/(Vehicle-name)/History</nowiki>) and add a link to it here using the <code>main</code> template. Be sure to reference text and sources by using <code><nowiki><ref></ref></nowiki></code>, as well as adding them at the end of the article with <code><nowiki><references /></nowiki></code>. This section may also include the vehicle's dev blog entry (if applicable) and the in-game encyclopedia description (under <code><nowiki>=== In-game description ===</nowiki></code>, also if applicable).'' --> | + | <!-- ''Describe the history of the creation and combat usage of the aircraft in more detail than in the introduction. If the historical reference turns out to be too long, take it to a separate article, taking a link to the article about the vehicle and adding a block "/History" (example: <nowiki>https://wiki.warthunder.com/(Vehicle-name)/History</nowiki>) and add a link to it here using the <code>main</code> template. Be sure to reference text and sources by using <code><nowiki><ref></ref></nowiki></code>, as well as adding them at the end of the article with <code><nowiki><references /></nowiki></code>. This section may also include the vehicle's dev blog entry (if applicable) and the in-game encyclopedia description (under <code><nowiki>=== In-game description ===</nowiki></code>, also if applicable).'' --> |
| − | + | === Development === | |
| + | ;11-Shi Carrier Bomber | ||
| + | Developed as the ''{{Annotation|11-Shi|11th year of the Showa reign, 1935}} Carrier Dive-Bomber'', it was a specification ordered by the Imperial Japanese Navy Aviation Bureau to replace the obsolete D1A biplane. The task was undertaken by Mitsubishi, Nakajima, and Aichi, with Mitsubishi dropping out of the design contest early after submitting their design. With the Navy having a civilian model of the Heinkel He 70 for evaluation and testing, Aichi decided to use the plane as a template, while Nakajima based theirs on their own ''[[B5N2|B5N]]'' torpedo bomber and ''C3N'' recon plane. | ||
| − | + | With Aichi basing its prototype off the He 70, many of its features such as all-metal fixed legs, dive air brakes, and the low-wing type were adopted into the Aichi 11-Shi. The initial model was finished in December 1937 and tested with the Nakajima Hikari 1 engine, which was also present on the D1A. The engine was underpowered and its airframe suffered from directional instability in wide turns, and in tighter turns it tended to snap roll. The dive brakes which were designed to withstand speeds up to {{annotation|200 knots|370 km/h}} would start vibrating violently and with the navy requesting a higher dive speed of {{annotation|240 knots|440 km/h}}, had to be redesigned. Nakajima's 11-Shi however missed the first deadline for the first prototype, but were still permitted to test the aircraft for the Bureau. | |
| − | + | Aichi worked on the second prototype to cure most of its previous flaws by adding a larger tail combating directional instability, and wing span was increased against snap rolling on top of equipping stronger air brakes. The engine was switched out to the Mitsubishi Kinsei 3 in a new engine cowling. Together all of this would solve most of the issues of the first prototype except for directional instability. In 1939, both the Aichi and Nakajima prototypes were evaluated. Nakajima's was a progressive design at the time and was not bad in terms of performance, but it was inferior in speed and operability compared to the Aichi model and that was enough for the Aichi 11-Shi to be selected and officially designated as the '''Type 99 Carrier Bomber Model 11 (D3A1)''' which the navy ordered a production line to be built. | |
| − | The | + | ;(D3A1) Type 99 Carrier Bomber Model 11 |
| + | The production version of the D3A1 switched out the engine once more for the Mitsubishi Kinsei 43 or 44 (most were equipped with Kinsei 44). The directional instability problem was finally cured with the fitting of a long dorsal fin-strake which started midway down the rear fuselage, and the aircraft actually became highly manoeuvrable. | ||
| − | + | Initially, Type 99 Carrier Bombers were painted in silver. During the summer of 1941, the paint finish changed to light olive grey. The colour changed again in early 1942 to dark green. | |
| − | + | ;(D3A2) Type 99 Carrier Bomber Model 22 | |
| − | + | With the pacific war raging on, the D3A1 became more and more unsatisfactory in terms of performance and by the end of August 1942, the navy requested an improved model for the D3A1. Aichi responded by changing the Kinsei 43 and 44 to the Kinsei 54 delivering 1,299 hp instead of the 1,000-1,070 hp the 43 and 44 offered, the engine change came with a new engine cowling and was equipped with a propeller spinner. Additionally, there was a rear extension of the windshield. | |
| − | + | All these changes, mainly coming from the engine, decreased the operational range of the D3A, and as a solution drop tanks were possible to be installed. This variant would be dubbed the '''Type 99 Carrier Bomber Model 22 (D3A2)''' and would replace the model 11s on the frontline by autumn of 1942. All remaining model 11s were sent back to Japan and sent to training units. | |
| − | + | {{break}} | |
| + | {{Navigation-Start|{{Annotation|Archive of the in-game description|An archive of the historical description of the vehicle that was presented in-game prior to Update 1.55 'Royal Armour'}}}} | ||
| + | {{Navigation-First-Simple-Line}} | ||
| + | The single-engine carrier-based Aichi D3A dive bomber, a metal-construction monoplane, was created by order of Japan's Supreme Command of Naval Aviation to replace the obsolete D1A biplane. The shape of the wing and tail, as well as the presence of special dive brake flaps, came from the German aircraft company Heinkel, which was in active partnership with Aichi. | ||
| − | + | A D3A prototype was ready in late 1937, and mass production of the D3A1 began in 1940. A Kinsey 43 engine producing 1,000 horsepower was used, and the aircraft's armament consisted of two synchronous 7.7 mm machine guns over the engine and one hand-operated machine gun with the radio operator at the rear of the cab. The wings had folding wingtips and duralumin sheeting, and the ailerons and flaps were covered with fabric. | |
| − | + | During the first half of the Second World War, the D3A, along with the B5N Kate, were the main strike force of the Japanese fleet. At the time the D3A1 could be considered one of the best dive-bombers in the world. No other dive bomber had characteristics that were even close, until the arrival of the American Dauntless and Helldiver. | |
| − | + | All in all, 470 D3A1s were produced. | |
| + | {{Navigation-End}} | ||
| − | + | == Media == | |
| + | <!-- ''Excellent additions to the article would be video guides, screenshots from the game, and photos.'' --> | ||
| − | + | ;Skins | |
| − | + | * [https://live.warthunder.com/feed/camouflages/?vehicle=d3a1 Skins and camouflages for the {{PAGENAME}} from live.warthunder.com.] | |
| − | == | + | ;Images |
| − | + | <gallery mode="packed-hover" heights="150px"> | |
| + | D3A1 and B5N2 wave.jpg| | ||
| + | </gallery> | ||
| − | + | ;Videos | |
| + | {{Youtube-gallery|AW9Gjrax8Zg|'''The Shooting Range #53''' - ''Pages of History'' section at 06:58 discusses the D3A.}} | ||
== See also == | == See also == | ||
| Line 274: | Line 244: | ||
== External links == | == External links == | ||
| − | ''Paste links to sources and external resources, such as:'' | + | <!-- ''Paste links to sources and external resources, such as:'' |
| + | * ''topic on the official game forum;'' | ||
| + | * ''other literature.'' --> | ||
| − | * | + | * [https://forum.warthunder.com/index.php?/topic/98014-aichi-d3a1/ Official data sheet - more details about the performance] |
| − | |||
| − | |||
| − | {{AirManufacturer | + | {{AirManufacturer Aichi}} |
| − | {{ | + | {{Japan bombers}} |
Latest revision as of 11:29, 3 July 2023


Contents
Description
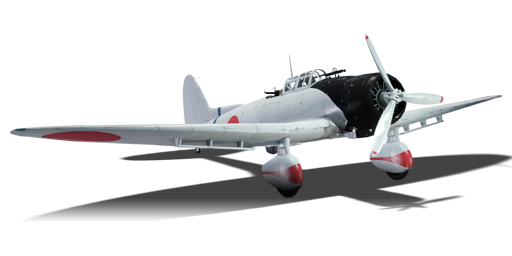
The D3A1, designated as Type 99 Carrier Dive Bomber (九九式艦上爆撃機) was a carrier-based dive bomber that served in the Imperial Japanese Navy during World War II. It was the first Japanese plane to strike American targets, starting with the Pearl Harbor attack in December 1941. It also took part in almost all major Japanese carrier operations in the first year of the war, such as the Indian Ocean Raid, the Battle of the Coral Sea, and the Battle of Midway. The Aichi D3A replaced the older D1A biplane and was influenced by the German Heinkel He 70. The Aichi D3A1 was accurate and reliable. It sank more Allied ships than any other Axis plane, but faced heavy losses as the war went on and newer Allied fighters surpassed it.
The D3A1 has been in the game since the start of the Open Beta Test prior to Update 1.27. It has a sturdy airframe, a fixed landing gear, and a Mitsubishi Kinsei radial engine that allows it to reach 240 knots (440 km/h). It can carry one 250 kg bomb under the fuselage and two 60 kg bombs under the wings. It also has two machine guns in the front and one in the back for self-defense. The D3A1 is not very fast or agile compared to other Japanese planes, but it is very precise when diving on a target, especially with the airbrake that helps it adjust its speed and angle.
- Nicknames
- IJN Pilot nickname: Kanbaku (艦爆, Abbriviation of 艦上爆撃機 (Kanjō Bakugekiki)).
- Allied reporting name: Val.
General info
Flight performance
The D3A1 is one of the fastest and most manoeuvrable of any early war dive bomber, allowing the D3A1 to hit hard and fast, while making it back to base in quick succession. This does come at the cost of only offering a limited payload of 1 x 250 kg and 2 x 60 kg bombs.
| Characteristics | Max Speed (km/h at 3,900 m) |
Max altitude (metres) |
Turn time (seconds) |
Rate of climb (metres/second) |
Take-off run (metres) | |||
|---|---|---|---|---|---|---|---|---|
| AB | RB | AB | RB | AB | RB | |||
| Stock | 417 | 408 | 30.0 | 30.6 | 6.4 | 6.4 | 232 | |
| Upgraded | 443 | 430 | 28.5 | 29.2 | 11.1 | 8.6 | ||
Details
| Features | ||||
|---|---|---|---|---|
| Combat flaps | Take-off flaps | Landing flaps | Air brakes | Arrestor gear |
| ✓ | ✓ | ✓ | ✓ | ✓ |
| Limits | ||||||
|---|---|---|---|---|---|---|
| Wings (km/h) | Gear (km/h) | Flaps (km/h) | Max Static G | |||
| Combat | Take-off | Landing | + | - | ||
| 458 | 429 | 280 | ~12 | ~4 | ||
| Optimal velocities (km/h) | |||
|---|---|---|---|
| Ailerons | Rudder | Elevators | Radiator |
| < 330 | < 360 | < 380 | > 315 |
Survivability and armour
The D3A1 lacks any armour protection, but its three fuel tanks are self-sealing. One is located beneath the pilot, and the other two are in the wings, one in each wing. The gunner is exposed (his head sticks out of the aircraft).
Modifications and economy
When upgrading the D3A1, it's preferred to focus on improving the performance as the bomb load is already unlocked. The armaments should be focused on last as performance is the key trait of the D3A1.
Armaments
Offensive armament
The D3A1 is armed with:
- 2 x 7.7 mm Type 97 navy machine guns, nose-mounted (900 rpg = 1,800 total)
While only armed with 2 x nose-mounted 7.7 mm Type 97 machine guns, they can still pose a threat to underestimating foes; while only rifle-calibre, they can still knock out open-topped tanks and trucks, and with superb manoeuvrability for a dive bomber, the D3A1 can keep up in a dogfight.
Suspended armament
The D3A1 can be outfitted with the following ordnance:
- Without load
- 1 x 250 kg Navy Type Number 25 Model 2 bomb + 2 x 60 kg Navy Type 97 Number 6 bombs (370 kg total)
While it only comes with a single preset of 1 x 250 kg + 2 x 60 kg, it is still more than a threat for any target it will be dropped upon, be it a tank or ship, the 250 kg will make short work of it, with the 60 kg allowing more novice pilots to precise bomb for ground targets or smaller vessels.
Defensive armament
The D3A1 is defended by:
- 1 x 7.7 mm Type 92 machine gun, dorsal turret (1,000 rpg)
The D3A1 is defended by a single Type 92 MG in the tail gunner position. While offering not much punch, the dorsal MG will still fend off any attackers staying directly behind the tail of the D3A1.
Usage in battles
The D3A1 is Japan's early dive bomber, a highly manoeuvrable aircraft that is able to outturn a lot of enemies and avoid bursts of fire. Having a small turn radius gives the D3A1 a chance to defend itself by getting on the tail of enemy, but if the enemy is smart enough and doesn't try to turn with the D3A1, they can run away from the D3A1 after it has lost a bit of speed in turning around to get on the tail. But the D3A1 can still get in a couple of hits.
D3A1 is capable of carrying a modest bomb load which is similar to early versions of Ju 87. But it's also similar in terms of firepower as well with 2 x 7.7 mm Type 97 navy machine guns which can be used to defend itself from enemies, but also strafe light targets like AA/howitzer postions and light armoured vehicles like trucks and SPAA. D3A1 also has a defensive Type 92 machine gun mounted on the back, the gunner has an impressive area of cover which eliminates most dead zones that other dive bombers and some bombers have.
Main use of the D3A1 is dive bombing, that is where its strength lies, knocking out ground targets in ground battles or the AI targets in air battles, being able to dive near ground using the air brakes for accurate drop of bombs. After dropping bombs the D3A1 can be used as a fighter, but keep in mind that it has a relatively unprotected pilot and gunner, which makes it easy for enemy fighters and vehicles on the ground with AA-mounted machine guns to knock these out. The plane does not react well to being hit as well but it can still function relatively well even when damaged and can still put up a fight. Aircraft and vehicles equipped with 12.7 mm and above will make a quick work of the D3A1 either by getting the pilots or vital parts of the plane but also to set it on fire. 7.92 mm and below can also pose a threat if there is more than 1 mainly.
Enemies to be aware of:
- P-40E-1, P-400, He 100 D-1, Bf 109 E-1, P-66, H-81A-2 - These enemy fighters possess sufficient firepower and speed over the D3A1 to easily outclimb, outrun, and outgun the D3A1. They will Boom-n-Zoom the D3A1 and run away fast to prepare for the next attack, giving the D3A1 no chance to defend itself with its offensive machine guns.
- I-153 M-62 - The I-153 can outturn the D3A1 with ease and therefore will have no problem tailing the bomber in evasive manoeuvres.
- Tip for taking off in simulator battles
Hands-off carrier take-off (Auto engine control, no secondary weapons):
- Start engine
- Flaps: raised
- Elevator trim: 8% up
- Aileron trim: 0%
- Rudder trim: 21% right
- WEP throttle
- Hands off controls until your plane lifts off the carrier
Manual Engine Control
| MEC elements | ||||||
|---|---|---|---|---|---|---|
| Mixer | Pitch | Radiator | Supercharger | Turbocharger | ||
| Oil | Water | Type | ||||
| Not controllable | Controllable Not auto controlled |
Not controllable Not auto controlled |
Controllable Not auto controlled |
Combined | Not controllable 1 gear |
Not controllable |
Pros and cons
Pros:
- D3A for Carrier-based dive bomber:
- 250 kg + 2 x 60 kg
- Bomber airspawn
- Airbrakes
- Common Navy plane construction:
- Nose-mounted armament
- Excellent manoeuvrability
- the D3A1 has self-sealing fuel tanks
Cons:
- D3A for Carrier-based dive bomber:
- Has bomb cradle, significant delay in fuselage bomb drop
- Not good for bombing bases
- Common Navy plane construction:
- Poor offensive armament: 7.7 mm Type 97 MG
- Poor defensive armament: 7.7 mm Type 92 MG
- Fragile, little armour
- Exposed tail gunner
- D3A1 Specific:
- Payload is rather weak
History
Development
- 11-Shi Carrier Bomber
Developed as the 11-Shi Carrier Dive-Bomber, it was a specification ordered by the Imperial Japanese Navy Aviation Bureau to replace the obsolete D1A biplane. The task was undertaken by Mitsubishi, Nakajima, and Aichi, with Mitsubishi dropping out of the design contest early after submitting their design. With the Navy having a civilian model of the Heinkel He 70 for evaluation and testing, Aichi decided to use the plane as a template, while Nakajima based theirs on their own B5N torpedo bomber and C3N recon plane.
With Aichi basing its prototype off the He 70, many of its features such as all-metal fixed legs, dive air brakes, and the low-wing type were adopted into the Aichi 11-Shi. The initial model was finished in December 1937 and tested with the Nakajima Hikari 1 engine, which was also present on the D1A. The engine was underpowered and its airframe suffered from directional instability in wide turns, and in tighter turns it tended to snap roll. The dive brakes which were designed to withstand speeds up to 200 knots would start vibrating violently and with the navy requesting a higher dive speed of 240 knots, had to be redesigned. Nakajima's 11-Shi however missed the first deadline for the first prototype, but were still permitted to test the aircraft for the Bureau.
Aichi worked on the second prototype to cure most of its previous flaws by adding a larger tail combating directional instability, and wing span was increased against snap rolling on top of equipping stronger air brakes. The engine was switched out to the Mitsubishi Kinsei 3 in a new engine cowling. Together all of this would solve most of the issues of the first prototype except for directional instability. In 1939, both the Aichi and Nakajima prototypes were evaluated. Nakajima's was a progressive design at the time and was not bad in terms of performance, but it was inferior in speed and operability compared to the Aichi model and that was enough for the Aichi 11-Shi to be selected and officially designated as the Type 99 Carrier Bomber Model 11 (D3A1) which the navy ordered a production line to be built.
- (D3A1) Type 99 Carrier Bomber Model 11
The production version of the D3A1 switched out the engine once more for the Mitsubishi Kinsei 43 or 44 (most were equipped with Kinsei 44). The directional instability problem was finally cured with the fitting of a long dorsal fin-strake which started midway down the rear fuselage, and the aircraft actually became highly manoeuvrable.
Initially, Type 99 Carrier Bombers were painted in silver. During the summer of 1941, the paint finish changed to light olive grey. The colour changed again in early 1942 to dark green.
- (D3A2) Type 99 Carrier Bomber Model 22
With the pacific war raging on, the D3A1 became more and more unsatisfactory in terms of performance and by the end of August 1942, the navy requested an improved model for the D3A1. Aichi responded by changing the Kinsei 43 and 44 to the Kinsei 54 delivering 1,299 hp instead of the 1,000-1,070 hp the 43 and 44 offered, the engine change came with a new engine cowling and was equipped with a propeller spinner. Additionally, there was a rear extension of the windshield.
All these changes, mainly coming from the engine, decreased the operational range of the D3A, and as a solution drop tanks were possible to be installed. This variant would be dubbed the Type 99 Carrier Bomber Model 22 (D3A2) and would replace the model 11s on the frontline by autumn of 1942. All remaining model 11s were sent back to Japan and sent to training units.
| Archive of the in-game description | |
|---|---|
|
The single-engine carrier-based Aichi D3A dive bomber, a metal-construction monoplane, was created by order of Japan's Supreme Command of Naval Aviation to replace the obsolete D1A biplane. The shape of the wing and tail, as well as the presence of special dive brake flaps, came from the German aircraft company Heinkel, which was in active partnership with Aichi. A D3A prototype was ready in late 1937, and mass production of the D3A1 began in 1940. A Kinsey 43 engine producing 1,000 horsepower was used, and the aircraft's armament consisted of two synchronous 7.7 mm machine guns over the engine and one hand-operated machine gun with the radio operator at the rear of the cab. The wings had folding wingtips and duralumin sheeting, and the ailerons and flaps were covered with fabric. During the first half of the Second World War, the D3A, along with the B5N Kate, were the main strike force of the Japanese fleet. At the time the D3A1 could be considered one of the best dive-bombers in the world. No other dive bomber had characteristics that were even close, until the arrival of the American Dauntless and Helldiver. All in all, 470 D3A1s were produced. | |
Media
- Skins
- Images

- Videos
See also
Links to the articles on the War Thunder Wiki that you think will be useful for the reader, for example:
- reference to the series of the aircraft;
- links to approximate analogues of other nations and research trees.
External links
| Aichi Aircraft Company, Limited (愛知航空機株式会社) | |
|---|---|
| Bombers | D3A1 |
| B7A2 · B7A2 (Homare 23) | |
| Recon | E13A1 |
| Japan bombers | |
|---|---|
| Navy | |
| Carrier-based attack bomber | |
| B5N | B5N2 |
| B6N | B6N1 · B6N2 · B6N2a |
| B7A | B7A2 · B7A2 (Homare 23) |
| Carrier-based dive bomber | |
| D3A | D3A1 |
| D4Y | D4Y1 · D4Y2 · D4Y3 Ko |
| Shipboard Observation seaplane | |
| F1M | F1M2 |
| Land-based Attack bomber | |
| G4M | G4M1 |
| G5N | G5N1 |
| G8N | G8N1 |
| Flying boat | |
| H6K | H6K4 |
| H8K | H8K2 · H8K3 |
| Land-based Bomber | |
| P1Y | P1Y1 |
| Army | |
| Light | Ki-32 |
| Ki-48-II otsu | |
| Heavy | Ki-21-Ia · Ki-21-I hei |
| Ki-49-I · Ki-49-IIa · Ki-49-IIb · Ki-49-IIb/L | |
| Ki-67-I Ko · Ki-67-I otsu | |
| Other countries | ▅B-17E |
