Difference between revisions of "Leopard 2A4 (Sweden)"
(→See also: Edits) |
(→Ammunition: Converted to transclusion) |
||
| (2 intermediate revisions by one other user not shown) | |||
| Line 74: | Line 74: | ||
==== Ammunition ==== | ==== Ammunition ==== | ||
| − | { | + | {{:Rh120 L/44 (120 mm)/Ammunition|DM12, DM13, DM23}} |
| − | |||
| − | |||
| − | |||
| − | |||
| − | |||
| − | |||
| − | |||
| − | |||
| − | |||
| − | |||
| − | |||
| − | |||
| − | |||
| − | |||
| − | |||
| − | { | ||
| − | |||
| − | |||
| − | |||
| − | |||
| − | |||
| − | |||
| − | |||
| − | |||
| − | |||
| − | |||
| − | |||
| − | |||
| − | |||
| − | | DM12 | ||
| − | |||
| − | |||
| − | |||
| − | |||
| − | |||
| − | |||
==== [[Ammo racks]] ==== | ==== [[Ammo racks]] ==== | ||
| Line 188: | Line 152: | ||
== Media == | == Media == | ||
<!-- ''Excellent additions to the article would be video guides, screenshots from the game, and photos.'' --> | <!-- ''Excellent additions to the article would be video guides, screenshots from the game, and photos.'' --> | ||
| − | + | ||
| + | ;Skins | ||
| + | * [https://live.warthunder.com/feed/camouflages/?vehicle=sw_leopard_2a4_fin Skins and camouflages for the {{PAGENAME}} from live.warthunder.com.] | ||
== See also == | == See also == | ||
| Line 197: | Line 163: | ||
* [[Leopard 2 (Family)]] | * [[Leopard 2 (Family)]] | ||
** [[Leopard 2A4]] | ** [[Leopard 2A4]] | ||
| − | ** [[Leopard | + | ** [[Leopard 2 (PzBtl 123)]] |
== External links == | == External links == | ||
Latest revision as of 23:04, 2 February 2023
| This page is about the medium tank Leopard 2A4 (Sweden). For other versions, see Leopard 2 (Family). |
Contents
Description
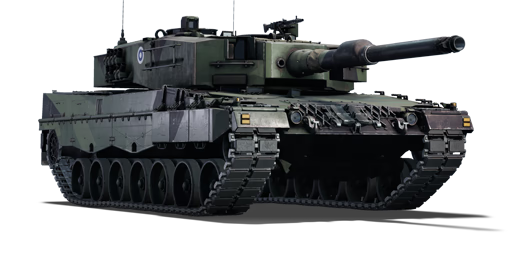
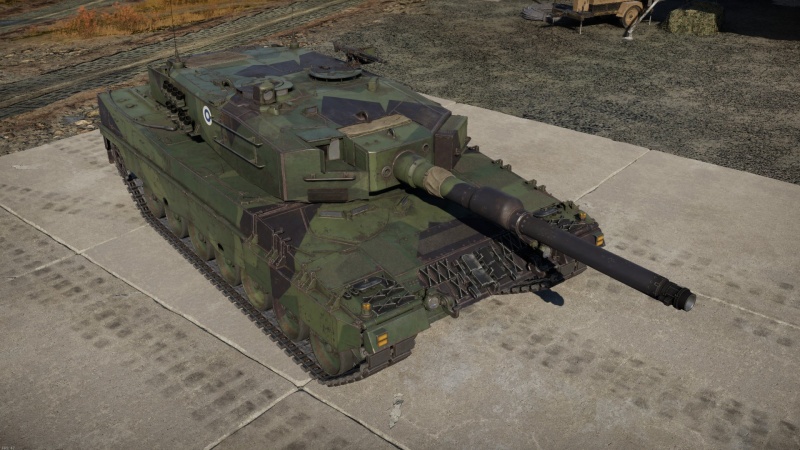
The ▄Leopard 2A4 is a rank Swedish medium tank with a battle rating of (AB), (RB), and (SB). It was introduced in Update "Fire and Ice".
General info
Survivability and armour
The Leopard 2A4's protection proves acceptable for long-range combat, although it's ill-advised to remain in one location for any extended period of time to avoid opposing vehicles being able to hone their shots onto your weak spots. The 2A4's protection should not be relied upon in urban or other close-range environments.
Armour type:
| Armour | Front (Slope angle) | Sides | Rear | Roof |
|---|---|---|---|---|
| Hull | 35 mm (53-82°) Upper glacis 40 mm (50-51°) Lower glacis 30 mm (82°) Driver's hatch |
10 mm (5°) Upper hull 35 mm Lower forward hull 20 mm Lower rear hull 5 mm Side Skirts 100 mm Composite screening |
20 mm (12-50°) All rear | 20 mm (0-8°) Hull roof incl. engine deck |
| Turret | 35 mm (0-6°) Cheeks incl. Gunner optics 35 mm (1°) Mantlet 120 mm Rear Mantlet Plate |
35 mm Forward 15 mm Rear |
10 mm (10°) Basket 20 mm (70°) Turret underside |
40 mm (82-85°) Forehead Armour 14 mm (72-77°) Forward sides 20 mm (89°) Rear turret incl. cupolas 5 mm (84°) Basket |
Notes:
Mobility
| Game Mode | Max Speed (km/h) | Weight (tons) | Engine power (horsepower) | Power-to-weight ratio (hp/ton) | |||
|---|---|---|---|---|---|---|---|
| Forward | Reverse | Stock | Upgraded | Stock | Upgraded | ||
| Arcade | Expression error: Unexpected * operator. | 2,032 | Expression error: Unexpected round operator. | __.__ | |||
| Realistic | 1,327 | Expression error: Unexpected round operator. | __.__ | ||||
Modifications and economy
Armaments
Main armament
The famous Rheinmetall L/44 120 mm cannon is mounted as the primary armament on the Leopard 2A4, offering a balance of firepower, accuracy and sustained rate of fire. The 2A4 has three rounds available to it: DM12 HEATFS, DM13 APFSDS and DM23 APFSDS. Of these, only DM12 is available when the vehicle is stock, with DM13 a tier 1 and DM23 a tier 4 modification. The L/44 is reasonably accurate at long range with any ammunition, however minor round deviation may be evident at extreme ranges (over 2,000 m).
It's advisable to primarily rely on the best available APFSDS round for engaging other MBTs, however, retaining a couple of DM12 rounds can prove valuable against lighter vehicles such as the ADATS.
| 120 mm Rh120 L/44 | Turret rotation speed (°/s) | Reloading rate (seconds) | |||||||||||
|---|---|---|---|---|---|---|---|---|---|---|---|---|---|
| Mode | Capacity | Vertical | Horizontal | Stabilizer | Stock | Upgraded | Full | Expert | Aced | Stock | Full | Expert | Aced |
| Arcade | 42 | -9°/+20° | ±180° | Two-plane | 38.1 | 52.7 | 64.0 | 70.8 | 75.3 | 7.80 | 6.90 | 6.36 | 6.00 |
| Realistic | 23.8 | 28.0 | 34.0 | 37.6 | 40.0 | ||||||||
Ammunition
| Penetration statistics | |||||||
|---|---|---|---|---|---|---|---|
| Ammunition | Type of warhead |
Penetration @ 0° Angle of Attack (mm) | |||||
| 10 m | 100 m | 500 m | 1,000 m | 1,500 m | 2,000 m | ||
| DM12 | HEATFS | 480 | 480 | 480 | 480 | 480 | 480 |
| DM13 | APFSDS | 393 | 390 | 384 | 376 | 367 | 359 |
| DM23 | APFSDS | 410 | 408 | 401 | 393 | 384 | 376 |
| Shell details | ||||||||||||
|---|---|---|---|---|---|---|---|---|---|---|---|---|
| Ammunition | Type of warhead |
Velocity (m/s) |
Projectile mass (kg) |
Fuse delay (m) |
Fuse sensitivity (mm) |
Explosive mass (TNT equivalent) (kg) |
Ricochet | |||||
| 0% | 50% | 100% | ||||||||||
| DM12 | HEATFS | 1,140 | 13.5 | 0.05 | 0.1 | 2.15 | 65° | 72° | 77° | |||
| DM13 | APFSDS | 1,650 | 4.44 | - | - | - | 78° | 80° | 81° | |||
| DM23 | APFSDS | 1,640 | 4.3 | - | - | - | 78° | 80° | 81° | |||
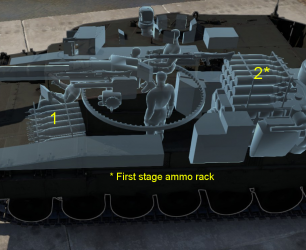
Ammo racks

| Full ammo |
1st rack empty |
2nd rack empty |
Visual discrepancy |
|---|---|---|---|
| 42 | 16 (+26) | 1 (+41) | No |
Notes:
- Shells are modeled individually and disappear after having been shot or loaded.
- Rack 2 is a first stage ammo rack located within a blow-out containment
- It totals 15 shells and gets filled first when loading up the tank and emptied first when firing.
- If you pack 16 (+26) shells, it will keep the hull empty of ammo.
- Full reload speed will be realized as long as shells are available in the ready rack 2. If the ready rack is empty, a penalty to reload speed will occur.
- Simply not firing when the gun is loaded will move ammo from rack 1 into rack 2. Firing will interrupt the restocking of the ready rack.
Machine guns
| 7.62 mm MG3A1 | ||||
|---|---|---|---|---|
| Mount | Capacity (Belt) | Fire rate | Vertical | Horizontal |
| Coaxial | 4,600 (200) | 1,200 | N/A | N/A |
| Pintle | 2,000 (200) | 1,200 | -10°/+75° | ±180° |
Usage in battles
The Leopard 2A4 may feel somewhat sluggish when stock, and the DM12 HEATFS round may appear to be relatively ineffective. Prior to researching improved rounds and engine modifications, it may be wise to play conservatively. Once the vehicle's modifications are all researched, however, the 2A4 becomes significantly more mobile and has a competitive, albeit not impressive round in the DM23 APFSDS. The 2A4 can be used comfortably in both urban and rural environments, providing the vehicle's weaknesses are kept in mind. While it is capable in most forms of engagement, it does lack the precision of the British Challenger MBTs or the extreme round velocities of the Soviet T-64/T-80 series. The 2A4 also has a particularly large and blocky profile, making for a particularly visible target in many situations. Considering the above, a Leopard 2A4 player should utilise its great mobility and competitive gun to get into early positions to pick off unsuspecting targets, rather than attempting to engage opposing forces head-on.
Pros and cons
Pros:
- Powerful engine, high top speed and acceleration
- Good neutral steering system
- Good gunner sight magnification for long-range engagements
- Reasonably high-velocity kinetic rounds
- Competent DM23 APFSDS
- Turret armour is mostly effective for hull-down engagements
- Primary ammunition is contained within a storage unit with blow-out panels
- Generation 1 thermals in the gunner sight
Cons:
- Hull armour is mediocre, particularly against kinetic rounds
- The stock DM12 HEATFS round can prove relatively ineffectual when compared to DM13/DM23, particularly against targets with ERA
- The gunner's optics are a weak spot, enemies who know how to aim can cripple your gun and kill your crew
- The gun mantlet is relatively weak while being quite prominent, penetration can disable the gun or knock turret crew out
- The turret cheeks can be penetrated by most APFSDS rounds when hit at the right angle
- Secondary ammunition storage is extremely vulnerable, although this is avoidable by carrying no more than 16 rounds
- Both machine guns are relatively light calibre, suffer from mediocre gun elevation and will not prove to be much more an annoyance to aircraft, particularly helicopters
- Blowout panels are unreliable and have a low capacity
History
Describe the history of the creation and combat usage of the vehicle in more detail than in the introduction. If the historical reference turns out to be too long, take it to a separate article, taking a link to the article about the vehicle and adding a block "/History" (example: https://wiki.warthunder.com/(Vehicle-name)/History) and add a link to it here using the main template. Be sure to reference text and sources by using <ref></ref>, as well as adding them at the end of the article with <references />. This section may also include the vehicle's dev blog entry (if applicable) and the in-game encyclopedia description (under === In-game description ===, also if applicable).
Media
- Skins
See also
External links
| Sweden medium tanks | |
|---|---|
| Strv m/42 | Lago I · Strv m/42 EH · Ikv 73 · Strv m/42 DT · Pvkv IV |
| Centurion derivatives | Strv 81 · Strv 81 (RB 52) · Strv 101 · Strv 104 · Strv 105 |
| Strv 103 | Strv 103-0 · Strv 103A · Strv 103С |
| Strv 121/122 | Strv 121 · Christian II · Strv 122A · Strv 122B PLSS · Strv 122B+ |
| Other | Sherman III/IV · T 80 U |
| Finland | |
| WWII | ▄T-28 · ▄T-34 · ▄Pz.IV · ▄T-34-85 |
| Post War | ▄Comet I · ▄Charioteer Mk VII · ▄T-54 · ▄T-55M · ▄T-72M1 · ▄Leopard 2A4 · ▄Leopard 2A6 |
| Norway | Leopard 1A5NO2 |


