Difference between pages "MiG-9 (l) (China)" and "75/34 M42"
(→History: history of the delivery and quick demise of MiG-9 in Mainland China) (Tag: Visual edit) |
(→Ammunition: Converted to transclusion) |
||
| Line 1: | Line 1: | ||
{{About | {{About | ||
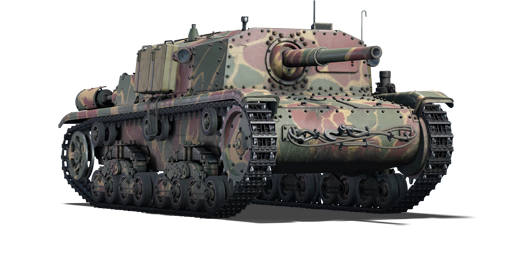
| − | | about = | + | | about = Italian tank destroyer '''{{PAGENAME}}''' |
| − | | usage = other | + | | usage = other uses |
| − | | link = | + | | link = M42 (Disambiguation) |
}} | }} | ||
{{Specs-Card | {{Specs-Card | ||
| − | |code= | + | |code=it_semovente_m42_75_34 |
| − | |images={{Specs-Card-Image| | + | |images={{Specs-Card-Image|GarageImage_75_34_M42.jpg|ArtImage_75-34_M42.png}} |
}} | }} | ||
== Description == | == Description == | ||
| − | <!-- ''In the description, the first part should be about the history of | + | <!-- ''In the description, the first part should be about the history of the creation and combat usage of the vehicle, as well as its key features. In the second part, tell the reader about the ground vehicle in the game. Insert a screenshot of the vehicle, so that if the novice player does not remember the vehicle by name, he will immediately understand what kind of vehicle the article is talking about.'' --> |
| − | The '''{{Specs|name}}''' is a rank {{Specs|rank}} | + | The '''{{Specs|name}}''' is a rank {{Specs|rank}} Italian tank destroyer {{Battle-rating}}. It was introduced in [[Update 1.85 "Supersonic"]]. |
== General info == | == General info == | ||
| − | === | + | === Survivability and armour === |
| − | {{Specs- | + | {{Specs-Tank-Armour}} |
| − | <!-- ''Describe | + | <!-- ''Describe armour protection. Note the most well protected and key weak areas. Appreciate the layout of modules as well as the number and location of crew members. Is the level of armour protection sufficient, is the placement of modules helpful for survival in combat? If necessary use a visual template to indicate the most secure and weak zones of the armour.'' --> |
| − | |||
| − | + | '''Armour type:''' | |
| − | + | * Rolled homogeneous armour (hull, casemate) | |
| + | * Cast homogeneous armour (gun mantlet) | ||
| − | {| class="wikitable" | + | {| class="wikitable" |
| − | |||
| − | |||
| − | |||
| − | |||
| − | |||
| − | |||
|- | |- | ||
| − | ! | + | ! Armour !! Front (Slope angle) !! Sides !! Rear !! Roof |
|- | |- | ||
| − | + | | Hull || 25 mm (80°) ''Front glacis'' <br> 30 mm (cylindrical) ''Lower plate'' || 25 mm || 25 mm ''Upper part'' <br> 25 mm (15°) ''Lower part'' || 25 mm (10°) ''Front glacis'' <br> 10 mm (15°) ''Rear - Engine hood'' <br> 5-10 mm (8°) ''Rear - Radiator vents'' | |
| − | | | ||
|- | |- | ||
| − | + | | Casemate || 50 mm (5°) ''Casemate front plate'' <br> 50 + 50 mm (spherical) ''Gun mantlet'' <br> 25 mm (60°) ''Plate connecting with hull'' || 25 mm (6-7°) || 25 mm || 15 mm (5°) ''Centre'' <br> 15 mm (21-22°) ''Sides'' | |
| − | | | ||
|- | |- | ||
|} | |} | ||
| + | '''Notes:''' | ||
| + | |||
| + | * Suspension wheels are 15 mm thick while tracks are 20 mm thick and bogies 10 mm thick. | ||
| + | * The belly is 15 mm thick. | ||
| + | * Mudguards are 4 mm thick. | ||
| + | |||
| + | The {{PAGENAME}} shares the same vulnerabilities as the [[75/18 M41]] and the [[75/32 M41]]: a rather weak vertical armour front plate, weak sides and an even weaker roof armour and a crew of only 3 sitting in a cramped space. | ||
| + | |||
| + | === Mobility === | ||
| + | {{Specs-Tank-Mobility}} | ||
| + | <!-- ''Write about the mobility of the ground vehicle. Estimate the specific power and manoeuvrability, as well as the maximum speed forwards and backwards.'' --> | ||
| + | |||
| + | {{tankMobility|abMinHp=263|rbMinHp=164}} | ||
| + | |||
| + | === Modifications and economy === | ||
| + | {{Specs-Economy}} | ||
| − | ==== | + | == Armaments == |
| − | { | + | {{Specs-Tank-Armaments}} |
| − | + | === Main armament === | |
| − | + | {{Specs-Tank-Weapon|1}} | |
| − | + | <!-- ''Give the reader information about the characteristics of the main gun. Assess its effectiveness in a battle based on the reloading speed, ballistics and the power of shells. Do not forget about the flexibility of the fire, that is how quickly the cannon can be aimed at the target, open fire on it and aim at another enemy. Add a link to the main article on the gun: <code><nowiki>{{main|Name of the weapon}}</nowiki></code>. Describe in general terms the ammunition available for the main gun. Give advice on how to use them and how to fill the ammunition storage.'' --> | |
| − | + | {{main|75/34 mod.39 (75 mm)}} | |
| − | |||
| − | | | ||
| − | | | ||
| − | |||
| − | {| class="wikitable" style="text-align:center" width=" | + | {| class="wikitable" style="text-align:center" width="100%" |
|- | |- | ||
| − | ! colspan=" | + | ! colspan="5" | [[75/34 mod.39 (75 mm)|75 mm 75/34 mod.39]] || colspan="5" | Turret rotation speed (°/s) || colspan="4" | Reloading rate (seconds) |
|- | |- | ||
| − | ! | + | ! Mode !! Capacity !! Vertical !! Horizontal !! Stabilizer |
| − | ! | + | ! Stock !! Upgraded !! Full !! Expert !! Aced |
| − | ! | + | ! Stock !! Full !! Expert !! Aced |
| − | ! | ||
|- | |- | ||
| − | ! | + | ! ''Arcade'' |
| + | | rowspan="2" | 45 || rowspan="2" | -10°/+22° || rowspan="2" | ±18° || rowspan="2" | N/A || 12.3 || 17.1 || 20.7 || 22.9 || 24.4 || rowspan="2" | 8.45 || rowspan="2" | 7.48 || rowspan="2" | 6.89 || rowspan="2" | 6.50 | ||
|- | |- | ||
| − | | | + | ! ''Realistic'' |
| + | | 8.3 || 9.8 || 11.9 || 13.2 || 14.0 | ||
|- | |- | ||
|} | |} | ||
| − | + | ==== Ammunition ==== | |
| − | + | {{:75/34 mod.39 (75 mm)/Ammunition|Granata Perforante 75/32, EPS M42, Granata 75/32}} | |
| − | |||
| − | | | ||
| − | |||
| − | |||
| − | |||
| − | |||
| − | |||
| − | ==== | + | ==== [[Ammo racks]] ==== |
| + | [[File:Ammoracks 75-34 M42.png|right|thumb|x250px|[[Ammo racks]] of the {{PAGENAME}}]] | ||
| + | <!-- '''Last updated: 1.101.1.16''' --> | ||
{| class="wikitable" style="text-align:center" | {| class="wikitable" style="text-align:center" | ||
|- | |- | ||
| − | ! | + | ! Full<br>ammo |
| − | ! | + | ! 1st<br>rack empty |
| + | ! 2nd<br>rack empty | ||
| + | ! Visual<br>discrepancy | ||
|- | |- | ||
| − | + | | '''45''' || 24 ''(+21)'' || 1 ''(+44)'' || No | |
| − | |||
| − | |||
| − | |||
| − | |||
| − | |||
| − | |||
| − | |||
| − | |||
| − | |||
| − | |||
| − | |||
| − | |||
| − | |||
| − | |||
| − | |||
| − | |||
| − | |||
| − | |||
| − | |||
| − | |||
| − | | '' | ||
| − | |||
| − | |||
| − | |||
| − | |||
|- | |- | ||
|} | |} | ||
| + | '''Note''': | ||
| − | + | * As they are modeled by sets of 2, 3 or 4, shells disappear from the rack only after you fire all shells in the set. | |
| − | |||
| − | |||
| − | + | == Usage in battles == | |
| − | + | <!-- ''Describe the tactics of playing in the vehicle, the features of using vehicles in the team and advice on tactics. Refrain from creating a "guide" - do not impose a single point of view but instead give the reader food for thought. Describe the most dangerous enemies and give recommendations on fighting them. If necessary, note the specifics of the game in different modes (AB, RB, SB).'' --> | |
| − | |||
| − | |||
| − | |||
| − | |||
| − | |||
| − | |||
| − | + | ;Combat tactics | |
| − | |||
| − | |||
| − | |||
| − | |||
| − | |||
| − | + | Thanks to its performant gun, the {{PAGENAME}} is effective as a tank destroyer at long range with the good penetration of its APCBC round. With a maximum penetration of 64 mm at 1,000 m, the vehicle will have no problem penetrating the angled front armour of many similar rank vehicles from a distance. Light tanks, armoured cars and SPAA are the easiest targets. The vehicle's effectiveness improves once the HEAT shell is unlocked, with 100 mm of penetration at all ranges. This allows for reliable penetration of practically all the Semovente's potential adversaries. Your most dangerous opponents are fast and agile light tanks such as the M22 that can easily flank the Semovente undetected and disable you from close range. Their speed and small size make those light tanks difficult to target for the Semovente's gun. | |
| − | + | With the HEAT shell, the Semovente can make for an effective tank destroyer, provided you stay at a distance guaranteeing your survivability. The one thing to remember about the HEAT shell is that it sacrifices the one-shot capability of APCBC, meaning that larger tanks will often take multiple hits to disable while the reload time is pretty slow for the battle rating. Like the 75/32 M41, the HEAT shell has a good muzzle velocity making it capable to hit reliably targets at long range. | |
| − | |||
| − | + | ;Notable enemies: | |
| − | + | Many tanks are capable of easily disabling you. By order of lethality: | |
| − | + | * Tank destroyers with long guns | |
| − | + | * Howitzers with powerful HE shells | |
| + | * Tanks with HEAT shells | ||
| + | * Frontline tanks with APHE shells | ||
| + | * Light tanks or armoured cars with autocannons | ||
| − | + | ;How to defeat a {{PAGENAME}} | |
| − | + | The {{PAGENAME}} has several weak spots: | |
| − | + | * In a frontal encounter, the vertical front plate is the easiest to target. | |
| + | * Shoot the lower front plate to damage the transmission and immobilize the tank if you lack penetration power. | ||
| + | * When flanking, aim for the weak sides of the casemate. | ||
=== Pros and cons === | === Pros and cons === | ||
| − | <!-- ''Summarise and briefly evaluate the vehicle in terms of its characteristics and combat effectiveness. Mark its pros and cons in | + | <!-- ''Summarise and briefly evaluate the vehicle in terms of its characteristics and combat effectiveness. Mark its pros and cons in a bulleted list. Try not to use more than 6 points for each of the characteristics. Avoid using categorical definitions such as "bad", "good" and the like - use substitutions with softer forms such as "inadequate" and "effective".'' --> |
| − | |||
'''Pros:''' | '''Pros:''' | ||
| − | * | + | * Decent 75 mm gun with a respectable reload rate |
| − | + | * Low profile = harder to spot | |
| − | + | * Has access to HEAT rounds | |
| − | + | * Decent top speed | |
| − | * | + | * Large explosive filler in the APCBC round almost guarantees vehicle destruction upon penetration |
| − | * Has | ||
| − | * | ||
| − | * | ||
'''Cons:''' | '''Cons:''' | ||
| − | * | + | * Overall armour is not very good |
| − | * | + | * Is vulnerable to getting flanked due to being a casemate tank destroyer |
| − | + | * Thin top armour; can be vulnerable to strafing aircraft | |
| − | + | * Acceleration leaves things to be desired | |
| − | + | * Shells have a rather slow muzzle velocity | |
| − | |||
| − | |||
| − | * | ||
| − | * | ||
| − | * | ||
== History == | == History == | ||
| − | <!-- ''Describe the history of the creation and combat usage of the | + | <!-- ''Describe the history of the creation and combat usage of the vehicle in more detail than in the introduction. If the historical reference turns out to be too long, take it to a separate article, taking a link to the article about the vehicle and adding a block "/History" (example: <nowiki>https://wiki.warthunder.com/(Vehicle-name)/History</nowiki>) and add a link to it here using the <code>main</code> template. Be sure to reference text and sources by using <code><nowiki><ref></ref></nowiki></code>, as well as adding them at the end of the article with <code><nowiki><references /></nowiki></code>. This section may also include the vehicle's dev blog entry (if applicable) and the in-game encyclopedia description (under <code><nowiki>=== In-game description ===</nowiki></code>, also if applicable).'' --> |
| − | = | + | {{main|M15/42#History|l1=History of the M15/42}} |
| + | |||
| + | ;Development | ||
| − | + | Following the success of the Semovente da 75/18 in its anti-tank role, the Italian command ordered in October 1942 the development of an improved version of the Semovente based this time on the M15/42 chassis and a 75 mm L/34 Breda cannon, a gun with identical performance to the one equipped on the P26/40 tank. The new vehicle was accepted in April 1943 and production started in May 1943 with an order for 280 Semoventi. Due to wartime shortages of materials and manpower, only 93 tank destroyers were produced by the Italians before the Armistice and only 60 vehicles delivered to their combat units. The Germans then seized control of Northern Italy and continued its manufacture, completing 80 more units alongside 36 already confiscated ones. | |
| − | |||
| − | + | ;Combat usage | |
| − | |||
| − | + | The {{PAGENAME}} saw shortly combat action on the Italian side during the battle of Rome in September 1943 and more extensively on the German side along with the other Semovente variants in Northern Italy and the Balkans in 1944. | |
== Media == | == Media == | ||
| − | ''Excellent additions to the article would be video guides, screenshots from the game, and photos.'' | + | <!-- ''Excellent additions to the article would be video guides, screenshots from the game, and photos.'' --> |
| + | |||
| + | ;Skins | ||
| + | |||
| + | * [https://live.warthunder.com/feed/camouflages/?vehicle=it_semovente_m42_75_34 Skins and camouflages for the {{PAGENAME}} from live.warthunder.com.] | ||
| + | |||
| + | ;Videos | ||
| + | {{Youtube-gallery|hwZZvlooCQ0|'''Semovente da {{PAGENAME}}, Italian, Tier-2, Tank Destroyer''' - ''Angry Nerd Gaming''|t5VZ6gv_2dA|'''First 10 - {{PAGENAME}}''' - ''Orangefan''}} | ||
== See also == | == See also == | ||
| − | ''Links to the articles on the War Thunder Wiki that you think will be useful for the reader, for example:'' | + | <!-- ''Links to the articles on the War Thunder Wiki that you think will be useful for the reader, for example:'' |
| + | * ''reference to the series of the vehicles;'' | ||
| + | * ''links to approximate analogues of other nations and research trees.'' --> | ||
| − | + | ;Vehicles equipped with the same chassis | |
| − | * | + | |
| + | * [[M15/42]] | ||
| + | |||
| + | ;Other vehicles of similar configuration and role | ||
| + | |||
| + | * [[StuG III A]] | ||
| + | * [[75/34 M43]] | ||
== External links == | == External links == | ||
| − | <!--''Paste links to sources and external resources, such as:'' | + | <!-- ''Paste links to sources and external resources, such as:'' |
| − | |||
* ''topic on the official game forum;'' | * ''topic on the official game forum;'' | ||
| − | + | * ''other literature.'' --> | |
| − | * ''other literature.''--> | ||
| − | * [https:// | + | * [[Wikipedia:Semovente_da_75/34|[Wikipedia] Semovente da 75/34]] |
| + | * [https://www.tanks-encyclopedia.com/ww2/italy/Semovente_Da_75-34.php <nowiki>[Tanks Encyclopedia]</nowiki> Semovente da 75/34] | ||
| − | {{ | + | {{TankManufacturer FIAT-Ansaldo}} |
| − | {{ | + | {{Italy tank destroyers}} |
Latest revision as of 20:30, 24 January 2023
| This page is about the Italian tank destroyer 75/34 M42. For other uses, see M42 (Disambiguation). |


Contents
Description
The Semovente 75/34 M42 is a rank Italian tank destroyer with a battle rating of (AB), (RB), and (SB). It was introduced in Update 1.85 "Supersonic".
General info
Survivability and armour
Armour type:
- Rolled homogeneous armour (hull, casemate)
- Cast homogeneous armour (gun mantlet)
| Armour | Front (Slope angle) | Sides | Rear | Roof |
|---|---|---|---|---|
| Hull | 25 mm (80°) Front glacis 30 mm (cylindrical) Lower plate |
25 mm | 25 mm Upper part 25 mm (15°) Lower part |
25 mm (10°) Front glacis 10 mm (15°) Rear - Engine hood 5-10 mm (8°) Rear - Radiator vents |
| Casemate | 50 mm (5°) Casemate front plate 50 + 50 mm (spherical) Gun mantlet 25 mm (60°) Plate connecting with hull |
25 mm (6-7°) | 25 mm | 15 mm (5°) Centre 15 mm (21-22°) Sides |
Notes:
- Suspension wheels are 15 mm thick while tracks are 20 mm thick and bogies 10 mm thick.
- The belly is 15 mm thick.
- Mudguards are 4 mm thick.
The 75/34 M42 shares the same vulnerabilities as the 75/18 M41 and the 75/32 M41: a rather weak vertical armour front plate, weak sides and an even weaker roof armour and a crew of only 3 sitting in a cramped space.
Mobility
| Game Mode | Max Speed (km/h) | Weight (tons) | Engine power (horsepower) | Power-to-weight ratio (hp/ton) | |||
|---|---|---|---|---|---|---|---|
| Forward | Reverse | Stock | Upgraded | Stock | Upgraded | ||
| Arcade | Expression error: Unexpected * operator. | 263 | Expression error: Unexpected round operator. | __.__ | |||
| Realistic | 164 | Expression error: Unexpected round operator. | __.__ | ||||
Modifications and economy
Armaments
Main armament
| 75 mm 75/34 mod.39 | Turret rotation speed (°/s) | Reloading rate (seconds) | |||||||||||
|---|---|---|---|---|---|---|---|---|---|---|---|---|---|
| Mode | Capacity | Vertical | Horizontal | Stabilizer | Stock | Upgraded | Full | Expert | Aced | Stock | Full | Expert | Aced |
| Arcade | 45 | -10°/+22° | ±18° | N/A | 12.3 | 17.1 | 20.7 | 22.9 | 24.4 | 8.45 | 7.48 | 6.89 | 6.50 |
| Realistic | 8.3 | 9.8 | 11.9 | 13.2 | 14.0 | ||||||||
Ammunition
| Penetration statistics | |||||||
|---|---|---|---|---|---|---|---|
| Ammunition | Type of warhead |
Penetration @ 0° Angle of Attack (mm) | |||||
| 10 m | 100 m | 500 m | 1,000 m | 1,500 m | 2,000 m | ||
| Granata Perforante 75/32 | APCBC | 79 | 78 | 71 | 64 | 58 | 52 |
| EPS M42 | HEAT | 100 | 100 | 100 | 100 | 100 | 100 |
| Granata 75/32 | HE | 10 | 10 | 9 | 9 | 9 | 9 |
| Shell details | ||||||||||||
|---|---|---|---|---|---|---|---|---|---|---|---|---|
| Ammunition | Type of warhead |
Velocity (m/s) |
Projectile mass (kg) |
Fuse delay (m) |
Fuse sensitivity (mm) |
Explosive mass (TNT equivalent) (g) |
Ricochet | |||||
| 0% | 50% | 100% | ||||||||||
| Granata Perforante 75/32 | APCBC | 637 | 6.35 | 1.2 | 14 | 270 | 48° | 63° | 71° | |||
| EPS M42 | HEAT | 552 | 5.3 | 0.05 | 0.1 | 656.64 | 62° | 69° | 73° | |||
| Granata 75/32 | HE | 552 | 6.35 | 0.2 | 0.1 | 600 | 79° | 80° | 81° | |||
Ammo racks

| Full ammo |
1st rack empty |
2nd rack empty |
Visual discrepancy |
|---|---|---|---|
| 45 | 24 (+21) | 1 (+44) | No |
Note:
- As they are modeled by sets of 2, 3 or 4, shells disappear from the rack only after you fire all shells in the set.
Usage in battles
- Combat tactics
Thanks to its performant gun, the 75/34 M42 is effective as a tank destroyer at long range with the good penetration of its APCBC round. With a maximum penetration of 64 mm at 1,000 m, the vehicle will have no problem penetrating the angled front armour of many similar rank vehicles from a distance. Light tanks, armoured cars and SPAA are the easiest targets. The vehicle's effectiveness improves once the HEAT shell is unlocked, with 100 mm of penetration at all ranges. This allows for reliable penetration of practically all the Semovente's potential adversaries. Your most dangerous opponents are fast and agile light tanks such as the M22 that can easily flank the Semovente undetected and disable you from close range. Their speed and small size make those light tanks difficult to target for the Semovente's gun.
With the HEAT shell, the Semovente can make for an effective tank destroyer, provided you stay at a distance guaranteeing your survivability. The one thing to remember about the HEAT shell is that it sacrifices the one-shot capability of APCBC, meaning that larger tanks will often take multiple hits to disable while the reload time is pretty slow for the battle rating. Like the 75/32 M41, the HEAT shell has a good muzzle velocity making it capable to hit reliably targets at long range.
- Notable enemies
Many tanks are capable of easily disabling you. By order of lethality:
- Tank destroyers with long guns
- Howitzers with powerful HE shells
- Tanks with HEAT shells
- Frontline tanks with APHE shells
- Light tanks or armoured cars with autocannons
- How to defeat a 75/34 M42
The 75/34 M42 has several weak spots:
- In a frontal encounter, the vertical front plate is the easiest to target.
- Shoot the lower front plate to damage the transmission and immobilize the tank if you lack penetration power.
- When flanking, aim for the weak sides of the casemate.
Pros and cons
Pros:
- Decent 75 mm gun with a respectable reload rate
- Low profile = harder to spot
- Has access to HEAT rounds
- Decent top speed
- Large explosive filler in the APCBC round almost guarantees vehicle destruction upon penetration
Cons:
- Overall armour is not very good
- Is vulnerable to getting flanked due to being a casemate tank destroyer
- Thin top armour; can be vulnerable to strafing aircraft
- Acceleration leaves things to be desired
- Shells have a rather slow muzzle velocity
History
- Development
Following the success of the Semovente da 75/18 in its anti-tank role, the Italian command ordered in October 1942 the development of an improved version of the Semovente based this time on the M15/42 chassis and a 75 mm L/34 Breda cannon, a gun with identical performance to the one equipped on the P26/40 tank. The new vehicle was accepted in April 1943 and production started in May 1943 with an order for 280 Semoventi. Due to wartime shortages of materials and manpower, only 93 tank destroyers were produced by the Italians before the Armistice and only 60 vehicles delivered to their combat units. The Germans then seized control of Northern Italy and continued its manufacture, completing 80 more units alongside 36 already confiscated ones.
- Combat usage
The 75/34 M42 saw shortly combat action on the Italian side during the battle of Rome in September 1943 and more extensively on the German side along with the other Semovente variants in Northern Italy and the Balkans in 1944.
Media
- Skins
- Videos
See also
- Vehicles equipped with the same chassis
- Other vehicles of similar configuration and role
External links
| FIAT-Ansaldo | |
|---|---|
| Autoblindo | AB 41 · AB 43 |
| Light Tanks | L6/40 · L6/40 (31 Rgt.) |
| Medium Tanks | Celere Sahariano |
| M11/39 | M11/39 |
| M13/40 | M13/40 (I) · M13/40 (II) · M13/40 (III) |
| M14/41 | M14/41 · M14/41 (47/40) |
| M15/42 | M15/42 |
| P40 | P40 · P40 "G.C. Leoncello" |
| Tank Destroyers | |
| L3/33 | L3/33 CC |
| Semovente L40 | 47/32 L40 |
| Semovente M41 | 75/18 M41 · 75/32 M41 · 90/53 M41M |
| Semovente M42 | 75/34 M42 |
| Semovente M43 | 105/25 M43 · M43 "G.C.Leoncello" · 75/34 M43 · 75/46 M43 |
| SPAAs | M42 Contraereo |
| Italy tank destroyers | |
|---|---|
| Italy | |
| M41 | 75/18 M41 · 75/32 M41 · 90/53 M41M |
| M42 | 75/34 M42 |
| M43 | 105/25 M43 · M43 "G.C.Leoncello" · 75/34 M43 · 75/46 M43 |
| Wheeled | Lancia 3Ro (100/17) · AS 42/47 · Breda 90/53 · Breda 501 |
| Other | L3/33 CC · 47/32 L40 |
| Germany | ▄StuG III G |
| USA | M36B1 · ▄M109G · M113A1 (TOW) |
| Hungary | |
| Zrínyi | Zrinyi I · Zrinyi II |
| USSR | ◔2S1 |
