Difference between revisions of "OTOMATIC"
U103691029 (talk | contribs) m (→Main armament: Autoloader) (Tag: Visual edit) |
(retyped pros and cons, and added some new) (Tag: Visual edit) |
||
| (56 intermediate revisions by 21 users not shown) | |||
| Line 1: | Line 1: | ||
| − | {{Specs-Card | + | {{Specs-Card|code=it_otomatic}} |
| − | |code=it_otomatic | ||
| − | |||
| − | }} | ||
== Description == | == Description == | ||
| − | <!-- ''In the description, the first part | + | <!--''In the description, the first part needs to be about the history of the creation and combat usage of the vehicle, as well as its key features. In the second part, tell the reader about the ground vehicle in the game. Insert the screenshot of the vehicle. If the novice player does not remember the vehicle by name, they will immediately understand what kind of vehicle it is talking about.''--> |
| − | The | + | The '''{{Specs|name}}''' (shortened to '''{{Specs|pseudonym}}''') is a Rank {{Specs|rank}} Italian self-propelled anti-aircraft gun {{Battle-rating|1}}. This vehicle was introduced in [[Update 1.85 "Supersonic"]]. |
| − | + | The OTOMATIC is a radar-equipped SPAAG that is capable of shooting proximity fuzed frag rounds, and can destroy planes even in a single, well-aimed shot; therefore, it should be used as such, at least until APFSDS rounds are unlocked, so staying in a cap zone is recommended, as the unit doesn't not carry a lot of ammo (90 shells for a cannon with a 0.5s reload). When APFSDS are available, the OTOMATIC may defend capture points against enemy tanks as well, while still dealing with aircraft, or it can switch to a more mobile, MBT-like playstyle, mostly thanks to the good penetration of the sabot rounds and the two-axis stabilizer. | |
| − | |||
| − | |||
== General info == | == General info == | ||
=== Survivability and armour === | === Survivability and armour === | ||
| − | + | <!--''Describe armour protection. Note the most well protected and key weak areas. Appreciate the layout of modules as well as the number and location of crew members. Is the level of armour protection sufficient, is the placement of modules helpfull for survival in combat?'' | |
| − | <!-- ''Describe armour protection. Note the most well protected and key weak areas. Appreciate the layout of modules as well as the number and location of crew members. Is the level of armour protection sufficient, is the placement of modules | + | |
| + | ''If necessary use a visual template to indicate the most secure and weak zones of the armour.''--> | ||
'''Armour type:''' | '''Armour type:''' | ||
* Rolled homogeneous armour | * Rolled homogeneous armour | ||
| − | * Structural steel (Radar equipment, | + | * Structural steel (Radar equipment, Mud guards) |
* Rubber-fabric screens | * Rubber-fabric screens | ||
| Line 33: | Line 29: | ||
=== Mobility === | === Mobility === | ||
| − | + | <!--''Write about the mobility of the ground vehicle. Estimate the specific power and maneuverability as well as the maximum speed forward and backward.''--> | |
| − | <!-- ''Write about the mobility of the ground vehicle. Estimate the specific power and | + | {| class="wikitable" style="text-align:center" |
| − | + | |- | |
| − | + | ! colspan="3" | Mobility characteristic | |
| − | + | |- | |
| − | === | + | ! Weight (tons) |
| − | + | ! colspan="1" | Add-on Armor<br>weight (tons) | |
| + | ! colspan="1" | Max speed (km/h) | ||
| + | |- | ||
| + | | rowspan="2" | 46.0 || colspan="1" rowspan="2" | N/A || colspan="1" | 71 (AB) | ||
| + | |- | ||
| + | |65 (RB/SB) | ||
| + | |- | ||
| + | ! colspan="3" | Engine power (horsepower) | ||
| + | |- | ||
| + | ! colspan="1" | Mode | ||
| + | !Stock | ||
| + | !Upgraded | ||
| + | |- | ||
| + | |''Arcade'' | ||
| + | |1,179 | ||
| + | |____ | ||
| + | |- | ||
| + | |''Realistic/Simulator'' | ||
| + | |734 | ||
| + | |____ | ||
| + | |- | ||
| + | ! colspan="3" | Power-to-weight ratio (hp/ton) | ||
| + | |- | ||
| + | ! colspan="1" | Mode | ||
| + | !Stock | ||
| + | !Upgraded | ||
| + | |- | ||
| + | |''Arcade'' | ||
| + | |25.63 | ||
| + | |__.__ | ||
| + | |- | ||
| + | |''Realistic/Simulator'' | ||
| + | |15.96 | ||
| + | |__.__ | ||
| + | |- | ||
| + | |} | ||
== Armaments == | == Armaments == | ||
| − | |||
=== Main armament === | === Main armament === | ||
| − | + | <!--''Give the reader information about the characteristics of the main gun. Assess its effectiveness in a battle based on the reloading speed, ballistics and the power of shells. Do not forget about the flexibilty of the fire, that is how quickly the cannon can be aimed at the target, open fire on it and aim at another enemy. Add a link to the main article on the gun: <code><nowiki>{{main|Name of the weapon}}</nowiki></code>. Describe in general terms the ammunition available for the main gun. Give advice on how to use them and how to fill the ammunition storage.''--> | |
| − | <!-- ''Give the reader information about the characteristics of the main gun. Assess its effectiveness in a battle based on the reloading speed, ballistics and the power of shells. Do not forget about the | ||
{{main|OTO Breda Cannone da 76/62 (76 mm)}} | {{main|OTO Breda Cannone da 76/62 (76 mm)}} | ||
| − | + | {| class="wikitable" style="text-align:center" | |
| − | + | |- | |
| − | + | ! colspan="6" | [[OTO Breda Cannone da 76/62 (76 mm)|76 mm OTO Breda Cannone da 76/62]] | |
| − | + | |- | |
| + | ! colspan="3" rowspan="1" style="width:5em" |Capacity | ||
| + | ! rowspan="1" | Vertical <br> guidance | ||
| + | ! rowspan="1" | Horizontal <br> guidance | ||
| + | ! rowspan="1" | Stabilizer | ||
| + | |- | ||
| + | | colspan="3" | 90 || -5°/+60° || ±180° || Two-plane | ||
| + | |- | ||
| + | ! colspan="6" | Turret rotation speed (°/s) | ||
| + | |- | ||
| + | ! style="width:4em" |Mode | ||
| + | ! style="width:4em" |Stock | ||
| + | ! style="width:4em" |Upgraded | ||
| + | ! style="width:4em" |Prior + Full crew | ||
| + | ! style="width:4em" |Prior + Expert qualif. | ||
| + | ! style="width:4em" |Prior + Ace qualif. | ||
| + | |- | ||
| + | | ''Arcade'' || 23.8 || __.__ || __.__ || __.__ || __.__ | ||
|- | |- | ||
| − | + | | ''Realistic'' || __.__ || __.__ || __.__ || __.__ || __.__ | |
|- | |- | ||
| − | ! | + | ! colspan="4" | Reloading rate (seconds) |
| − | |||
| − | |||
|- | |- | ||
| − | ! | + | ! colspan="1" style="width:4em" |Stock |
| − | + | ! colspan="1" style="width:4em" |Prior + Full crew | |
| + | ! colspan="1" style="width:4em" |Prior + Expert qualif. | ||
| + | ! colspan="1" style="width:4em" |Prior + Ace qualif. | ||
|- | |- | ||
| − | + | | 0.6 || __.__ || __.__ || __.__ | |
| − | | | ||
|- | |- | ||
|} | |} | ||
| − | ==== Ammunition ==== | + | ===== Ammunition ===== |
| − | + | {| class="wikitable sortable" style="text-align:center" width="100%" | |
| − | + | ! colspan="8" | Penetration statistics | |
| − | + | |- | |
| − | + | ! rowspan="2" data-sort-type="text" | Ammunition | |
| − | ''' | + | ! rowspan="2" class="unsortable" | Type of <br /> warhead |
| − | + | ! colspan="6" | '''Penetration''' '''''in mm''''' '''@ 90°''' | |
| − | ''' | ||
| − | |||
| − | |||
| − | |||
| − | |||
| − | |||
| − | |||
| − | |||
|- | |- | ||
| − | ! | + | ! 10m |
| − | ! | + | ! 100m |
| − | ! | + | ! 500m |
| − | ! | + | ! 1000m |
| − | ! | + | ! 1500m |
| − | ! | + | ! 2000m |
|- | |- | ||
| − | | | + | | 76/62 SAPOM || APHE || 60 || 58 || 50 || 45 || 35 || 30 |
|- | |- | ||
| + | | 76/62 APFSDS || APFSDS || 311 || 308 || 301 || 291 || 281 || 271 | ||
| + | |- | ||
| + | | 76/62 HE-MOM || HE-VT* || 13 || 13 || 13 || 13 || 13 || 13 | ||
| + | |- | ||
|} | |} | ||
| − | + | {| class="wikitable sortable" style="text-align:center" width="100%" | |
| − | === | + | ! colspan="11" | Shell details |
| − | + | |- | |
| − | + | ! rowspan="2" data-sort-type="text" | Ammunition | |
| − | + | ! rowspan="2" class="unsortable" | Type of <br /> warhead | |
| − | + | ! rowspan="2" |Velocity <br /> in m/s | |
| − | ! colspan=" | + | ! rowspan="2" |Projectile<br />Mass in kg |
| + | ! rowspan="2" | ''Fuse delay'' | ||
| + | ''in m:'' | ||
| + | ! rowspan="2" | ''Fuse sensitivity'' | ||
| + | ''in mm:'' | ||
| + | ! rowspan="2" | ''Explosive Mass in g<br /> (TNT equivalent):'' | ||
| + | ! rowspan="2" | ''Normalization At 30° <br> from horizontal:'' | ||
| + | ! colspan="3" | ''Ricochet:'' | ||
|- | |- | ||
| − | ! | + | ! 0% |
| − | ! | + | ! 50% |
| − | ! | + | ! 100% |
| − | |||
| − | |||
|- | |- | ||
| − | | 15 | + | | 76/62 SAPOM || APHE || 910 || 6.4 || 1.3 || 15 || 662.4 || ° || 47° || 60° || 65° |
|- | |- | ||
| − | + | | 76/62 APFSDS || APFSDS || 1580 || 2.2 || N/A || N/A || N/A || ° || 78° || 80° || 81° | |
| + | |- | ||
| + | | 76/62 HE-MOM || HE-VT* || 910 || 6.3 || 0.2 || 0.1 || 969.12 || +0° || 79° || 80° || 81° | ||
| + | |- | ||
| + | |} | ||
| + | |||
| + | ===== [[Ammo racks|Ammo racks]] ===== | ||
| + | {| class="wikitable sortable" style="text-align:center" | ||
|- | |- | ||
| − | ! | + | ! class="wikitable unsortable" |Full<br /> ammo |
| − | ! | + | ! class="wikitable unsortable" |1st<br /> rack empty |
| − | ! | + | ! class="wikitable unsortable" |2nd<br /> rack empty |
| − | ! | + | ! class="wikitable unsortable" |3rd<br /> rack empty |
| − | ! | + | ! class="wikitable unsortable" |4th<br /> rack empty |
| + | ! class="wikitable unsortable" |Visual<br /> discrepancy | ||
|- | |- | ||
| − | | | + | || '''90''' || XX ''(X+)'' || ''(+)'' || ''(+)'' || ''(+)'' || style="text-align:left" | no |
|- | |- | ||
|} | |} | ||
| − | == Usage in battles == | + | == Usage in the battles == |
| − | <!-- ''Describe the tactics of playing in the vehicle, the features of using vehicles in the team and advice on tactics. Refrain from creating a "guide" - do not impose a single point of view but | + | <!--''Describe the tactics of playing in the vehicle, the features of using vehicles in the team and advice on tactics. Refrain from creating a "guide" - do not impose a single point of view but give the reader food for thought. Describe the most dangerous enemies and give recommendations on fighting them. If necessary, note the specifics of the game in different modes (AB, RB, SB).''--> |
| − | + | This vehicle provides abundant play style depending on how players are comfortable using it. You can take full ammo of 90 rounds and hide in a re-spawn point or building as a conventional SPAA. It can do this job very well and you can also reduce ammunition load to join your first-line team suggest ammo distribution 12 APDSFS & 16 HE-VT &2 APHE shell) as supplementary firepower while intercepting aircraft. Finally, when centre on point, launch an offensive because you need APDSFS Supplement. | |
| − | |||
| − | |||
| − | |||
| − | |||
| − | |||
| − | |||
| − | |||
| − | |||
| − | |||
| − | |||
| − | |||
| − | |||
| − | |||
| − | |||
| − | |||
| − | |||
| − | |||
| − | |||
| − | |||
| − | |||
| − | |||
| − | |||
| − | |||
| − | |||
| − | |||
| − | |||
| − | |||
| − | |||
| − | |||
| − | |||
| − | |||
| − | |||
| − | |||
| − | |||
| − | |||
| − | |||
| − | |||
| − | |||
| − | |||
| − | |||
| − | |||
| − | |||
| − | |||
| − | |||
| − | |||
| − | |||
| − | |||
| − | |||
| − | |||
| − | |||
| − | |||
| − | |||
| − | + | OTOMATIC is proficient in street combat, the full-automatic gun allows you to ruin enemy troops in a very short time. | |
| − | |||
| − | |||
| − | |||
| − | |||
=== Pros and cons === | === Pros and cons === | ||
| − | <!-- '' | + | <!--''Summarize and briefly evaluate the vehicle in terms of its characteristics and combat effectiveness. Mark its pros and cons in a bulleted list. Do not use more than 6 points for each of the characteristics. Avoid using categorical definitions such as "bad", "good" and the like - they have a substitution in the form of softer "inadequate", "effective".''--> |
| − | |||
'''Pros:''' | '''Pros:''' | ||
| − | * Radar guidance system | + | * Radar guidance system. |
| − | * Equipped by default with HE-VT | + | * Equipped by default with HE-VT fuze shells capable of annihilating any aircraft in 1-3 shots with indirect hits. Direct hits usually destroy the aircraft. |
| − | * Excellent scoped zoom for an SPAA | + | * Excellent scoped zoom for an SPAA. |
| − | * Immense fire rate for the gun | + | * Immense fire rate for the gun caliber; 120 rpm for a 76mm gun. |
| − | * Two axis | + | * Two axis stabilizer. |
| − | * APFSDS can penetrate up to 311 mm, enough to | + | * APFSDS can penetrate up to 311 mm, enough to kill any top-tier MBT with a well-placed shot. |
| − | * Equipped with | + | * Equipped with APHE shells, capable of dealing with many light tanks and the XM-1. |
| − | * Capable of taking out long-range helicopters with | + | * Capable of taking out long-range helicopters, with shells that don't explode until about 4.6 km, allowing for shots well past the radar tracking range. |
| − | * The OF-40 chassis provides reasonable protection and mobility (especially compared to the M163 and ZSU-23-4) | + | * Doesn't hull break. |
| − | * Fantastic turret rotation and elevation speed | + | * The OF-40 chassis provides reasonable protection and mobility (especially compared to the M163 and ZSU-23-4). |
| − | + | * Fantastic turret rotation and elevation speed. | |
| − | |||
| − | |||
| − | |||
'''Cons:''' | '''Cons:''' | ||
| − | * Turret has immensely thin | + | * Turret has immensely thin armor, can be penetrated by other SPAA as well as secondary cannons from the MBT-70 or AMX-40. |
| − | * Several turret-mounted ammo racks that are almost impossible ''not'' to hit | + | * Several turret-mounted ammo racks that are almost impossible ''not'' to hit. |
| − | * APFSDS rounds are a tier | + | * APFSDS rounds are a tier 4 modification. |
| − | * APFSDS capacity limited to 12 rounds | + | * APFSDS capacity limited to 12 rounds. |
| − | * APFSDS has limited accuracy at range | + | * APFSDS is has limited accuracy at range. |
| − | * Massive profile, | + | * HE-VT has a max range about 4.6 km, shells will self destruct when fired past this distance. |
| − | * This vehicle's reputation precedes it | + | * Massive profile, very easy to spot and shoot. |
| − | * | + | * This vehicle's reputation precedes it. Enemies will show no mercy. |
| − | * | + | * APHE's penetration is abysmal, and 62mm consistently fails to penetrate the sides of Abrams or T-64s/T-72s/T-80s. |
| − | + | * Magazine capacity of 12 rounds. Every round must be individually loaded into the magazine, greatly increasing reload speed. | |
| − | + | * The gun doesn't elevate fully. | |
| − | * The gun | ||
| − | |||
| − | |||
| − | |||
== History == | == History == | ||
| − | + | ''Describe the history of the creation and combat usage of the ground vehicle in more detail than in the introduction. If the historical reference turns out to be too big, take it to a separate article, taking a link to an article about the vehicle and adding a block "/historical reference" (example: https://wiki.warthunder.com/Name-vehicles/historical reference) and add a link to it here using the <code>main</code> template. Be sure to include links to sources at the end of the article.'' | |
| − | |||
| − | |||
| − | |||
== Media == | == Media == | ||
| − | + | ''An excellent addition to the article will be video guides, as well as screenshots from the game and photos.'' | |
| − | |||
| − | |||
| − | |||
| − | |||
| − | |||
| − | |||
| − | |||
| − | |||
| − | |||
| − | |||
| − | |||
| − | |||
| − | |||
| − | |||
| − | + | == Read also == | |
| − | + | ''Links to the articles on the War Thunder Wiki that you think will be useful for the reader, for example,'' | |
| − | |||
| − | |||
* ''reference to the series of the vehicles;'' | * ''reference to the series of the vehicles;'' | ||
| − | * ''links to approximate analogues of other nations and research trees.'' | + | * ''links to approximate analogues of other nations and research trees.'' |
| − | + | ''ETC.'' | |
| − | + | == Sources == | |
| + | ''Paste links to sources and external resources, such as:'' | ||
| − | |||
| − | |||
* ''topic on the official game forum;'' | * ''topic on the official game forum;'' | ||
| − | * ''other literature.'' | + | * ''other literature.'' |
| − | |||
| − | |||
| − | |||
| − | |||
| − | |||
| − | |||
{{Italy anti-aircraft vehicles}} | {{Italy anti-aircraft vehicles}} | ||
Revision as of 02:48, 8 February 2019
Contents
Description
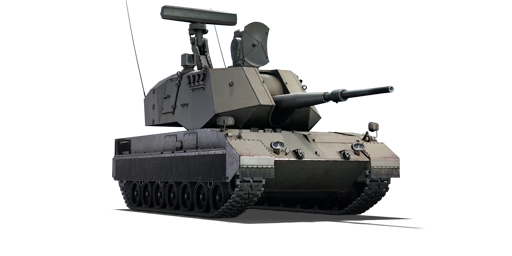
The OTO Main Anti-aircraft Tank for Intercept and Combat (shortened to OTOMATIC) is a Rank Italian self-propelled anti-aircraft gun with a battle rating of (AB), (RB), and (SB). This vehicle was introduced in Update 1.85 "Supersonic".
The OTOMATIC is a radar-equipped SPAAG that is capable of shooting proximity fuzed frag rounds, and can destroy planes even in a single, well-aimed shot; therefore, it should be used as such, at least until APFSDS rounds are unlocked, so staying in a cap zone is recommended, as the unit doesn't not carry a lot of ammo (90 shells for a cannon with a 0.5s reload). When APFSDS are available, the OTOMATIC may defend capture points against enemy tanks as well, while still dealing with aircraft, or it can switch to a more mobile, MBT-like playstyle, mostly thanks to the good penetration of the sabot rounds and the two-axis stabilizer.
General info
Survivability and armour
Armour type:
- Rolled homogeneous armour
- Structural steel (Radar equipment, Mud guards)
- Rubber-fabric screens
| Armour | Front (Slope angle) | Sides | Rear | Roof |
|---|---|---|---|---|
| Hull | 70 mm (59°), 35 mm (81°) Front glacis 50 mm (52°) Lower glacis 25 mm (81°), 50 mm (30-46°) Ammo stowage hatch |
25-35 mm Top 30 mm Bottom |
25 mm (1-40°) | 30 mm (89°) Front 15 mm (89°) Rear 5 mm Engine grille |
| Turret | 25 mm (25-45°) Turret front 25 mm (17-83°) Gun mantlet |
25 mm (0-11°) | 25 mm (1-10°) | 15 mm |
Mobility
| Mobility characteristic | ||
|---|---|---|
| Weight (tons) | Add-on Armor weight (tons) |
Max speed (km/h) |
| 46.0 | N/A | 71 (AB) |
| 65 (RB/SB) | ||
| Engine power (horsepower) | ||
| Mode | Stock | Upgraded |
| Arcade | 1,179 | ____ |
| Realistic/Simulator | 734 | ____ |
| Power-to-weight ratio (hp/ton) | ||
| Mode | Stock | Upgraded |
| Arcade | 25.63 | __.__ |
| Realistic/Simulator | 15.96 | __.__ |
Armaments
Main armament
| 76 mm OTO Breda Cannone da 76/62 | |||||
|---|---|---|---|---|---|
| Capacity | Vertical guidance |
Horizontal guidance |
Stabilizer | ||
| 90 | -5°/+60° | ±180° | Two-plane | ||
| Turret rotation speed (°/s) | |||||
| Mode | Stock | Upgraded | Prior + Full crew | Prior + Expert qualif. | Prior + Ace qualif. |
| Arcade | 23.8 | __.__ | __.__ | __.__ | __.__ |
| Realistic | __.__ | __.__ | __.__ | __.__ | __.__ |
| Reloading rate (seconds) | |||||
| Stock | Prior + Full crew | Prior + Expert qualif. | Prior + Ace qualif. | ||
| 0.6 | __.__ | __.__ | __.__ | ||
Ammunition
| Penetration statistics | |||||||
|---|---|---|---|---|---|---|---|
| Ammunition | Type of warhead |
Penetration in mm @ 90° | |||||
| 10m | 100m | 500m | 1000m | 1500m | 2000m | ||
| 76/62 SAPOM | APHE | 60 | 58 | 50 | 45 | 35 | 30 |
| 76/62 APFSDS | APFSDS | 311 | 308 | 301 | 291 | 281 | 271 |
| 76/62 HE-MOM | HE-VT* | 13 | 13 | 13 | 13 | 13 | 13 |
| Shell details | ||||||||||
|---|---|---|---|---|---|---|---|---|---|---|
| Ammunition | Type of warhead |
Velocity in m/s |
Projectile Mass in kg |
Fuse delay
in m: |
Fuse sensitivity
in mm: |
Explosive Mass in g (TNT equivalent): |
Normalization At 30° from horizontal: |
Ricochet: | ||
| 0% | 50% | 100% | ||||||||
| 76/62 SAPOM | APHE | 910 | 6.4 | 1.3 | 15 | 662.4 | ° | 47° | 60° | 65° |
| 76/62 APFSDS | APFSDS | 1580 | 2.2 | N/A | N/A | N/A | ° | 78° | 80° | 81° |
| 76/62 HE-MOM | HE-VT* | 910 | 6.3 | 0.2 | 0.1 | 969.12 | +0° | 79° | 80° | 81° |
Ammo racks
| Full ammo |
1st rack empty |
2nd rack empty |
3rd rack empty |
4th rack empty |
Visual discrepancy |
|---|---|---|---|---|---|
| 90 | XX (X+) | (+) | (+) | (+) | no |
Usage in the battles
This vehicle provides abundant play style depending on how players are comfortable using it. You can take full ammo of 90 rounds and hide in a re-spawn point or building as a conventional SPAA. It can do this job very well and you can also reduce ammunition load to join your first-line team suggest ammo distribution 12 APDSFS & 16 HE-VT &2 APHE shell) as supplementary firepower while intercepting aircraft. Finally, when centre on point, launch an offensive because you need APDSFS Supplement.
OTOMATIC is proficient in street combat, the full-automatic gun allows you to ruin enemy troops in a very short time.
Pros and cons
Pros:
- Radar guidance system.
- Equipped by default with HE-VT fuze shells capable of annihilating any aircraft in 1-3 shots with indirect hits. Direct hits usually destroy the aircraft.
- Excellent scoped zoom for an SPAA.
- Immense fire rate for the gun caliber; 120 rpm for a 76mm gun.
- Two axis stabilizer.
- APFSDS can penetrate up to 311 mm, enough to kill any top-tier MBT with a well-placed shot.
- Equipped with APHE shells, capable of dealing with many light tanks and the XM-1.
- Capable of taking out long-range helicopters, with shells that don't explode until about 4.6 km, allowing for shots well past the radar tracking range.
- Doesn't hull break.
- The OF-40 chassis provides reasonable protection and mobility (especially compared to the M163 and ZSU-23-4).
- Fantastic turret rotation and elevation speed.
Cons:
- Turret has immensely thin armor, can be penetrated by other SPAA as well as secondary cannons from the MBT-70 or AMX-40.
- Several turret-mounted ammo racks that are almost impossible not to hit.
- APFSDS rounds are a tier 4 modification.
- APFSDS capacity limited to 12 rounds.
- APFSDS is has limited accuracy at range.
- HE-VT has a max range about 4.6 km, shells will self destruct when fired past this distance.
- Massive profile, very easy to spot and shoot.
- This vehicle's reputation precedes it. Enemies will show no mercy.
- APHE's penetration is abysmal, and 62mm consistently fails to penetrate the sides of Abrams or T-64s/T-72s/T-80s.
- Magazine capacity of 12 rounds. Every round must be individually loaded into the magazine, greatly increasing reload speed.
- The gun doesn't elevate fully.
History
Describe the history of the creation and combat usage of the ground vehicle in more detail than in the introduction. If the historical reference turns out to be too big, take it to a separate article, taking a link to an article about the vehicle and adding a block "/historical reference" (example: https://wiki.warthunder.com/Name-vehicles/historical reference) and add a link to it here using the main template. Be sure to include links to sources at the end of the article.
Media
An excellent addition to the article will be video guides, as well as screenshots from the game and photos.
Read also
Links to the articles on the War Thunder Wiki that you think will be useful for the reader, for example,
- reference to the series of the vehicles;
- links to approximate analogues of other nations and research trees.
ETC.
Sources
Paste links to sources and external resources, such as:
- topic on the official game forum;
- other literature.
| Italy anti-aircraft vehicles | |
|---|---|
| R3 Capraia | R3 T20 FA-HS |
| SIDAM 25 | SIDAM 25 · SIDAM 25 (Mistral) |
| Wheeled | AS 42 · CM52 |
| Tracked | M42 Contraereo · Leopard 40/70 · OTOMATIC |
| Hungary | ◔ZSU-57-2 · ◔ZSU-23-4 |
