Difference between revisions of "Strv 105"
U101304893 (talk | contribs) m (add ERA info) |
(Added Pros and COns, penetration table, Usage in battles, and Shell characteristics.) (Tag: Visual edit) |
||
| (17 intermediate revisions by 8 users not shown) | |||
| Line 6: | Line 6: | ||
== Description == | == Description == | ||
<!-- ''In the description, the first part should be about the history of the creation and combat usage of the vehicle, as well as its key features. In the second part, tell the reader about the ground vehicle in the game. Insert a screenshot of the vehicle, so that if the novice player does not remember the vehicle by name, he will immediately understand what kind of vehicle the article is talking about.'' --> | <!-- ''In the description, the first part should be about the history of the creation and combat usage of the vehicle, as well as its key features. In the second part, tell the reader about the ground vehicle in the game. Insert a screenshot of the vehicle, so that if the novice player does not remember the vehicle by name, he will immediately understand what kind of vehicle the article is talking about.'' --> | ||
| − | The '''{{Specs|name}}''' | + | The '''{{Specs|name}}''' is a rank {{Specs|rank}} Swedish medium tank {{Battle-rating}}. It was introduced in [[Update "Wind of Change"]]. |
| − | |||
| − | |||
== General info == | == General info == | ||
| Line 14: | Line 12: | ||
{{Specs-Tank-Armour}} | {{Specs-Tank-Armour}} | ||
<!-- ''Describe armour protection. Note the most well protected and key weak areas. Appreciate the layout of modules as well as the number and location of crew members. Is the level of armour protection sufficient, is the placement of modules helpful for survival in combat? If necessary use a visual template to indicate the most secure and weak zones of the armour.'' --> | <!-- ''Describe armour protection. Note the most well protected and key weak areas. Appreciate the layout of modules as well as the number and location of crew members. Is the level of armour protection sufficient, is the placement of modules helpful for survival in combat? If necessary use a visual template to indicate the most secure and weak zones of the armour.'' --> | ||
| − | + | ''Describe armour protection. Note the most well protected and key weak areas. Appreciate the layout of modules as well as the number and location of crew members. Is the level of armour protection sufficient, is the placement of modules helpful for survival in combat? If necessary use a visual template to indicate the most secure and weak zones of the armour.'' | |
| − | '''Armour type:''' | + | '''Armour type:''' <!-- The types of armour present on the vehicle and their general locations --> |
| − | * Rolled homogeneous armour ( | + | <!-- Example: * Rolled homogeneous armour (Front, Side, Rear, Hull roof) |
| − | * Cast homogeneous armour ( | + | * Cast homogeneous armour (Turret, Transmission area) --> |
{| class="wikitable" | {| class="wikitable" | ||
| Line 24: | Line 22: | ||
! Armour !! Front (Slope angle) !! Sides !! Rear !! Roof | ! Armour !! Front (Slope angle) !! Sides !! Rear !! Roof | ||
|- | |- | ||
| − | | Hull || | + | | Hull || ___ mm || ___ mm ''Top'' <br> ___ mm ''Bottom'' || ___ mm || ___ - ___ mm |
|- | |- | ||
| − | | Turret || | + | | Turret || ___ - ___ mm ''Turret front'' <br> ___ mm ''Gun mantlet'' || ___ - ___ mm || ___ - ___ mm || ___ - ___ mm |
|- | |- | ||
| − | | Cupola || | + | | Cupola || ___ mm || ___ mm || ___ mm || ___ mm |
|- | |- | ||
|} | |} | ||
| − | + | '''Notes:''' <!-- Any additional notes which the user needs to be aware of --> | |
| − | + | <!-- Example: * Suspension wheels are 20 mm thick, tracks are 30 mm thick, and torsion bars are 60 mm thick. --> | |
| − | |||
| − | |||
| − | |||
| − | |||
| − | |||
| − | |||
| − | |||
| − | |||
| − | |||
| − | * Suspension wheels, tracks, and torsion bars are | ||
| − | |||
=== Mobility === | === Mobility === | ||
{{Specs-Tank-Mobility}} | {{Specs-Tank-Mobility}} | ||
<!-- ''Write about the mobility of the ground vehicle. Estimate the specific power and manoeuvrability, as well as the maximum speed forwards and backwards.'' --> | <!-- ''Write about the mobility of the ground vehicle. Estimate the specific power and manoeuvrability, as well as the maximum speed forwards and backwards.'' --> | ||
| + | ''Write about the mobility of the ground vehicle. Estimate the specific power and manoeuvrability, as well as the maximum speed forwards and backwards.'' | ||
| − | {{tankMobility | + | {{tankMobility}} |
=== Modifications and economy === | === Modifications and economy === | ||
| Line 61: | Line 49: | ||
<!-- ''Give the reader information about the characteristics of the main gun. Assess its effectiveness in a battle based on the reloading speed, ballistics and the power of shells. Do not forget about the flexibility of the fire, that is how quickly the cannon can be aimed at the target, open fire on it and aim at another enemy. Add a link to the main article on the gun: <code><nowiki>{{main|Name of the weapon}}</nowiki></code>. Describe in general terms the ammunition available for the main gun. Give advice on how to use them and how to fill the ammunition storage.'' --> | <!-- ''Give the reader information about the characteristics of the main gun. Assess its effectiveness in a battle based on the reloading speed, ballistics and the power of shells. Do not forget about the flexibility of the fire, that is how quickly the cannon can be aimed at the target, open fire on it and aim at another enemy. Add a link to the main article on the gun: <code><nowiki>{{main|Name of the weapon}}</nowiki></code>. Describe in general terms the ammunition available for the main gun. Give advice on how to use them and how to fill the ammunition storage.'' --> | ||
{{main|kan Strv 101 (105 mm)}} | {{main|kan Strv 101 (105 mm)}} | ||
| + | |||
| + | ''Give the reader information about the characteristics of the main gun. Assess its effectiveness in a battle based on the reloading speed, ballistics and the power of shells. Do not forget about the flexibility of the fire, that is how quickly the cannon can be aimed at the target, open fire on it and aim at another enemy. Add a link to the main article on the gun: <code><nowiki>{{main|Name of the weapon}}</nowiki></code>. Describe in general terms the ammunition available for the main gun. Give advice on how to use them and how to fill the ammunition storage.'' | ||
{| class="wikitable" style="text-align:center" width="100%" | {| class="wikitable" style="text-align:center" width="100%" | ||
| Line 71: | Line 61: | ||
|- | |- | ||
! ''Arcade'' | ! ''Arcade'' | ||
| − | | rowspan="2" | 48 || rowspan="2" | -10°/+15° || rowspan="2" | ±180° || rowspan="2" | Two-plane || | + | | rowspan="2" | 48 || rowspan="2" | -10°/+15° || rowspan="2" | ±180° || rowspan="2" | Two-plane || __._ || __._ || __._ || __._ || __._ || rowspan="2" | _.__ || rowspan="2" | _.__ || rowspan="2" | _.__ || rowspan="2" | _.__ |
|- | |- | ||
! ''Realistic'' | ! ''Realistic'' | ||
| − | | | + | | __._ || __._ || __._ || __._ || __._ |
|- | |- | ||
|} | |} | ||
==== Ammunition ==== | ==== Ammunition ==== | ||
| − | { | + | {| class="wikitable sortable" style="text-align:center" width="100%" |
| + | ! colspan="8" | Penetration statistics | ||
| + | |- | ||
| + | ! rowspan="2" data-sort-type="text" | Ammunition | ||
| + | ! rowspan="2" | Type of<br>warhead | ||
| + | ! colspan="6" | Penetration @ 0° Angle of Attack (mm) | ||
| + | |- | ||
| + | ! 10 m !! 100 m !! 500 m !! 1,000 m !! 1,500 m !! 2,000 m | ||
| + | |- | ||
| + | |slpprj m/80||APFSDS||337||335||330||322||314||306 | ||
| + | |- | ||
| + | | slsgr m/61A || HE ||23||23||23||23||23||23 | ||
| + | |- | ||
| + | | slspgr m/61 || HESH ||127||127||127||127||127||127 | ||
| + | |- | ||
| + | | slpprj m/90c || APFSDS ||436||434||426||416||406||396 | ||
| + | |- | ||
| + | |} | ||
| + | {| class="wikitable sortable" style="text-align:center" width="100%" | ||
| + | ! colspan="10" | Shell details | ||
| + | |- | ||
| + | ! rowspan="2" data-sort-type="text" | Ammunition | ||
| + | ! rowspan="2" | Type of<br>warhead | ||
| + | ! rowspan="2" | Velocity<br>(m/s) | ||
| + | ! rowspan="2" | Projectile<br>Mass (kg) | ||
| + | ! rowspan="2" | Fuse delay<br>(m) | ||
| + | ! rowspan="2" | Fuse sensitivity<br>(mm) | ||
| + | ! rowspan="2" | Explosive Mass<br>(TNT equivalent) (g) | ||
| + | ! colspan="3" | Ricochet | ||
| + | |- | ||
| + | ! 0% !! 50% !! 100% | ||
| + | |- | ||
| + | | slpprj m/80 || APFSDS ||1,455||3.79||N/A||N/A||N/A||78°||80°||81 | ||
| + | |- | ||
| + | | slsgr m/61A || HE ||650||15.5||0||0.1||1,830||79°||80°||81° | ||
| + | |- | ||
| + | | slspgr m/61 || HESH ||720||11.4||0.1||4||3,150||73°||77°||80° | ||
| + | |- | ||
| + | | slpprj m/90c || APFSDS ||1,455||4.3||N/A||N/A||N/A||78°||80°||81° | ||
| + | |- | ||
| + | |} | ||
| + | {| class="wikitable" style="text-align:center" | ||
| + | ! colspan="7" | Smoke shell characteristics | ||
| + | |- | ||
| + | ! Ammunition | ||
| + | ! Velocity<br>(m/s) | ||
| + | ! Projectile<br>Mass (kg) | ||
| + | ! Screen radius<br>(m) | ||
| + | ! Screen deploy time<br>(s) | ||
| + | ! Screen hold time<br>(s) | ||
| + | ! Explosive Mass<br>(TNT equivalent) (g) | ||
| + | |- | ||
| + | | rökgr m/61 || ___ || ____ || __ || __ || __ || ___ | ||
| + | |- | ||
| + | |} | ||
==== [[Ammo racks]] ==== | ==== [[Ammo racks]] ==== | ||
| Line 101: | Line 145: | ||
=== Machine guns === | === Machine guns === | ||
{{Specs-Tank-Weapon|2}} | {{Specs-Tank-Weapon|2}} | ||
| − | |||
<!-- ''Offensive and anti-aircraft machine guns not only allow you to fight some aircraft but also are effective against lightly armoured vehicles. Evaluate machine guns and give recommendations on its use.'' --> | <!-- ''Offensive and anti-aircraft machine guns not only allow you to fight some aircraft but also are effective against lightly armoured vehicles. Evaluate machine guns and give recommendations on its use.'' --> | ||
{{main|ksp 39 C (7.62 mm)}} | {{main|ksp 39 C (7.62 mm)}} | ||
| + | |||
| + | ''Offensive and anti-aircraft machine guns not only allow you to fight some aircraft but also are effective against lightly armoured vehicles. Evaluate machine guns and give recommendations on its use.'' | ||
{| class="wikitable" style="text-align:center" width="50%" | {| class="wikitable" style="text-align:center" width="50%" | ||
| Line 111: | Line 156: | ||
! Mount !! Capacity (Belt) !! Fire rate !! Vertical !! Horizontal | ! Mount !! Capacity (Belt) !! Fire rate !! Vertical !! Horizontal | ||
|- | |- | ||
| − | | | + | | || ___ (___) || ___ || __° || __° |
|- | |- | ||
| − | | | + | | || ___ (___) || ___ || __° || __° |
|- | |- | ||
|} | |} | ||
| Line 119: | Line 164: | ||
== Usage in battles == | == Usage in battles == | ||
<!-- ''Describe the tactics of playing in the vehicle, the features of using vehicles in the team and advice on tactics. Refrain from creating a "guide" - do not impose a single point of view but instead give the reader food for thought. Describe the most dangerous enemies and give recommendations on fighting them. If necessary, note the specifics of the game in different modes (AB, RB, SB).'' --> | <!-- ''Describe the tactics of playing in the vehicle, the features of using vehicles in the team and advice on tactics. Refrain from creating a "guide" - do not impose a single point of view but instead give the reader food for thought. Describe the most dangerous enemies and give recommendations on fighting them. If necessary, note the specifics of the game in different modes (AB, RB, SB).'' --> | ||
| − | The Strv 105 is an upgraded variant | + | The Strv 105 is an upgraded variant the [[Strv 104]], based off the [[Centurion Mk 10]]. With the new upgrades it has such as thermal imagine and m/90C APFSDS, you can defeat the toughest of MBTs and including some generation 3 MBTs, such as the [[Leopard 2A4]], [[M1 Abrams]] and [[T-72 (Family)|T-72]]/[[T-80 (Family)|T-80s]]. It is best to snipe from a position where the enemy can't see you as m/90c has enough penetration over range to penetrate enemies from a distance, as your armor isn't really strong against other opponents. While you do have an upgraded engine, you're still a bit sluggish than most of your NATO counterpart and vehicles such as the [[XM-803]] or [[Leopard 1A5]] can beat you in mobility terms. It's best to try to stay cover to cover when moving. Defeating generation 3 Main Battle Tanks in uptiers can be done but due to their mobility and gun handling control being more advanced, they will have a better reaction time than you. A few tanks should be taken into account though. |
| − | |||
| − | It is best to snipe from a position where the enemy can't see you | ||
| − | + | [[T-72B|T-72B,]] [[T-72B (1989)]]: These Soviet MBTs have their armor increased on the frontal hull and with the 1989 variant featuring Konkakt-5, it will be impossible to kill them from the front except for a few weakspots. It's best to aim for the lower front plate and the driver port. | |
| − | + | [[Challenger Mk.2]]/[[Challenger Mk.3]]: The turret of these British tanks will be nearly impossible to penetrate at range, and how the composite plates are angled. The lower hull can be penetrated though, especially around the driver port or the lower front plate. | |
| − | |||
=== Pros and cons === | === Pros and cons === | ||
| − | <!-- ''Summarise and briefly evaluate the vehicle in terms of its characteristics and combat effectiveness. Mark its pros and cons in a bulleted list. Try not to use more than 6 points for each of the characteristics. Avoid using categorical definitions such as "bad", "good" and the like - use substitutions with softer forms such as "inadequate" and "effective".'' --> | + | <!-- ''Summarise and briefly evaluate the vehicle in terms of its characteristics and combat effectiveness. Mark its pros and cons in a bulleted list. Try not to use more than 6 points for each of the characteristics. Avoid using categorical definitions such as "bad", "good" and the like - use substitutions with softer forms such as "inadequate" and "effective".'' -->'''Pros:''' |
| − | + | * Access to m/90c (DM63) with more than enough penetration. | |
| + | * Thermal Imaging sight. | ||
| + | * Better engine than its previous variant. | ||
| + | * ERA stops most HEAT-FS. | ||
| + | * Stock APFSDS | ||
| − | * | + | * |
| − | |||
| − | |||
| − | |||
| − | |||
| − | |||
| − | |||
'''Cons:''' | '''Cons:''' | ||
| − | * Mobility is subpar compared to other | + | * Mobility is subpar compared to other counterparts. |
| − | * Weak | + | * Weak armor against most APDS/APFSDS, even from Soviet APHE |
| − | * | + | * Vehicle lineup is subpar, often uptiering 8.3 vehicles. |
| − | * | + | * Generation 3 MBTs may be difficult to deal with in uptiers. |
| + | |||
| + | * | ||
== History == | == History == | ||
| Line 154: | Line 196: | ||
== Media == | == Media == | ||
<!-- ''Excellent additions to the article would be video guides, screenshots from the game, and photos.'' --> | <!-- ''Excellent additions to the article would be video guides, screenshots from the game, and photos.'' --> | ||
| − | + | ''Excellent additions to the article would be video guides, screenshots from the game, and photos.'' | |
| − | |||
| − | |||
| − | |||
== See also == | == See also == | ||
| Line 180: | Line 219: | ||
* ''other literature.'' | * ''other literature.'' | ||
| − | |||
{{Sweden medium tanks}} | {{Sweden medium tanks}} | ||
Revision as of 14:46, 31 March 2022

Contents
Description
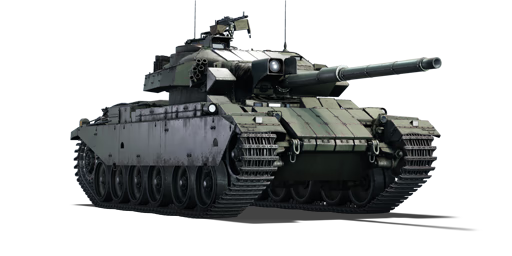
The Stridsvagn 105 is a rank Swedish medium tank with a battle rating of (AB), (RB), and (SB). It was introduced in Update "Wind of Change".
General info
Survivability and armour
Describe armour protection. Note the most well protected and key weak areas. Appreciate the layout of modules as well as the number and location of crew members. Is the level of armour protection sufficient, is the placement of modules helpful for survival in combat? If necessary use a visual template to indicate the most secure and weak zones of the armour.
Armour type:
| Armour | Front (Slope angle) | Sides | Rear | Roof |
|---|---|---|---|---|
| Hull | ___ mm | ___ mm Top ___ mm Bottom |
___ mm | ___ - ___ mm |
| Turret | ___ - ___ mm Turret front ___ mm Gun mantlet |
___ - ___ mm | ___ - ___ mm | ___ - ___ mm |
| Cupola | ___ mm | ___ mm | ___ mm | ___ mm |
Notes:
Mobility
Write about the mobility of the ground vehicle. Estimate the specific power and manoeuvrability, as well as the maximum speed forwards and backwards.
| Game Mode | Max Speed (km/h) | Weight (tons) | Engine power (horsepower) | Power-to-weight ratio (hp/ton) | |||
|---|---|---|---|---|---|---|---|
| Forward | Reverse | Stock | Upgraded | Stock | Upgraded | ||
| Arcade | Expression error: Unexpected * operator. | _,___ | __.__ | __.__ | |||
| Realistic | _,___ | __.__ | __.__ | ||||
Modifications and economy
Armaments
Main armament
Give the reader information about the characteristics of the main gun. Assess its effectiveness in a battle based on the reloading speed, ballistics and the power of shells. Do not forget about the flexibility of the fire, that is how quickly the cannon can be aimed at the target, open fire on it and aim at another enemy. Add a link to the main article on the gun: {{main|Name of the weapon}}. Describe in general terms the ammunition available for the main gun. Give advice on how to use them and how to fill the ammunition storage.
| 105 mm kan Strv 101 | Turret rotation speed (°/s) | Reloading rate (seconds) | |||||||||||
|---|---|---|---|---|---|---|---|---|---|---|---|---|---|
| Mode | Capacity | Vertical | Horizontal | Stabilizer | Stock | Upgraded | Full | Expert | Aced | Stock | Full | Expert | Aced |
| Arcade | 48 | -10°/+15° | ±180° | Two-plane | __._ | __._ | __._ | __._ | __._ | _.__ | _.__ | _.__ | _.__ |
| Realistic | __._ | __._ | __._ | __._ | __._ | ||||||||
Ammunition
| Penetration statistics | |||||||
|---|---|---|---|---|---|---|---|
| Ammunition | Type of warhead |
Penetration @ 0° Angle of Attack (mm) | |||||
| 10 m | 100 m | 500 m | 1,000 m | 1,500 m | 2,000 m | ||
| slpprj m/80 | APFSDS | 337 | 335 | 330 | 322 | 314 | 306 |
| slsgr m/61A | HE | 23 | 23 | 23 | 23 | 23 | 23 |
| slspgr m/61 | HESH | 127 | 127 | 127 | 127 | 127 | 127 |
| slpprj m/90c | APFSDS | 436 | 434 | 426 | 416 | 406 | 396 |
| Shell details | |||||||||
|---|---|---|---|---|---|---|---|---|---|
| Ammunition | Type of warhead |
Velocity (m/s) |
Projectile Mass (kg) |
Fuse delay (m) |
Fuse sensitivity (mm) |
Explosive Mass (TNT equivalent) (g) |
Ricochet | ||
| 0% | 50% | 100% | |||||||
| slpprj m/80 | APFSDS | 1,455 | 3.79 | N/A | N/A | N/A | 78° | 80° | 81 |
| slsgr m/61A | HE | 650 | 15.5 | 0 | 0.1 | 1,830 | 79° | 80° | 81° |
| slspgr m/61 | HESH | 720 | 11.4 | 0.1 | 4 | 3,150 | 73° | 77° | 80° |
| slpprj m/90c | APFSDS | 1,455 | 4.3 | N/A | N/A | N/A | 78° | 80° | 81° |
| Smoke shell characteristics | ||||||
|---|---|---|---|---|---|---|
| Ammunition | Velocity (m/s) |
Projectile Mass (kg) |
Screen radius (m) |
Screen deploy time (s) |
Screen hold time (s) |
Explosive Mass (TNT equivalent) (g) |
| rökgr m/61 | ___ | ____ | __ | __ | __ | ___ |
Ammo racks
| Full ammo |
1st rack empty |
2nd rack empty |
3rd rack empty |
4th rack empty |
5th rack empty |
6th rack empty |
Visual discrepancy |
|---|---|---|---|---|---|---|---|
| 48 | __ (+__) | __ (+__) | __ (+__) | __ (+__) | __ (+__) | __ (+__) | __ |
Machine guns
Offensive and anti-aircraft machine guns not only allow you to fight some aircraft but also are effective against lightly armoured vehicles. Evaluate machine guns and give recommendations on its use.
| 7.62 mm ksp 39 C | ||||
|---|---|---|---|---|
| Mount | Capacity (Belt) | Fire rate | Vertical | Horizontal |
| ___ (___) | ___ | __° | __° | |
| ___ (___) | ___ | __° | __° | |
Usage in battles
The Strv 105 is an upgraded variant the Strv 104, based off the Centurion Mk 10. With the new upgrades it has such as thermal imagine and m/90C APFSDS, you can defeat the toughest of MBTs and including some generation 3 MBTs, such as the Leopard 2A4, M1 Abrams and T-72/T-80s. It is best to snipe from a position where the enemy can't see you as m/90c has enough penetration over range to penetrate enemies from a distance, as your armor isn't really strong against other opponents. While you do have an upgraded engine, you're still a bit sluggish than most of your NATO counterpart and vehicles such as the XM-803 or Leopard 1A5 can beat you in mobility terms. It's best to try to stay cover to cover when moving. Defeating generation 3 Main Battle Tanks in uptiers can be done but due to their mobility and gun handling control being more advanced, they will have a better reaction time than you. A few tanks should be taken into account though.
T-72B, T-72B (1989): These Soviet MBTs have their armor increased on the frontal hull and with the 1989 variant featuring Konkakt-5, it will be impossible to kill them from the front except for a few weakspots. It's best to aim for the lower front plate and the driver port.
Challenger Mk.2/Challenger Mk.3: The turret of these British tanks will be nearly impossible to penetrate at range, and how the composite plates are angled. The lower hull can be penetrated though, especially around the driver port or the lower front plate.
Pros and cons
Pros:
- Access to m/90c (DM63) with more than enough penetration.
- Thermal Imaging sight.
- Better engine than its previous variant.
- ERA stops most HEAT-FS.
- Stock APFSDS
Cons:
- Mobility is subpar compared to other counterparts.
- Weak armor against most APDS/APFSDS, even from Soviet APHE
- Vehicle lineup is subpar, often uptiering 8.3 vehicles.
- Generation 3 MBTs may be difficult to deal with in uptiers.
History
Describe the history of the creation and combat usage of the vehicle in more detail than in the introduction. If the historical reference turns out to be too long, take it to a separate article, taking a link to the article about the vehicle and adding a block "/History" (example: https://wiki.warthunder.com/(Vehicle-name)/History) and add a link to it here using the main template. Be sure to reference text and sources by using <ref></ref>, as well as adding them at the end of the article with <references />. This section may also include the vehicle's dev blog entry (if applicable) and the in-game encyclopedia description (under === In-game description ===, also if applicable).
Media
Excellent additions to the article would be video guides, screenshots from the game, and photos.
See also
- Related Development
External links
Paste links to sources and external resources, such as:
- topic on the official game forum;
- other literature.
| Sweden medium tanks | |
|---|---|
| Strv m/42 | Lago I · Strv m/42 EH · Ikv 73 · Strv m/42 DT · Pvkv IV |
| Centurion derivatives | Strv 81 · Strv 81 (RB 52) · Strv 101 · Strv 104 · Strv 105 |
| Strv 103 | Strv 103-0 · Strv 103A · Strv 103С |
| Strv 121/122 | Strv 121 · Christian II · Strv 122A · Strv 122B PLSS · Strv 122B+ |
| Other | Sherman III/IV · T 80 U |
| Finland | |
| WWII | ▄T-28 · ▄T-34 · ▄Pz.IV · ▄T-34-85 |
| Post War | ▄Comet I · ▄Charioteer Mk VII · ▄T-54 · ▄T-55M · ▄T-72M1 · ▄Leopard 2A4 · ▄Leopard 2A6 |
| Norway | Leopard 1A5NO2 |
