Difference between revisions of "Ystervark"
m (add engine power) (Tag: Visual edit) |
(Edits) |
||
| Line 36: | Line 36: | ||
{{Specs-Tank-Mobility}} | {{Specs-Tank-Mobility}} | ||
<!-- ''Write about the mobility of the ground vehicle. Estimate the specific power and manoeuvrability, as well as the maximum speed forwards and backwards.'' --> | <!-- ''Write about the mobility of the ground vehicle. Estimate the specific power and manoeuvrability, as well as the maximum speed forwards and backwards.'' --> | ||
| − | |||
{{tankMobility|abMinHp=176|rbMinHp=110}} | {{tankMobility|abMinHp=176|rbMinHp=110}} | ||
| Line 49: | Line 48: | ||
<!-- ''Give the reader information about the characteristics of the main gun. Assess its effectiveness in a battle based on the reloading speed, ballistics and the power of shells. Do not forget about the flexibility of the fire, that is how quickly the cannon can be aimed at the target, open fire on it and aim at another enemy. Add a link to the main article on the gun: <code><nowiki>{{main|Name of the weapon}}</nowiki></code>. Describe in general terms the ammunition available for the main gun. Give advice on how to use them and how to fill the ammunition storage.'' --> | <!-- ''Give the reader information about the characteristics of the main gun. Assess its effectiveness in a battle based on the reloading speed, ballistics and the power of shells. Do not forget about the flexibility of the fire, that is how quickly the cannon can be aimed at the target, open fire on it and aim at another enemy. Add a link to the main article on the gun: <code><nowiki>{{main|Name of the weapon}}</nowiki></code>. Describe in general terms the ammunition available for the main gun. Give advice on how to use them and how to fill the ammunition storage.'' --> | ||
{{main|GAI C01 (20 mm)}} | {{main|GAI C01 (20 mm)}} | ||
| − | |||
| − | |||
{| class="wikitable" style="text-align:center" width="100%" | {| class="wikitable" style="text-align:center" width="100%" | ||
| Line 61: | Line 58: | ||
|- | |- | ||
! ''Arcade'' | ! ''Arcade'' | ||
| − | | rowspan="2" | 600 (75) || rowspan="2" | 996 || rowspan="2" | -7°/+83° || rowspan="2" | ±180° || rowspan="2" | N/A || | + | | rowspan="2" | 600 (75) || rowspan="2" | 996 || rowspan="2" | -7°/+83° || rowspan="2" | ±180° || rowspan="2" | N/A || 39.6 || 54.8 || 66.6 || 73.6 || 78.4 || rowspan="2" | 9.10 || rowspan="2" | 8.05 || rowspan="2" | 7.42 || rowspan="2" | 7.00 |
|- | |- | ||
! ''Realistic'' | ! ''Realistic'' | ||
| − | | | + | | 26.8 || 31.5 || 38.3 || 42.3 || 45.0 |
|- | |- | ||
|} | |} | ||
==== Ammunition ==== | ==== Ammunition ==== | ||
| − | |||
* '''Default:''' {{Annotation|HVAP-T|High-velocity armour-piercing tracer}}{{-}}{{Annotation|HEF-I|High-explosive fragmentation incendiary}} | * '''Default:''' {{Annotation|HVAP-T|High-velocity armour-piercing tracer}}{{-}}{{Annotation|HEF-I|High-explosive fragmentation incendiary}} | ||
* '''M594:''' {{Annotation|HEF-I|High-explosive fragmentation incendiary}}{{-}}{{Annotation|HEF-I|High-explosive fragmentation incendiary}}{{-}}{{Annotation|HVAP-T|High-velocity armour-piercing tracer}} | * '''M594:''' {{Annotation|HEF-I|High-explosive fragmentation incendiary}}{{-}}{{Annotation|HEF-I|High-explosive fragmentation incendiary}}{{-}}{{Annotation|HVAP-T|High-velocity armour-piercing tracer}} | ||
| Line 82: | Line 78: | ||
! 10 m !! 100 m !! 500 m !! 1,000 m !! 1,500 m !! 2,000 m | ! 10 m !! 100 m !! 500 m !! 1,000 m !! 1,500 m !! 2,000 m | ||
|- | |- | ||
| − | | Default ||57||52||37||24||15||10 | + | | Default || 57 || 52 || 37 || 24 || 15 || 10 |
|- | |- | ||
| − | | M594 ||57||52||37||24||15||10 | + | | M594 || 57 || 52 || 37 || 24 || 15 || 10 |
|- | |- | ||
| − | | M601 ||57||52||37||24||15||10 | + | | M601 || 57 || 52 || 37 || 24 || 15 || 10 |
|- | |- | ||
|} | |} | ||
| − | + | {| class="wikitable sortable" style="text-align:center" width="100%" | |
| − | {| class="wikitable sortable | + | ! colspan="10" | Shell details |
| − | ! colspan="10" | | ||
|- | |- | ||
| − | ! rowspan="2" data-sort-type="text" | | + | ! rowspan="2" data-sort-type="text" | Ammunition |
| − | ! rowspan="2" |Type of | + | ! rowspan="2" | Type of<br>warhead |
| − | warhead | + | ! rowspan="2" | Velocity<br>(m/s) |
| − | ! rowspan="2" |Velocity | + | ! rowspan="2" | Projectile<br>Mass (kg) |
| − | (m/s) | + | ! rowspan="2" | Fuse delay<br>(m) |
| − | ! rowspan="2" |Projectile | + | ! rowspan="2" | Fuse sensitivity<br>(mm) |
| − | Mass (kg) | + | ! rowspan="2" | Explosive Mass<br>(TNT equivalent) (g) |
| − | ! rowspan="2" |Fuse delay | + | ! colspan="3" | Ricochet |
| − | (m) | ||
| − | ! rowspan="2" |Fuse sensitivity | ||
| − | (mm) | ||
| − | ! rowspan="2" |Explosive Mass | ||
| − | (TNT equivalent) (g) | ||
| − | ! colspan="3" |Ricochet | ||
|- | |- | ||
| − | !0%!!50%!!100% | + | ! 0% !! 50% !! 100% |
|- | |- | ||
| − | | | + | | 20 mm M601 || HVAP-T || 1,100 || 0.11 || N/A || N/A || N/A || 66° || 77° || 72° |
| − | | | ||
|- | |- | ||
| − | | | + | | 20 mm M594 || HEF-I || 1,054 || 0.12 || 0 || 0.1 || 27.2 || N/A || N/A || N/A |
| − | | | ||
| − | |0. | ||
| − | |N/A | ||
| − | |N/A | ||
| − | |N/A | ||
| − | |||
| − | |||
| − | |||
|- | |- | ||
| − | |||
| − | |||
| − | |||
| − | |||
| − | |||
| − | |||
| − | |||
| − | |||
| − | |||
| − | |||
| − | |||
| − | |||
| − | |||
| − | |||
| − | |||
| − | |||
| − | |||
| − | |||
| − | |||
| − | |||
|} | |} | ||
| + | |||
==== [[Ammo racks]] ==== | ==== [[Ammo racks]] ==== | ||
[[File:Ammoracks_{{PAGENAME}}.png|right|thumb|x250px|[[Ammo racks]] of the {{PAGENAME}}]] | [[File:Ammoracks_{{PAGENAME}}.png|right|thumb|x250px|[[Ammo racks]] of the {{PAGENAME}}]] | ||
| Line 199: | Line 160: | ||
== History == | == History == | ||
<!-- ''Describe the history of the creation and combat usage of the vehicle in more detail than in the introduction. If the historical reference turns out to be too long, take it to a separate article, taking a link to the article about the vehicle and adding a block "/History" (example: <nowiki>https://wiki.warthunder.com/(Vehicle-name)/History</nowiki>) and add a link to it here using the <code>main</code> template. Be sure to reference text and sources by using <code><nowiki><ref></ref></nowiki></code>, as well as adding them at the end of the article with <code><nowiki><references /></nowiki></code>. This section may also include the vehicle's dev blog entry (if applicable) and the in-game encyclopedia description (under <code><nowiki>=== In-game description ===</nowiki></code>, also if applicable).'' --> | <!-- ''Describe the history of the creation and combat usage of the vehicle in more detail than in the introduction. If the historical reference turns out to be too long, take it to a separate article, taking a link to the article about the vehicle and adding a block "/History" (example: <nowiki>https://wiki.warthunder.com/(Vehicle-name)/History</nowiki>) and add a link to it here using the <code>main</code> template. Be sure to reference text and sources by using <code><nowiki><ref></ref></nowiki></code>, as well as adding them at the end of the article with <code><nowiki><references /></nowiki></code>. This section may also include the vehicle's dev blog entry (if applicable) and the in-game encyclopedia description (under <code><nowiki>=== In-game description ===</nowiki></code>, also if applicable).'' --> | ||
| − | Up until the early | + | Up until the early 1980s, the SADF anti-air regiments were reliant on towed equipment. However, as the military doctrine shifted towards mobile warfare, the need for a self-propelled anti-air gun unit became clear. As a result, South African engineers began working on a respective design, which had to be rugged enough to withstand the harsh South African terrain and threat of landmines, yet light enough to ensure a high level of mobility. |
Building on the basis of a previous mine-resistant vehicle project, the engineers came up with a light SPAAG design, built on top of the Bulldog APC chassis between 1983 and 1984. Entering service almost immediately, the Ystervark was used to accompany South African mechanized battalions and to protect strategic assets, such as air bases in the southwest African region. Ystervarks were first employed operationally during Operation Thunder Chariot in 1984 - a division -scale exercise in South Africa during which the Ystervarks were first tested. | Building on the basis of a previous mine-resistant vehicle project, the engineers came up with a light SPAAG design, built on top of the Bulldog APC chassis between 1983 and 1984. Entering service almost immediately, the Ystervark was used to accompany South African mechanized battalions and to protect strategic assets, such as air bases in the southwest African region. Ystervarks were first employed operationally during Operation Thunder Chariot in 1984 - a division -scale exercise in South Africa during which the Ystervarks were first tested. | ||
| − | However, the Ystervarks didn’t have to wait long for their first combat deployment. Taking part in several operations in the ongoing South African Border War from 1986, Ystervarks were used to great success as deterrents to low-flying Angolan attack aircraft and helicopters, even downing several Angolan | + | However, the Ystervarks didn’t have to wait long for their first combat deployment. Taking part in several operations in the ongoing South African Border War from 1986, Ystervarks were used to great success as deterrents to low-flying Angolan attack aircraft and helicopters, even downing several Angolan MiGs in 1986 and 1987. After the conclusion of the Border War in 1989, the Ystervark was gradually being phased out of service in 1991 and replaced by the SAMIL 100 Kwêvoël mine-protected SPAAG armoured truck called the Bosvark. Officially, the Ystervark was withdrawn from active service in 1997 after more than 70 units were produced. |
''- From [[wt:en/news/7390-development-ystervark-the-little-truck-that-could-en|Devblog]]'' | ''- From [[wt:en/news/7390-development-ystervark-the-little-truck-that-could-en|Devblog]]'' | ||
Revision as of 14:49, 2 November 2021

Contents
Description
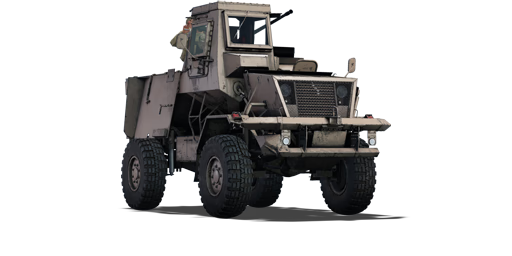
The Ystervark is a rank British SPAA with a battle rating of (AB), (RB), and (SB). It was introduced in Update "Ground Breaking".
General info
Survivability and armour
Describe armour protection. Note the most well protected and key weak areas. Appreciate the layout of modules as well as the number and location of crew members. Is the level of armour protection sufficient, is the placement of modules helpful for survival in combat? If necessary use a visual template to indicate the most secure and weak zones of the armour.
Armour type:
| Armour | Front (Slope angle) | Sides | Rear | Roof |
|---|---|---|---|---|
| Hull | ___ mm | ___ mm Top ___ mm Bottom |
___ mm | ___ - ___ mm |
| Turret | ___ - ___ mm Turret front ___ mm Gun mantlet |
___ - ___ mm | ___ - ___ mm | ___ - ___ mm |
| Cupola | ___ mm | ___ mm | ___ mm | ___ mm |
Notes:
Mobility
| Game Mode | Max Speed (km/h) | Weight (tons) | Engine power (horsepower) | Power-to-weight ratio (hp/ton) | |||
|---|---|---|---|---|---|---|---|
| Forward | Reverse | Stock | Upgraded | Stock | Upgraded | ||
| Arcade | Expression error: Unexpected * operator. | 176 | Expression error: Unexpected round operator. | __.__ | |||
| Realistic | 110 | Expression error: Unexpected round operator. | __.__ | ||||
Modifications and economy
Armaments
Main armament
| 20 mm GAI C01 | Turret rotation speed (°/s) | Reloading rate (seconds) | ||||||||||||
|---|---|---|---|---|---|---|---|---|---|---|---|---|---|---|
| Mode | Capacity (Belt) | Fire rate | Vertical | Horizontal | Stabilizer | Stock | Upgraded | Full | Expert | Aced | Stock | Full | Expert | Aced |
| Arcade | 600 (75) | 996 | -7°/+83° | ±180° | N/A | 39.6 | 54.8 | 66.6 | 73.6 | 78.4 | 9.10 | 8.05 | 7.42 | 7.00 |
| Realistic | 26.8 | 31.5 | 38.3 | 42.3 | 45.0 | |||||||||
Ammunition
- Default: HVAP-T · HEF-I
- M594: HEF-I · HEF-I · HVAP-T
- M601: HVAP-T · HVAP-T · HEF-I
| Penetration statistics | ||||||
|---|---|---|---|---|---|---|
| Belt | Penetration @ 0° Angle of Attack (mm) | |||||
| 10 m | 100 m | 500 m | 1,000 m | 1,500 m | 2,000 m | |
| Default | 57 | 52 | 37 | 24 | 15 | 10 |
| M594 | 57 | 52 | 37 | 24 | 15 | 10 |
| M601 | 57 | 52 | 37 | 24 | 15 | 10 |
| Shell details | |||||||||
|---|---|---|---|---|---|---|---|---|---|
| Ammunition | Type of warhead |
Velocity (m/s) |
Projectile Mass (kg) |
Fuse delay (m) |
Fuse sensitivity (mm) |
Explosive Mass (TNT equivalent) (g) |
Ricochet | ||
| 0% | 50% | 100% | |||||||
| 20 mm M601 | HVAP-T | 1,100 | 0.11 | N/A | N/A | N/A | 66° | 77° | 72° |
| 20 mm M594 | HEF-I | 1,054 | 0.12 | 0 | 0.1 | 27.2 | N/A | N/A | N/A |
Ammo racks

| Full ammo |
Ammo type |
1st rack empty |
2nd rack empty |
3rd rack empty |
4th rack empty |
|---|---|---|---|---|---|
| 8 600 |
Magazines Rounds |
7 (+1) 525 (+75) |
6 (+2) 450 (+150) |
5 (+3) 375 (+225) |
4 (+4) 300 (+300) |
| 5th rack empty |
6th rack empty |
7th rack empty |
8th rack empty |
Visual discrepancy |
|
| 3 (+5) 225 (+375) |
2 (+6) 150 (+450) |
1 (+7) 75 (+525) |
0 (+8) 0 (+600) |
No |
Note:
- Ammunition is divided into 8 magazines of 75 rounds.
Usage in battles
Describe the tactics of playing in the vehicle, the features of using vehicles in the team and advice on tactics. Refrain from creating a "guide" - do not impose a single point of view but instead give the reader food for thought. Describe the most dangerous enemies and give recommendations on fighting them. If necessary, note the specifics of the game in different modes (AB, RB, SB).
Pros and cons
Pros:
- Fast 900+ rounds/min firerate allows it easily score hits with a burst on an aircraft's flight path
- Small profile makes it very easy to conceal itself
- High top speed of 90 km/h means great agility
- Lack of armour means conventional cannons will struggle to one-shot it if poorly aimed
- 75-round belt allows it to confidentally engage targets without worrying too much about reloading
Cons:
- The driving compartment can obstruct the autocannon's gun depression which might be sometimes fatal
- No armour protection, making it highly vulnerable to MG bullets, shrapnel, and even ramming from tanks and aircraft
- Is wheeled, meaning its mobility will be significantly worsened on bad road conditions
- Reverse speed of -13 km/h can be inadequate, especially when comparing to its counterpart R3 T20
- Gunsight is position far above the gun, which can be awkward to aim in simulator
- Complex appearance can make it hard to place bushes, decorators, and decals
History
Up until the early 1980s, the SADF anti-air regiments were reliant on towed equipment. However, as the military doctrine shifted towards mobile warfare, the need for a self-propelled anti-air gun unit became clear. As a result, South African engineers began working on a respective design, which had to be rugged enough to withstand the harsh South African terrain and threat of landmines, yet light enough to ensure a high level of mobility.
Building on the basis of a previous mine-resistant vehicle project, the engineers came up with a light SPAAG design, built on top of the Bulldog APC chassis between 1983 and 1984. Entering service almost immediately, the Ystervark was used to accompany South African mechanized battalions and to protect strategic assets, such as air bases in the southwest African region. Ystervarks were first employed operationally during Operation Thunder Chariot in 1984 - a division -scale exercise in South Africa during which the Ystervarks were first tested.
However, the Ystervarks didn’t have to wait long for their first combat deployment. Taking part in several operations in the ongoing South African Border War from 1986, Ystervarks were used to great success as deterrents to low-flying Angolan attack aircraft and helicopters, even downing several Angolan MiGs in 1986 and 1987. After the conclusion of the Border War in 1989, the Ystervark was gradually being phased out of service in 1991 and replaced by the SAMIL 100 Kwêvoël mine-protected SPAAG armoured truck called the Bosvark. Officially, the Ystervark was withdrawn from active service in 1997 after more than 70 units were produced.
- From Devblog
Media
Excellent additions to the article would be video guides, screenshots from the game, and photos.
See also
Links to the articles on the War Thunder Wiki that you think will be useful for the reader, for example:
- reference to the series of the vehicles;
- links to approximate analogues of other nations and research trees.
External links
| Britain anti-aircraft vehicles | |
|---|---|
| Crusader AA | Crusader AA Mk I · Crusader AA Mk II |
| Wheeled | Staghound AA · AEC AA |
| Radar SPAAG | Chieftain Marksman |
| Missile SPAA | Stormer AD · Stormer HVM |
| Other | Light AA Mk I · Falcon |
| Canada | Skink · ADATS (M113) |
| South Africa | Ystervark · Bosvark · ZA-35 |
